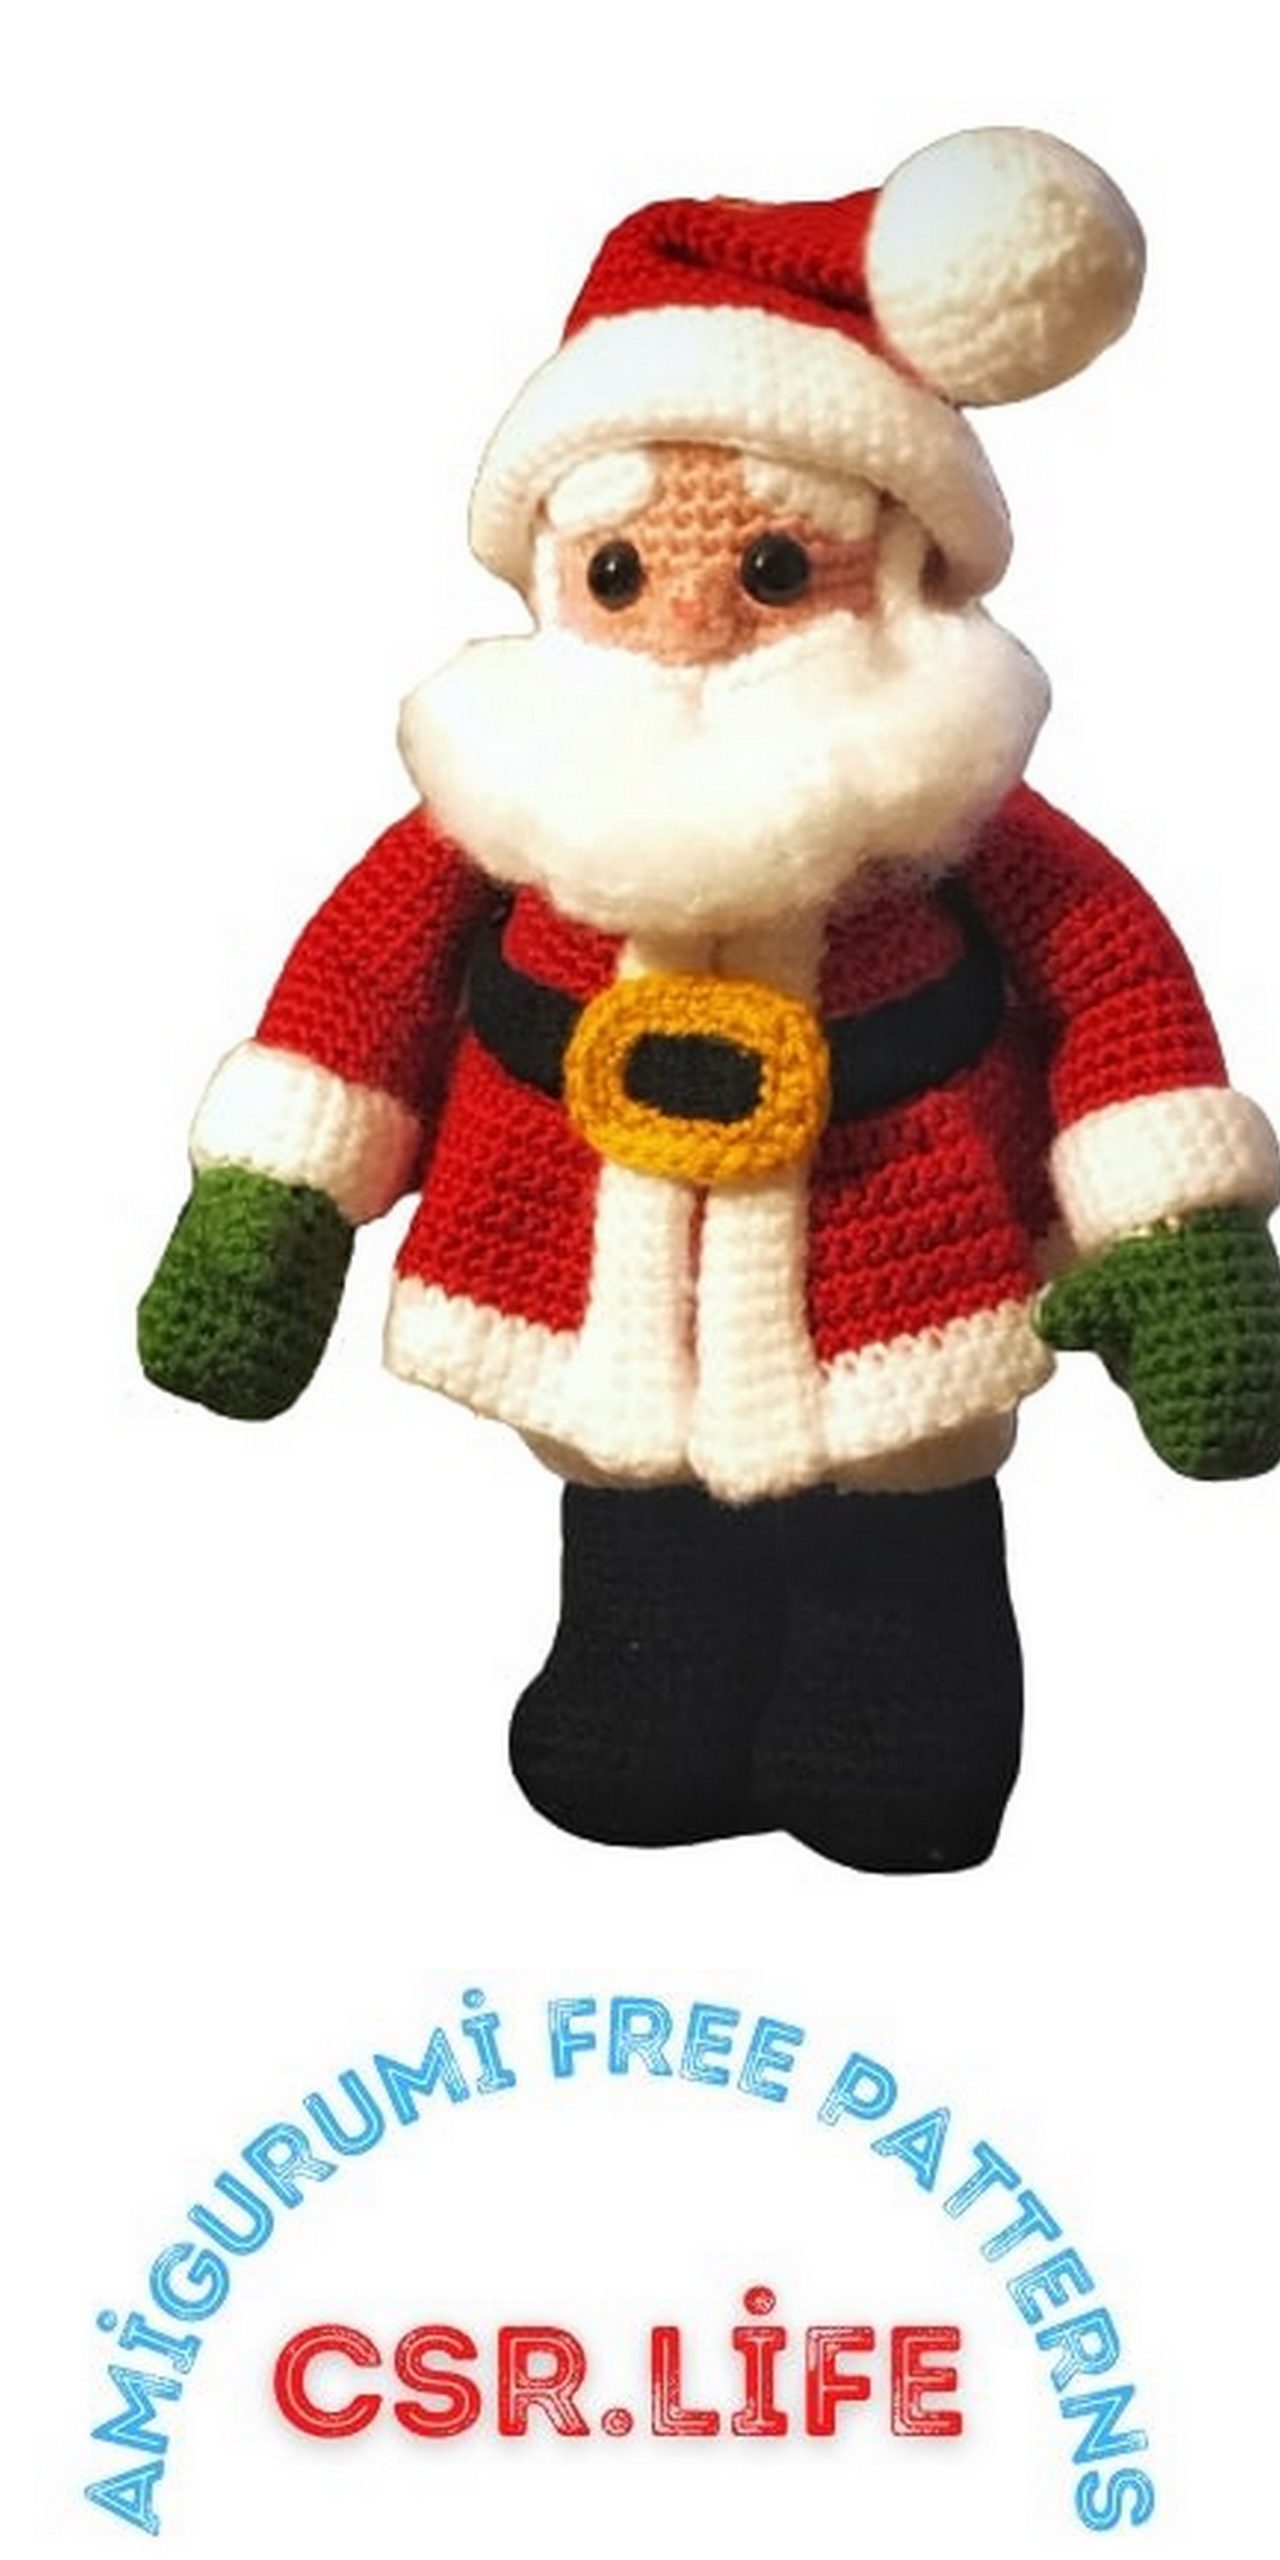
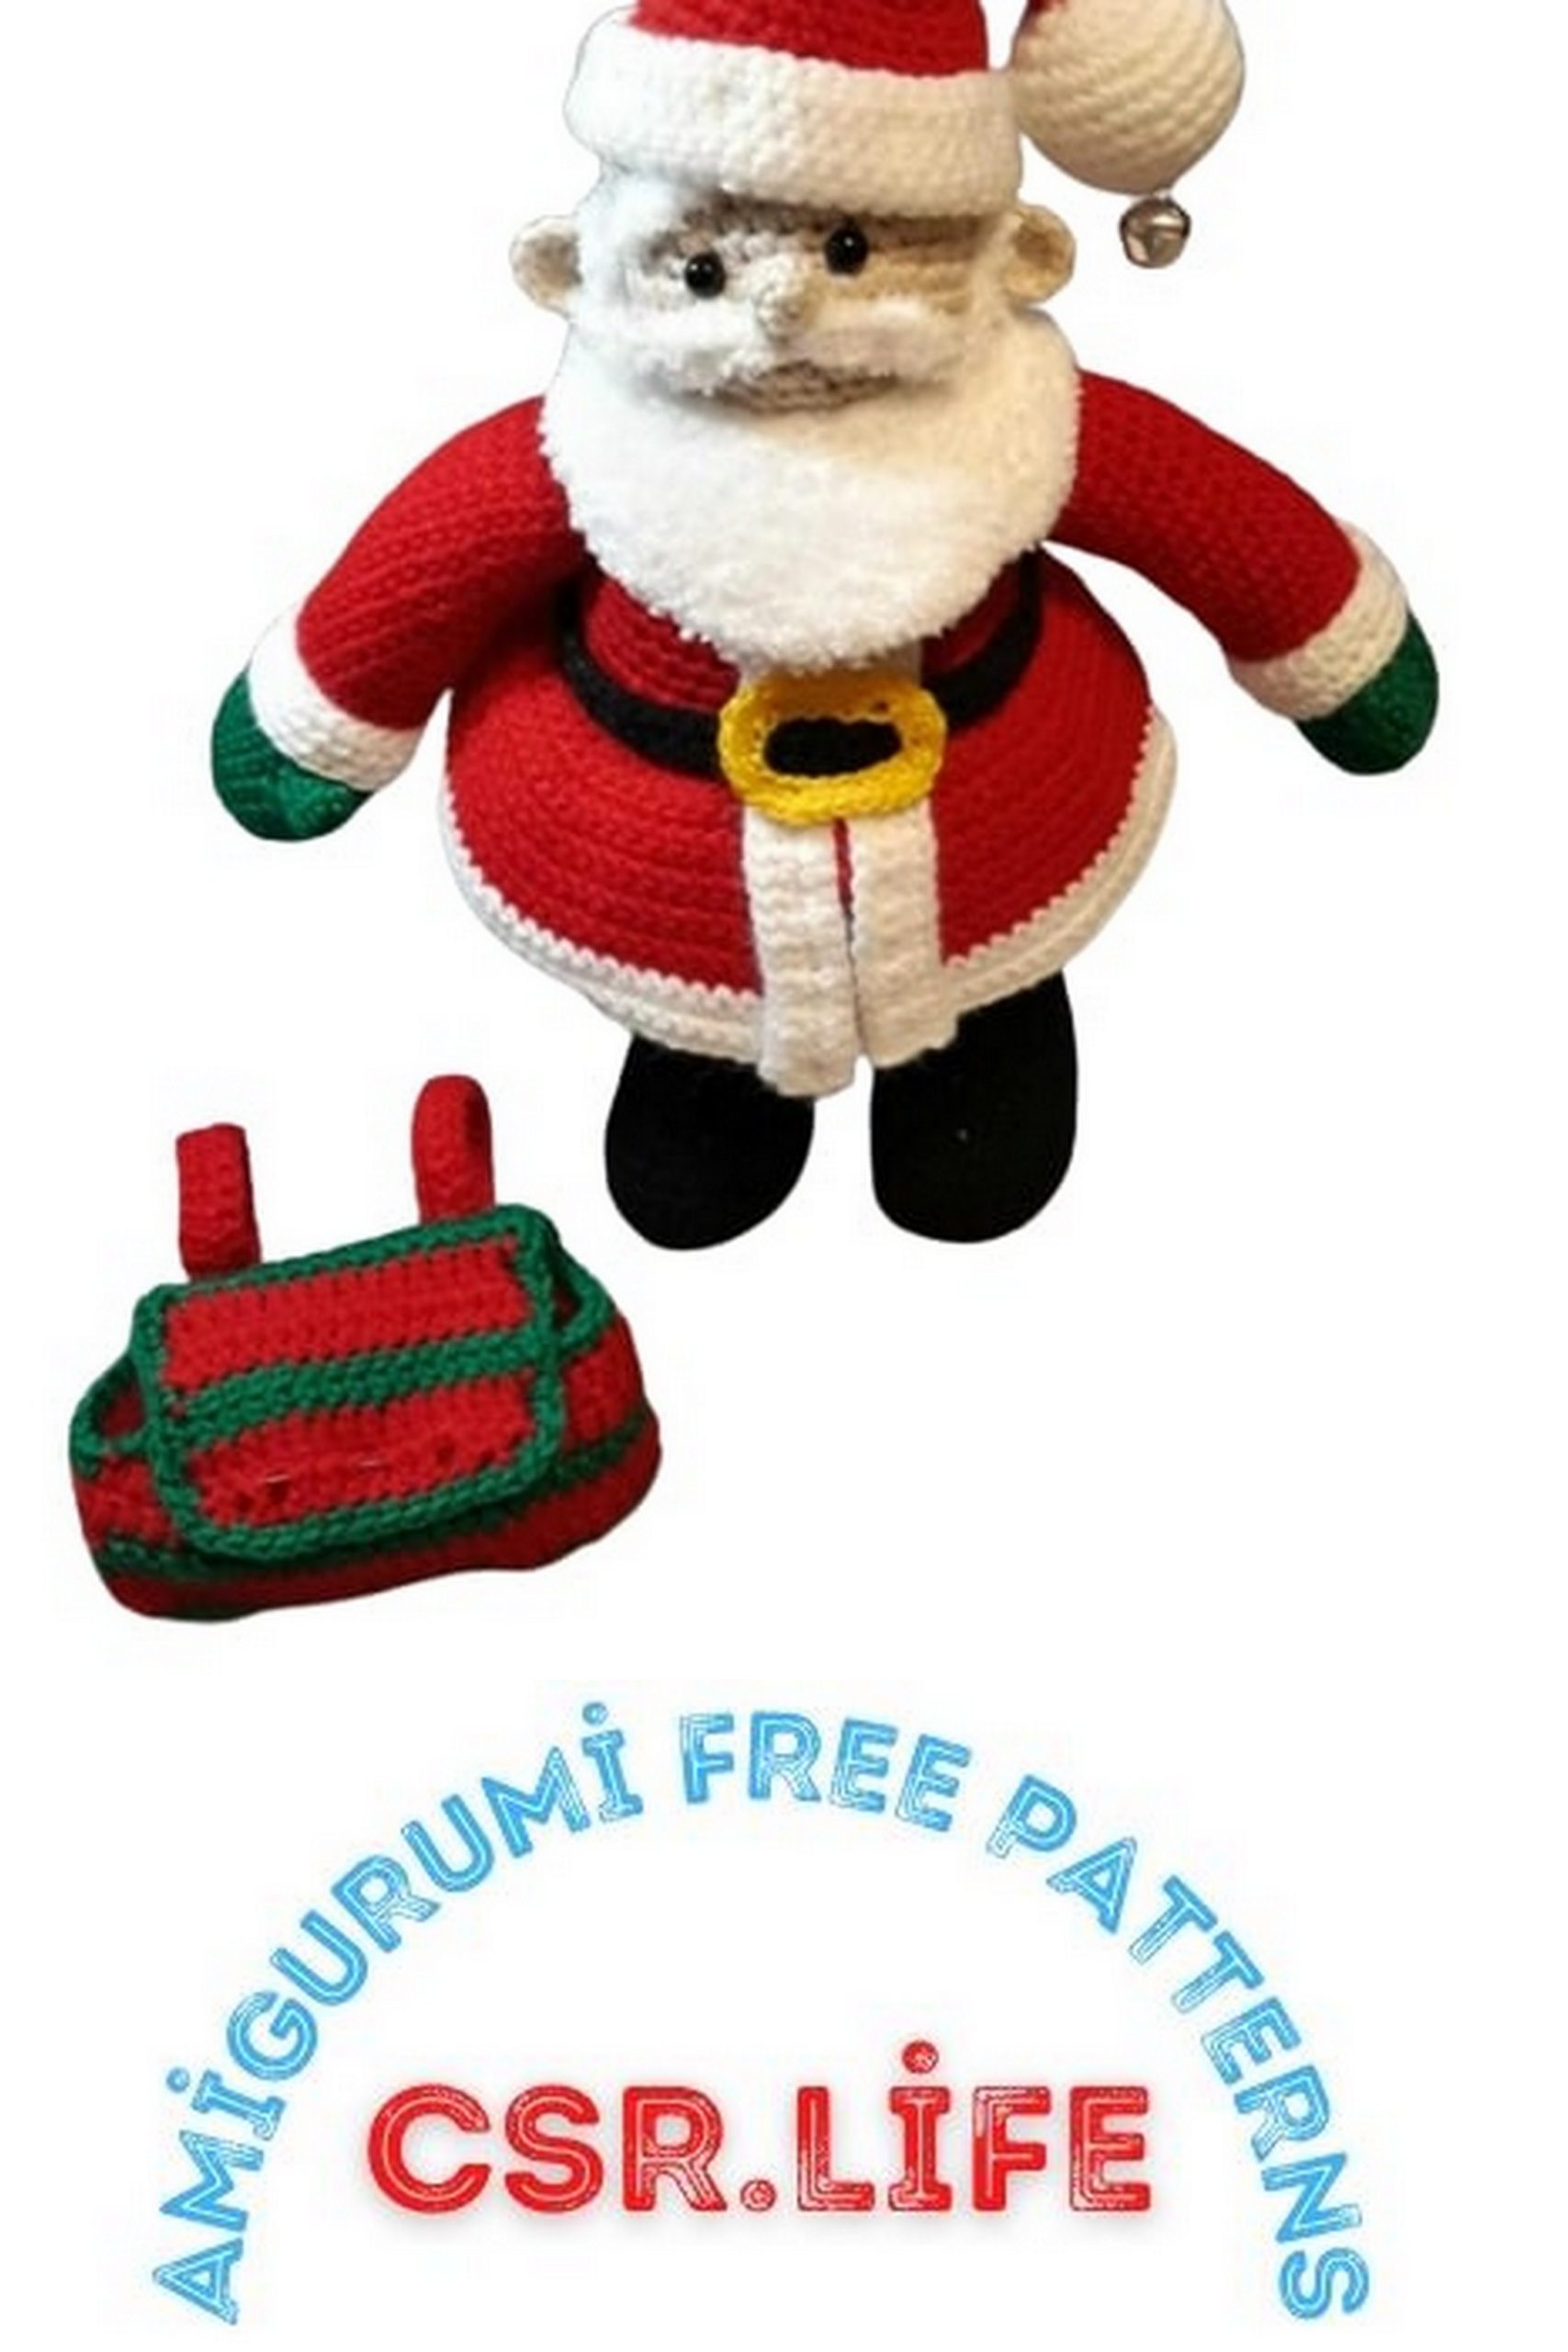
Here Comes Santa Claus Amigurumi Free Pattern
Abbreviations
alt – alternate
approx – approximately
beg – begin/beginning
bet — between
BL – back loop
ch – chain stitch
ch- – refers to a ch space previously made:
e.g., ch-1 space
cm – centimeter(s)
cont — continue
Dc – double crochet (UK treble cr)
Dc2tog – double crochet 2 stitches together (decrease)
Dec – decreases(s)
ea – each
FL – front loop(s)
FO – fasten off
hdc – half double crochet
hdc2tog – half double crochet 2 stitches
together
inc – increase
lp(s) – loops
mm – millimeter(s)
oz – ounce(s)
pl – place
prev – previous
rem – remaining
rep – repeat(s)
rnd(s) – round(s)
RS – right side
sc – single crochet (same as UK dc)
sc2tog – single crochet 2 stitches together
sk – skip
Sl st – slip stitch (same as UK sc)
Sp(s) – space(s)
St – stitch
tog — together
WS — wrong side
Yd(s) – yard(s)
YO – yarn over
Yoh – yarn over hook
Materials and Supplies:
(Santa is approximately 12 inches tall, or 30 cm)
• Sport or DK weight yarn, such as Red Heart Sport or Paton’s Astra: Peach or light pink for skin (50 yds), red (175 yds), soft white (150 yds), green (100 yds), black (75 yds), and small amounts of gray or gold. Red Heart Sport was used for the model.
• Size C crochet hook (2 –2.75mm)
• Two 1/2 ” (13 mm) buttons for backpack in color of choice
• Five 25 mm plastic disk sets
• One ½” (13 mm) jingle bell (optional)
• Hemostat, tweezers, or other stuffing tool of choice
• Mohair finger brush or stiff toothbrush for brushing up “fur”
• Two 9 mm plastic eyes (I prefer the plastic backs to the metal because the metal ones tend to show between the stitches)
• Stuffing
• Needles: 5-inch (18 cm) doll needle, blunt tapestry needle (these are suggestions; use the needles that work best for you.)
Gage: Gage is not important as long as the same size thread and hook are used for all the pattern pieces. However, since tension can vary in different circumstances, it is suggested that when making two pieces that must be the same, such as arms and legs, that you complete both in one sitting.
Special Instructions:
Adjustable Ring: Grasp the yarn between your thumb and forefinger, leaving a tail at the beginning. Wrap the thread over and around the index finger clockwise, crossing the thread at the top of the finger. Insert the hook underneath the front thread that you just crossed, then catch the back thread with the hook, and pull a loop of the back thread from underneath. Slip the loop off the finger, grasping the working end in the left hand as if to begin crocheting. Chain 1, work number of stitches required into the ring. Pull up a long loop, then, grasping the stitches just made with the right hand and tail with left (or vice versa), pull to tighten ring. Insert hook into long loop and tighten back against hook. Making sure tail is to the back, skip first chain worked and continue working pattern.
Dc2tog: Decrease in double crochet: *YOH and insert hook into next stitch, YO and pull up a loop, YOH and pull through 2 loops on hook; ** repeat * to ** once, YOH and pull through remaining loops on hook.
Weaving/hiding loose thread ends: When making the doll, you can hide the loose ends by pulling them to the inside of the piece with a tapestry needle. Pass the needle through the piece 2 or 3 times to anchor the thread end (always go in and come out between stitches, being careful not to catch any fabric), then pull the thread taut, and clip close to the surface so that it disappears inside.
For other pattern pieces, it’s best to weave all loose ends as you finish each piece. If you can’t hide the beginning tail by working over it for a few stitches, leave a tail that is long enough to enable you to thread it onto a needle to weave it. When you fasten off, always leave a tail that is long enough to thread onto a needle and weave.
To weave loose ends: Thread the tail onto a needle. Working on the WS of the piece and beginning directly beneath the place where you fastened off, insert the needle underneath and through the upper loops of fabric for a length of 4 or 5 stitches, and then turn and repeat through 2 or 3 of the same stitches in the opposite direction.
PATTERN
HEAD:
1. Begin with an adjustable ring, make 6 sc in ring OR ch 2 with skin color, 6 sc in 2nd ch from hook; do not join. Use a piece of contrasting thread as a rnd marker.
2. 2 sc in ea sc around. (12 sc)
3. (2 sc in next sc, sc in next sc) 6 times. (18 sc)
4. Sc in ea sc around. (18 sc)
5. (2 sc in next sc, sc in next sc) 9 times. (27 sc)
6. Sc in ea sc around. (27 sc)
7. (2 sc in next sc, sc in next 2 sc) 9 times. (36 sc)
8 – 12. Sc in ea sc around. (36 sc)
13. Sc in next 15 sc, sl st loosely in ea of next 2 sc, sc in next 2 sc, sl st loosely in next 2 sc, sc in next 15 sc. (32 sc, 4 sl st)
14. Sc in next 5 sc, sc2tog twice, sc in next 3 sc, 2 sc in ea of next 5 st, sc in next 2 sc, 2 sc in ea of next 5 st, sc in next 3 sc, sc2tog twice, sc in next 5 sc. (42 sc)
15. Sc in ea sc around. (42 sc)
16. Sc2tog, sc in next 18 sc, sc2tog, sc in next 18 sc, sc2tog. (39 sc)
17. Sc in next 8 sc, (sc2tog, sc in next 2 sc) 5 times, sc2tog, sc in next 9 sc. (33 sc)
18. Sc in ea sc around. (33 sc)
• Stuff head through rnd 11.
• Insert the eyes now. There is a stitch pattern on the front of the face where you made “2 sl st, 2sc, 2 sl st”. Place the eyes so that the pins are inserted between rnds 12 and 13, putting the first eye into the 1st slip stitch of the first group of 2 slip stitches, and the second eye into the 2nd slip stitch of the second group. The bottom edge of the eyes should touch the top edge of rnd 14. Insert the eye’s pin between stitches, then reach inside the head and firmly push the metal or plastic backing onto the eye pin. If you have an eye placement disaster, you can pull out the stitches all the way back to the stitch just after the last eye you come to. The eyes will come out with the stitches as you get to them, and you can begin crocheting again from this point. You won’t be able to use these eyes again, however.
19. (Sc2tog, sc in next sc) 4 times, sc2tog, sc in next 7 sc, (sc2tog, sc in next sc) 4 times. (24 sc)
• Continue stuffing.
20. (Sc2tog, sc in next sc) 3 times, sc2tog, sc in next 2 sc, (sc2tog, sc in next sc) 3 times, sc2tog. (16 sc)
• Make sure the cheeks are filled out nicely.
21. Sc in next 3 sc, sc2tog 5 times, sc in next 3 sc. (11 sc)
• Finish stuffing head.
• Insert one of the plastic disks inside the bottom head opening, with its pin protruding downward.
22. Sc2tog 5 times; FO with sl st in next sc. (5 sc)
• Hide loose end using method described in “Special Instructions” above.
You may alternatively sew the head and limbs to the body, in which case you will omit the jointing steps.
FACIAL FEATURES
Nose:
1. With same thread as head, ch 4, sc in 2nd ch from hook and in next 2 ch; ch 1, turn. (3 sc)
2. Sc in ea of the next 3 sc, ch 1, turn.
3. Sc in ea of the next 3 sc; FO, leaving long end.
• Using the long end, sew a row of gathering stitches around all 4 sides of the piece, as close to the edge as possible, and only catching one thread with each stitch. Pull the end to gather and close after putting a tiny bit of stuffing inside. Using the same thread, sew the nose to the face, with the top edge of the nose centered between the eyes.
Eyebrows (Make 2):
1. Using one strand of white ch 6, sc in 2nd ch from hook and in next 4 ch; turn. (5 sc)
2. Sk 1st sc, sc in next 3 sc, sl st in last sc; FO, leaving long end for sewing eyebrow to face. (3 sc, sl st)
• The “furring” is optional; gently brush the eyebrows until they are slightly fuzzy, always brushing in one direction, away from what will be the inside edge. Trim any unruly ends, and then pin the brows above the eyes in the desired location. Carefully sew them to the face using the long tail remaining from row 2.
LEFT EAR:
1. Ch 2 with skin color, 8 sc in 2nd ch from hook; ch 1, turn. (8 sc)
2. 2 sc in next sc, sc in next 4 sc, 2 sc in ea of next 2 sc, sl st in last sc; FO, leaving long end for sewing. (10 sc, sl st)
RIGHT EAR:
1. Ch 2 with skin color, 8 sc in 2nd ch from hook; turn. (8 sc)
2. Sl st in 1st sc, 2 sc in ea of next 2 sc, sc in next 4 sc, 2 sc in last sc; FO, leaving long end for sewing. (10 sc, sl st)
• To place the doll’s left ear, count about 6 sc back from the outer edge of the eye and place the vertical inside edge of the ear here, with the center of the ear lying on the line between rnds 12 and 13. Because of the slight difference in the horizontal line caused by working in rounds, you will need to place the right ear down just a bit, with the center of the ear lying ON rnd 13. Sew ear to head. Keep your stitching between rows 1 and 2, so that the edges of the ears will come away from the head like real ears do.
MUSTACHE (MAKE 2 PIECES):
1. With one strand of white, ch 8, sc in 2nd ch from hook and in next 5 sc, sl st in last ch; turn. (6 sc, sl st)
2. Sk sl st, sl st in next sc, sc in next 4 sc, sl st in last sc; FO, leaving long end for sewing to head. Row 2 is front of mustache. (4 sc, 2 sl st)
• Brush up the mustache as you did the eyebrows. Trim unruly ends if needed. Pin in place, with the ends of the two pieces meeting below the center of the nose. Sew to face.
HAIR:
1. Ch 21 with white, sc in 2nd ch from hook and in next 19 sc; ch 1, turn. (20 sc)
2 – 3. Sc in ea sc across; ch 1, turn. (20 sc)
4. Sk 1st sc, sc in next 18 sc, sl st in last sc, FO, leaving long end for sewing to head. (18 sc, sl st)
• Row 4 is the right side. Brush up and trim hair. Pin hair to head with the right side out, across lower back of head, with top of each end being just slightly above an ear, curving downward in the middle like a smile. Do not sew in place yet.
LEFT ARM:
1. With green ch 7, sc in 2nd ch from hook and in next 5 ch, moving to opposite side of chain, sc in next 6 free lps; do not join, place rnd marker. (12 sc)
2. (2 sc in next sc, sc in next sc) 6 times. (18 sc)
3. Sc in ea sc around. (18 sc)
4. (2 sc in next sc, sc in next 8 sc) twice. (20 sc)
5 – 7. Sc in ea sc around. (20 sc)
8. Sc2tog, sc in next sc, ch 3, sk 2 sc, sc in next 5 sc, sc2tog, sc in next 8 sc. (16 sc, 3 ch)
9. Sc in next 2 sc, sc in BL of next 3 ch, sc in both lps of next 14 sc. (19 sc)
10. Sc2tog, sc in next 8 sc, sc2tog, sc in next 7 sc; FO with sl st in next sc. (17 sc)
Thumb:
1. With wrist opening toward you, join green with sc in 1st free lp of ch-3 on rnd 8, sc in next 2 free lps, sc in side of sc bet top and bottom of thumb opening, continue around and sc in next 2 sc, sc in side of sc bet top and bottom of thumb opening, do not join. (7 sc)
2. Sc in ea sc around. (7 sc)
3. Sc2tog, sc in next 4 sc, FO with sl st in next sc leaving long end for closing end of thumb – do not work last sc. (5 sc, sl st)
• Sew gathering stitches around rnd 3; pull to close the thumb end; FO, hide end by pulling to inside of thumb. Stuff hand.
11. Resume arm; join red with sc in next sc on hand, sc in ea st around. (17 sc)
12. Sc in next 9 sc, 2 sc in next sc, sc in next 7 sc. (18 sc)
13 – 20. Sc in ea sc around. (18 sc)
21. Sl st loosely in next 5 sc, sc in next 13 sc. (5 sl st, 13 sc)
22 – 23. Sc in ea st around. (18 sc)
24. Sc in next 11 sc, 2 sc in next sc, sc in next 6 sc. (19 sc)
25 – 29. Sc in ea sc around. (19 sc)
• Stuff arm through rnd 24. Bend arm slightly inward where the 5 slip stitches are made on rnd 21. Find the center of the inside of the bottom end of the hand, and follow a line upward to the center of the inside of the upper arm; mark with a pin or thread. Insert a plastic disk inside the top of the arm, pushing its plastic pin through to the outside between rnds 28 and 29, at the point where the marker identifies the center. Finish stuffing to the top of the arm to ensure that you have centered the joint on the inside of the arm (remember that the thumbs face forward). If the placement is wrong, remove the stuffing and reposition the pin.
30. Sc in next 3 sc, sc2tog, sc in next 8 sc, sc2tog, sc in next 4 sc. (17 sc)
31. Sc in next 3 sc, sc2tog, sc in next 6 sc, sc2tog, sc in next 4 sc. (15 sc)
32. Sc in next 2 sc, sc2tog, sc in next 6 sc, sc2tog, sc in next 3 sc; sl st in next 4 sc, or to the side edge of the arm, FO, leaving long end for closing the end of the arm. (13 sc)
• Finish stuffing. Stuff the last 8 rows fairly lightly, keeping the top of the arm flat so it won’t stick out too much from the shoulder. The arm is wider front-to-back. Sew the arm seam using a ladder (see illustration below) or oversew stitch. It makes a neater stitch if you sew using the BL’s only of the sc’s on each side, going in the outer loop of the left side, across and through the outer loop of the opposite side, then reverse and go in the outer loop of the right side, across and through the outer loop of the opposite side.
RIGHT ARM:
1 – 4. Repeat 1 – 4 of left arm.
5 – 6. Sc in ea sc around. (20 sc)
7. Sc in next 18 sc, ch 3, sk next 2 sc. (18 sc, ch-3)
8. Sc2tog, sc in next 8 sc, sc2tog, sc in next 6 sc. (16 sc, 3 ch)
9. Sc in BL of next 3 ch, sc in next 16 sc. (19 sc) Ladder Stitch
10. Sc in next 2 sc, sc2tog, sc in next 8 sc, sc2tog, sc in next 5 sc; FO with sl st in next sc. (17 sc)
Thumb:
Work same as for left arm.
11. Resume arm; join red with sc in next sc on hand, sc in ea st around. (17 sc)
12. Sc in next sc, 2 sc in next sc, sc in next 15 st. (18 sc)
13 – 19. Sc in ea sc around. (18 sc)
20. Sc in next 17 sc, sl st loosely in next sc. (17 sc, sl st)
21. Sl st loosely in next 4 sc, sc in next 14 st. (4 sl st, 14 sc)
22 – 23. Sc in ea st around. (18 sc)
24. Sc in next 12 sc, 2 sc in next sc, sc in next 5 sc. (19 sc)
25 – 29. Sc in ea sc around. (19 sc)
• Stuff and insert joint using instructions for left arm, except that you will insert the joint pin between rnds 27 and 28, rather than 28 and 29.
30 – 32. Repeat 30 – 32 of left arm.
• Finish same as left arm.
CUFFS (MAKE 2):
1. With white ch 22 (or to fit around your doll’s wrist), join with sl st in 1st ch to form a ring, ch 1, sc in same ch as joining and in next 21 ch; join with sl st in 1st sc, ch 1, do not turn. (22 sc)
2 – 3. Sc in ea sc across; join with sl st in 1st sc, ch 1, do not turn. (22 sc)
4. Sc in ea sc across; join with sl st in 1st sc, FO, leaving a long end for sewing the cuff. (22sc)
• Brush up the cuff to make it a bit fuzzy.
• With WS out, slip the cuff over the hand to fit around the wrist, and carefully and sew the cuff to the arm.
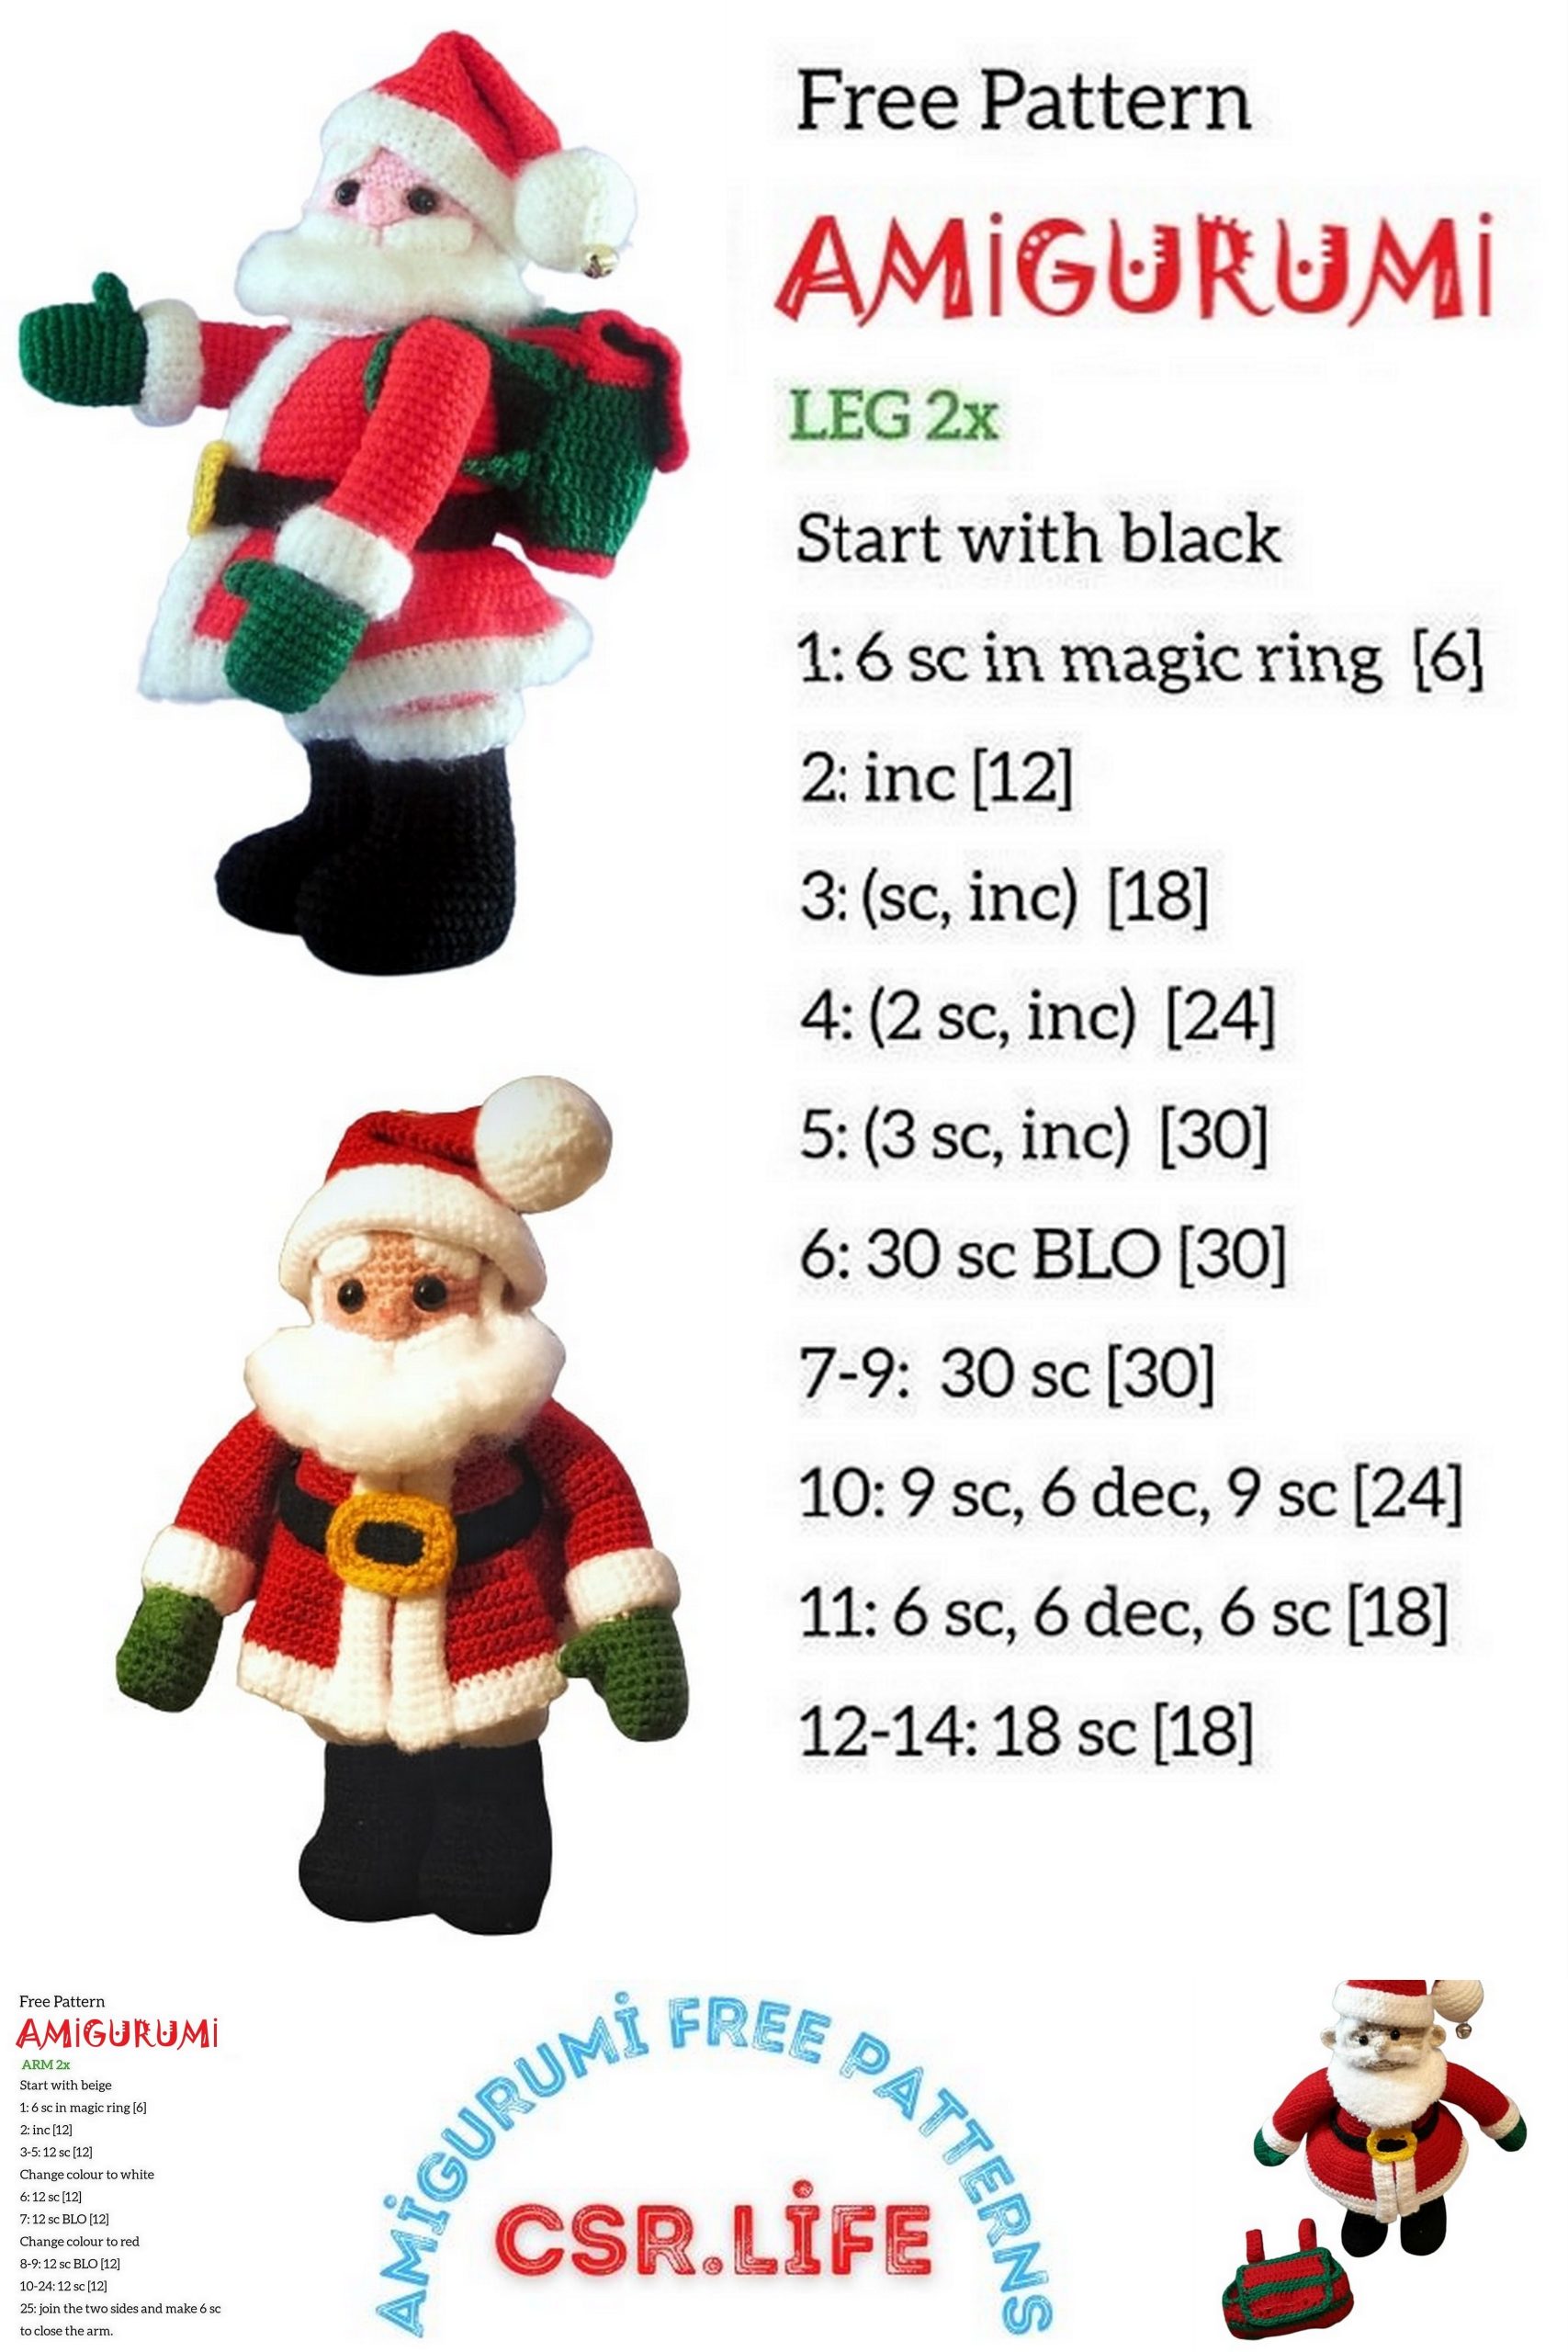
LEGS (MAKE 2):
Boots:
1. Ch 10 with black, 2 sc in 2nd ch from hook, sc in next 7 ch, 2 sc in last ch, moving around to opposite side of ch, 2 sc in 1st free lp, sc in next 7 free lps, 2 sc in last free lp; do not join, place rnd marker. (22 sc)
2. 2 sc in ea of next 2 sc, sc in next 6 sc, 2 sc in ea of next 6 sc, sc in next 6 sc, 2 sc in ea of next 2 sc. (32 sc)
3. Sc in next sc, 2 sc in next sc, sc in next 7 sc, (2 sc in next sc, sc in next sc) 6 times, 2 sc in next sc, sc in next 8 sc, 2 sc in next sc, sc in next sc. (41 sc)
4. Sc in BL of ea sc around. (41 sc)
5 – 7. Sc in ea sc around. (41 sc)
8. Sc in next sc, place rnd marker for beginning of rnd here (moving the starting point does NOT change the total stitch count), sc in next 13 sc, sc2tog 8 times, sc in next 12 sc. (33 sc)
9. Sc in next 10 sc, (sc2tog, sc in next sc) 4 times, sc2tog, sc in next 9 sc. (28 sc)
10. Sc in next 10 sc, sc2tog 4 times, sc in next 10 sc. (24 sc)
11. Sc in next sc, place rnd marker for beginning of rnd here, sc in next 9 sc, sc2tog, sc in next 2 sc, sc2tog, sc in next 9 sc. (22 sc)
12 – 15. Sc in ea sc around. (22 sc)
16. (2 sc in next sc, sc in next 10 sc) twice. (24 sc)
17 – 18. Sc in ea sc around; after rnd 18, FO black with sl st in next sc. (24 sc)
• Stuff foot; keep bottom as flat as possible.
Leg:
19. With RS facing, join red with sc at ctr back of boot, sc around; do not join. (24 sc)
20 – 28. Sc in ea sc around. (24 sc)
29. Sc in next sc, move rnd marker to begin rnd here, (sc2tog, sc in next 10 sc) twice. (22 sc)
30. (Sc2tog, sc in next 9 sc) twice. (20 sc)
Place a leg joint disk, pin outward, against the inner side of the leg just under the top loops of rnd 31, centered vertically on the inner leg. Note where the pin should lie, and insert the joint inside the top of the leg. Push through between stitches at the point noted.
Careful: When you insert the joint for the 2nd leg, make sure that you have both joints on the inner side of the leg. Place the 2 legs next to each other with the pins inserted, and see that both boots are facing forward when the joint pins are together.
31. (Sc2tog, sc in next 8 sc) twice; FO with sl st in next sc, leaving long end for sewing.
• The top edge of the disk should rest just below the loops of rnd 31. Finish stuffing the leg, with the top 4 rnds stuffed lightly so that the leg won’t stick out from the side of the body too severely. The leg should not be round, but oval shaped, with the wider part of the oval being from front to back. The top of the leg will be sewn together with the seam running front to back. Close the leg opening using ladder stitch or oversew stitch.
CUFFS (MAKE ONE FOR EACH LEG):
1. With white ch 32, or number needed to fit loosely around leg at boot top; being careful not to twist the chain, join with sl st in 1st ch, ch 1, sc in same ch as joining and in ea ch around; ch 1, do not turn. (32 sc)
2 – 3. Sc in ea sc around; join with sl st in 1st sc, ch 1, do not turn. FO at end of rnd 3. (32 sc)
• The WS will face out. Brush WS until slightly fuzzy. Slip cuff onto the leg and pin to leg around top of boot, covering the line where the boot and leg join. Sew cuff to leg, easing evenly to fit. (Easing means to pin or sew while using your fingers to adjust adjoining pieces that are not the same length so they match up.)
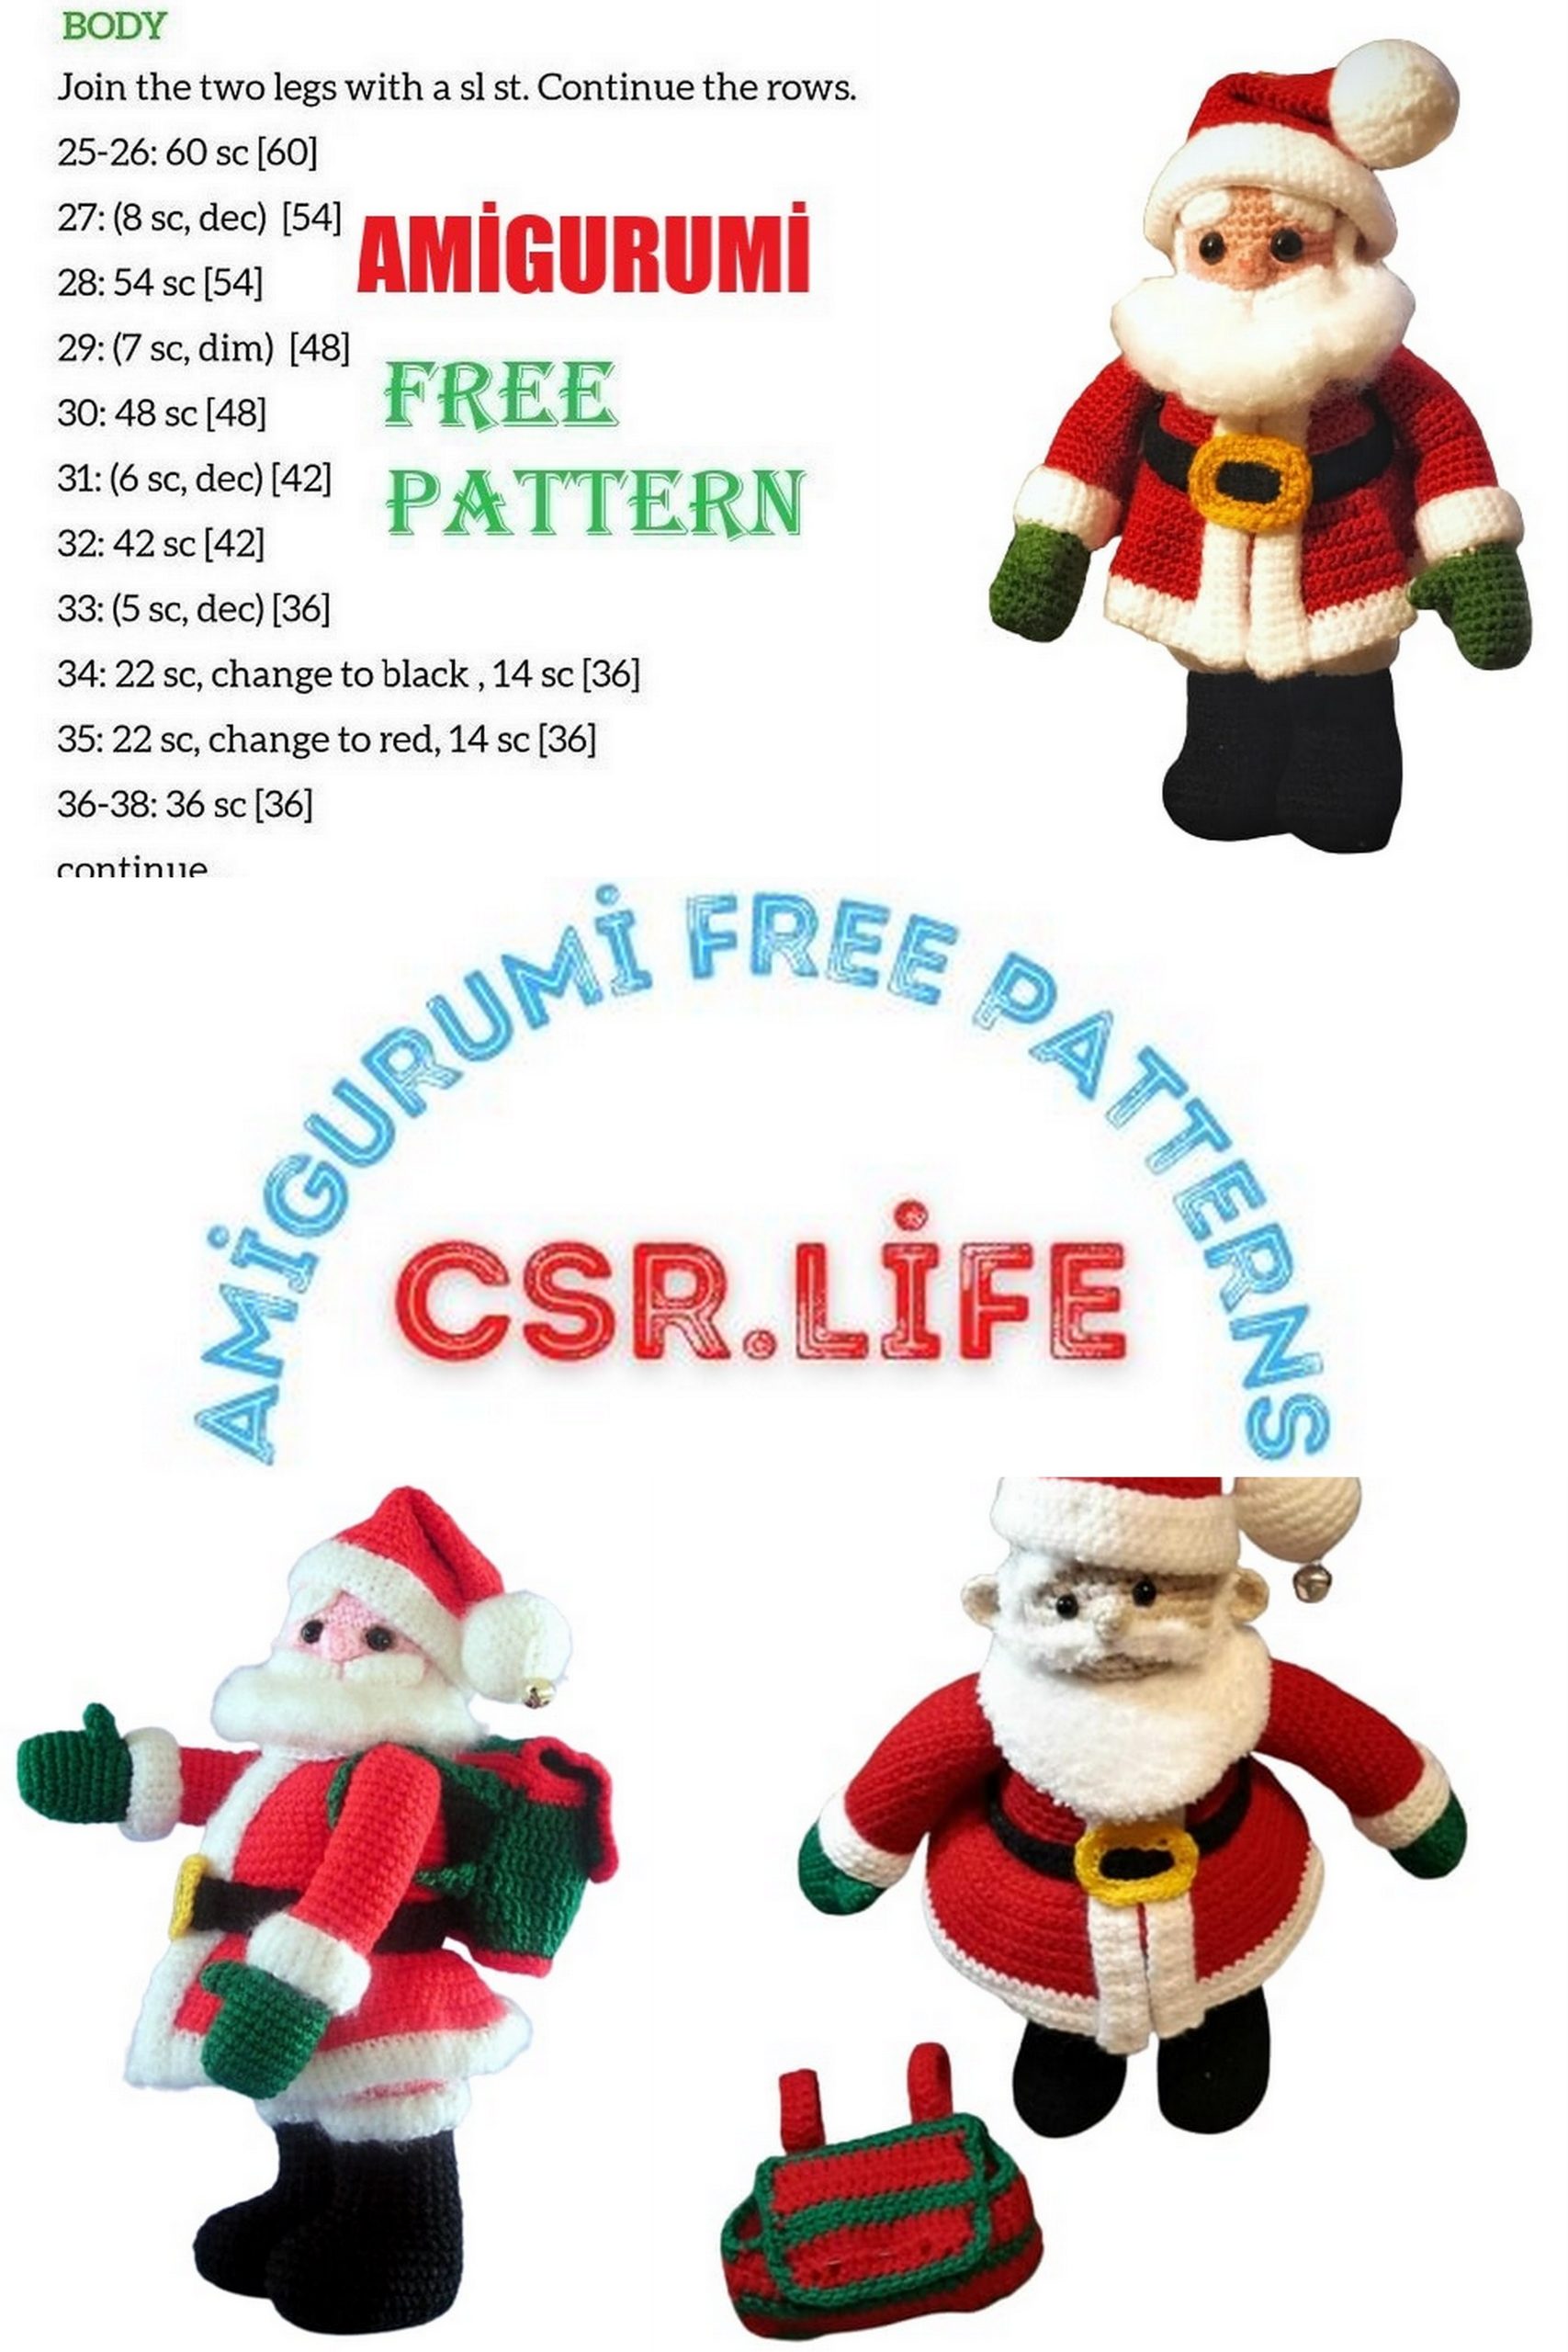
BODY:
1. Ch 11 with red, sc in 2nd ch from hook and in next 9 ch; moving around to opposite side of ch, sc in next 10 free lps; do not join. (20 sc)
2. (2 sc in next sc, sc in next sc) 10 times. (30 sc)
3. (2 sc in next sc, sc in next 2 sc) 10 times. (40 sc)
4. (2 sc in next sc, sc in next 2 sc) 3 times, 2 sc in next sc, (2 sc in next sc, sc in next 2 sc) 10 times. (54 sc)
5. Sc in ea sc around. (54 sc)
6. Sc in next 54 sc; remove rnd marker, sc in next 3 sc, replace rnd marker. This changes the beginning point for the rounds, and does NOT change the total stitch count. (54 sc)
7. Sc in ea sc around. (54 sc)
8. (Sc in next 25 sc, sc2tog) twice. (52 sc)
• Insert pin protruding from the bottom of the head through the center of rnd 1until head is flush with body fabric. Place the plain disk onto the pin and, and then place the lock washer onto the pin; push flush against the fabric to lock in place.
9. (Sc in next 24 sc, sc2tog) twice. (50)
10. Sc2tog, sc in next 20 sc, sc2tog, sc in next 26 sc. (48 sc)
11. Sc in next 2 sc, 2 sc in ea of next 16 sc, sc in next 4 sc, sc2tog, sc in next 20 sc, sc2tog, sc in next 2 sc. (62 sc)
12 – 13. Sc in ea sc around. (62 sc)
14. Sc in next 6 sc, sc2tog, sc in next 24 sc, sc2tog, sc in next 28 sc. (60 sc)
15. Sc in ea sc around. (60 sc)
16. Sc in next 5 sc, sc2tog, sc in next 24 sc, sc2tog, sc in next 27 sc. (58 sc)
ATTACH ARMS:
Both sides: Look for the left end of the foundation chain, then count 8 rnds straight down the side of the doll from that point. Insert the joint pin (remember that the thumbs point forward) between stitches, between rnds 8 and 9. Insert some stuffing into the body so that the shoulders are filled out in order to check for arm positioning. If the position looks right, push the plain disk onto the pin, then the lock washer; push until locked into place flush against the fabric. If positioning is not right, remove the stuffing and reposition the joints. Repeat until the arm placement looks pleasing.
17 – 19. Sc in ea sc around. (58 sc)
20. Sc2tog, sc in next sc, sc2tog, sc in next 30 sc, sc2tog, sc in next sc, sc2tog, sc in next
18 sc. (54 sc)
21. Sc2tog twice, sc in next 28 sc, sc2tog twice, sc in next 18 sc. (50 sc)
22. Sc in next sc, (sc2tog, sc in next sc) 10 times, sc in next sc, (sc2tog, sc in next sc) 6 times. (34 sc)
23. Sc in ea sc around. (34 sc)
24. (Sc2tog, sc in next 3 sc) 5 times, sc2tog, sc in next 7 sc. (28 sc)
25. Sc in ea sc around. (28 sc)
• Stuff upper body.
26. (Sc2tog, sc in next 2 sc) 7 times. (21 sc)
27 – 28. Sc in ea sc around. (21 sc)
ATTACH LEGS:
Both sides: Raise the arms until they are pointing straight forward. The back of the leg will be placed directly below the back edge of the arm as it is now positioned (the top end when the arms are down). Insert the joint pin (remember that the toes of the boots point forward), between stitches, between rnds 24 and 25. If the position looks right, push the disks onto the pins until locked in place.
29. (Sc2tog, sc in next sc) 7 times. (14 sc)
• Finish stuffing the body.
30. Sc2tog 7 times; FO with sl st in next sc, leaving long end for sewing. (7 sc)
• Add more stuffing if needed.
• Thread a needle with the long end; run a gathering stitch in and out of the outer loops of rnd 30. Pull tightly to gather. Secure end and cut thread. Pull end inside body to hide.
JACKET SKIRT:
1. Ch 67, sc in 2nd ch from hook and in ea ch across; do not join; ch 1, turn. (66 sc) The piece will be longer around than the doll’s waist.
2. (2 sc in next sc, sc in next 10 sc) 3 times, (sc in next 10 sc, 2 sc in next sc) 3 times; ch 1, turn. (72 sc)
3. (Sc in next 11 sc, 2 sc in next sc) 3 times, (2 sc in next sc, sc in next 11 sc) 3 times; ch 1, turn. (78 sc)
4 – 5. Sc in ea sc across; ch 1, turn. (78 sc)
6. (Sc in next 12 sc, 2 sc in next sc) 3 times, (2 sc in next sc, sc in next 12 sc) 3 times; ch 1, turn. (84 sc)
7 – 8. Sc in ea sc across; ch 1, turn. (84 sc)
9. (Sc in next 13 sc, 2 sc in next sc) twice, sc in next 6 sc, 2 sc in next sc, (sc in next 7 sc, 2 sc in next sc) twice, sc in next 5 sc, 2 sc in next sc, sc in next 13 sc, 2 sc in next sc, sc in next 13 sc; FO. (91 sc) Row 9 is WS.
10. “Fur” trim: With WS facing, join white with sc in 1st sc, sc in same pl, (2 sc in next sc, sc in next 14 sc) 6 times, 2 sc in last sc; FO. (98 sc)
11 – 13. Rejoin white with sc in 1st sc of previous row, sc in ea sc across; FO. (98 sc)
• Brush “fur” trim until fuzzy. Trim as needed.
• Sew a row of gathering stitches across the top edge of the skirt using the free loops of the foundation chain: Insert the needle through the first free lp from the RS, then turn the needle and go into the next free lp from the WS; continue in this manner across the top edge of the skirt; do not fasten off or secure the thread yet.
• Wrap the skirt around the body between the 13th and 14th rnds up from the center of the bottom of the doll, and with the two ends meeting at center front. Pin the front edges in place, then pull the gathering thread until the piece fits around the body. Distribute the fullness evenly around. Pin the center of the back in place, and the sides, then fasten off and secure the end of the gathering thread. Sew the skirt in place.
JACKET FRONT “FUR” TRIM (MAKE 2):
1. Leave a long tail at the beginning. With white ch 32 (or number required to fit down front of jacket from chin to bottom front edge); sc in 2nd ch from hook and in ea ch across; FO with sl st in same pl as last sc. (31 sc)
2. Rejoin white with sc in 1st sc from previous row, sc in ea sc across; FO with sl st in same pl as last sc. (32 sc)
3. Repeat row 2; FO with sl st in same place as last sc, leaving a long tail for sewing, if desired. (32 sc)
• Brush until trim is slightly fuzzy. With WS facing up, pin a piece of the trim to each side of the front of the jacket, beginning at the bottom edge of the skirt, keeping the outer edge flush with the outer edge of the jacket skirt, and continuing straight up to the chin. Sew the trim to the jacket skirt and body, easing in any fullness. Beginning just above the skirt, the two pieces should be flush against each other running up the front.
COLLAR:
1. With white ch 31, sc in 2nd ch from hook and in ea ch across; turn. (30 sc)
2. Sl st in 1st sc, sc in same pl, sc in next sc, hdc in next 26 sc, sc in next sc, (sc, sl st) in last sc; ch 1, turn. (26 hdc, 4 sc, 2 sl st)
3. 2 hdc in next sl st, (hdc in next 5 st, 2 hdc in next st) twice, hdc in next 4 st, (2 hdc in next st, hdc in next 5 st) twice, 2 hdc in last sl st, ch 1, sl st in same pl; FO. (36 hdc)
• Brush collar to bring up fuzziness. Tack collar to body around head, with top front placed together just underneath the chin.
BELT:
1. With black ch 4, sc in 2nd ch from hook and in next 2 sc; ch 1, turn. (3 sc)
2 – 59. Sc in next 3 sc, ch 1, turn. (3 sc) (The belt should fit around Santa’s waist with about ½ inch overlapping. Add or subtract rows if necessary)
60. Sc in next sc, hdc in next sc, sc in next sc; FO with sl st in same pl as last sc. (2 sc, hdc)
• Place the belt around the waist, with the bottom edge flush against the top edge of the jacket skirt, overlapping the end of row 60 over the 1st few rows. Sew belt to body around bottom edge.
Belt Buckle: Ch 20 with dark yellow, gold, or gray, join to form a ring, being careful not to twist the chain; ch 1, 2 sc in same ch as joining, (sc in next 4 ch, 2 sc in next ch) 3 times, sc in next 4 ch; join with sl st in 1st sc, FO leaving long end. Sewing just inside inner edge of buckle, sew to front center of belt.
BEARD:
Top Piece:
1. With white ch 31; sc in 2nd ch from hook and in next 29 ch; FO with sl st in same pl as last sc. (30 sc) This is the RS.
2. With RS facing, sk 5 sc, rejoin white with sl st in next sc, sc in next sc, hdc in next 7 sc, 2 hdc in ea of next 2 sc, hdc in next 7 sc, sc in next sc, sl st in next sc, FO. (2 sl st, 2 sc, 18 hdc)
3. With RS facing, rejoin white with sl st in 1st sl st on previous row, ch 1, sc in next sc, hdc in same pl, 2 hdc in ea of next 18 hdc, hdc in next sc, sc in same pl, sl st in last sl st; FO. (38 hdc, 2 sc, 2 sl st)
4. With RS facing, rejoin white with sc in 1st sl st, sc in next 4 st, (hdc in next st, 2 hdc in next st, hdc in next st, sc in next 3 st) twice, 2 hdc in ea of next 8 st, (sc in next 3 st, hdc in next st, 2 hdc in next st, hdc in next st) twice, sc in next 5 st, sl st in same pl as last sc; FO. (22 sc, 30 hdc)
Bottom Piece:
1. With white ch 21, sc in 2nd ch from hook and in next 19 ch; ch 1, turn. (20 sc)
2. Sl st in next sc, sc in next sc, hdc in next 7 sc, 2 hdc in ea of next 2 sc, hdc in next 7 sc, sc in next sc, sl st in next sc, ch 1, turn. (2 sl st, 2 sc, 18 hdc)
3. Sl st in 1st sl st, sc in next sc, hdc in same pl, 2 hdc in ea of next 18 hdc, hdc in next sc, sc in same pl, sl st in last sl st; ch 1, turn. (38 hdc, 2 sc, 2 sl st)
4. Sc in 1st sl st, sc in next 4 st, (hdc in next st, 2 hdc in next st, hdc in next st, sc in next 3 st) twice, 2 hdc in ea of next 8 st, (sc in next 3 st, hdc in next st, 2 hdc in next st, hdc in next st) twice, sc in next 5 st, sl st in last sl st; FO. (sl st, 22 sc, 30 hdc)
• The WS of the top piece will be the front of the beard. Sew the two pieces together, matching up stitches, with the WS of the top piece out. ( It doesn’t matter which side of the bottom piece is out.) Sew all the way around the beard, top and bottom, omitting the sideburns of course. Pause every inch or so to put a little bit of stuffing into the lower ¾ of the beard.
• Use a pink pencil, eye shadow, or blush to shade the cheeks just below and to the outside of the eyes, the tip of the nose, the lips, and just inside the ears. To give his eyes some twinkle, put a tiny dab of white or sparkly nail polish in the center of each eye. To add character to his face, use a very fine tip black marker and dot a tiny line around the top half of each eye. Then use a light brown pencil or some eye shadow to shade in a very narrow arc around each eye.
• Brush the beard until it is as fuzzy as you want it. Pin beard to face, with one end of sideburns touching the front edge of the hair on each side, and having the top of the beard touching the mustache, but leaving a small area beneath the center of the mustache for the mouth. Sew hair and beard in place.
HAT:
1. With red ch 40, join with sl st in 1st ch, being careful not to twist the chain, ch 1, sc in ea ch around; do not join. (40 sc)
2 – 4. Sc in ea sc around. (40 sc)
5. (Sc2tog, sc in next 6 sc) 5 times. (35 sc)
6 – 7. Sc in ea sc around. (35 sc)
8. (Sc2tog, sc in next 5 sc) 5 times. (30 sc)
9 – 10. Sc in ea sc around. (30 sc)
11. (Sc2tog, sc in next 4 sc) 5 times. (25 sc)
12. Sc in ea sc around. (25 sc)
13. Sc in FL of next 13 sc, sc in both lps of next 12 sc. (25 sc)
14. (Sc2tog, sc in next 3 sc) 5 times. (20 sc)
15 – 16. Sc in ea sc around. (20 sc)
17. (Sc2tog, sc in next 2 sc) 5 times. (15 sc)
18 – 19. Sc in ea sc around. (15 sc)
20. (Sc2tog, sc in next sc) 5 times. (10 sc)
21 – 22. Sc in ea sc around. (10 sc)
23. Sc2tog around. (5 sc)
24. Sc in ea sc around; FO with sl st in next sc. (5 sc)
Pompom:
25. Working all rnds from the WS, join white with sc in next sc, sc in same pl; 2 sc in ea
st around; do not join. (10 sc)
26. 2 sc in ea sc around. (20 sc)
27. (2 sc in next sc, sc in next sc) 10 times. (30 sc)
28 – 30. Sc in ea sc around. (30 sc)
31. (Sc2tog, sc in next 3 sc) 6 times. (24 sc)
32. Sc in ea sc around. (24 sc)
33. (Sc2tog, sc in next 2 sc) 6 times. (18 sc)
34. (Sc2tog, sc in next sc) 6 times. (12 sc)
• Stuff the pompom until it’s a nice orb shape, but not firm.
35. Sc2tog 6 times; FO with sl st in next sc, leaving long end for closing. (6 sc)
• Sew a row of gathering stitches in and out of the FL of the rnd 35 sc; pull to close. FO securely, and hide the thread end inside the pompom. Brush the pompom until it is fuzzy.
Fur Hat Trim:
1. Join white with sc in 1st free lp at bottom edge of hat, sc in same pl, sc in next 7 free lps, (2 sc in next free lp, sc in next 7 free lps) 4 times; do not join. (45 sc)
2. Sc in BL of ea sc around. (45 sc)
3. Resume working in both lps, (sc in next 8 sc, 2 sc in next sc) 5 times. (50 sc)
4 – 5. Sc in ea sc around. (50 sc)
6. Sc in ea sc around, FO, leaving long end for sewing top edge to hat.
• Brush up the WS of the trim until fuzzy. Fold the trim up along the ridge between rnds 1 and 2 where you worked in the BL. Pin the trim to the hat around, and then tack in place along the upper edge.
• Find the line of 13 stitches on rnd 13 which you worked in the FL; fold the top end of the hat downward along this line; tack in place. Place hat on Santa’s head; tacking to head if desired.
SANTA’S BACKPACK:
(TURNING CH-3 COUNTS AS 1ST DC)
1. Ch 21 with green, 2 sc in 2nd ch from hook, sc in next 18 ch, 2 sc in last ch; move around to opposite side of ch and 2 sc in 1st free lp, sc in next 18 free lps, 2 sc in last free lp; do not join, pl rnd marker. (44 sc)
2. Sc in next row end, sc in next sc, turn corner and make 2 sc in next sc, sc in next 18 sc, 2 sc in next sc, turn corner and sc in row end, sc in next 2 sc, 2 sc in next sc, sc in next 20 sc, turn corner and sc in row end; do not join. (50 sc)
3. Sc in next 3 sc, sc in next row end, 2 sc in next sc, sc in next 19 sc, 2 sc in next sc, sc in next row end, sc in next 3 sc, sc in next row end, 2 sc in next sc, sc in next 21 sc; join with sl st in BL of 1st sc; ch 1, do not turn. (55 sc, sl st)
4. Sc in BL of same pl as turning and in ea sc around; join with sl st in 1st sc, ch 3, do not turn. (56 sc)
5 – 10. (Ch-3 counts as 1st dc) Dc in ea sc around; join with sl st in top of beg ch-3, ch 3, do not turn. FO after row 10. (56 sc)
11. Join red with sc in same pl as joining on row 10, sc in next dc and in ea dc around; join with sl st in 1st sc, ch 1, do not turn. (56 sc)
12. Sc in same pl as joining, and in ea sc around; join with sl st in 1st sc, FO. (56 sc)
13. Begin flap: With RS facing and working this row in BL, sk 6 sc after joining on row
12, join green with sc in next sc, sc in next 20 sc, ch 3, turn. (21 sc)
14 – 15. Resume working in both lps, dc in next sc and in ea sc across; ch 3, turn. (21 dc)
16. Dc in ea dc across; ch 1, turn. (21 dc)
17. Sc across; ch 1, turn. (21 dc)
18. Sc in FL of ea sc across; ch 3, turn. (21 sc)
19. Dc in ea st across; ch 3, turn. (21 sc)
20. Dc in ea st across; ch 2, turn. (21 sc)
21. Sk 1st dc, dc2tog, dc in next dc, ch 1, sk next dc, dc in next 11 sc, ch 1, sk next dc, dc in next 2 dc, dc2tog; FO. (16 dc, 2 ch-1 sp)
22. With RS facing, join red with sl st in the same sc on row 13 where you joined green for row 14; working up the right edge of flap, sc in next row end (sc row), (2 sc in next row end) 3 times, sc in next 2 row ends, (2 sc in next row end) twice, sc in next row end (side of ch-2), turn the corner and make 2 sc in top of ch-2; working in BL, sc in next 2 dc, sc in next ch-1, sc in next 11 dc, sc in next ch-1, sc in next 2 dc, 2 sc in last dc, turn the corner, and working down the left edge of flap, sc in next row end, (2 sc in next row end) twice, sc in next 2 row ends, (2 sc in next row end) 3 times, sc in last row end; FO with sl st in same sc on row 13 as edge of flap. (49 sc, 2 sl st)
Bottom Trim:
1. With end of backpack facing you and bottom up, join red with sc in 1st free lp on row 3 at right back edge of backpack, sc in ea sc around; FO. (54 sc)
Straps: (Make 2) Leave long tail on each end for sewing to backpack.
1. Ch 3 with green, sc in 2nd ch from hook and in next sc; ch 1, turn. (2 sc)
2 – 30. Sc in next 2 sc; ch 1, turn. FO after row 30. (2 sc)
Sew straps to backpack: With the back side of the backpack facing you and holding a strap horizontally beneath the back edge of the flap, pin the end of the strap in place with the top of the long edge abutting the bottom of the 1st red row, and with the short end placed directly below the inside edge of the red trim of the flap. Hold the opposite end of the strap and curve it into a “U” shape, being careful not to twist the strap, and pin it in place two rows straight down from the first end. Sew strap end in place. Repeat the process for the other strap, reversing the placement.
• The ridge formed by working row 18 in the FL is the point at which the flap folds down over the front of the backpack. Line up this ridge over the top edge of the front, and mark the location on the front for the buttons. Sew a button to the front of the backpack beneath the buttonholes on each side.
• Fill backpack with small pieces of wadded gift wrap or tissue paper.