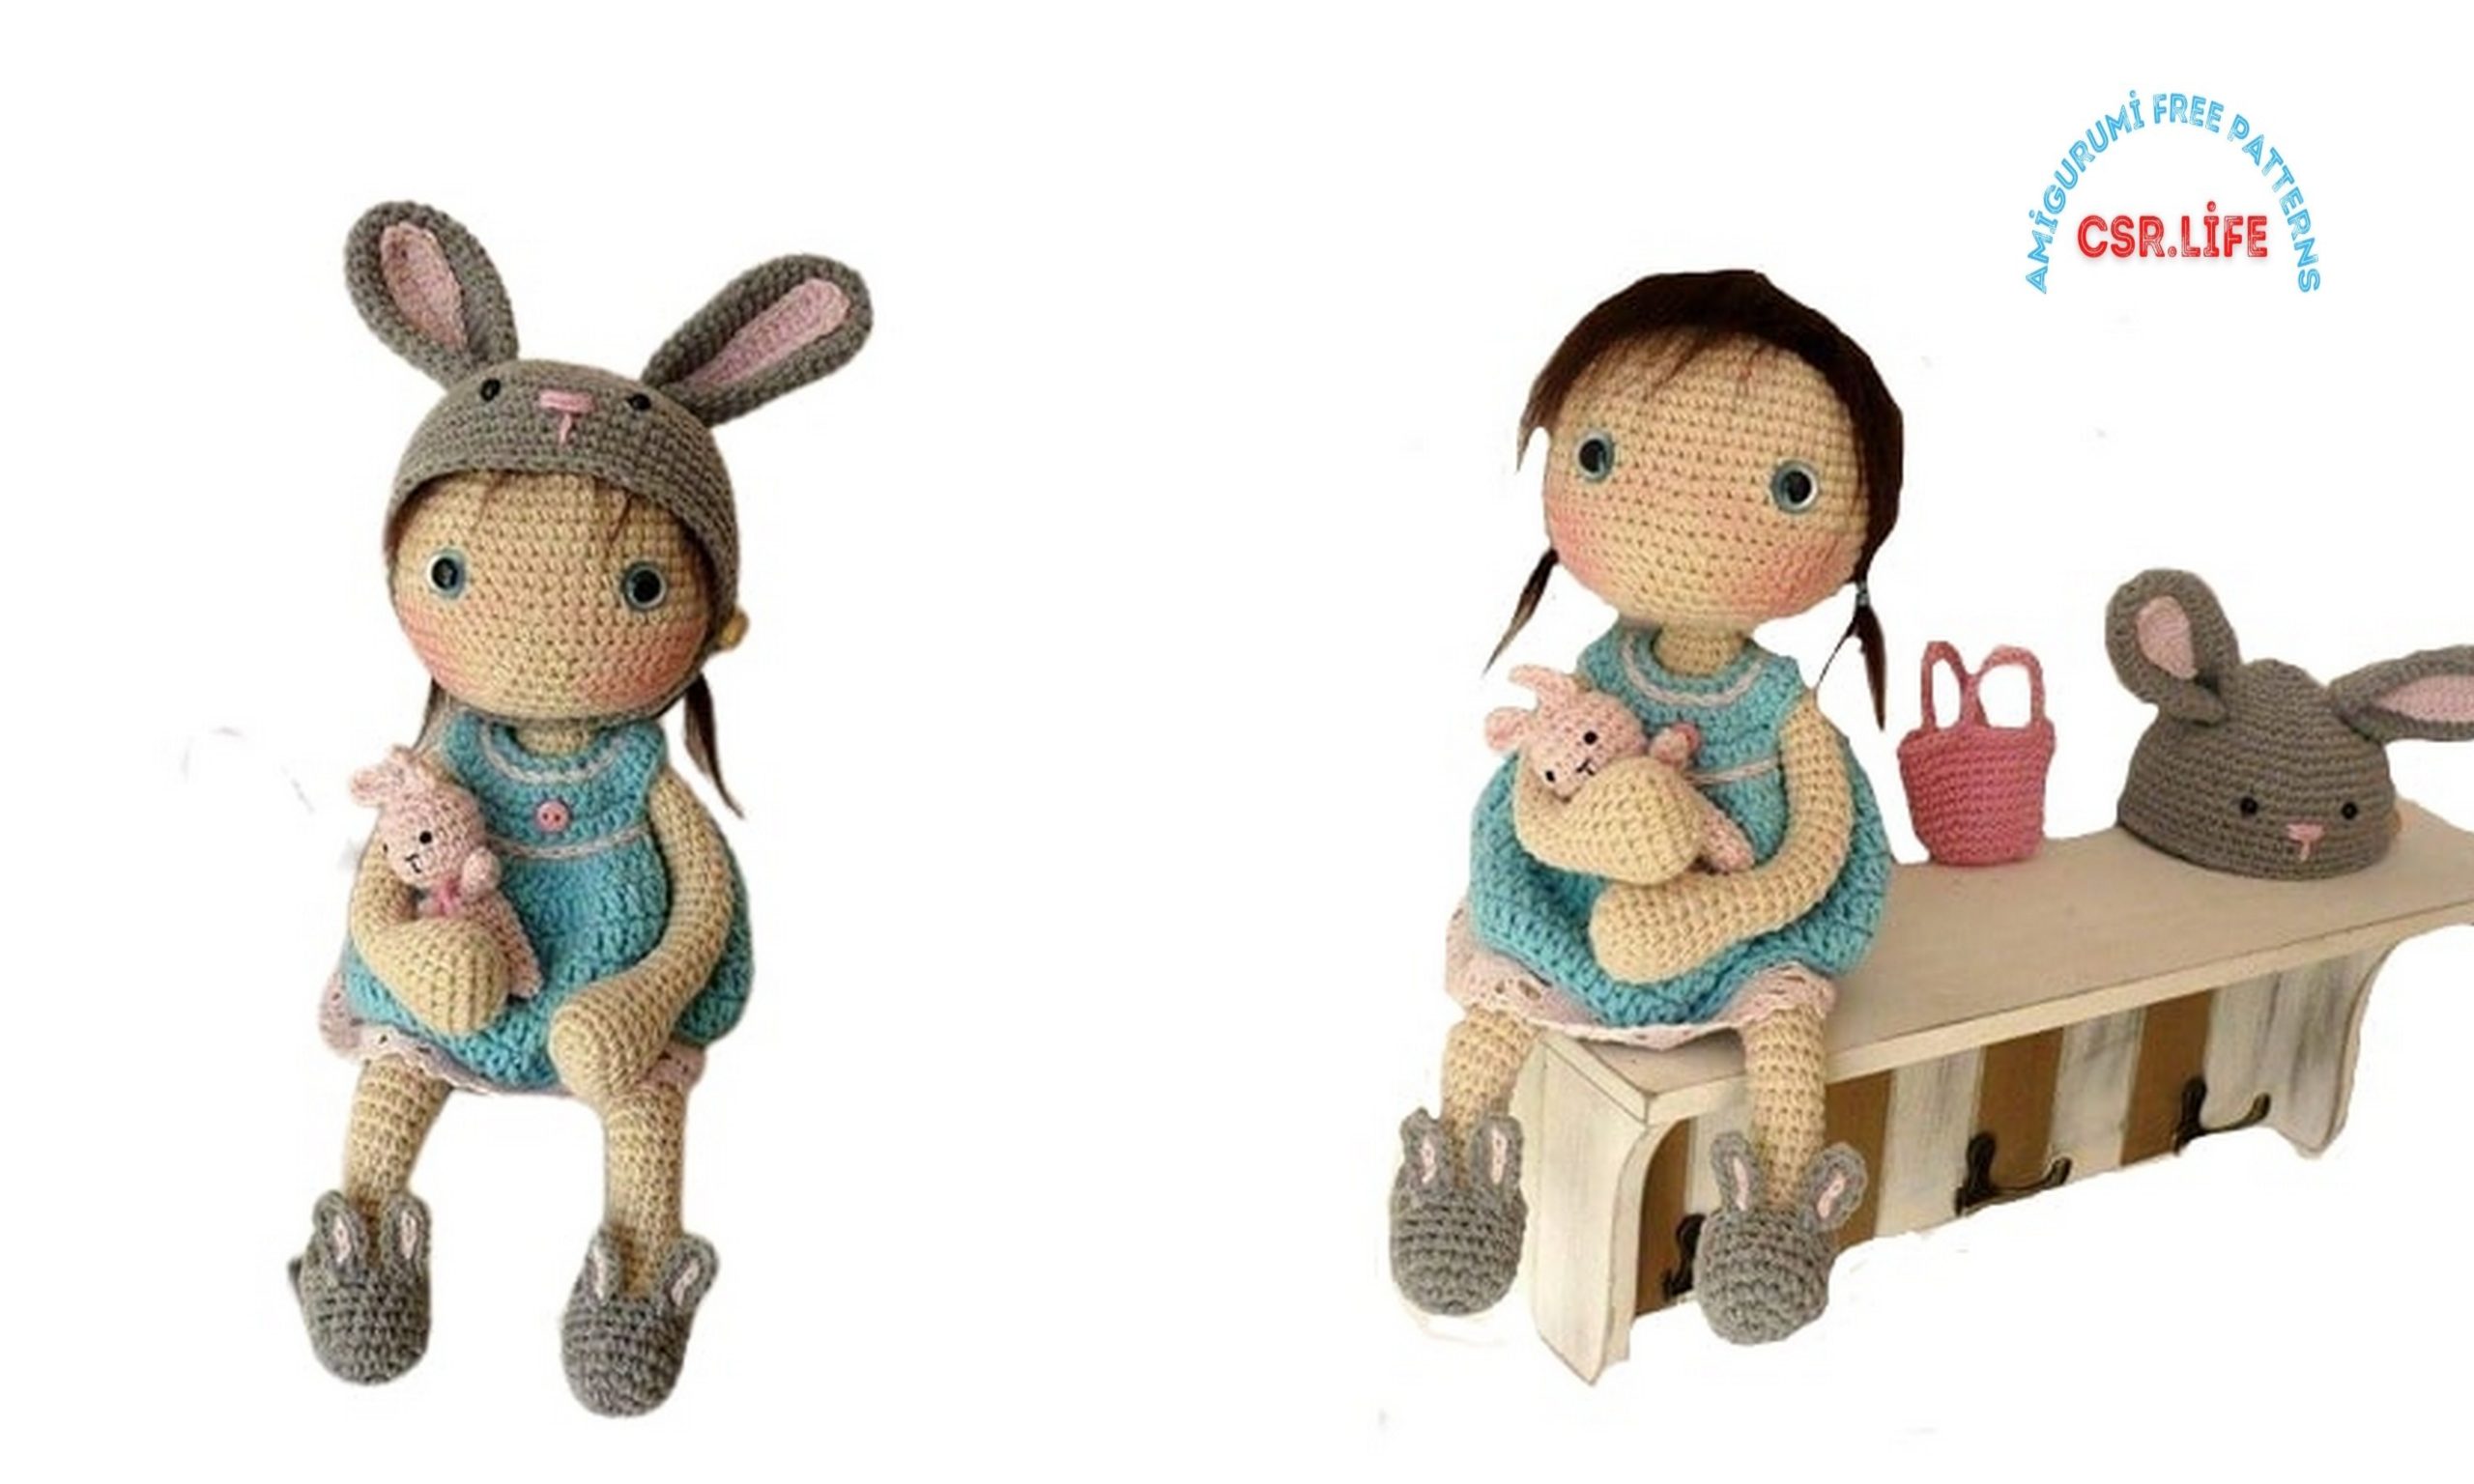
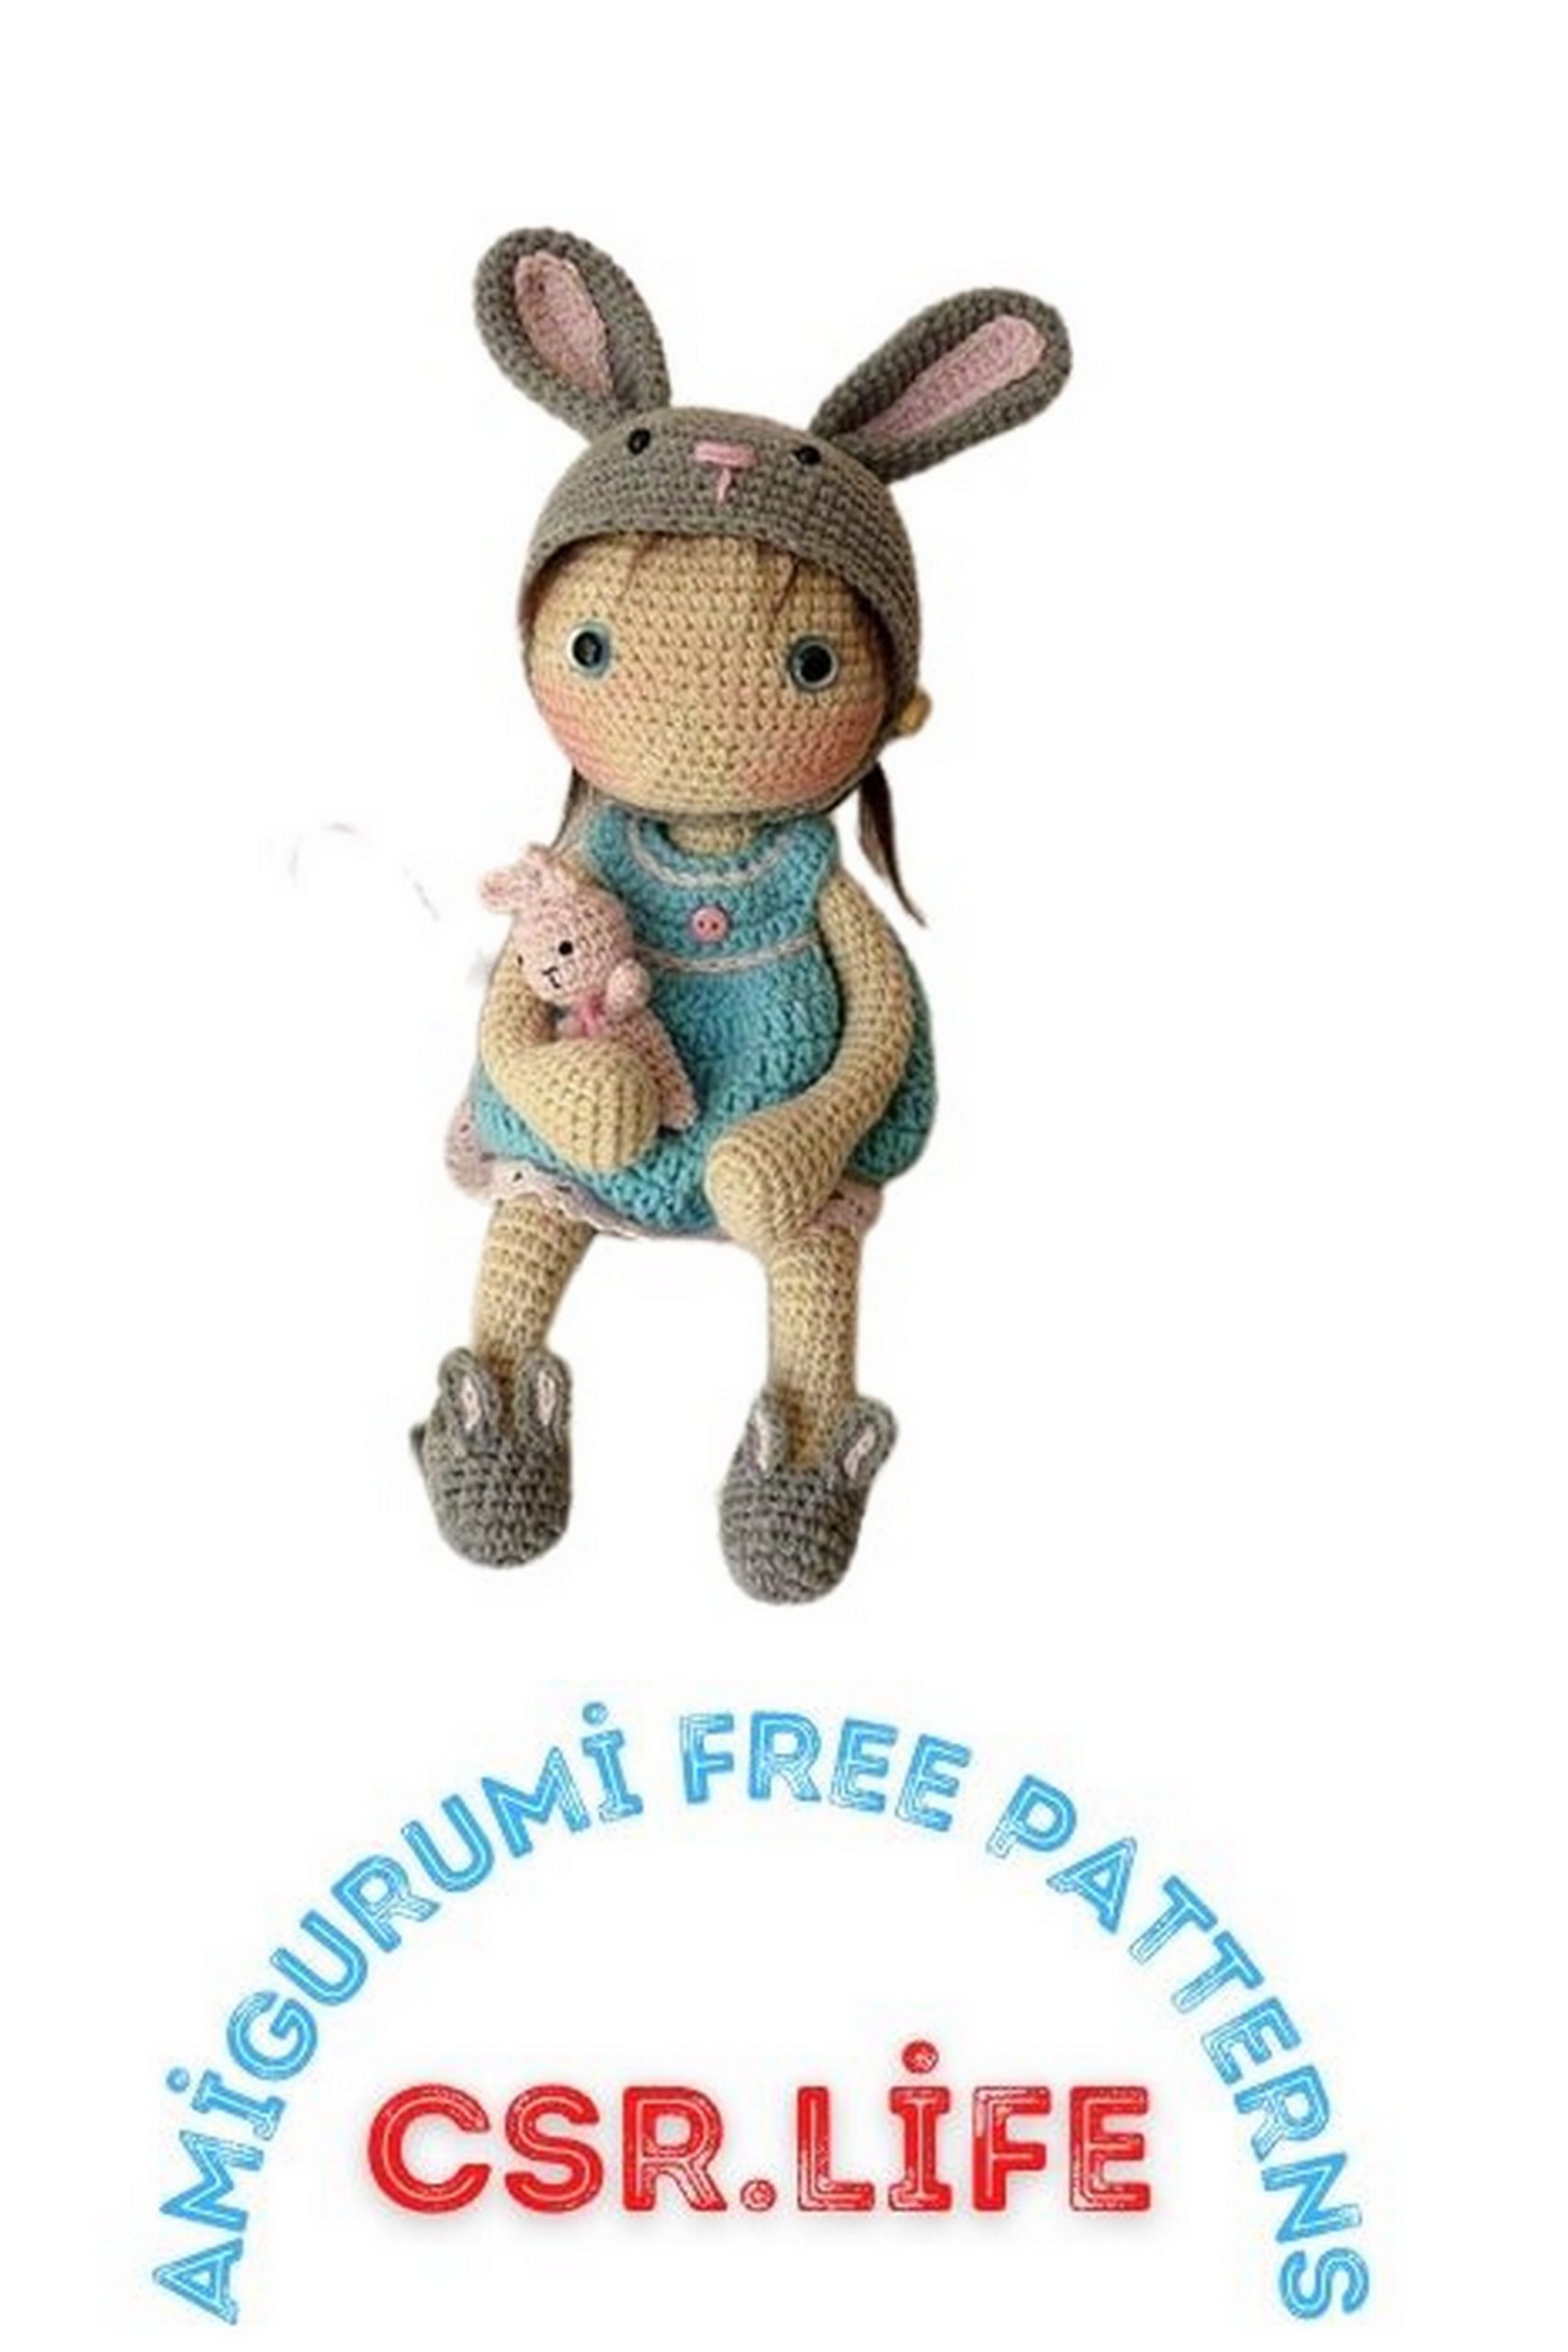
Lilly Doll with Bunny Hat Amigurumi Free Pattern
Wonderful amigurumi doll patterns are with you for free. You will love the amigurumi lilly doll pattern in this article.
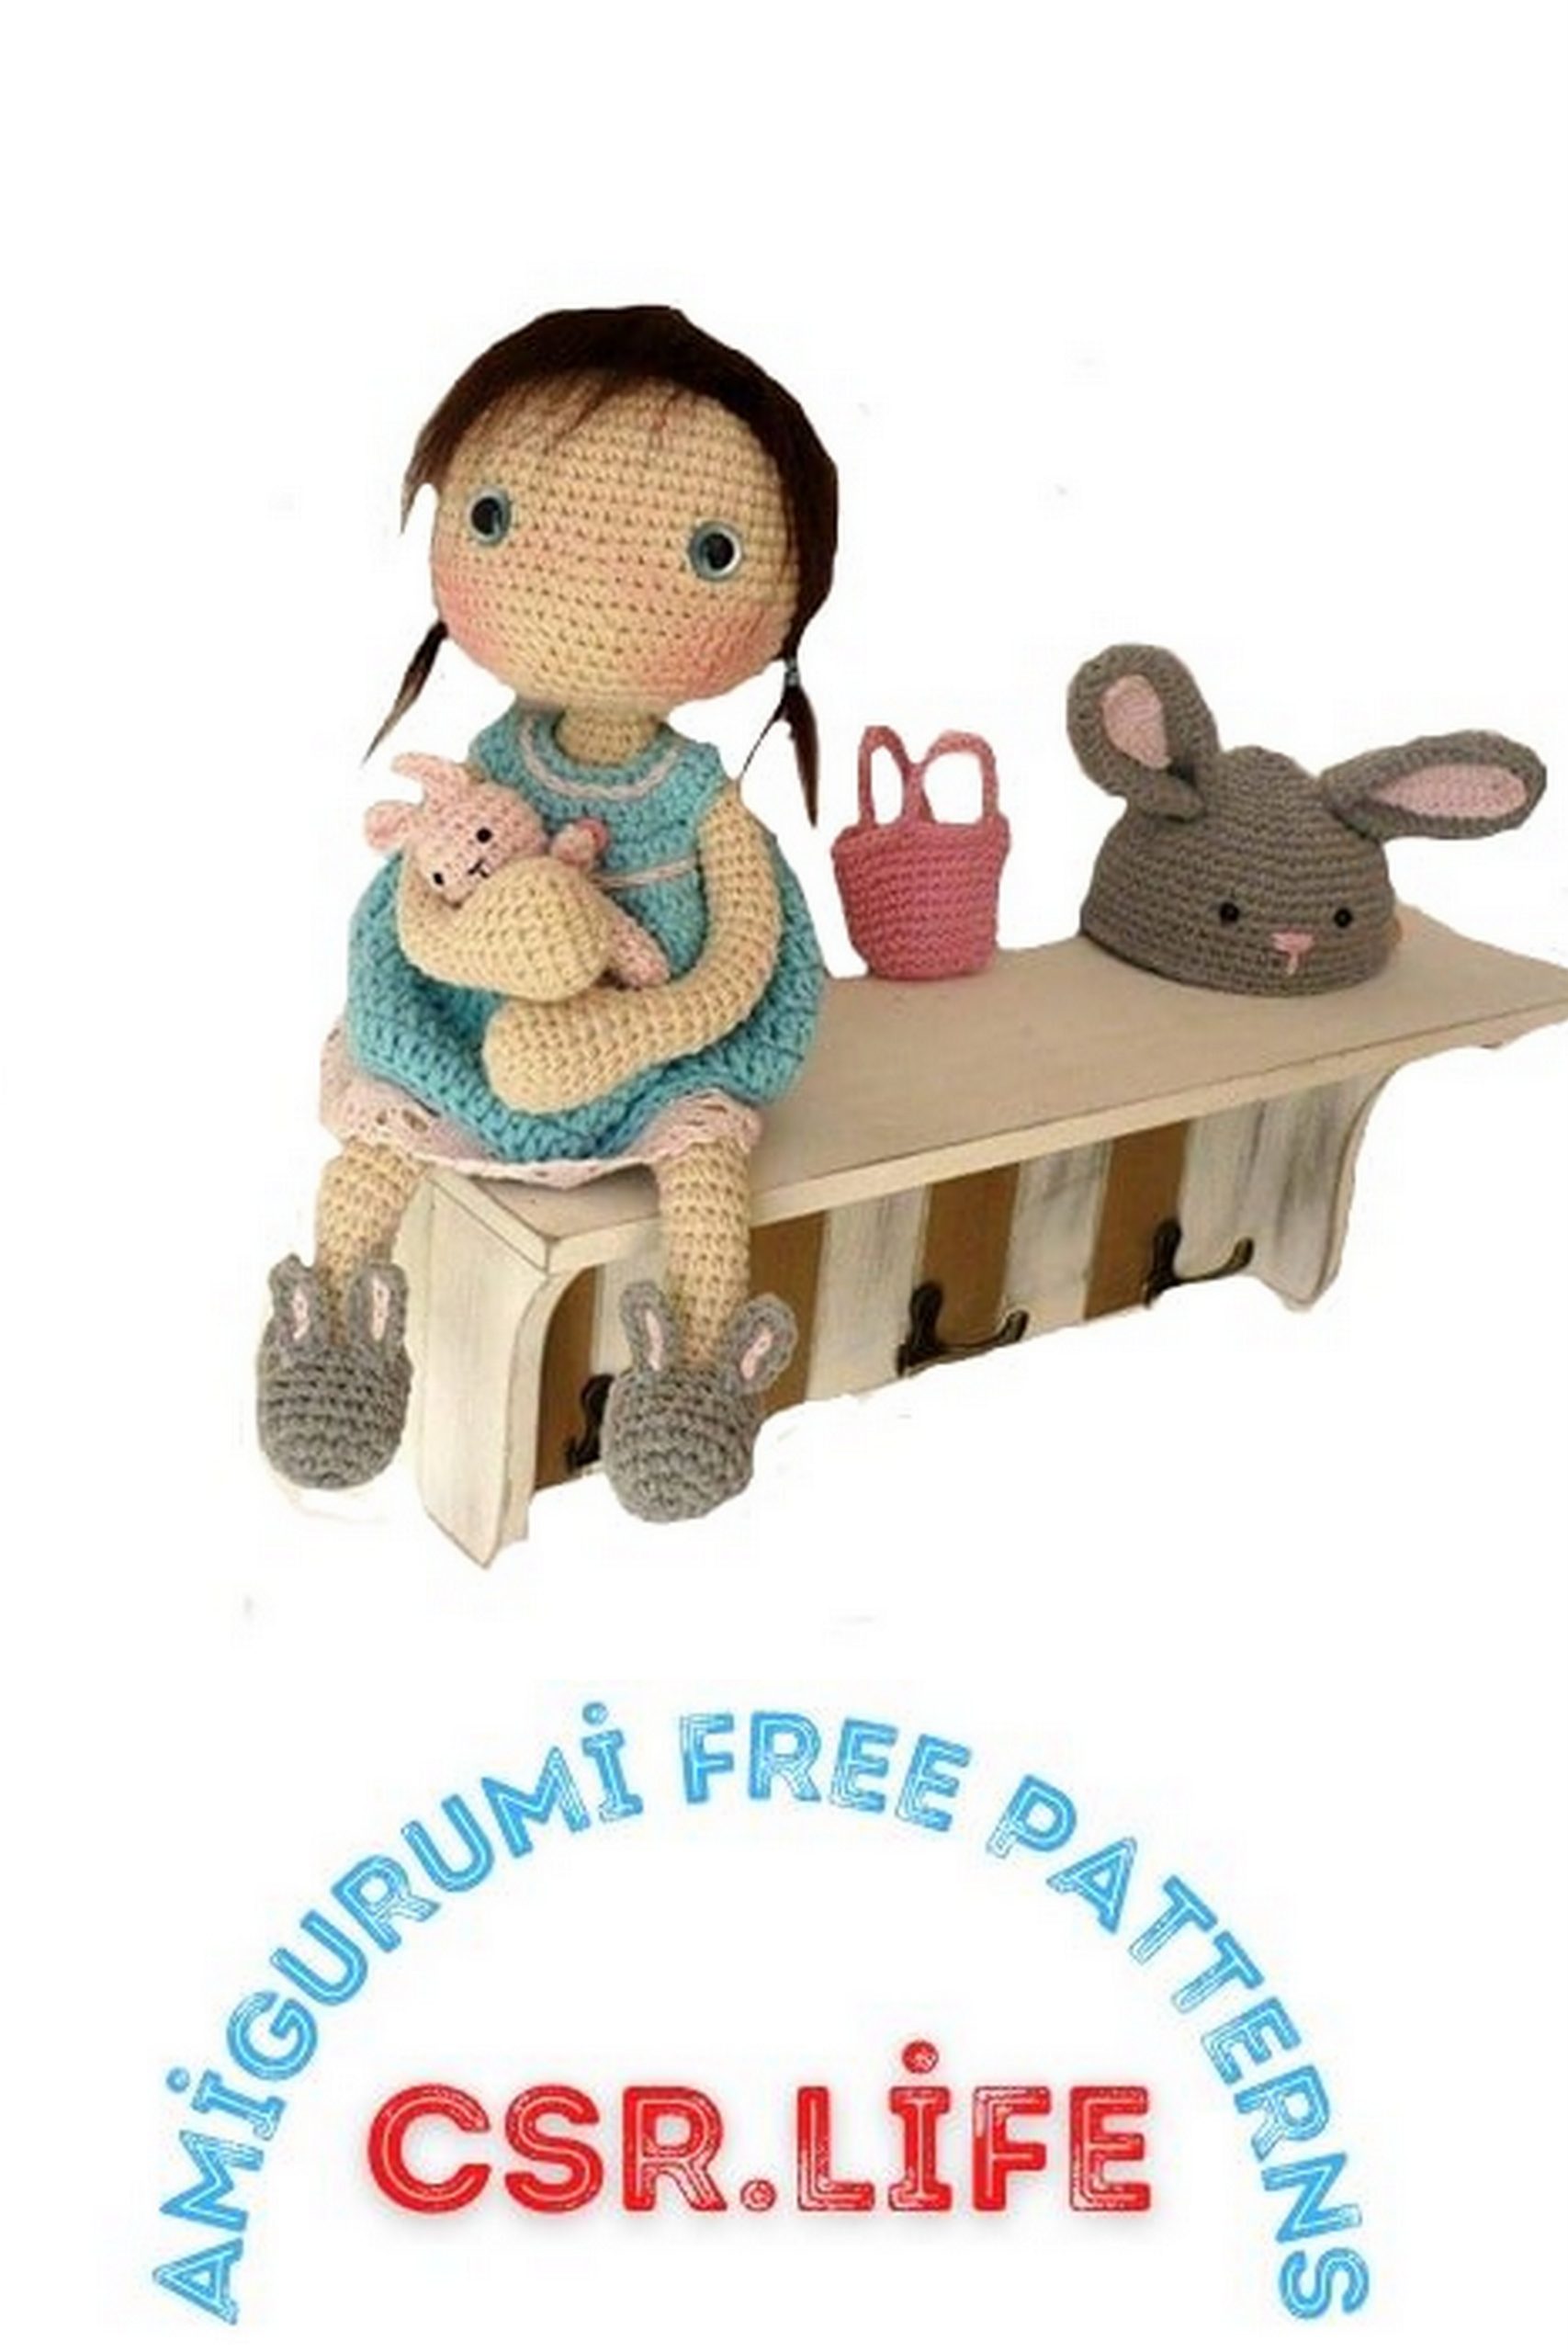
PATTERN: Doll with Rabbit Hat & Accessories
The type of material recommended is yarn (cotton type)… preferably Omega Symphony… but that doesn’t mean that you can’t use yarn or the material of your choice… But you have to notice that the size of the doll will change according to the yarn you will use and therefore the size of safety eyes… then I put two lists of materials that are the most used here in Mexico… I have already prepared a “Prototype” and the resulting size of the doll is about 22 cm Omega Hilaza mercerized cotton and 32 cm in Worsted wool yarn type (without the hat).
GAME OF COLORS (Cotton)
– 100 gr of color skin (it can be straw, bones, cream or one of your choice)
– 50 gr of grey color (for the hat and the shoes)
– 50 gr of light blue (clothes)
– 20 gr of light pink color (bunny and dress details)
– 20 gr of dark pink color (bag)
– Coffee brown or black for the hair in medium size yarn
– Safety eyes in coffee color or in light Blue between 8 to 10 mm (like those in the picture)
– Safety eyes in black color & 6 mm (for the bunny) or embroidery black thread instead
– Pink Lace in 2.5 or 3 cm wide
– Small decorative buttons
– Hook 2 mm
Worsted wool yarn type
– 50 gr of skin color (or the one of your choice)
– 30 gr of grey (for the hat & shoes)
– 30 gr of light blue (clothes)
– 10 gr of light pink color (bunny & dress details)
– 10 gr of dark pink (bag)
– Coffee brown or black for the hair in medium size yarn
– Safety eyes in coffee color or in light Blue between 12 mm (like those in the picture)
– Safety eyes in black color 8 mm (for the bunny) or embroidery black thread instead
– Pink Lace in 3 cm wide
– Small decorative buttons
– Hook 2.5 & 3 mm
The colors of the list are those of the original design, but you can choose your own color combination, if you want to use other colors and yarns you must keep in mind that the size of the eyes will have to vary according to the thickness of your material.
I. DETAILED IMAGES
In the case of this beautiful doll from RusiDolls, I started to gather as many photos as possible of this design. These are the ones I show below:
As you will see I found some pictures of the doll without clothes that will help us a lot to know the proportions, remember that PROPORTIONS. It is important to follow the design or drawing and to remember that the doll parts are in proper size and shape.
Also in the photos we can see that there are other angles that help us to better appreciate the shape of each part of the body.
It is important that if we try to make a replica, find out the name of the designer, and (apart from giving you the credit you deserve), we can do the search in Google or Pinterest and get more pictures to help us know more about their style And their designs.
II. TRACKING A SILHOUETTE
To achieve adequate proportions of the doll, we start by drawing a silhouette that we will continue in our fabric (there are those who will say but I do not draw, if yours is not the drawing you can make an impression and highlight the outline).
When you start from a drawing, you can make the silhouette of the size you want. In this case we have an amigurumi so we have to get as close as possible to the size of the original doll. For reference take the head, and from the size of this draw the rest of the body.
The first thing I did is to make an approximate count of the points of the head, I counted approximately 30 in the wide and visible part of the head, multiplied by 2 (from both sides), I get 60sts. It can be seen that the head is almost completely spherical. Then I wove a sphere with a magic ring of 6st and increasing 6sts in each turn until achieving the 60 low points in width and made 5 laps keeping the 60sc (with these measures I will do the silhouette).
Draw the semi-circumference on paper and complete the head, by looking at the photo of the doll, continue with the neck and body, then approach the width and length of arms and legs.
– A head is a perfect sphere, with the detail that the curve is accentuated on the neck…
– The trunk is a cylinder that widens at the base.
– The arms start with oval hands (not spherical) and continue without complications, you will have the same thickness from the hand to the shoulder.
– The feet begin in sphere, then form the heel and continue with a leg a little wider than the arms.
Having this drawing is very important for me, and the proportion of the whole doll will depend on it.
III. CROCHET THE SHAPE OF THE SILHOUET
Crochet the head in following the silhouet of your drawing, in continuous rounds. You will have to compare with the drawing at each steps to see where it is noticed that the silhouette slims, in this case you will have to decrease of 4, 6 or 8 in that turn or the amount that is needed to fit the line, sometimes it is necessary to go back and change the Number of decreases, but it is crocheting by trying … unsinking and retrying. The same thing will happen when the shape is enlarged with the increases.
TIP… some “scars” will appear in your work when you decrease at the same height, so I recommend inserting the invisible decreases.
– (5 sc, 1dec) x 6 = 36
– (4 sc, 1 dec) x 6 = 30
– (3 sc, 1 dec) x 6 = 24……
This will make “scars” so you could avoid it in replacing it by the following steps:
– (2 sc 1 dec), (5 sc, 1dec) x 5, 3 sc = 36
– (4 sc, 1 dec) x 6 = 30
– (1 sc, 1 dec), (3 sc, 1 dec) x 5, 2 sc = 24
With this interchanging, the decreases are less visible, and the final result, nicer.
In the last part of the head we observe that the curve is more accentuated (decreases faster) so from this turn and until the end you will make decreases of 8 sc in each turn until forming the hole of the neck, in this way you will form the cheeks of the doll and give her face a round and sweet shape 😛
The result is the picture attached. We must remember to place the safety eyes at the appropriate height, so we will make some attempts before permanently fixing them, to adjust their height and separation, to make them look like the most to the design.
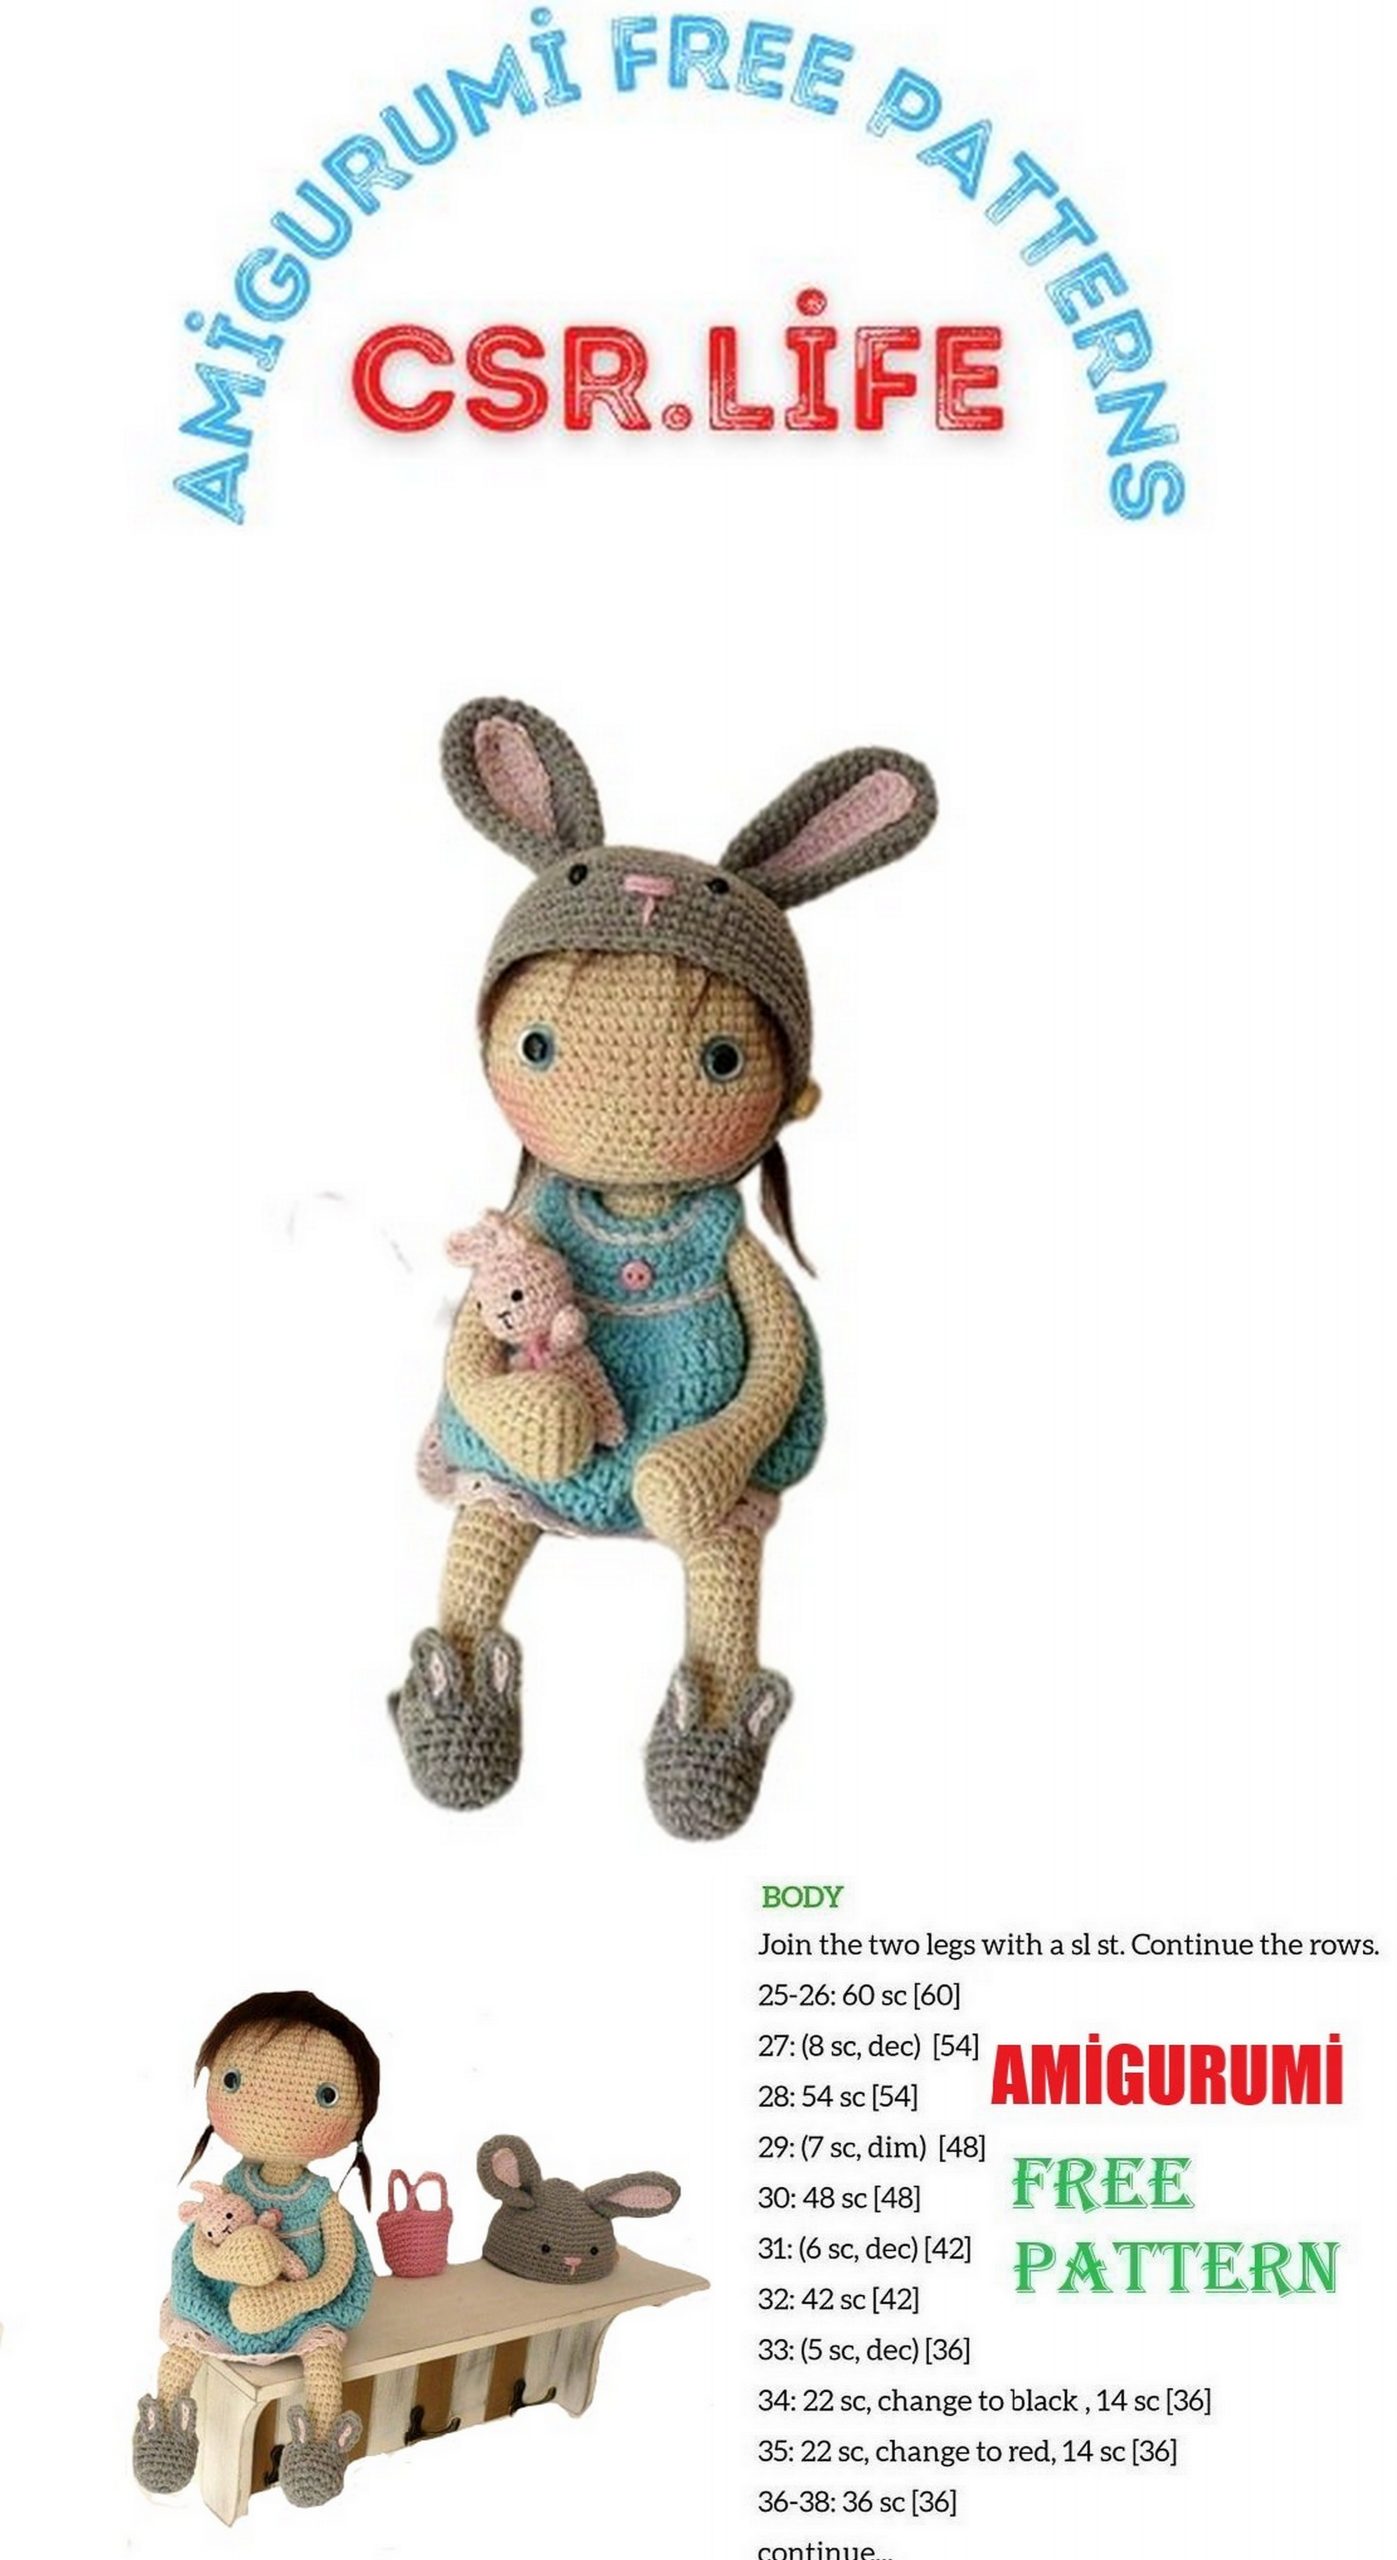
The body is started from the bottom to the top. We start with an oval, following the silhouette drawn. You will have to adjust to the width and crochet it till the top, in interspersing decreases every few turns until reaching the neck.
IV. HEAD & BODY PATTERN
Abbreviations:
Rnd: Round
sc: single crochet
inc: increase
dec: decrease
The recommendation on the label of the symphony yarn is a 3 mm hook, in the case of amigurumis the fabric should be a bit tight to avoid see the fill, personally I use the 2mm hook. They should then reduce the size of the recommended hook on the labels of your yarn or cotton by approximately 1 mm.
HEAD
Rnd 1: 6sc in a Magic Ring
Rnd 2: 6 inc = 12 sts
Rnd 3: (1 sc, 1 inc)x 6 = 18
Rnd 4: (2 sc, 1 inc) x 6 = 24
Rnd 5: (1 sc, 1 inc ), (3 sc, 1 inc)x 5, (2 sc) = 30
Rnd 6: (4 sc, 1 inc) x 6 = 36
Rnd 7: (2 sc, 1 inc), (5 sc, 1 inc) x 5, (3 sc) = 42
Rnd 8: (6 sc, 1 inc)x 6 = 48
Rnd 9: (3 sc, 1 inc), (7 sc, 1 inc)x 5, (4 sc ) = 54
Rnd 10: (8 sc,1 inc) x 6 = 60
Rnd 11-22: 60 sc
Rnd 23: (13 sc, 1 dec) x 4 = 56
Rnd 24: (5 sc, 1 dec) x 8 = 48
Rnd 25: (2 sc, 1 dec), (4 sc, 1 dec) x 7, (2 sc) = 40
Rnd 26: (3 sc, 1 dec) x 8 = 32
Rnd 27: (2 sc, 1 dec) x 8 = 24
Rnd 28: (1 sc, 1 dec) x 8 = 16
The eyes are placed between rounds 17 and 18 approximately (we must prove where they are better before fixing them), and there will have a separation of 12 sts between them.
As In the picture, I placed the little black eyes, but you can choose another color, I would recommend the 12 mm for the symphony yarn fabric but they can be the size that suits your taste.
BODY
At the beginning we will form an oval working on both sides of an initial chain. (See picture)
Start with 7 ch.
Rnd 1: 3 sc in the 2nd ch from the hook, 4 sc, 3 sc in the last ch, turn and continue on the other side
of the beginning chain, 4 sc = 14
Rnd 2: 3 inc, 4 sc, 3 inc, 4 sc = 20
Rnd 3: [(1 sc, 1 inc) x 3 , 4 sc)] x 2 times = 26
Rnd 4: (2 sc, 1 inc) x 3, 4 sc) x 2 times = 32
Rnd 5- 13: 32 sc
Rnd 14: (6 sc, 1 dec) x 4 = 28
Rnd 15 & 16: 28 sc
Rnd 17: (5 sc, 1 dec) x 4 = 24
Rnd 18: 24 sc
Rnd 19: (4 pb 1 dis)X 4 = 20
Rnd 20: 20 sc
Rnd 21: (3 sc, 1 dec) x 4 = 16
Rnd 22-24: 16 sc
Rnd 25: (6 sc, 1 dec) x 2 = 14
Rnd 26-28: 14 sc, fasten off & let long thread to sew to the head.
(I crocheted a few turns more than necessary to introduce inside the head and give more firmness)
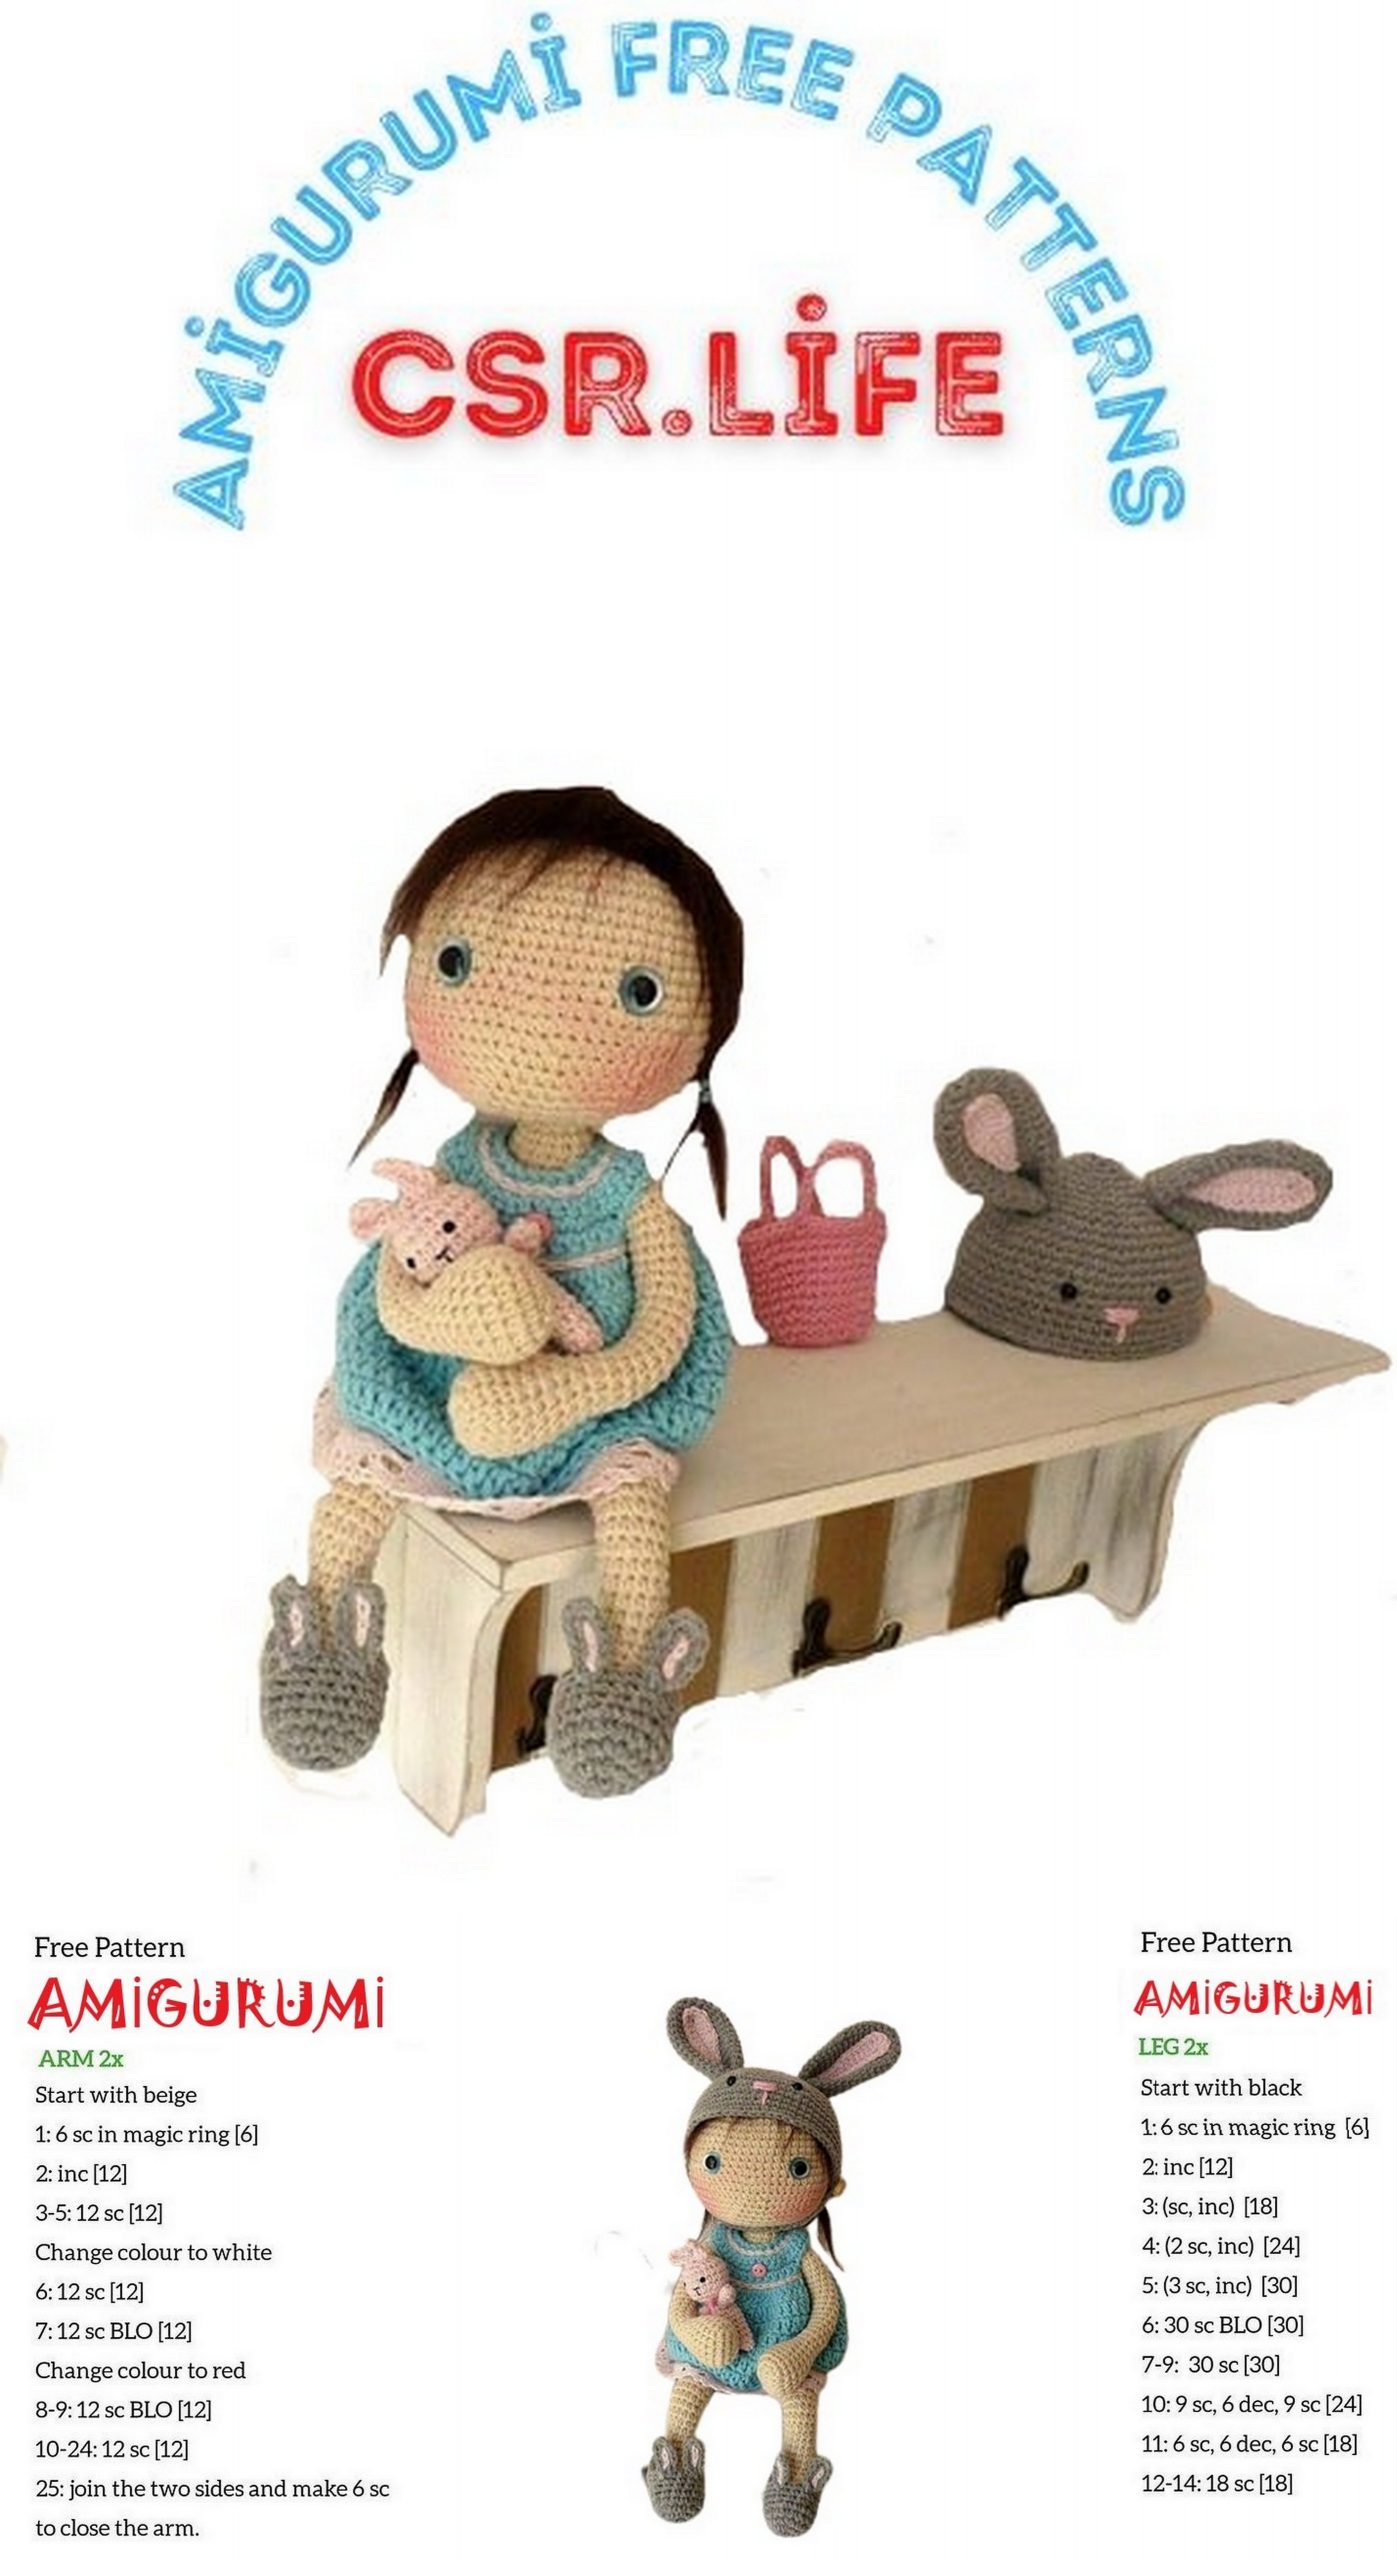
V. HANDS & ARMS
The way the hand starts is an oval, we will begin to crochet an oval. The size of the initial chain is the result of another “trial and error” step, until the most appropriate size, according to the silhouette was found. We repeat the laps without increases until reaching the desired length and then we will make some decreases interspersed until reaching the width of the arm and we will give as many turns as they are necessary to fit the length of our silhouette. You should note that the arm is even does not thin or have elbows as in other designs … and leave the “shoulder” without filling, to bend it … sewing and having greater mobility …
ARMS
Start with 6 ch
Rdn 1: 3 sc in the 2nd ch from the hook, then 3 sc, 3sc in the last one,
turn & continue on the opposite side of the chain, 3sc = 12
Rnd 2: (3 inc, 3 sc) x 2 = 18
Rnd 3 -6: 18 sc
Rnd 7: (4 sc, 1 dec) x 3 = 15
Rnd 8: (3 pb 1 dis) x 3 = 12
Rnd 9: 12 sc
Rnd 10: (2 sc, 1 dec) x 3 = 9
Rnd 11-31: 9 sc, fasten off, leave long thread to sew to the body.
Add filling as the work progresses, leave approximately 3 cm at the end of the arm, without filling… (shoulder)
When the hand is finished, continue on the 9 sc during several turns until reaching the desired length. (Check pattern)
Do not fill the last part of the arm, as shown in the photo.
With pins, we mark the position of the arms on the body. Don’t sew the head for the moment, we are going to put something to support because the cap is heavy and the head tends to fall.
VI. FEET & LEGS
The feet have a particular form… usually they start in an oval…. And then it rises making decreases in the instep of the foot…. Until reaching the width at the ankle and continue crocheting the leg.
In this design it is different, if you see well the photo of the doll, you can see that the feet start at the tip with a magic ring and advance towards the heel … then the laps go up again… that means that you can assemble by sewing and then coming back To crochet.
Here is the pattern of how I made them:
FEET & LEGS
Rnd 1: 6sc in a Magic Ring
Rnd 2: 6 inc = 12
Rnd 3: (1 sc, 1 inc ) x 6 = 18
Rnd 4-6: 18 sc
Rnd 7: 2 sc, 1ch & turn (till now, we will work in rows to form the heel)
Rnd 8-11: 4 rows of 11 sc, with a ch at the end before you turn
Rnd 12-16: 5 rows of 3 sc, with a ch at the end before you turn, fasten off, use the leaving thread to sew the foot and start the leg.
After that we will continue to crochet in spiral. (see picutres on next pages)
Rnd 17: 3 sc, 1 dec, 5 sc, 1 dec, 3 sc, 1 sc, 1 dec, 1 sc = 16
Rnd 18: (6 sc, 1 dec) x 2 =14
Rnd 19: (5 sc, 1 dec) x 2 = 12
Rnd 20-39: 12 sc, fasten off, leave long threat to sew to the body.
At this point of the work, the foot is no longer crocheted in spiral and begins to be in rows to form the heel, after that, from these lateral points we continue with the leg, in spiral again.
Sew with needle and the same thread forming a kind of little shoe.
Re-start to work in spiral, take the first stitch as shown in the picture.
The Foot is finished, and we continue to crochet on the stitches taken around it to form the leg.
VII. HAIR
If we see well the picture, the hair of the doll is different from the common one, I think (I say ‘I think’ because I haven’t work this material), it is felted wool, it needs a special needle to fix it. In the absence of this and the knowledge of the proper technique, I decided to make it with common acrylic yarn which I then brushed. The original doll has a part to crochet that is a hemisphere, it represents the scalp, and on this part you fix the hair, the hair fixed is scarce… to give it the appearance of a small girl.
Here I must tell you that girls who have this knowledge and know how to work special hair for dolls, with felt wool or some other way, let your imagination and skills fly.
Surely you will do much more similar to the original with the appropriate material.
For those still learning, I show you pictures of how I did it. The hair is not so scarce.
First with a needle and thread, I began to shape the hairstyle (pigtails), without pulling or adjusting to avoid deforming my head, until I almost completely filled my head. Then I made the common place of the hairstyle hair by hair (from the stripe to the center) and drop. Then brush everything to make it fluffy (I left some strands in the forehead for them to fall), I made the pigtails and I brushed again, to finally make a haircut to finalize it when the hairstyle is ready.
Mark with pins the central part of the hair (in the middle of the head) & the front line where the hair ends. I put the hair lines when the doll is filled and sewed, but perhaps it would be easier if you do that before sewing her.
Do not thighten, you have to go very weakly when you sew the hair threads to avoid deforming the head. Now, the front part.
Brush the hair, the yarn will be made fluffy, but without exaggeration. For the back part, I leave a gap in the center not directly on the pins, that is to put more hairs to the center, those hairs will go loose and be longer than the other, to form the pigtails. The strands of long threads are already placed near the center line. Brush these long strands again.
After brushing the strands again, combing and trimming the pigtails to taste.
VII. ARMATURE OF THE DOLL
Today I will tell you how to make the doll and we will make the dress and breeches (for those who have not yet incorporated them with the change of color in the body part).
Some of you have told me that they wanted to crochet the doll and give it more movement, that seems great, the original doll is not according to the description of the designer so do not consider it in this challenge. If you want to do it and know the form… I would recommend using cable number 12. In this case what is done is a wire skeleton, that method I use when the dolls are intended for an adult or will only be for exposure, for safety, because although it is minimum, there is always the risk that the wire or cable can break the fabric and leave, when much manipulated.
The doll holds the head by itself (without a cap), but then with the cap and the long hair to carry, the head tends to fall, (as dislocated some of you tell me), of course that happens when the size and the weight of the head is large compared to the trunk, to avoid it we must place something that firm and hold it. The materials that can be used are several … cable, lined wire, wooden sticks, plastic sticks, etc … that I leave it at the discretion of each one of you.
I am a little nervous when the dolls are intended for children (too much my husband would say), and I prefer to use silicone bars, eye… they do not give the same support that would give a wooden stick or wire, but in my opinion they are safer and there is no risk of oxidation or tissue rupture.
I can’t find the photo where I put the bar of this doll, so in the following publication I show you the image of a doll that I made a while ago, as you see is even more stubborn… Poppy Trolls, you have to introduce the bar by the neck to the base of the trunk, fill around it firmly and cut it by making the calculation that it reaches half the height of the head or a little more, then put the head in place… I put pins and finally I sew… you have to introduce the head a prudent distance that corresponds with the silhouette that we have… if you think it necessary, you can add several more laps in the neck creation, always on the 14sc, it will help to give more firmness to the head, finally we will sew the head to the body.
We will fill the arms in leaving a few cm free at the end (shoulder), we will sew with needle and the same thread by the inner strands (note that when sewing is parallel to the initial oval of the hands), leave a space for the neck as in the picture and sew by the threads external to the body.
The legs are usually sewn in a circle to the body, there is no complication, fix before sewing in verifying that the legs are at the same height, do not fill them too much so that the doll can sit and bend the legs.
We introduce the silicon bar half in the body, half in the head to support it. After that, we sew them together with the body color yarn as we do with the arms, don’t forget to leave the place of the neck.
Add the legs and sew them to the body. The process is described in the following pictures. 😉
Let’s start to do the clothes now.
VIII. CLOTHES
With the finished body, we can now take the measure to make the dress. It is not my strong dresses as a girl, if you have more experience than me, or know a different way, girls go ahead!
Put all your know-how in it. I will show you how I did it, but you already know that everyone is free to do as you like by adding the details that make each creation different & really unique.
I started with a chain around the neck, with that measure continue crocheting by increasing rows, leave holes for the arms, continue crocheting by rows till you get a suitable height, joined with a slip st, continue to crochet in rounds now, add interleaved increases to give Flight to dress.
Then with pink thread, I made the details of the neck and waist (in making a round of sl st on the top of the dress, neck part, and on the waist place), these sections serve to adjust the dress to the body, so leave thread on each sides to knot as with a ribbon. At the bottom of the dress, place the lace on the inside edge, with small stitches and it’s ready.
DRESS
Abbreviations:
sc: single crochet
sl st: slip stitch
inc: increase
hdc: half double crochet
inc-hdc: increase in hdc
dc: double crochet
inc-dc: increase in dc
We start crocheting in rows:
Start with 29 ch,
Row 1: start to crochet in the 2nd ch from the hook, make 6 sc, 1 inc, 13 sc, 1 inc, 7 sc (= 30), 1ch and turn.
Row 2: 2 sc, 1 inc, (4 sc, 1 inc) x 5, 2 sc (= 36), 1ch and turn,
Row 3: 4 sc, 8 ch (slip 8 sc), 12 sc , 8 ch (slip 8 sc), 4 sc (= 36), 1ch and turn
Rows 4-5: 36 sc, 2 ch and turn,
Row 6: 2 hdc, 1 inc-hdc, (5 hdc, 1 inc-hdc)x 5, 3 hdc (= 42), 2ch and turn
Row 7: 3dc, 1 inc-dc, (6 dc, 1 inc-dc)x 5, 3 dc (= 48), sl st in the 1st st of the row, 2ch now we continue to crochet in ROUNDS, finish each rounds in making 1sl st in the 1st st & 1ch
Rnd 8: (7 dc, 1 inc-dc)x 6 (= 54)
Rnd 9: 54 dc
Rnd 10: (8dc, 1 inc-dc) x 6 (= 60)
Rnd 11: 60 dc
Rnd 12: (9dc, 1inc-dc) x 6 (= 66)
Rnd 13: 66 dc. Close with sl st & fasten off.
IX. UNDIES
Start with 34 ch, sl st to close the round
We will crochet in rounds
Rnd 1-5: 34sc (5 turns) = 34
Rnd 6: (1 dec, 15 sc) x 2 = 32
Rnd 7: 8 sc (slip 16 sc), 8 sc = 16
Rnd 8: (3 ch, 1 sl st in the next sc) repeat till the end of round
Make a round of sc on the 16 slept sc and repeat the round 8.
X. RABBIT HAT
As the little doll doesn’t have a lot of hair, we will make a bonnet with almost the same amount of sts as the little head, we will make it just a little bit wider, so we will start with 7 sc in the magic ring and continue increasing by 7 in each turn until obtaining 63 sc. Then we will keep this amount of sts for the laps you think necessary for a good size, use a little bigger hook to make it.
With 2,5 mm Hook and grey color.
Start with 7sc in a Magical Ring =7
Rnd 1: 7 inc = 14
Rnd 2: (1 sc, 1 inc) x 7 = 21
Rnd 3: (2 sc, 1 inc) x 7 = 28
Rnd 4: (1 sc, 1 inc), (3 sc, 1 inc) x 6, 2 sc = 35
Rnd 5: (4 sc, 1 inc) x 7 = 42
Rnd 6: (2 sc, 1 inc), (5 sc, 1 inc) x 6, 3 sc = 49
Rnd 7: (6 sc, 1 inc) x 7 = 56
Rnd 8: (7 sc, 1 inc) x 7 = 63
Rnd 9-18: 63 sc, fasten off
To make ears as close as possible as the model (we see that they are folded in the base), what I did was draw them in white paper and cut them. After that, I cut again and profiled by placing them on the cap, until they seemed to have the shape and adequate size. So I crocheted the main part (bigger) & the inside one (smaller) in following the paper pieces.
BUNNY EARS
In grey color, with 2.5 mm hook, make 6 sc in a magic ring = 6
Rnd 1: 6 inc = 12
Rnd 2: (1 sc, 1 inc) x 6 = 18
Rnd 3: (5 sc, 1 inc) x 3 = 21
Rnd 4: 21 sc
Rnd 5: (6 sc, 1 inc) x 3 = 24
Rnd 6: 24 sc
Rnd 7: (7 sc, 1 inc) x 3 = 27
Rnds 8-10: 27 sc
Rnd 11: (7 sc, 1 dec) x 3 = 24
Rnds 12-13: 24 sc
Rnd 14: (6 sc, 1 dec) x 3 = 21
Rnds 15-19: 21 sc
Rnds 20: (5 sc, 1 dec) x 3 = 18
Rnd 21: 18 sc
Leave a long thread to sew.
Make a second ear.
PINK PART OF THE EARS
Make 15 ch.
Row 1: start with the 2nd ch from the hook, crochet 14 sc, 1ch & turn 3 sc, 5 hdc, 5 dc, 8 Tc, continue on the other side of the beginning ch. 5 dc, 5 hdc, 3 sc…
Leave long thread to sew.
Sew the pink part to the main part of the ears. The pink part is the « inside » part of the ears, sew the complete ears to the bunny hat.
Once the hat is complete, make nose with embroidery with pink thread, then add the eyes. You can do them with embroidery too, or paint them, or glue half black pearls, or use small safety eyes, as you prefer.
XI. SLIPPERS
The slippers have the same shape as the feet, a little bit bigger, so, as for the feet, we will crochet them in rounds, then continue in rows, sew the edges together and crochet a final round all around the remaining hole.
Take a 2.5 mm hook and grey yarn.
Make 7sc in a magic ring = 7
Rnd 1: 7 inc = 14
Rnd 2: (1 sc, 1 inc) x 7 = 21
Rnds 3-6: 21 sc = 21
Now continue in rows:
Rows 7-11: 5 rows on the 12 sc, 1ch to turn after each row
Rows 12-19: 8 rows on 2 sc, 1ch to turn after each row, except on the last one where you will fasten off and leave long thread to sew to give the shoe shape.
Row 20: finish the slippers with a final row all around the hole: 4 sc, 1 dec, 7 sc, 1 dec, 3 sc, 1 dec, 4 sc, 1 dec… fasten off
SLIPPERS EARS
Take light pink color and start with 7ch
Make 6sc, you have to start in the 2nd ch from the hook. Change color and continue with grey in the last st, 1ch turn.
5 sc, (3 sc in the last one), continue on the other side with 6 sc = 14 sc, leave thread to sew to the slippers.
XII. BAG
Start with 13 ch, start to crochet in the 2nd ch from the hook
Rnd 1: 3sc in 1ch, 10 sc, 3sc in 1ch, 10 sc = 26
Rnd 2: (3 inc, 10 sc) x 2 = 32
Rnd 3-8: 32 sc
Rnd 9: [(1 sc,1 inc) x 3, 10 sc] x 2 = 38
Rnd 10: [(2 sc, 1 inc) x 3, 10 sc] x 2 = 44
Rnds 11-12: 44 sc
Rnd 13: 16 sc, 16 ch (slip 6 sts), 15 sc, 16 ch (slip 6 sts), 1 sc = 64
Rnd 14: 15 sc, 1 dec, 14 sc, 1 dec, 13 sc, 1 dec, 14 sc, 1 dec =60
Rnd 15: 2 sc, 1 sl st, fasten off
XIII. BUNNY
Fill as the work goes
Head & Body:
Rnd 1: 6 sc in a magic ring
Rnd 2: 6 inc = 12
Rnd 3: (1 sc, 1 inc) x 6 = 18
Rnd 4-6: 18 sc
Rnd 7: (1 sc, 1 dec) x 6 = 12
Rnd 8: (1 sc, 1 dec) x 4 = 8
Rnd 9: 8 sc
Rnd 10: (1 sc, 1 inc) x 6 = 12
Rnd 11: (3 sc, 1 inc) x 3 = 15
Rnds 12-14: 15 sc
Rnd 15: 3 sc, 1 dec, 10 sc²& = 14
Leg 1:
Rnd 16: 3 sc, (slip 7 sts), 4 sc = 7
Rnd 17-18: 7 sc
Rnd 19: 2 sc, 1 dec, 3 sc = 6, sew the hole to close it
Leg 2:
Rnd 16-18: 7 sc
Rnd 19: 2 sc, 1 dec, 3 sc = 6, sew the hole to close it
Arms:
Rnd 1: 5 sc in a magic ring
Rnd 2-5: 5 sc, leave thread to sew to the body
Ears:
Start with 5 ch
Start to the 2nd ch from the hook
1 sl st, 2 sc, (5 sc in the last one), continue on the other side of the chain, 2 sc, 1 sl st, leave long thread to sew to the head.
Make the nose and the eyes with embroidery.
She’s done!! Congratulations!