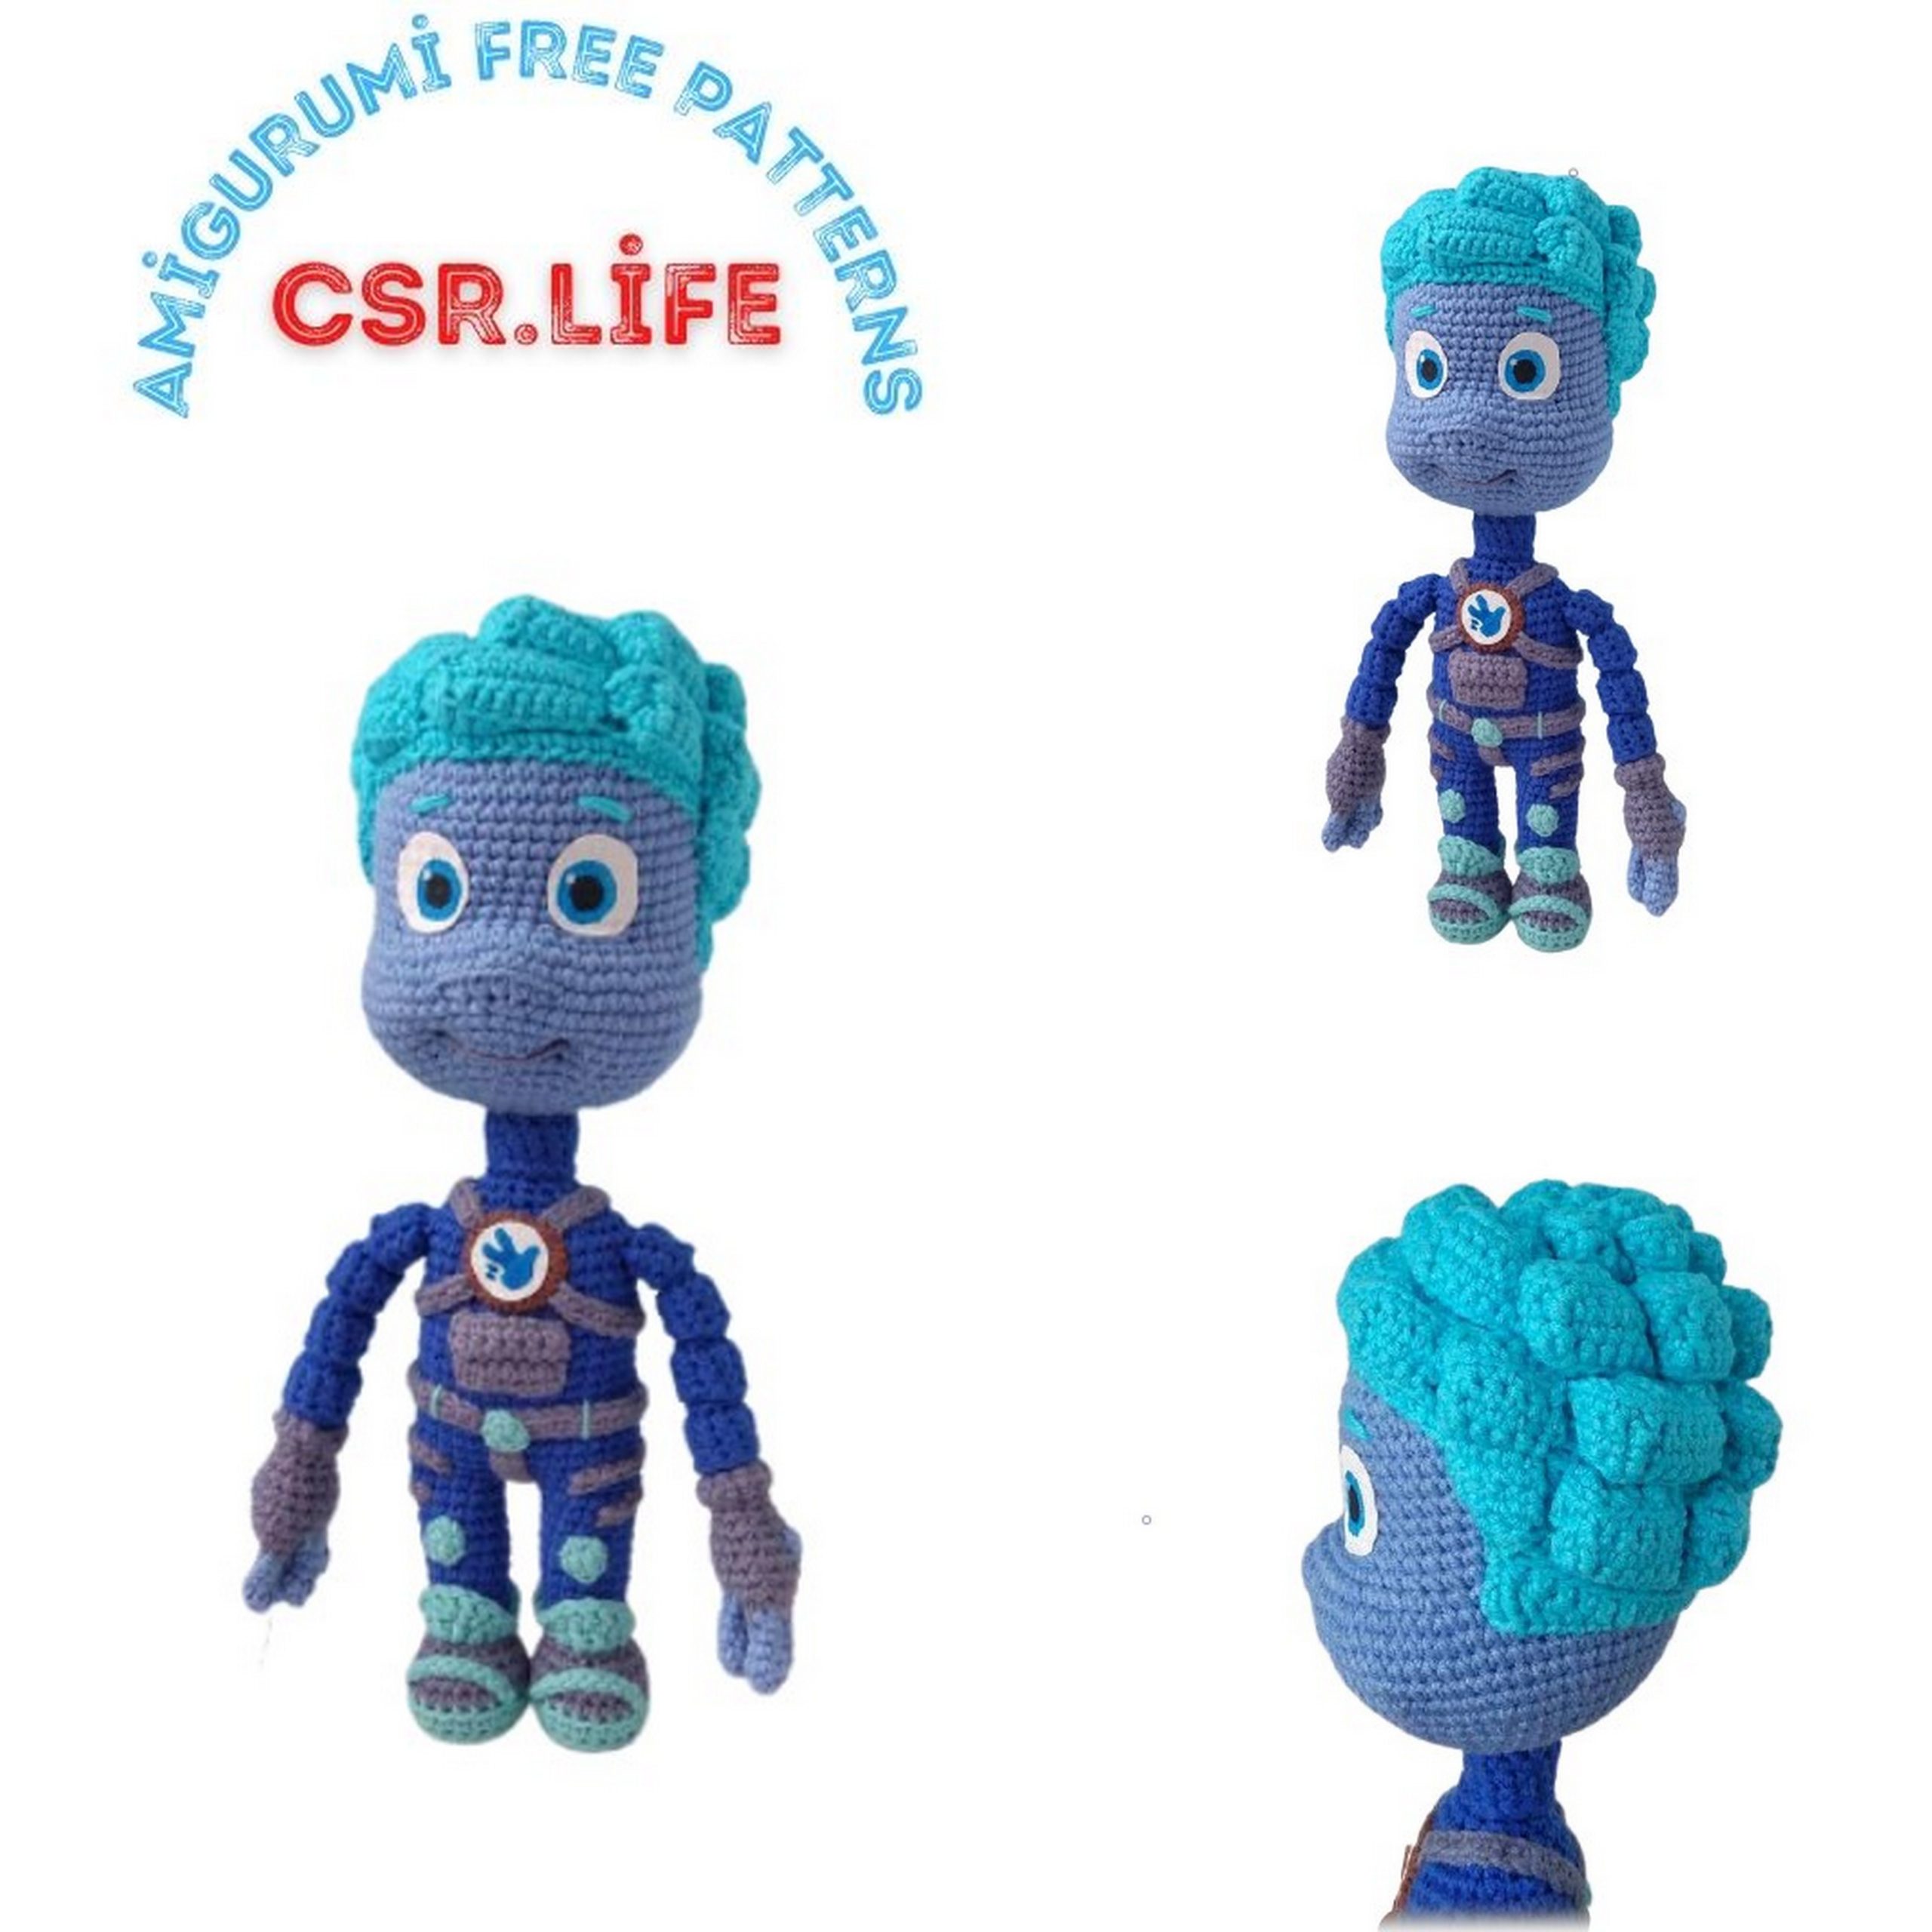
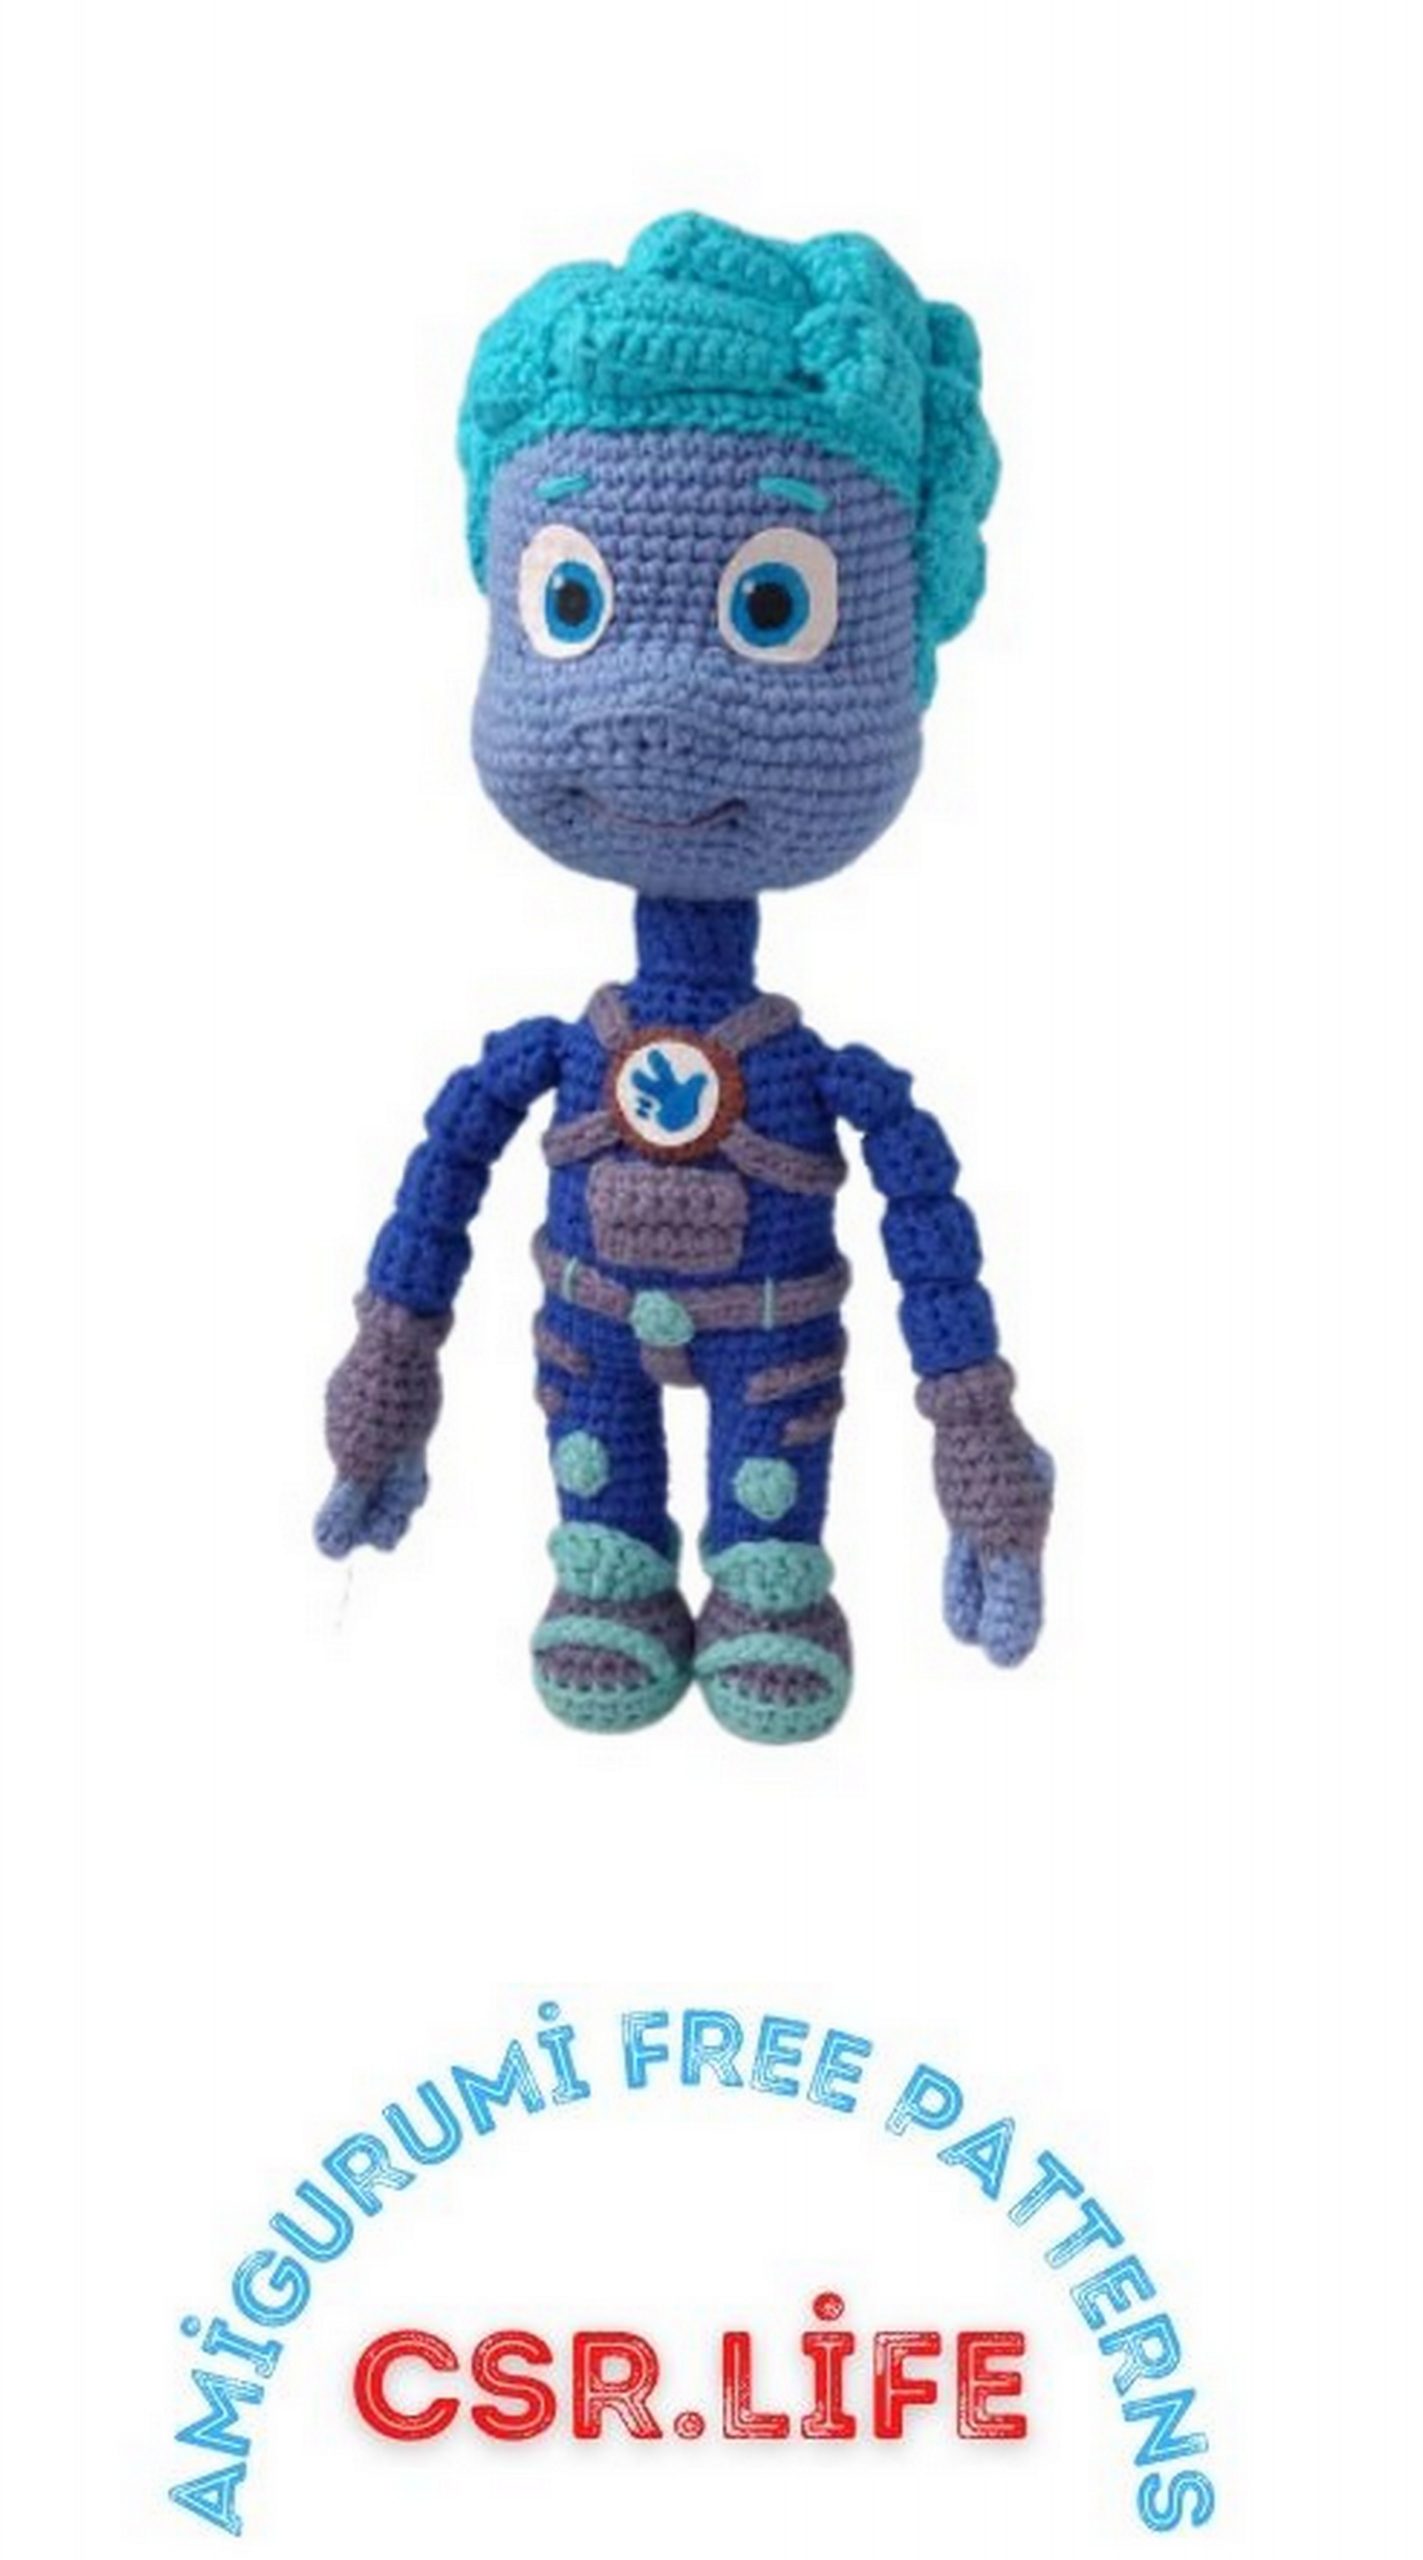
The Fixies Nolik Amigurumi Free Pattern
I continue to share amigurumi free patterns. In this article, the fixies nolik amigurumi free pattern is waiting for you.
Materials used:
YarnArt Jeans yarn, color 47 – blue, for a suit
YarnArt Jeans yarn, color 15 – light gray, for the head and fingers
YarnArt Jeans yarn, color 68 – gray, costume details
YarnArt Jeans yarn, color 33 – blue, for hairstyles
YarnArt Jeans yarn, color 76 – turquoise, for boots
Yarn Alize Cotton Gold, color 493 – brown, for the emblem
Hook: basic 2mm; 1.75mm; 1.25mm (crochet 2mm if not
a different number is indicated)
Frame wire, optional
For attaching the head, thick wire, or a pencil, or cotton
sticks
Some cardboard for the insoles
Filler
Electrical tape or adhesive plaster
White cloth
Acrylic Paints for Fabric
Scissors
Long sewing needle
Glue Moment Crystal
The height of the toy, subject to the use of these materials, is 24 cm.
For knitting toys, you can use any yarn and suitable for
her hook. Depending on the thickness of the yarn and the knitting density, the size
toys may differ.
Abbrevations
sc – single crochet
hdc – half double crochet
dc – double crochet
d2c – double crochet
convex sc – single crochet, knitted from right to left for
column of the previous row
concave sc – Single crochet, tied from right to left in front of
column of the previous row
ch – chain
inc – increase
dec – decrease
sl-st – slip stitch
* – number of repetitions
PATTERN
Arms
Fingers (hook 1.75; color 15; 10 pieces)
1) 5 sc into magic ring (5)
2 – 5) 5 sc (5)
Connect the fingers (hook 2; color 68)
1) 2 sc for 1st, 2 sc for 2nd, 2 sc for 3rd, 5 sc for 4th, 3 sc for 3rd, 3 sc for 2nd, 3 sc for 1st (20)
2) For the left hand: 2 sc, 2 sc together with the 5th, 16 sc (20)
Right hand: 6 sc, 2 sc together with 5th, 12 sc (20)
3) Left hand: 2 sc, 3 sc with 5th, 15 sc (20)
Right hand: 5 sc, 3 sc with 5th, 12 sc (20)
4) (8 sc, dec) * 2 (18)
5) (7 sc, dec) * 2 (16)
6) (6 sc, dec) * 2 (14)
7) (5 sc, dec) * 2 (12)
8) (4 sc, dec) * 2 (10)
Do not cut the thread, bring it forward
If your toy will be on a frame, at this point insert
wire, having previously wrapped it with electrical tape or plaster.
Stuff the brush with filler. Then fill the handle as
knitting.
Attach the thread in blue
9) For back half loops 10 sc (10)
10) 10 sc (10)
11) For back half loops 10 sc (10)
12 – 13) 10 sc (10)
14) for front half loops 10 sc (10)
15 – 16) 10 sc (10)
Turn the sleeve out
17) connect the turned-out edge with the front half-loops 11
row.
Cut the thread.
Attach the thread to the back half-loops of the 14th row
18) 10 sc for back sts 14 rows (10)
Repeat rows 11 – 18 3 more times. On the fourth doorway
Do not knit row 18.
Do not leave the thread for sewing, the hands will be tied into the body.
Legs
Start turquoise
1) 5 ch, in the second chain from the hook: inc, 2 sc,
3 sc in one loop, 3 sc (10)
2) 2 inc, 2 sc, 3 inc, 2 sc, inc (16)
3) (sc, inc) * 2, 2 sc, (sc, inc) * 3, 3 sc, inc (22)
4) For the back half loop 22 sc (22)
Change thread to gray
5) For the back half loop 22 sc (22)
6) 22 sc (22)
Insert insole
7) 7 sc, 4 dec, 7 sc (18)
8) 5 sc, 3 dec, 7 sc (15)
Change thread to blue
9) For the back half loop 15 sc (15)
Insert the wire for the toy on the frame. Stuff the foot.
10 – 18) 15 sc (15)
Stuff the leg as you knit.
Back to row 9, attach the turquoise thread to the side
in the middle and knit:
1) sl-st, sc, hdc, inc dc, hdc, 2 sl-st, sc, hdc, 2 inc dc, hdc, sc, sl-st
2) sl-st, sc, hdc, 2 inc dc, hdc, 2 sl-st, sc, hdc, 4 dc, hdc, sc, sl-st
Cut the thread on the first leg, do not cut on the second,
we continue to knit the body.
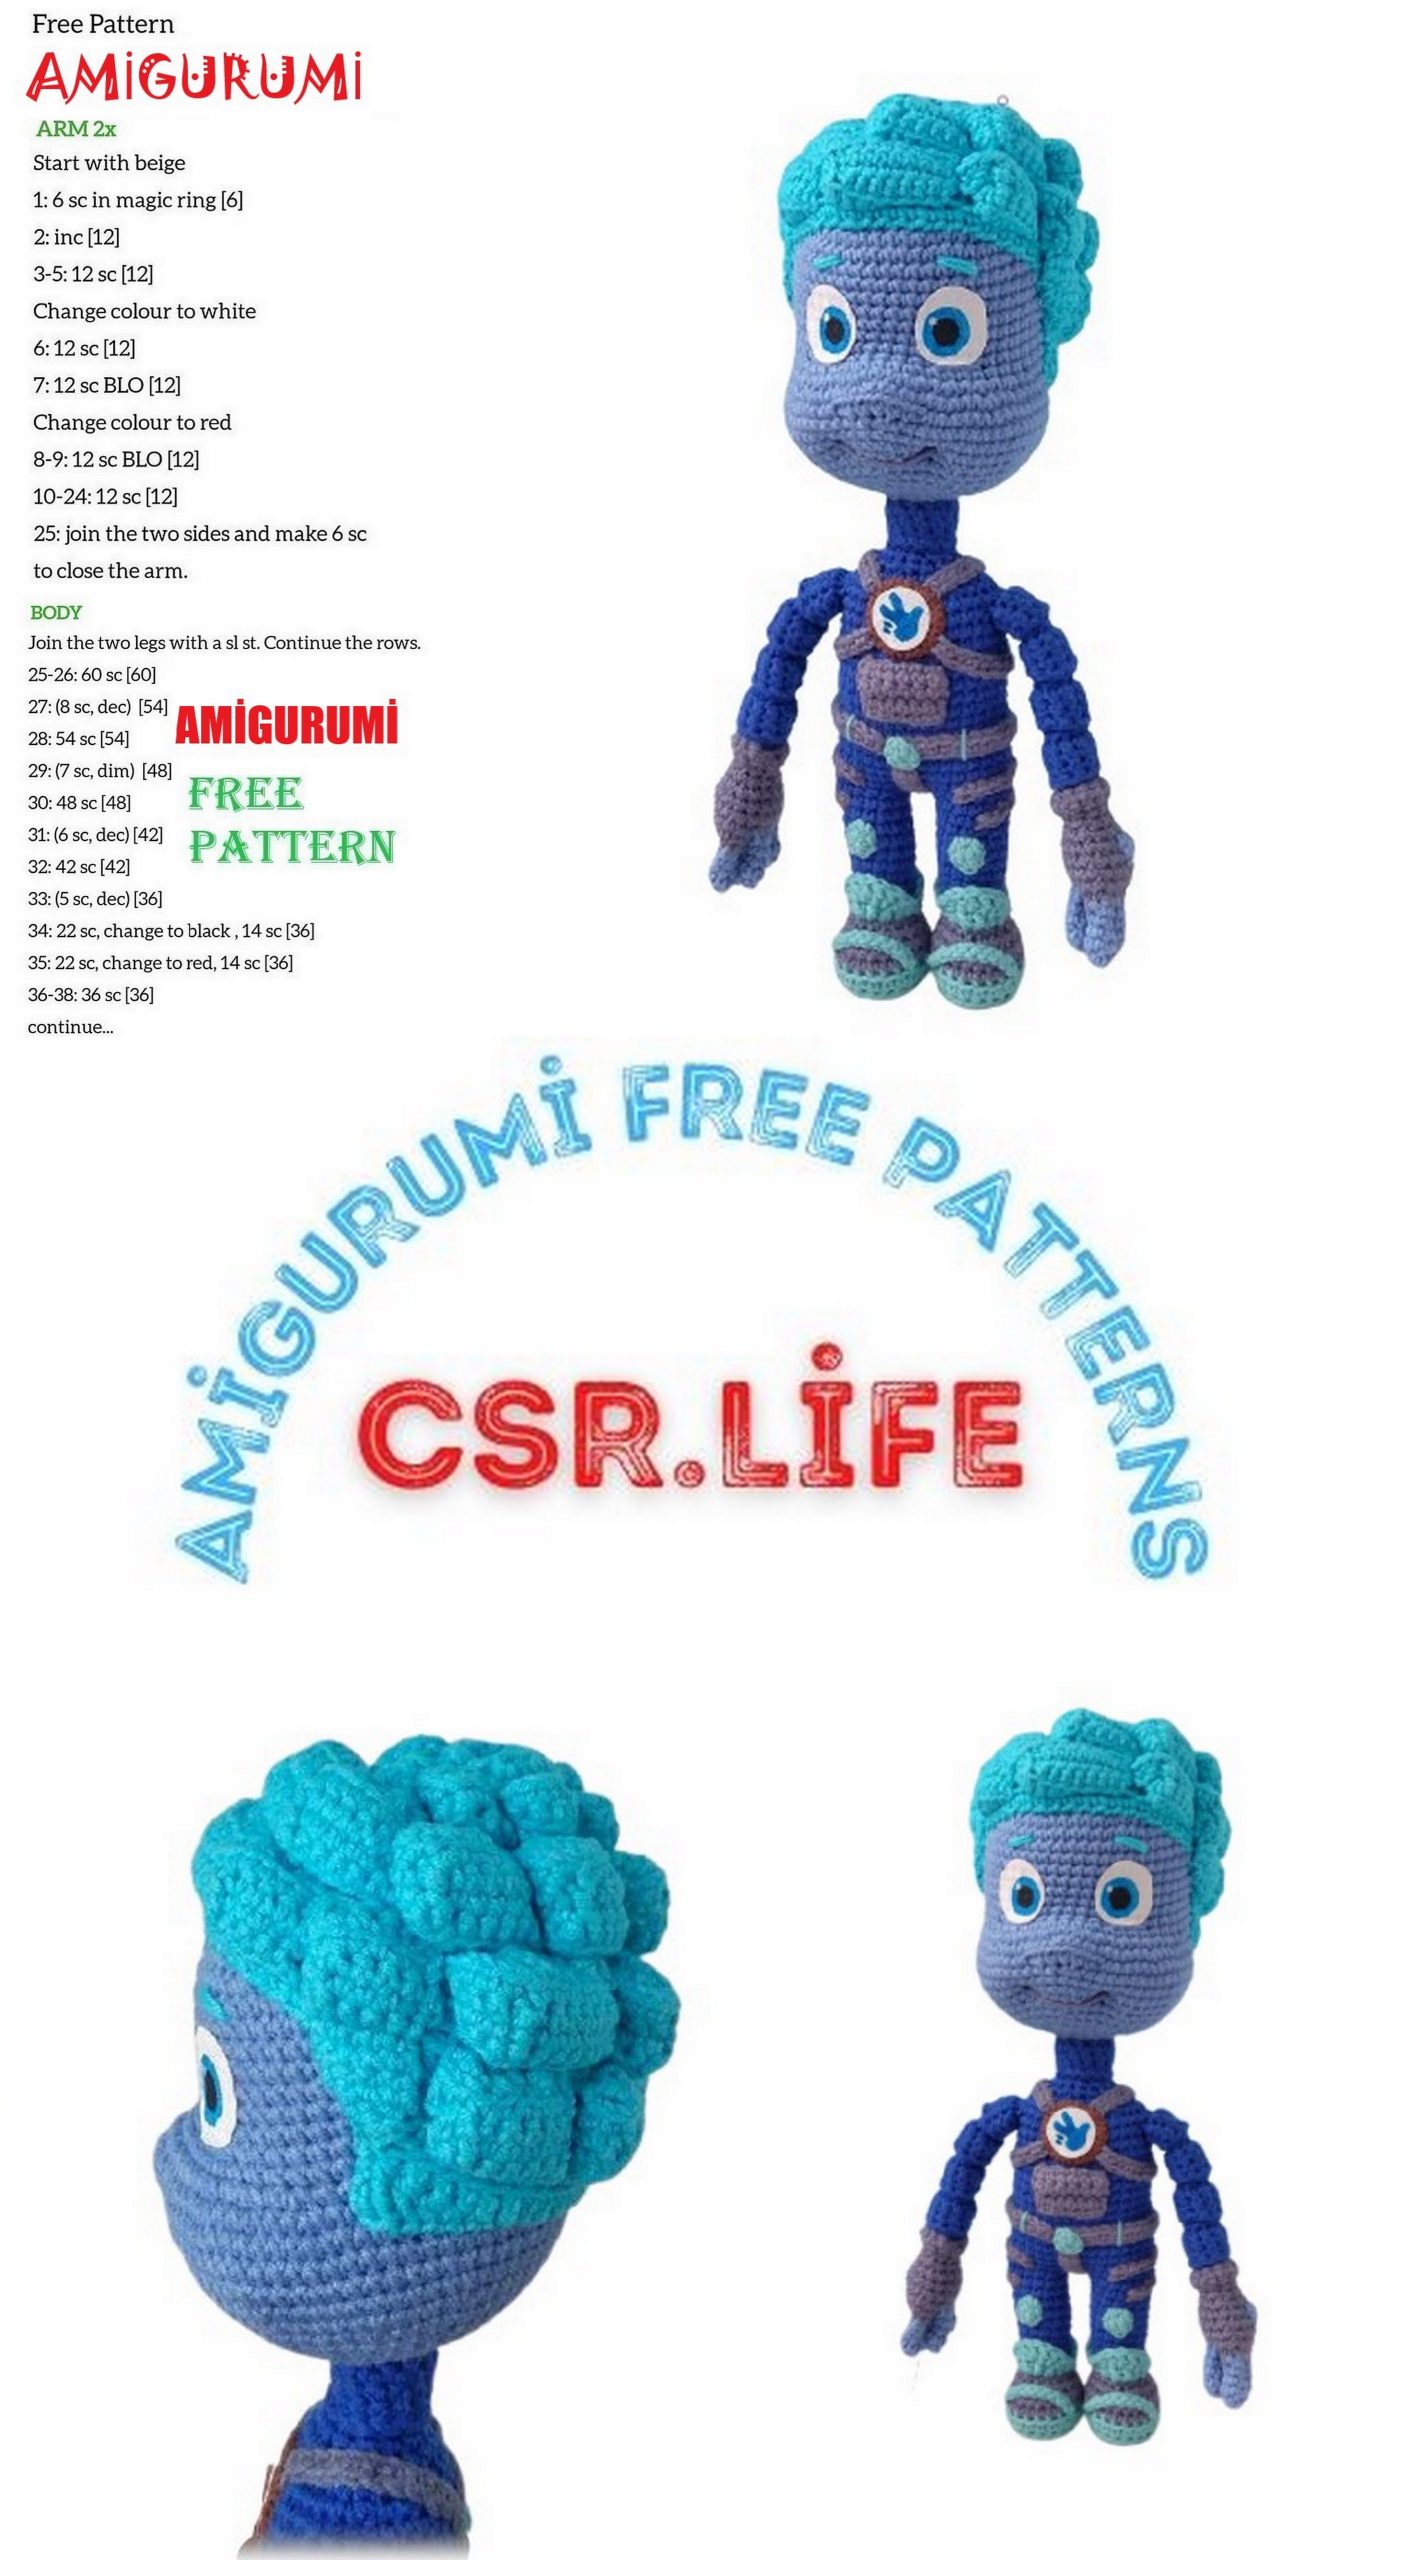
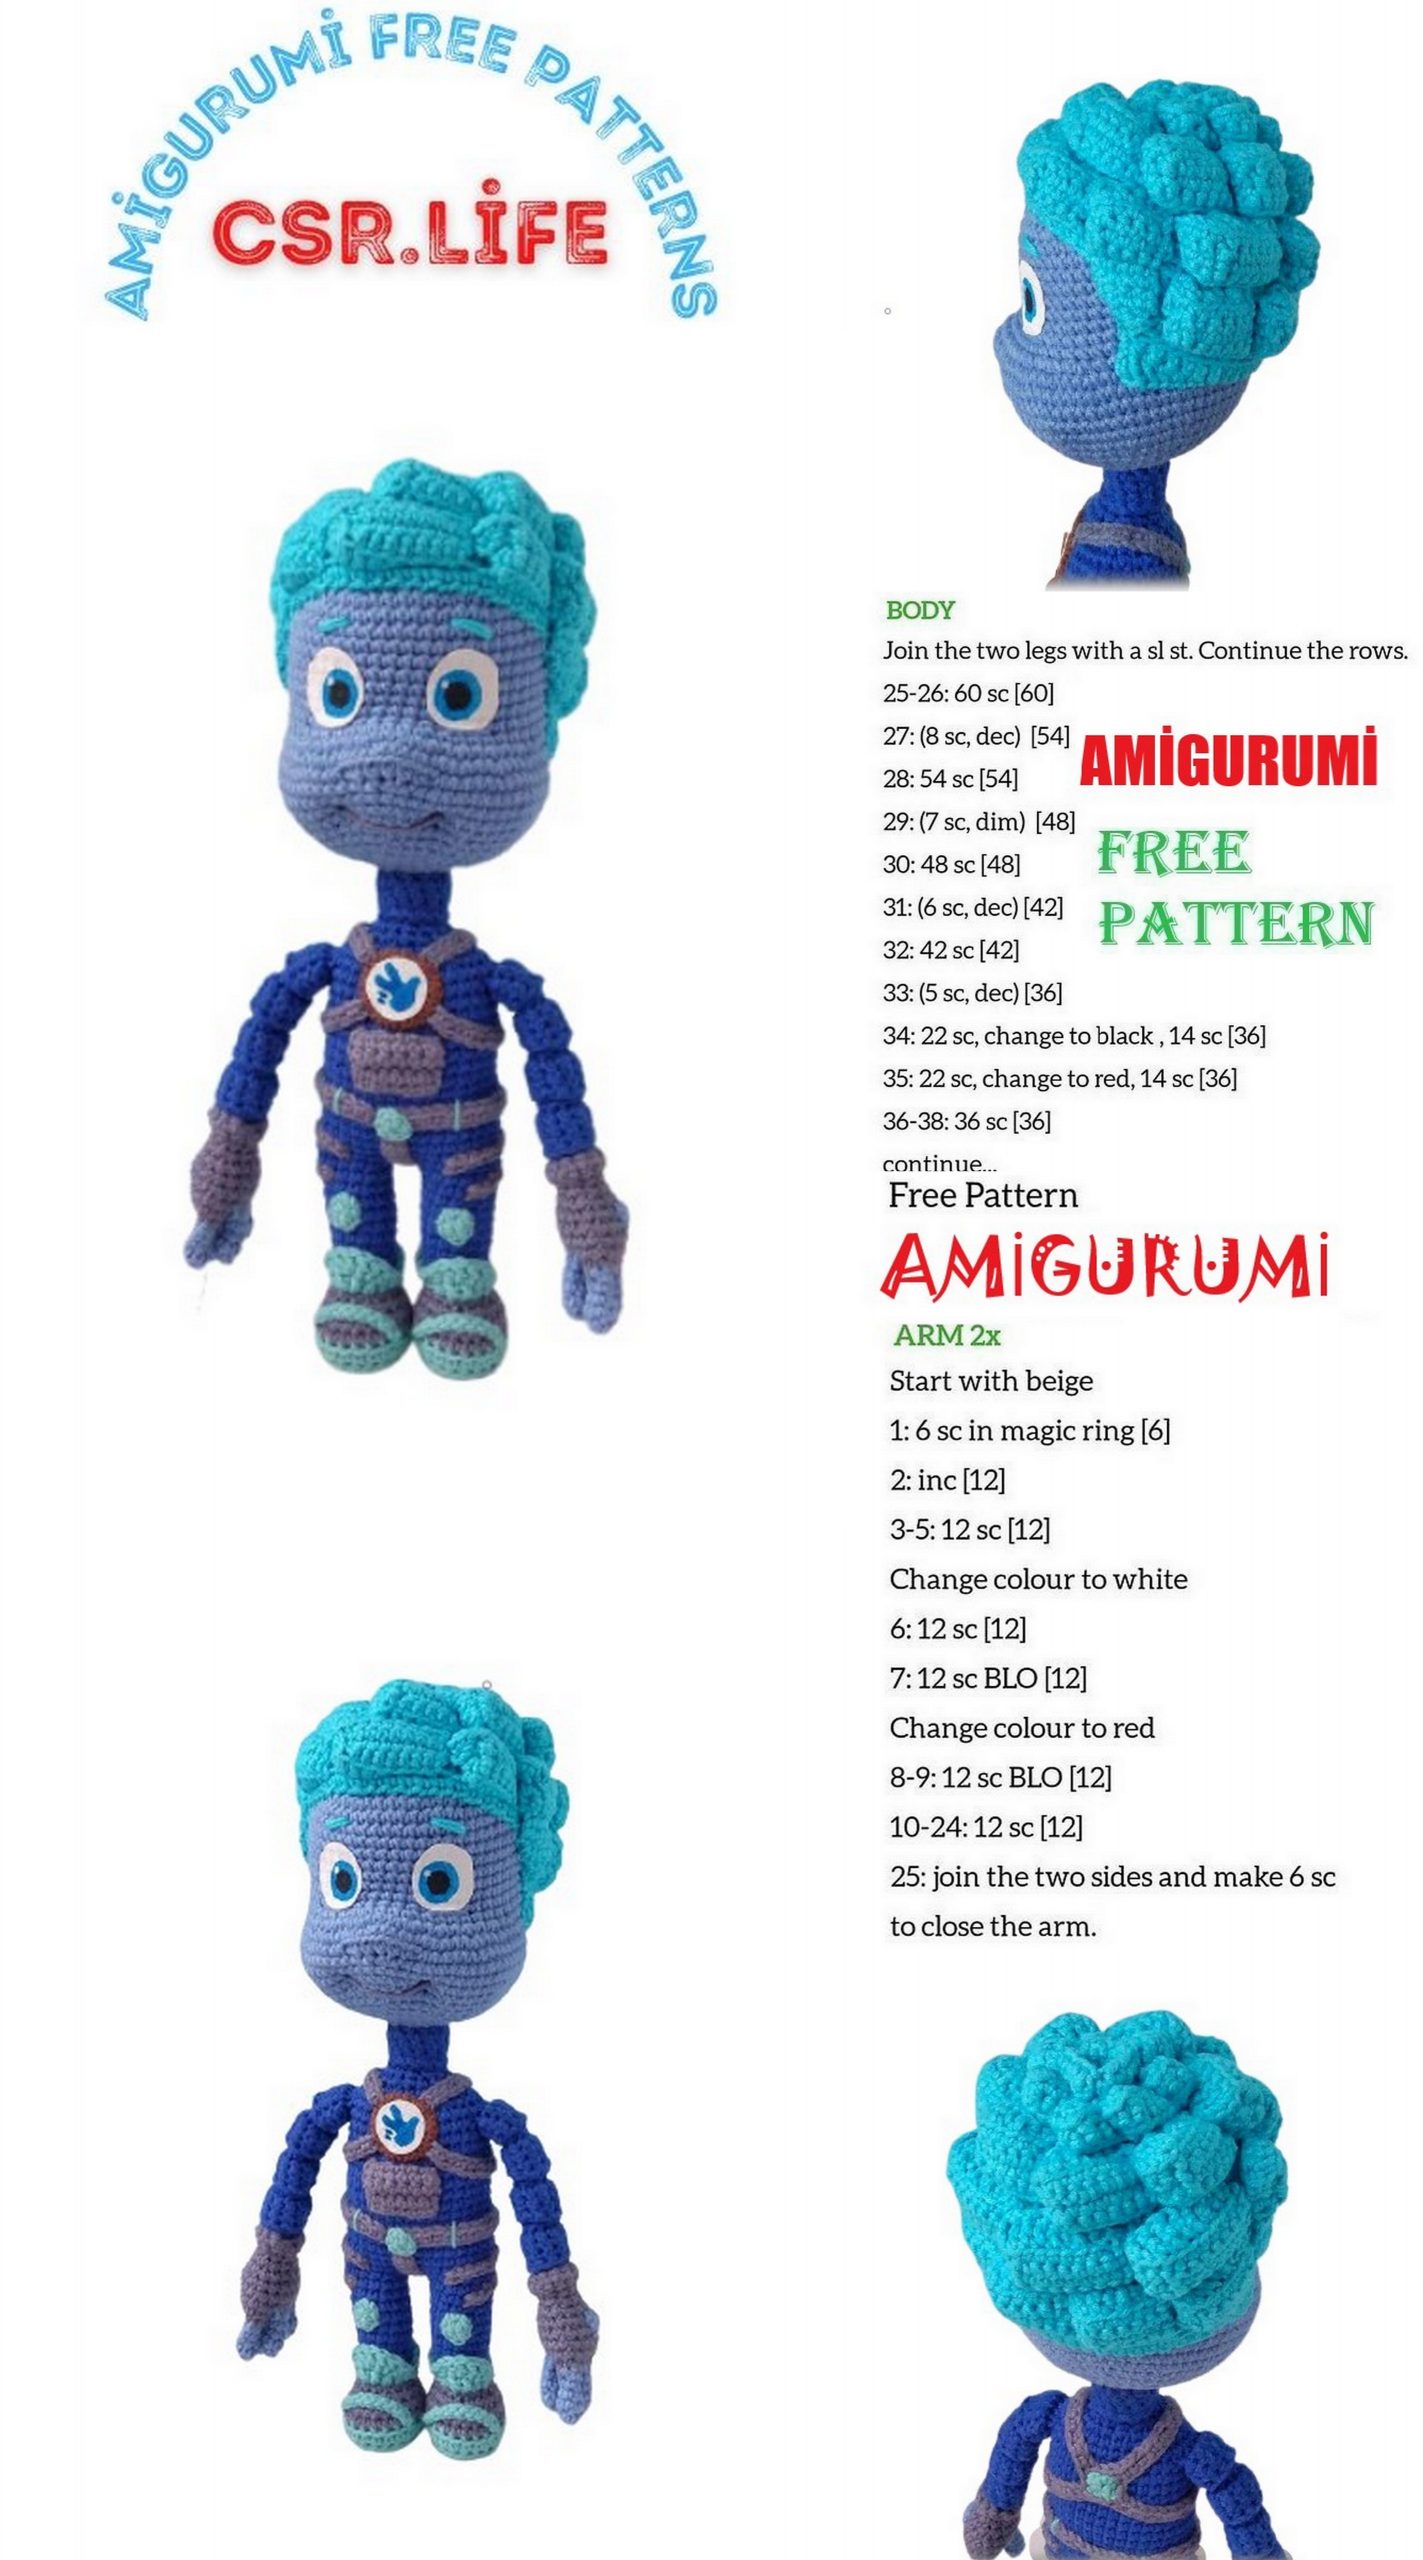
Body
1) On the second leg, knit another 7 sc, cast on 3 ch and join the first leg: 15 sc, 3 sc in ch, 15 sc, 3 sc in ch (36)
2 – 16) 36 sc (36)
In the next two rows we knit hands. If in your
if the arms are not on the side, adjust the amount
columns in a row.
17) 7 sc, 5 sc with arm, 13 sc, 5 sc with arm, 6 sc (36)
18) 7 sc, 5 sc with arm, 13 sc, 5 sc with arm, 6 sc (36)
19) (4 sc, dec) * 6 (30)
20) (3 sc, dec) * 6 (24)
21) (2 sc, dec) * 6 (18)
If the toy is on a frame, connect the wires of the arms and legs with electrical tape or plaster, and hang out the long end of the wire for the head.
22) (1 sc, dec) * 6 (12)
23) for back half loops 4 sc, inc, 5 sc, inc, sc (14)
24 – 26) 14 sc (14)
27) for front half loops 14 sc (14)
28 – 30) 14 sc (14)
Turn out and knit connecting posts at the front half-loops of the 23rd row.
We knit costume details
Wrist band, color 15 (2 pcs.)
6 ch
Dec, sc, dec
Leave the thread for sewing.
Knee pads and belt buckle, turquoise (2 pcs.)
6 sc in spacecraft, sl-st
Leave the thread for sewing.
Stripes for shoes, turquoise (2 pcs.)
11 ch
10sl-st
Leave the thread for sewing.
Leg stripes, color 68:
upper (2 pcs.)
13 ch
12 sl-st
bottom (2 pcs.)
10 ch
9 sl-st
Leave the thread for sewing.
Belt color 68
41 ch
40 sc
Leave the thread for sewing.
The second part of the belt that runs between the legs. Color 68
3 ch, after each row turn knitting
1 – 14) 2 sc
Leave the thread for sewing.
Pocket, color 68
1st piece: 8 ch, then knit in rotary rows
1 – 2) 7 sc
2nd piece: 8 ch, then knit in rotary rows
1 – 2) 7 sc
At the bottom, knit a row with a crustacean step
Leave the thread for sewing.
Base for the emblem
(Alize cotton gold yarn, separate two from the main thread and crochet on them 1.25)
1) 6 sc into magic ring
2) 6 inc (12)
3) (sc, inc) * 6 (18)
4) (2 sc, inc) * 6 (24)
5) (3 sc, inc) * 6 (30)
2 sl-st Leave long tip for sewing.
Attaching the emblem
1st detail: turquoise color
4 ch, further in turning rows
1 – 3) 3 sc
We tie straps to this part on four sides, color 68, without tearing the threads.
Upper: Attach yarn to top right edge, to 3rd sc, knit 13 ch, return 12 sc, sl-st to 1st sc.
Dial 13 ch, return 12 sc, sl-st to the edge.
Bottom: 17 ch, return 16 sc, sl-st to face.
We type 17 ch, return 16 sc, sl-st to the edge.
Leave the thread for sewing.
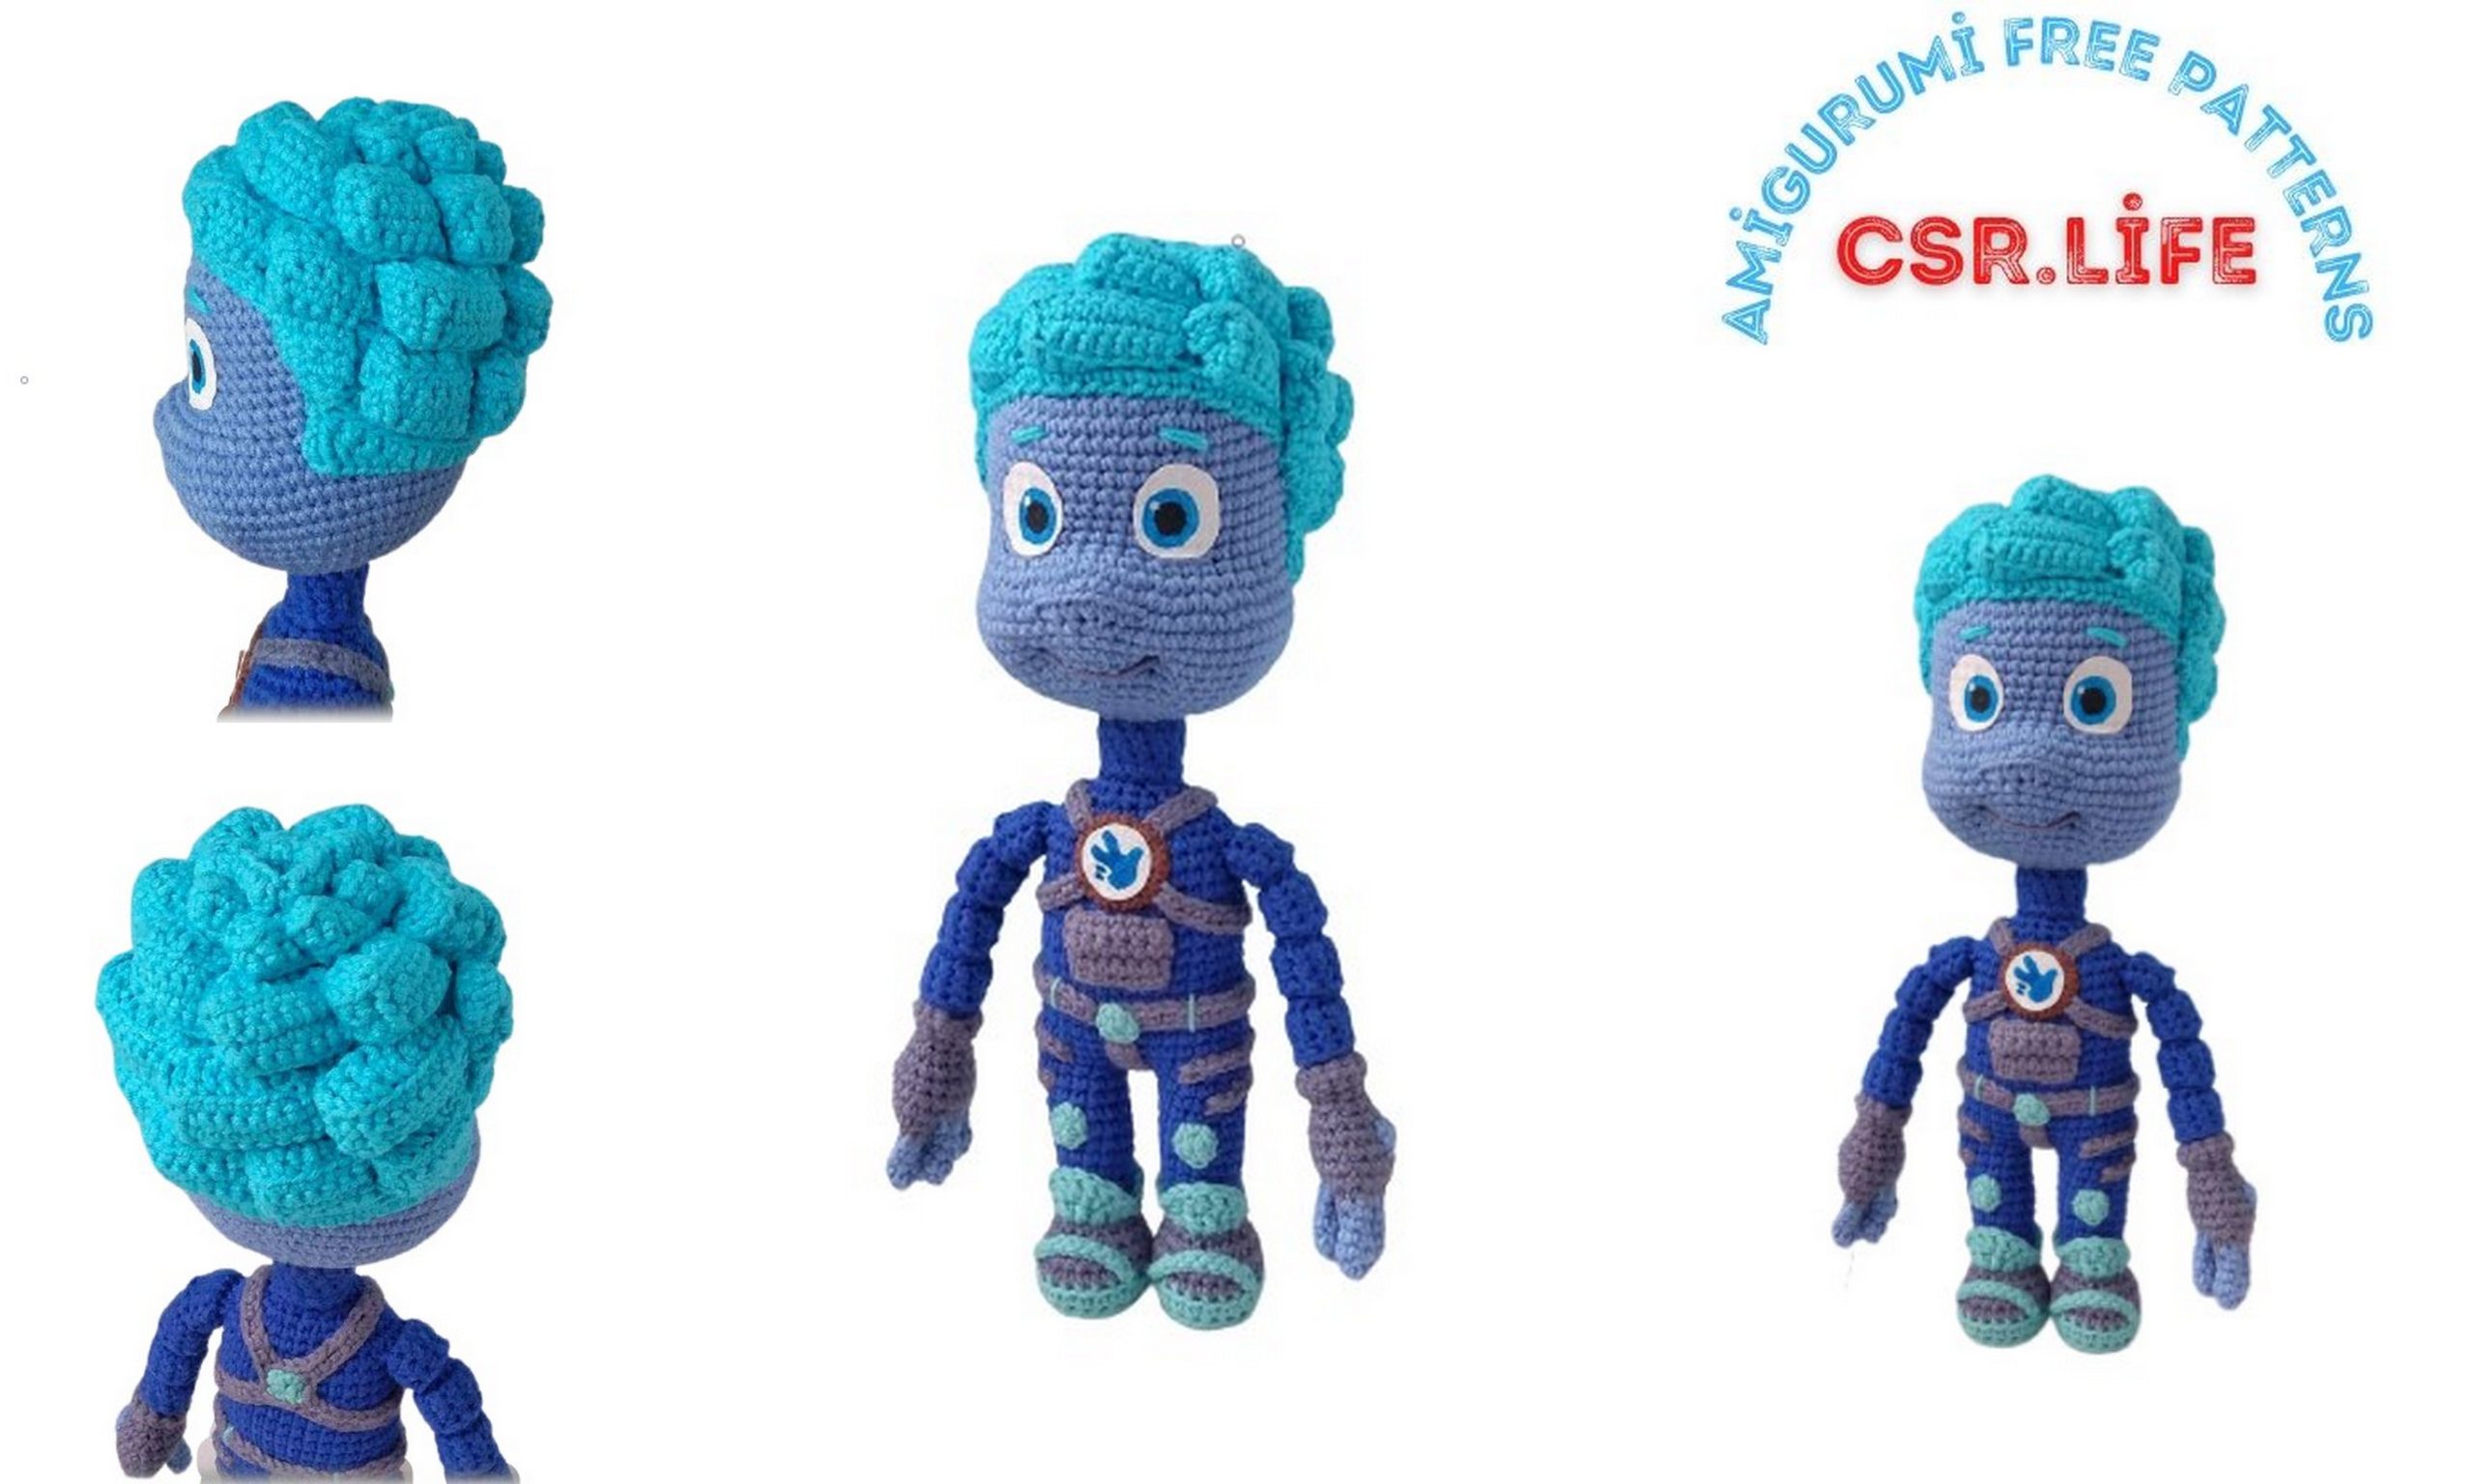
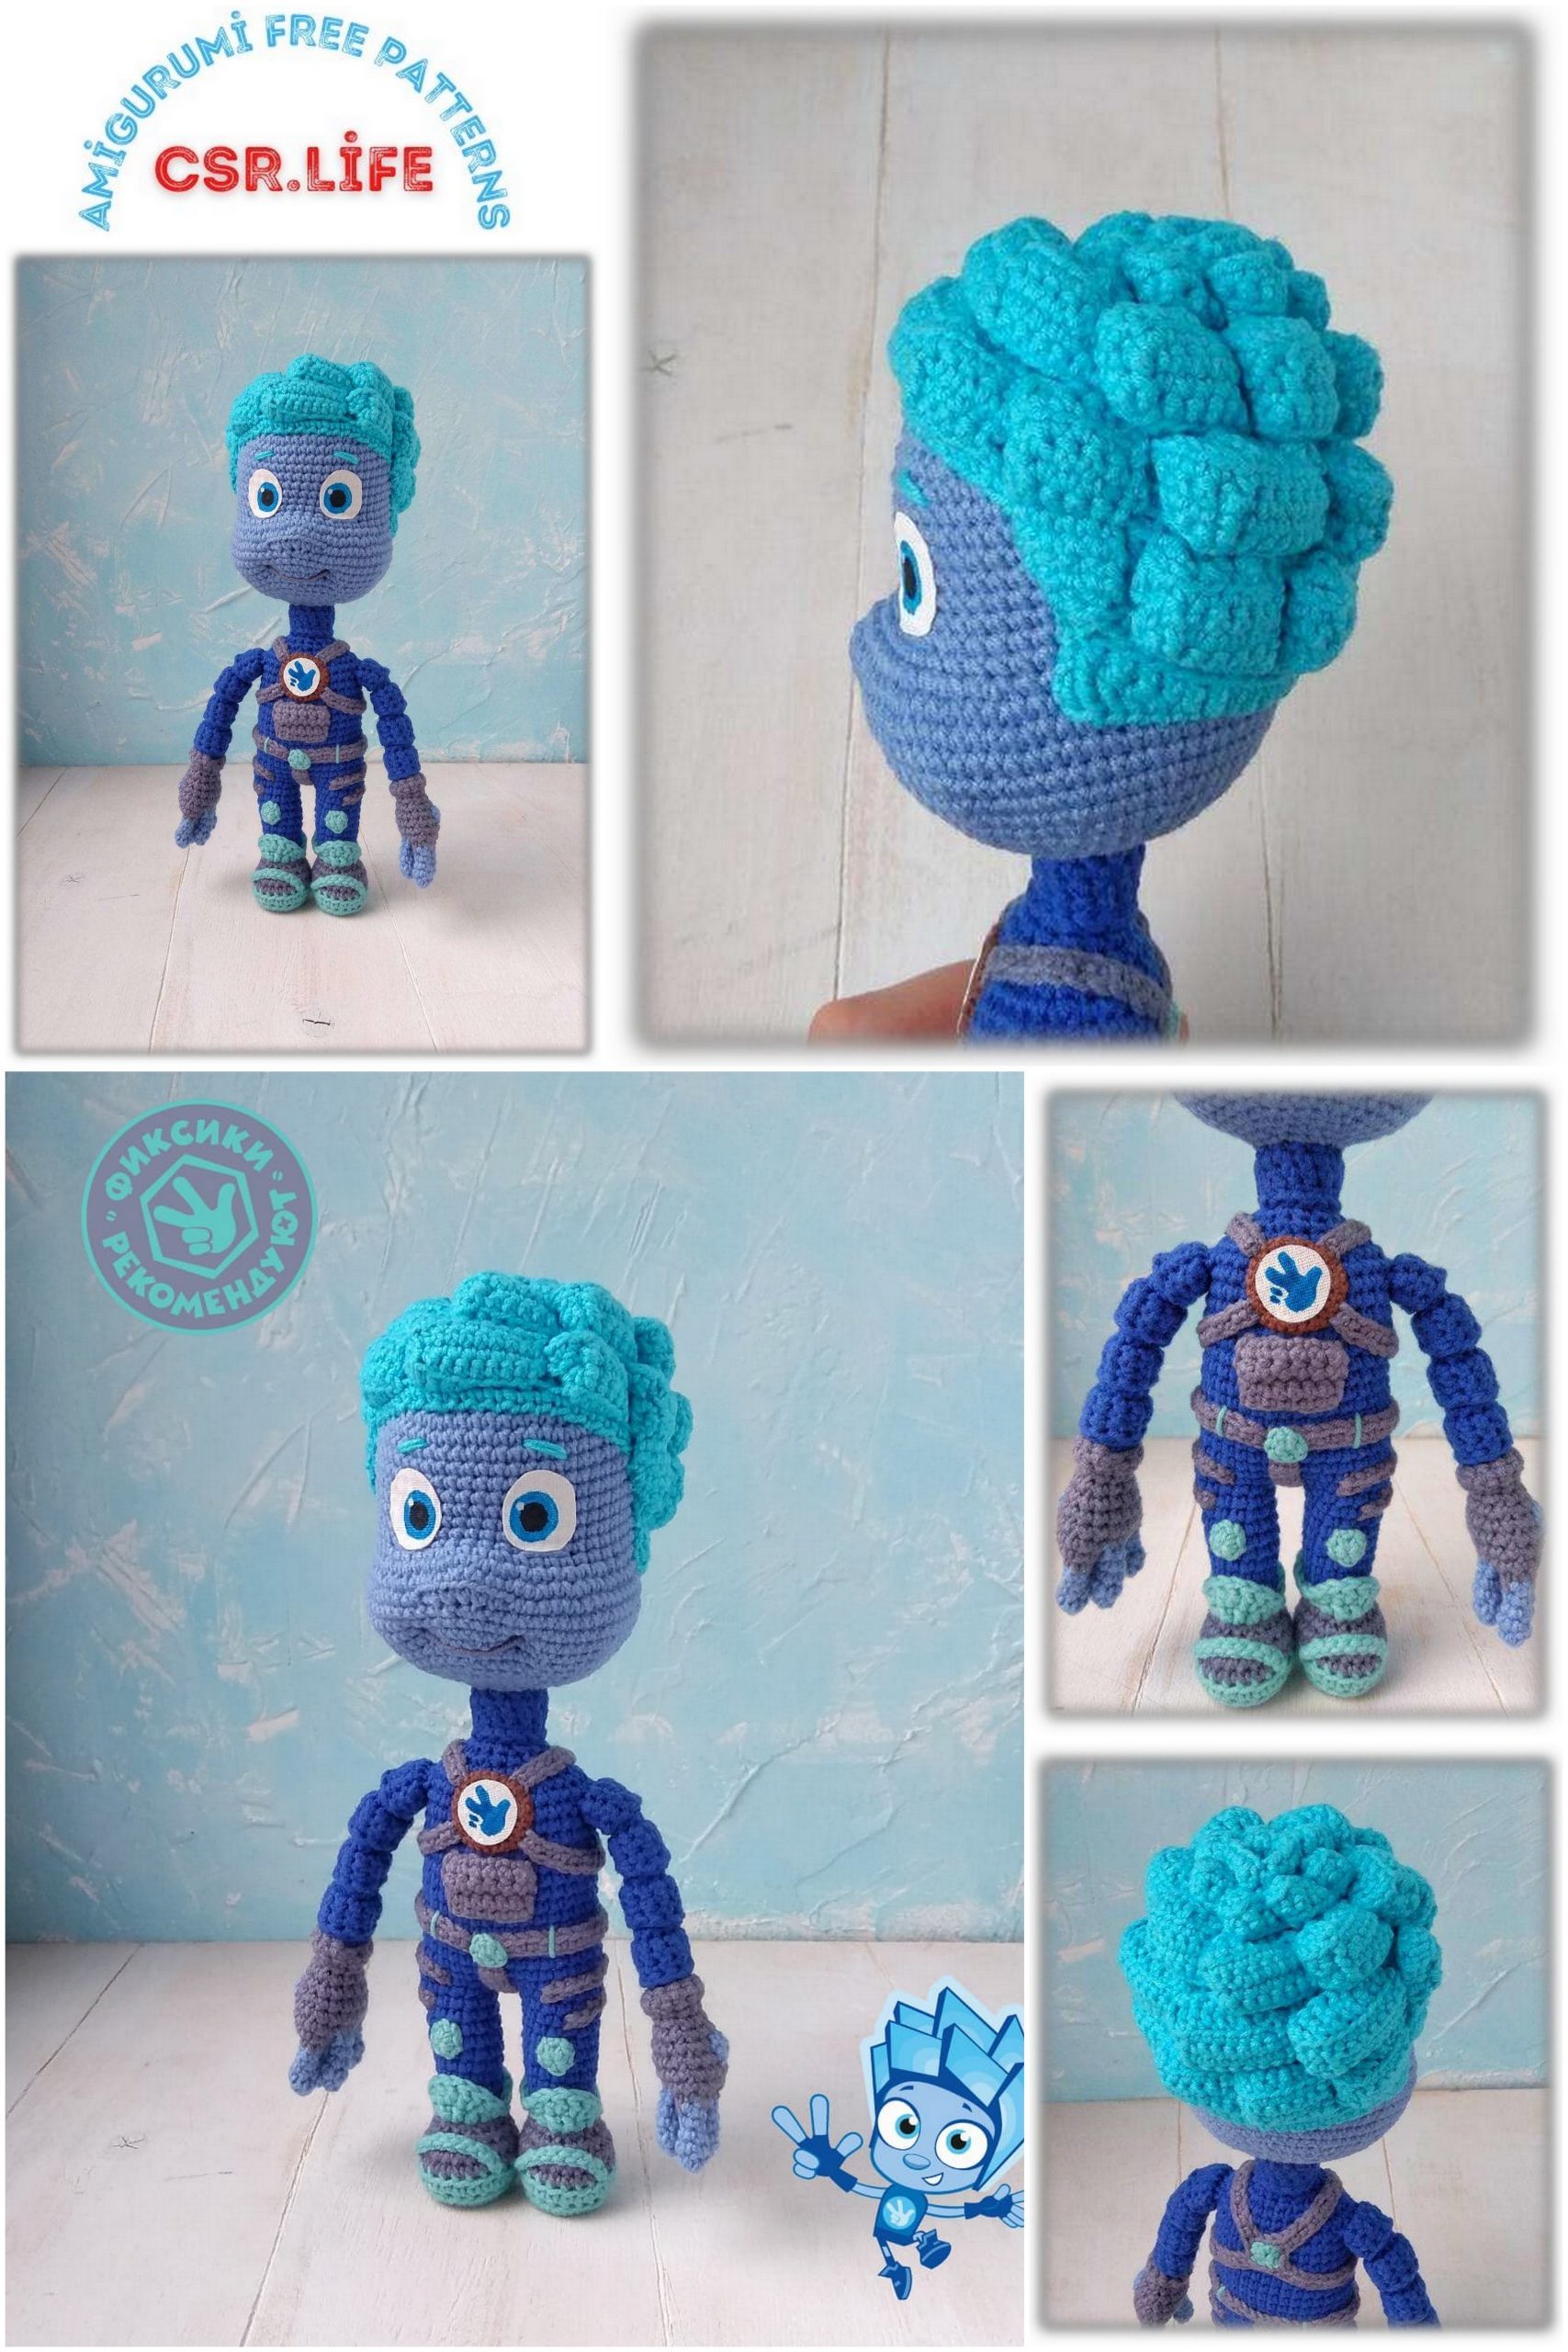
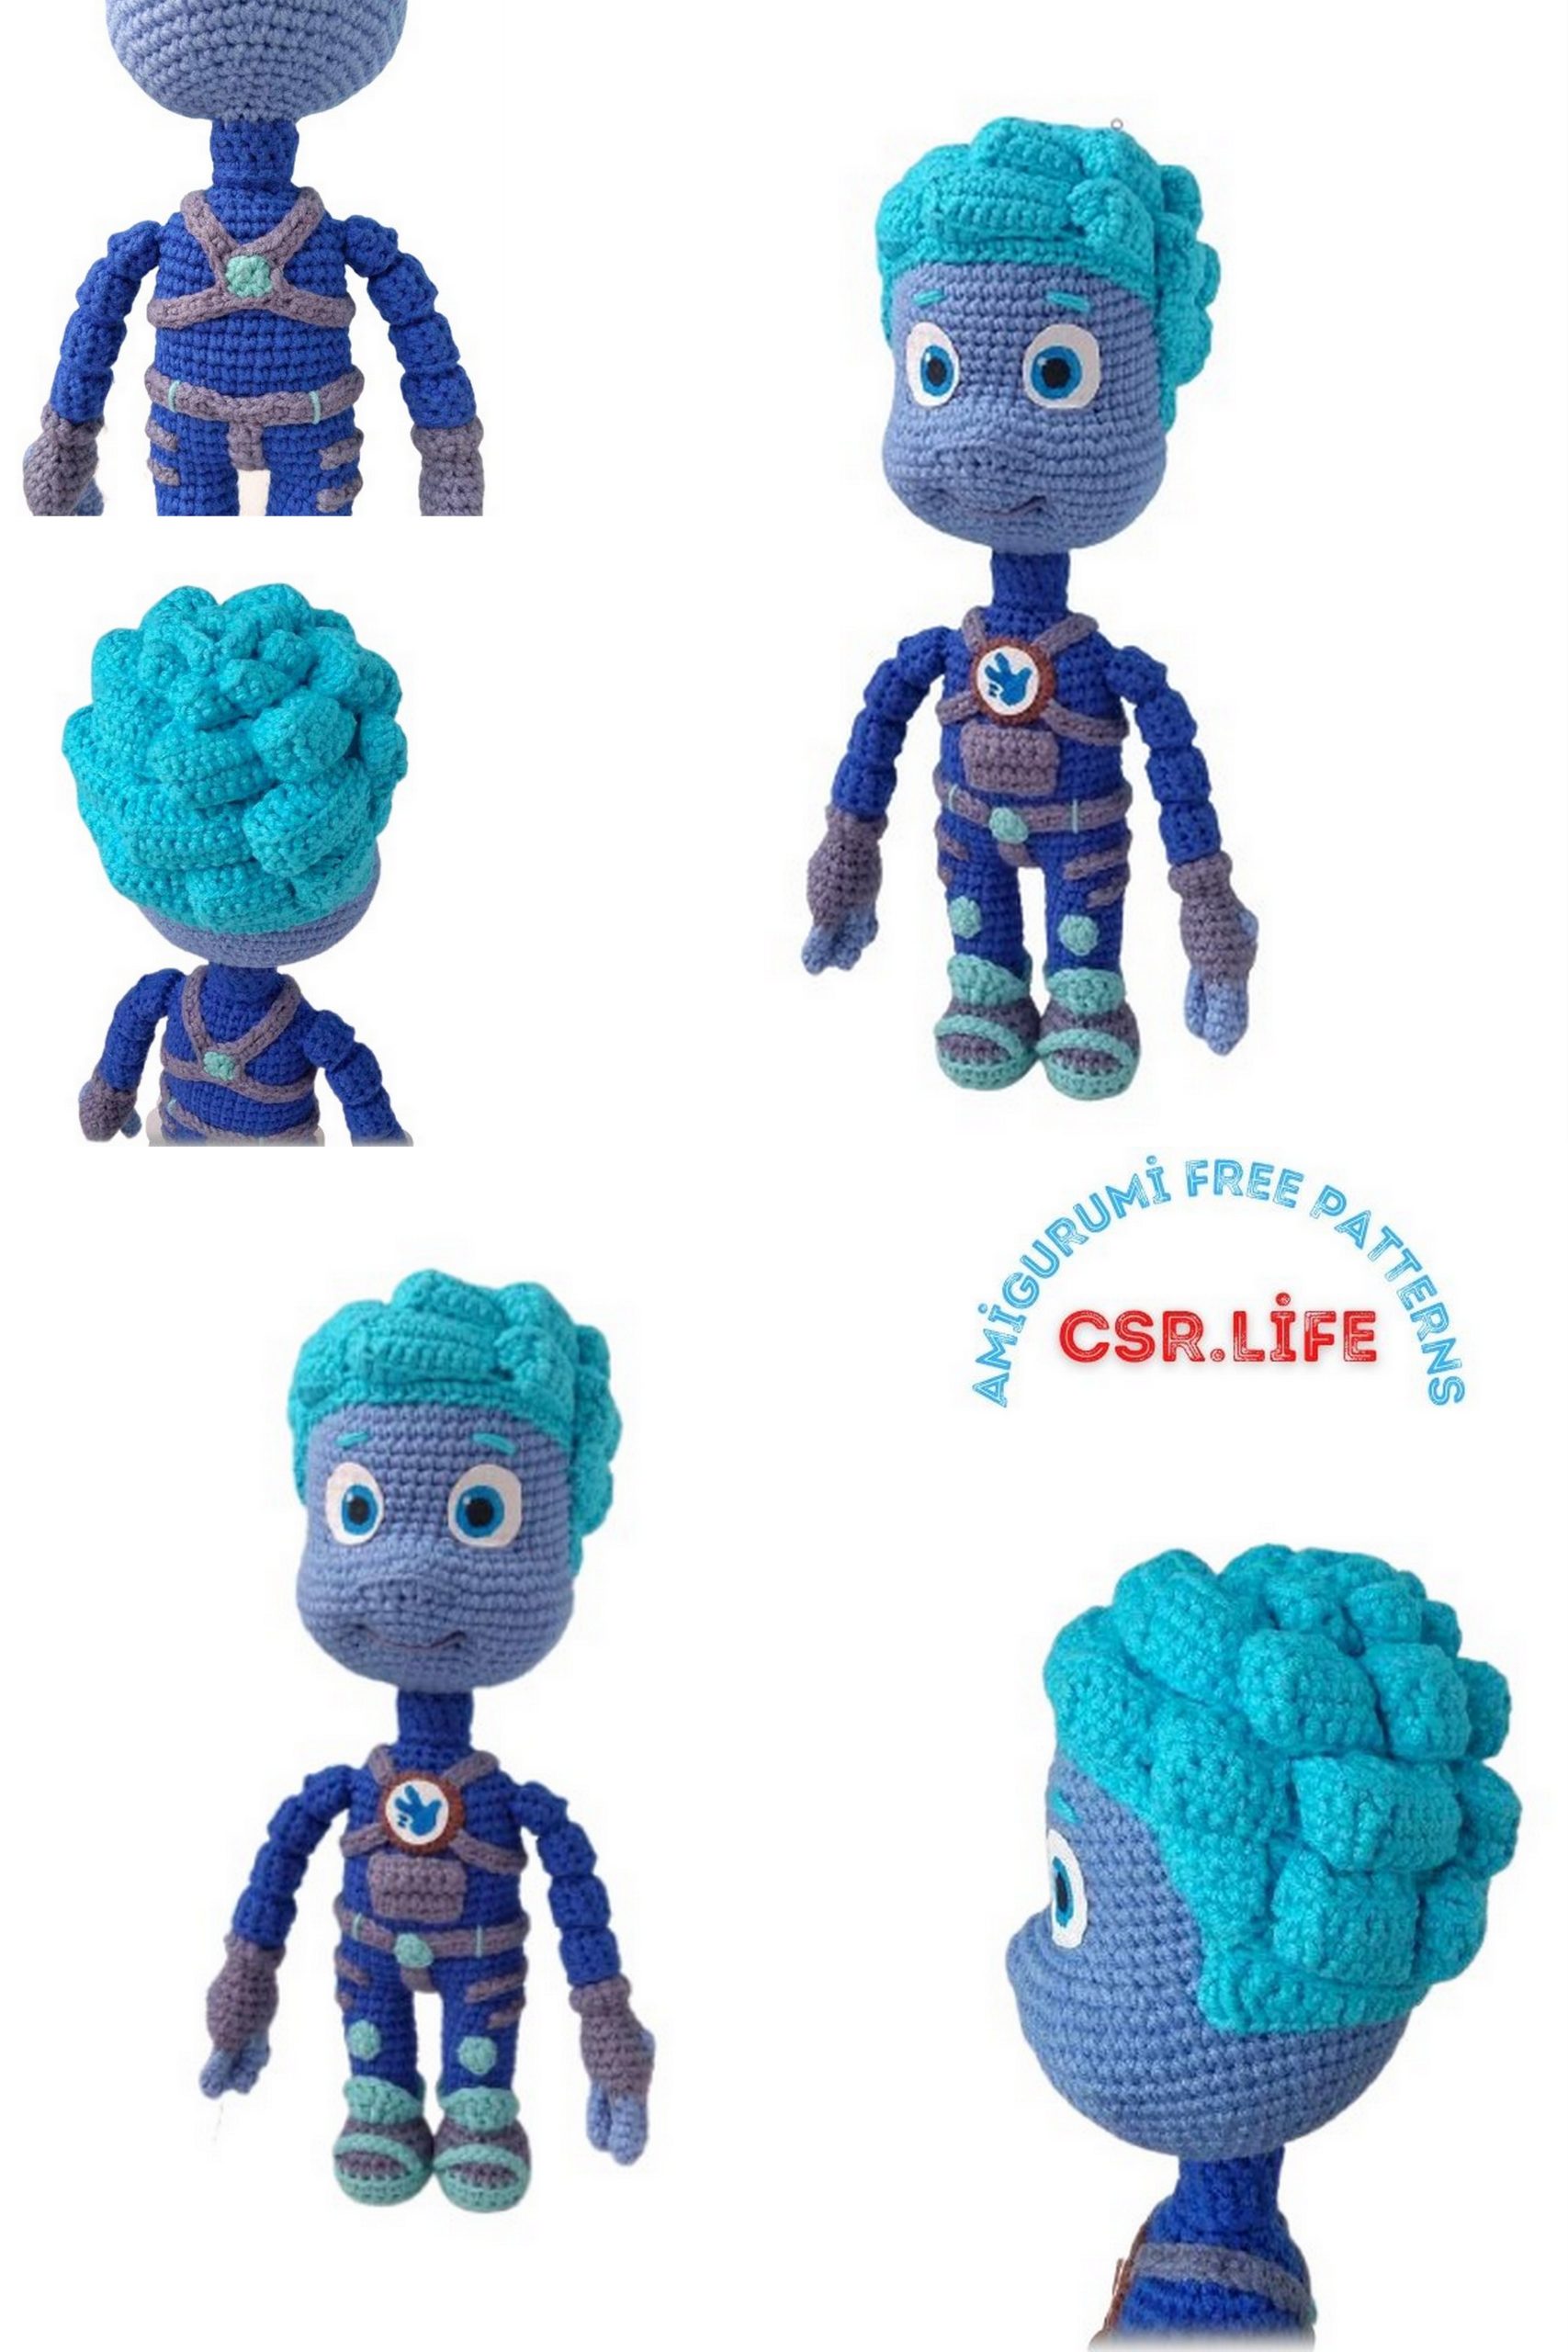
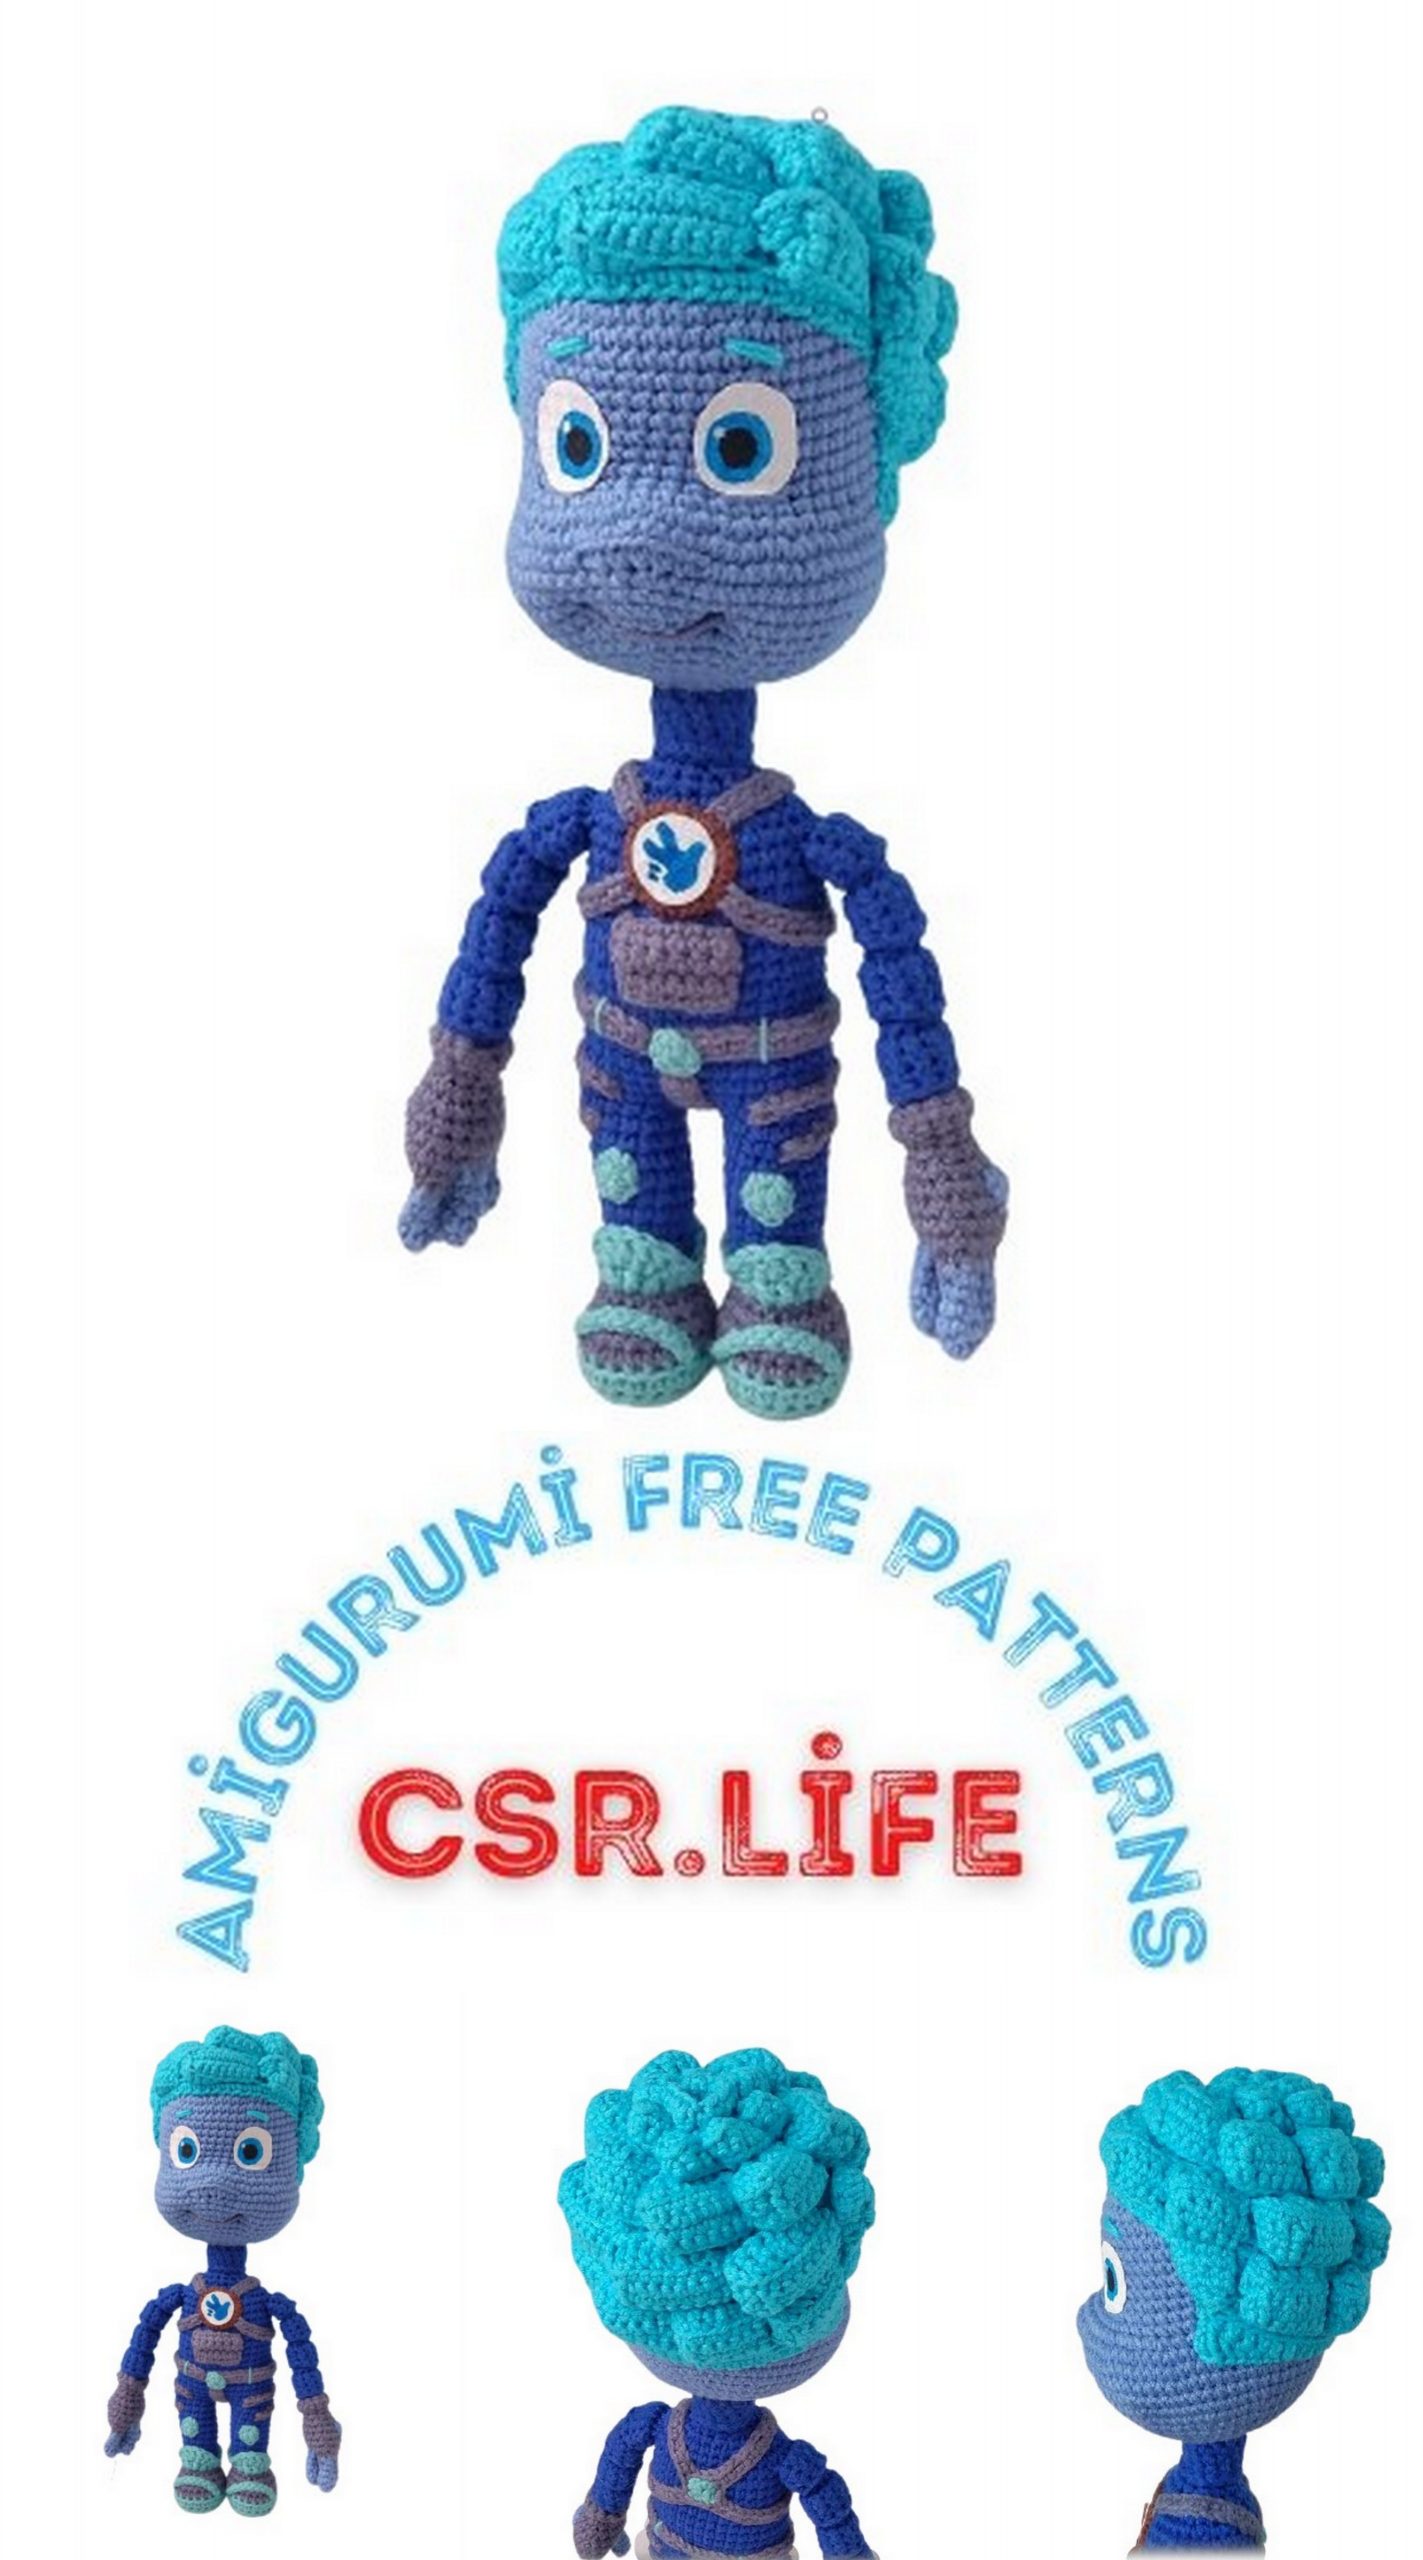
Design Nolik’s body based on the photo.
Head
1) 6 sc into magic ring (6)
2) inc * 6 times (12)
3) (sc, inc) * 6 (18)
4) (2 sc, inc) * 6 (24)
5) (3 sc, inc) * 6 (30)
6) (4 sc, inc) * 6 (36)
7) (5 sc, inc) * 6 (42)
8) (6 sc, inc) * 6 (48)
9) (7 sc, inc) * 6 (54)
10-18) 54 sc (54)
19) 25 sc, inc, 2 sc, inc, 25 sc (56)
20) 17 sc, (inc, sc) * 4, 2 inc, 2 sc, 2 inc, (sc, inc) * 4, 17 sc (68)
21) 17 sc, (inc, 2 sc) * 4, 10 sc, (2 sc, inc) * 4, 17 sc (76)
22) 33 sc, behind the back half loops 5 dec, 33 sc (71)
23) 33 sc, dec, sc, dec, 33 sc (69)
24) 69 sc (69)
25) (22 sc, dec) * 3 (66)
26) (9 sc, dec) * 6 (60)
27) (8 sc, dec) * 6 (54)
28) (7 sc, dec) * 6 (48)
29) (6 sc, dec) * 6 (42)
30) (5 sc, dec) * 6 (36)
31) (4 sc, dec) * 6 (30)
Stuff your head with filler, paying special attention to the nose and cheeks.
32) (3 sc, dec) * 6 (24)
33) (2 sc, dec) * 6 (18)
34) (sc, dec) * 6 (12)
35-36) 12 sc (12)
Leave the long end for sewing.
We make a tightening. Mark the area for the smile, roughly between rows 24 and 25. Mark the eye-tightening area between rows 18 and 19, mark spacing 4 sc.
Insert the needle into the left corner of the smile and bring it out in the left corner of the left eye, then
insert the needle into the right corner of the left eye and draw in the left corner of the smile, stepping back one sc from the mark to the right.
Repeat tightening again, fasten the thread.
For the second eye, repeat the same steps.
Wig
Knit for the back half-loops
1) 6 sc into magic ring (6)
2) Inc * 6 (12)
3) (sc, inc) * 6 (18)
4) (2 sc, inc) * 6 (24)
5) (3 sc, inc) * 6 (30)
6) (4 sc, inc) * 6 (36)
7) (5 sc, inc) * 6 (42)
8) (6 sc, inc) * 6 (48)
9) (7 sc, inc) * 6 (54)
10-13) 54 sc (54)
14) 35 sc, rotate
15) for the front half loops 35 sc, turn
16) for the back half-loops: dec, 31 sc, dec (33)
17) turn, for the front half-loops: dec, 29 sc, dec (31)
18) turn, behind the back half-loops: dec, 27 sc, dec (29)
19) turn, behind the front half-loops: dec, 25 sc, dec (27)
20) turn, 3 ch, d2c, dc, hdc, sc, 2 sl-st.
Cut the thread.
Attach the strand on the other side to the end of the wig and repeat row 20.
We shape the hairstyle.
We attach each cell to the front half-loops of the wig.
We knit in rotary rows. We fill the cells a little with filler. For each cell, reattach the thread and cut at the end.
We start with the front row.
First we knit the middle cell. We count five columns from the left, insert a hook into the sixth:
1) 2 sl-st, 2 sc, 2 hdc, 2 dc. On the last dc, knit 2 sc down. Sl-st for the front half loop of the wig, turn
2) for the front half-loops 10 sc, sl-st for the wig, turn
3) 8 sc, 1 convex sc, inc, sl-st per wig, twist (11)
4) 2 sc, 1 concave sc, 8 sc, sl-st per wig, twist (11)
5) 8 sc, 1 convex sc, sc, inc, sl-st per wig, twist (12)
6) We knit by the front half-loops and attach each column to the wig. Skip 3 sc, 2 d2c, 2 dc, 2 hdc, 2 sc
We knit two more cells from the middle cell to the left and to the right according to the following scheme:
1) sl-st, 2 sc, 2 hdc. On the last dc, knit 1 sc down. Sl-st for the front half loop of the wig, turn
2) for the front half-loops 6 sc, sl-st for the wig, turn
3) 4 sc, 1 convex sc, inc, sl-st per wig, twist (7)
4) 2 sc, 1 concave sc, 4 sc, sl-st per wig, twist (7)
5) 4 sc, 1 convex sc, sc, inc, sl-st per wig, twist (8)
6) We knit by the front half-loops and attach each column to the wig. Skip 3 sc, 2 dc, hdc, sc, sl-st
To the second cells from the middle, down, we attach the following:
Attach the thread behind the remaining half-loops of the 2nd row, so that the decreases are from the side of the face, and attach each row to the half-loops of the wig from the side of the head.
1) 5 sc, sl-st per wig, twist (5)
2) 3 sc, dec, turn (4)
3) 4 sc, sl-st per wig, twist (4)
4) 2 sc, dec, turn (3)
5) dec, sc, sl-st per wig, twist (2)
6) dec, sl-st per wig (1)
Continue to knit three more cells at the back of the head according to the middle cell pattern.
On the back of the head, knit 4 cells at the bottom according to the following pattern:
1) Attach the thread to the front half-loops of the lowest row 6 sc, sl-st per wig, turn (6)
2) inc, 5 sc, sl-st per wig, twist (7)
3) 5 sc, 1 convex sc, inc, sl-st per wig, twist (8)
4) 2 sc, 1 concave sc, 5 sc, sl-st per wig, twist (8)
5) 5 sc, 1 convex sc, 2 sc, sl-st per wig, twist (8)
6) Knit by the front half-loops, attach each column to the half-loops of the wig: 2 dc, 2 hdc, sc, sl-st
We knit three rows of the crown, starting from the front row to the center.
The first row – 7 cells according to the following scheme:
1) sl-st, 2 sc, 2 hdc, 2 dc, 2 sc down last dc, sl-st for half wig loops, twist (9)
2) for the front half loops 9 sc, sl-st for the half loops of the wig, turn (9)
3) 6 sc, 1 convex sc, sc, inc, sl-st for half wig loops, twist (10)
4) 3 sc, 1 concave sc, 6 sc, sl-st for half wig loops, twist (10)
5) 6 sc, 1 convex sc, 2 sc, inc, sl-st for half wig loops, twist (11)
6) skip 3 sc, knit by the front half-loops, attach each column to the wig: 2 d2c, 2 dc, hdc, sc, sl-st
The second row – 7 cells, alternate the next two schemes.
Scheme 1.
1) sc, hdc, dc, 2 sc down dc, sl-st for half wig loops, twist (5)
2) for the front half loops 5 sc, sl-st for the half loops of the wig, turn (5)
3) 2 sc, 1 convex sc, sc, inc, sl-st for half wig loops, twist (6)
4) skip 3 sc, knit by the front half-loops, attach each column to the wig: dc, hdc, sc
Scheme 2.
1) sc, hdc, 2 dc, 2 sc down dc, sl-st for half wig loops, twist (6)
2) for the front half loops 6 sc, sl-st for the half loops of the wig, turn (6)
3) 3 sc, 1 convex sc, sc, inc, sl-st for half wig loops, twist (7)
4) skip 3 sc, knit by the front half-loops, attach each column to the wig: d2c, dc, hdc, sc
Third row, crown
1) dial 21 ch
2) in the 3rd chain loop, knit 3 sc, (skip ch, in the next sl-st, skip ch, 3 sc in one) * 4, skip ch, sl-st, turn
3) for the front half loop (3 sc, sl-st) * 5
4) fold in half lengthwise, sew. Pull the thread through the resulting tube, pull it slightly, sew on the crown.
Registration
Sew the wig to the head. Embroider a mouth. Sew the head to the body, first insert a pencil or wire into the body and head (they should run along the entire length of the body and head).
Eyes can be drawn on fabric, made of felt, foamiran, or ready-made. Embroider eyebrows. The fixed icon can also be drawn on fabric, embroidered, cut out of felt.
Hurray, your Nolik is ready))))
Thank you for choosing my MK!