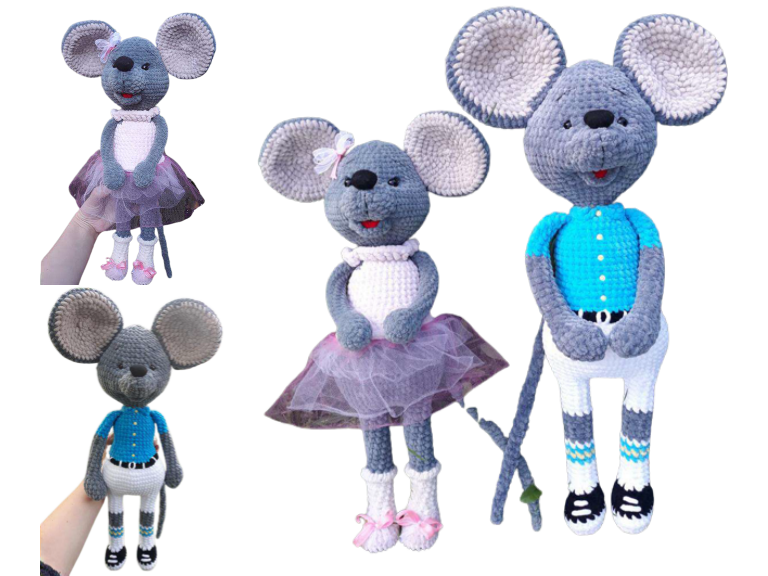
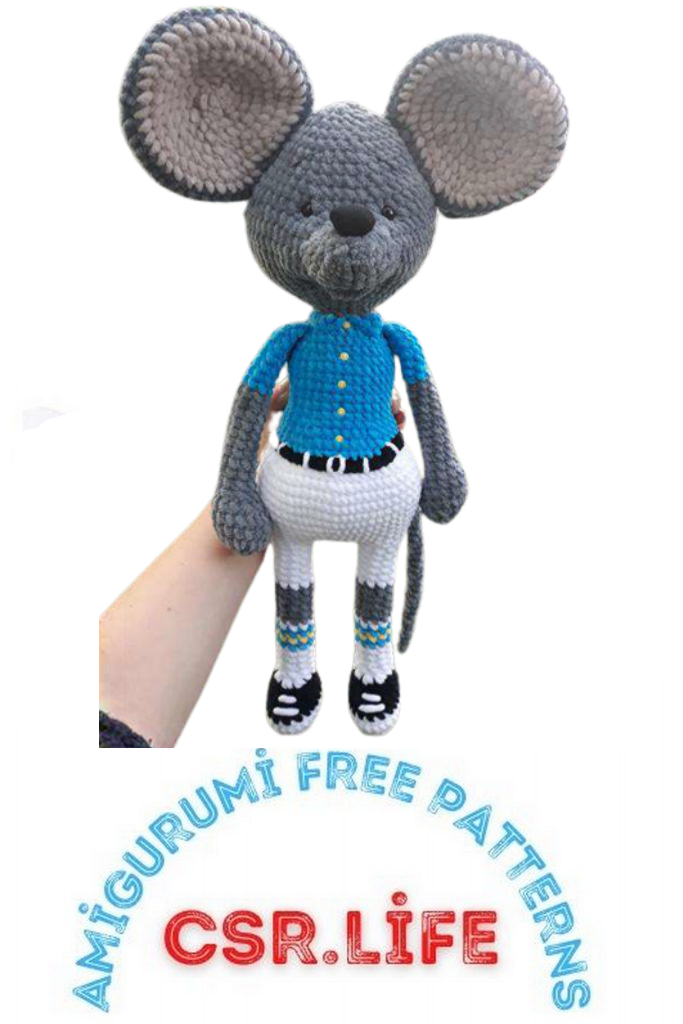
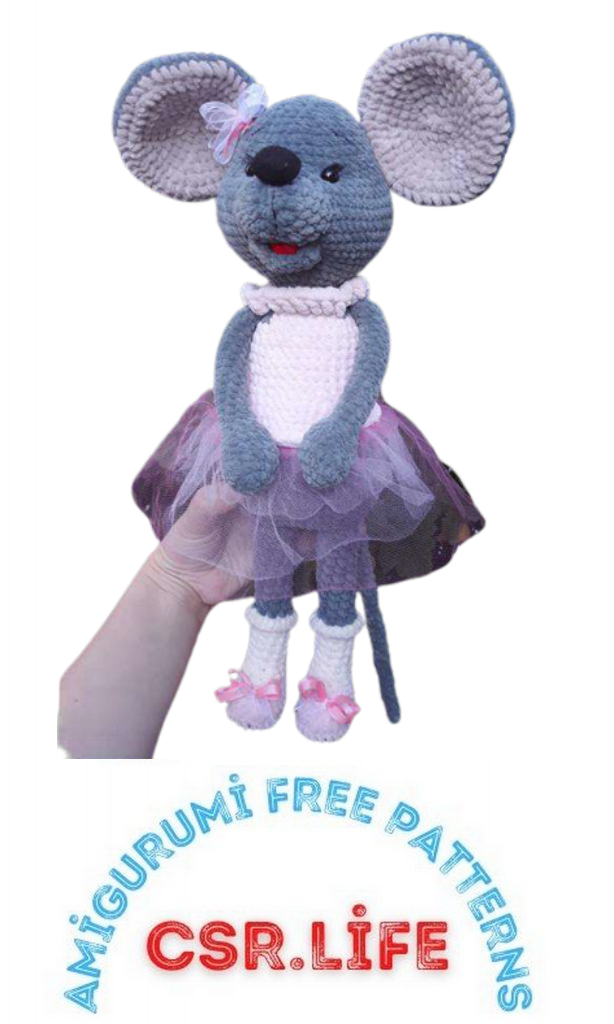
Mice Amigurumi Free Pattern
NECESSARY MATERIALS
Yarn
DOLCE YARNART (DOLCHE YARNART) or equivalent, a total of 2.5 skeins are needed Mouline thread or cotton for stitching and embroidering eyebrows.
Body Color
1.5 skeins a little over 1 skein
Cloth
0.5 hank 0.5 hank shorts, 0.5 shirt
Additional colors (0.1 skein each)
Hook
No. 3.5 or 4 (the girl I have is tied No. 3.5, the boy – No. 4)
Felt for spout
soft felt measuring 6 cm by 5 cm
holofiber
Accessories
Eyes – 1 pair (Ø 10 mm)
Eyelashes (regular)
Additional materials
Fatin – height 60 mm (per layer – 1m)
Satin ribbon, organza (width 7 mm)
1m
Buttons
Ø 6 mm – 5 pcs.
The toy turns out to be 40-49 cm tall, depending on the density of your knitting size
SYMBOLS
!!! The rows of the boy are indicated in red!!!
KA – amigurumi ring
vp – air loop
sbn single crochet
sst – connecting column
sn – single crochet
sdn – double crochet
psn – half-column with one crochet
P – increase
U – decrease
x – repeat (for example, “x6” – repeat 6 times)
We knit without lifting loops (if this is not indicated in the diagram), in a spiral. Mark the first or last stitch of the row
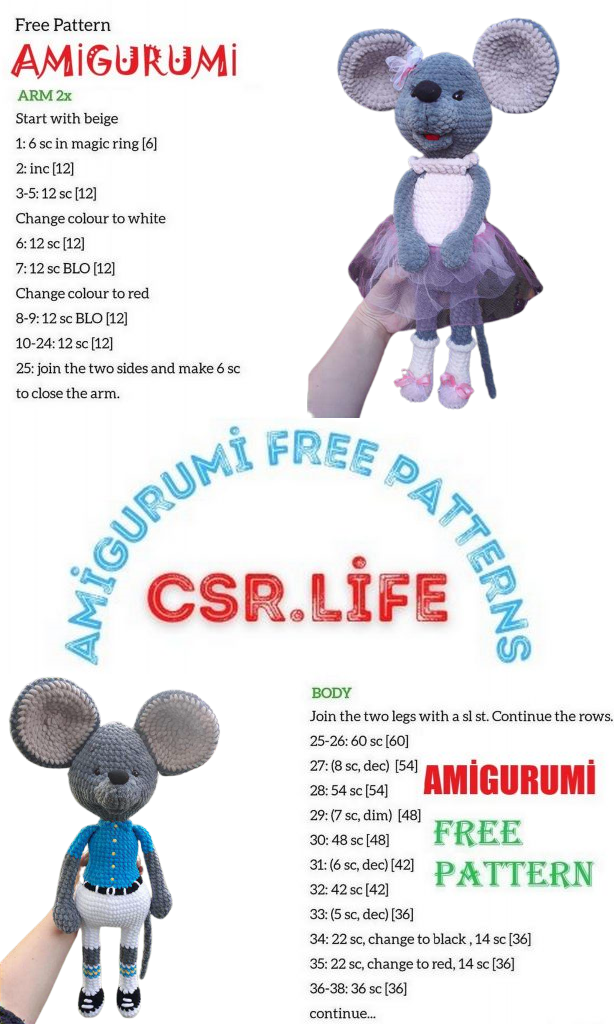
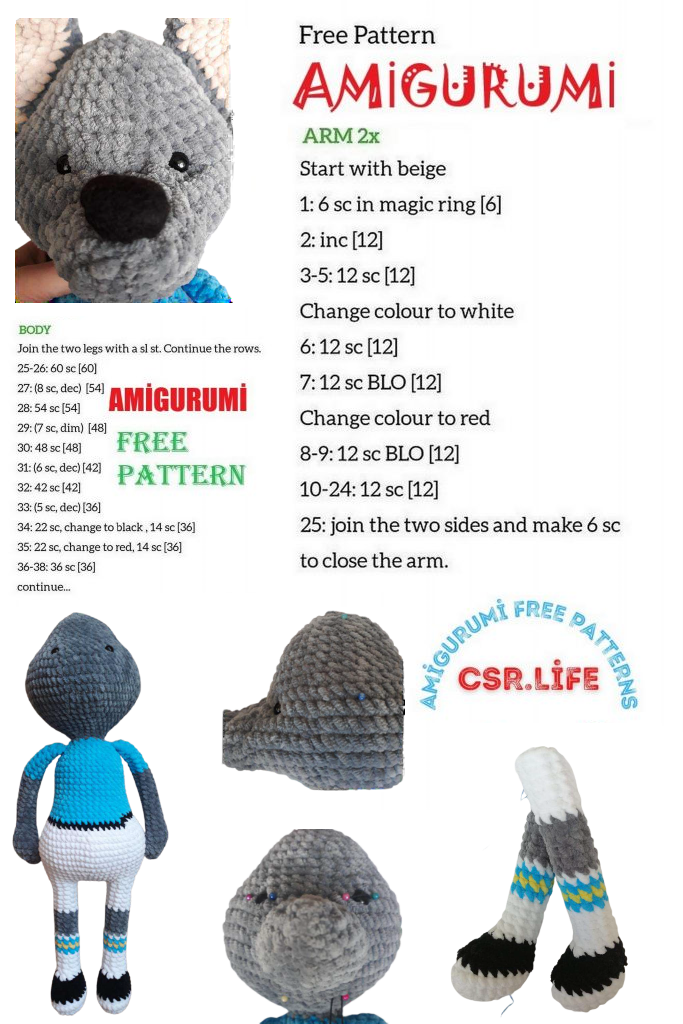
Handles (2 parts)
Knit with body color
1 row – KA – (6 sc)
2 row – 6P – (12 sc)
3 row – (1 sc, 1p) x 6 – (18 sc)
4 row – 3U, 12 sb – (15 sb)
5 row – 15 sc;
6 row – 3U, 9 sb – (12 sb)
7 row – 4U, 4 sb – (8 sb)
We fill the handle tighter.
Next, we stuff as we knit, and starting from the 18th or 19th row, we stop fill.
8 – 23 (17) rows – 8 sc – (16 rows (10 rows))
18 row – right hand – change color, shirt color – 8 sc
– left hand – 5 sbn, change the color to the color of the shirt, 3 sbn – (8 sbn)
19 – 23 rows – 8 sc (5 rows)
24 row – 1U, 2 sb, 1U, 2 sb – (6 sb)
25 row – we knit if you need several loops (or we dissolve a couple) to align the handle for knitting loops together. Fold the handle in half and knit the loops together (3 sc). We fix and hide the thread.
Ears (2 parts)
Knit with body color
1 row – KA – (6 sc)
2 row – 6P – (12 sc)
3 row – (1 sc, 1p) x 6 – (18 sc)
4 row – (2 sbn, 1P) x 6 – (24 sbn)
5 row – (3 sbn, 1P) x 6 – (30 sbn)
6 row – 2 sbn, 1P, (4 sbn, 1P) x 5, 2 sbn – (36 sbn)
7 row – (5 sbn, 1P) x 6 – (42 sbn)
8 row – 2 sbn, 1P, (6 sbn, 1P) x 5, 4 sbn – (48 sbn)
9 row – 5 sbn, 1P, (7 sbn, 1P) x 5, 2 sbn – (54 sbn)
10 row – (7 sbn, 1U) x 6 – (48 sbn)
11 row – 1 sbn, 1U, (6 sbn, 1U) x 5, 5 sbn – (42 sbn)
12 row – 3 sb, 1U, (5 sb, 1U) x 5, 2 sb – (36 sb)
13 row – (4 sc, 1U) x 6 – (30 sc)
14 row – 2 sbn, 1U, (3 sbn, 1U) x 5, 1 sbn – (24 sbn)
15 row – (2 sc, 1U) x 6 – (18 sc)
16 row – (1 sc, 1U) x 6 – (12 sc)
17 row – 6U (6 sbn)
Close knitting
Tail
Knit with body color
1 row – KA – (6 sc)
2 – 3 row – 6sc – (2 rows)
4 row – 1U, 2 sbn, 1U – (4 sbn)
Stuff tightly and fill 4 more rows
5 – 42 row -4 sc – (37 rows)
43 row -1U, 2 sb – (3 sb)
44 – 48 row – 3 sc – (5 rows)
Close knitting, hide the thread.
We sew the tail looking up, I sewed the whole wide part of the tail.
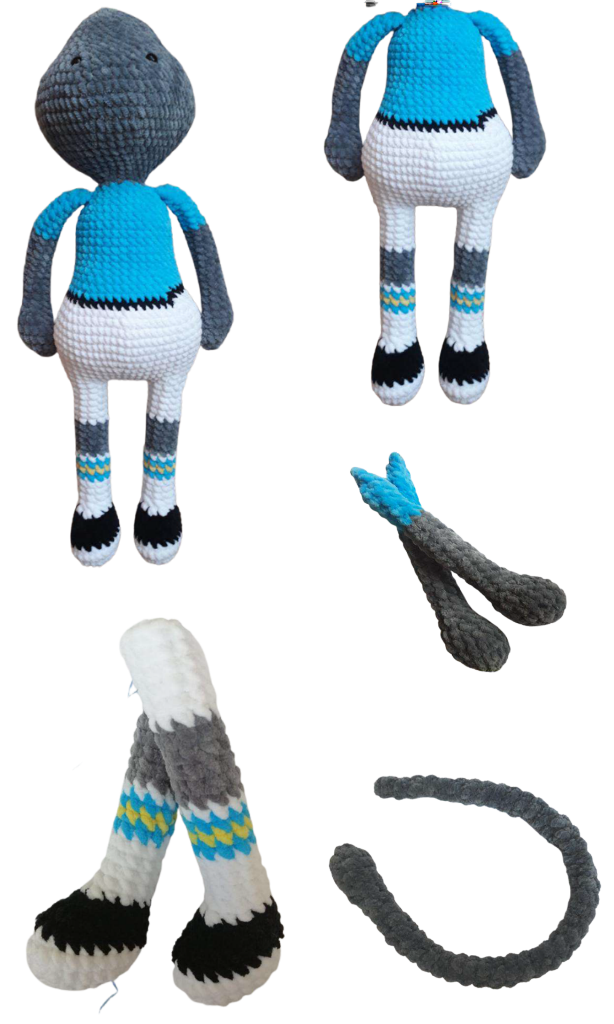
Legs (2 parts)
We take the color of the sole
1 row – dial 6 ch
2 row – in the second loop from the hook 2 sbn, then we knit 3 sbn along order, then we knit 3 sbn in one loop, turn knitting and we continue to knit 4 sc (12 sc)
3 row – 2P, 3 sbn, 3P, 3bn, 1P – (18 sbn)
4 row – (1 PRS, 1P) x 2, 3 PRS, (1 PRS, 1P) x 3, 4 PRS, 1P – (24 PRS)
We change to the color of the shoes (for a girl, a boy we continue to knit)
5 row – 24 sc
For the boy, we change the color of the shoes, we continue to knit the girl
6 row – 10 sbn, 3U, 8 sbn – (21 sbn)
7 row – 9 sbn, 3U, 6 sbn – (18 sbn)
8 row – 7 sb, 3U, 5 sb – (15 sb)
We stuff it tightly, then we stuff the legs as we knit, I didn’t stuff very tight, the idea was in “plasticine” legs
Change the thread to the color of the socks
9 row – we knit behind the back wall 6 sbn, 3U, 3 sbn – (12 sbn)
10 row – 6 sbn, 2U, 2 sbn – (10 sbn)
For girl mouse:
11 – 16 row – 10 sc – (6 rows). Important! 16 row knit for the back wall. Then in the same color (but with a new thread so that it is not visible transition) we knit 2 sc in each loop of the 15th row (this is a ruffle of a sock)
Change the thread to body color
17 – 27 row – 10 sc – (11 rows). We finish knitting the right leg, do not cut the thread on the left leg.
For boy mouse:
11 – 13 row – 10 sc – (4 rows)
! (for the right leg, you can start changing the thread in the 13th row without knitting 5 sbn so that the color transitions are inside leg)
14 – 17 rows – in each row we change the thread to the color of the pattern, we knit 10 sc (4 rows)
Change the thread to body color
18 – 22 rows – 10 sc – (5 rows)
Change the thread to the color of the shorts
23 – 28 rows – 10 sbn – (6 rows) The last row of the left leg is not knitted 2 sbn.
We finish knitting the right leg, do not cut the thread on the left leg.
Body
I indicate in red the information and row for the boy mouse
We continue to knit the body with a thread from the working leg
28 (29) row – 3 sb on the working leg, 5 ch, insert the hook into the second leg for three loops (for four loops) to the end of the already knitted row, we knit 3 sbn (4 sbn), 1 sbn in the loop where the connecting loop was knitted, 2 sbn (1 sbn), 1P, 3 sbn, 1 sbn in the loop where they started to knit on the leg, 5 sbn in air loops, 1 sbn in the loop where knitting on the first leg was finished, 3 sbn, 1P, 3 sbn – (34 sbn)
29 (30) row – 3 sbn, 1P, 3 sbn, 1P, 5 sbn, 1P, 2 sbn, 1P, 2 sbn, 1P, 5bn, 1P, 2 sb, 1p, 2 sb, 1p, 2 sb – (42 sb)
30 (31) row – 15 sbn, 1P, 4 sbn, 1P, 13 sbn, 1P, 4 sbn, 1P, 2 sbn – (46sbn)
31 (32) row – 15 sbn, 1P, 6 sbn, 1P, 13 sbn, 1P, 6 sbn, 1P, 2 sbn – (50bn)
32 (33) row – 15 sbn, 1P, 8 sbn, 1P, 13 sbn, 1P, 8 sbn, 1P, 2 sbn – (54bn)
33 (34) row – 7 sbn, 1P, 7 sbn, 1P, 10 sbn, 1P, 13 sbn, 1P, 10 sbn, 1P, 2 sbn – (59 sc)
34 (35) row – 7 sb, 2P, 7 sb, 1P, 39 sb, 1P, 2 sb – (63 sb)
35 (36) row – 63sc
36 (37) row – 31 sb, 1U, 11 sb, 1U, 17 sb – (61 sb)
37 (38) row – 31 sb, 1U, 9 sb, 1U, 17 sb – (59 sb)
38 (39) row – 31 sb, 1U, 7 sb, 1U, 17 sb – (57 sb)
39 (40) row – 7 sbn, 1U, 8 sbn, 1U, 12 sbn, 1U, 5 sbn, 1U, 14 sbn, 1U, 1 sbn – (52 sbn)
40 (41) row – 6 sb, 1U, 7 sb, 1U, 12 sb, 1U, 3 sb, 2U, 10 sb, 2U – (46 sb)
We change the thread to the color of the clothes (for a girl), to the color of the belt (for a boy)
41 (42) row – 13 sbn, 1U, 29 sbn, 1U (this decrease is passing, one loop from the current row, the other from the next.
Decrease will be the beginning of the next row) – (43 sc)
For the girl we continue knitting, for the boy we change the thread to the color of the shirt.
42 (43) row – 11 sbn, 1U, 29 sbn – (42 sbn)
43 (44) row – 1U, 9 sbn, 1U, 29 sbn – (40 sbn)
44 (45) row – 1U, 7 sbn, 1U, 29 sbn – (38 sbn)
45 (46) row – 1U, 5 sbn, 1U, 29 sbn – (36 sbn)
46 (47) – 51 (52) rows – 36 sc – (6 rows)
52 (53) row – 7 sbn, 1U, 5 sbn, 1U, 11 sbn, 1U, 5 sbn, 1U – (32 sbn)
53 (54) row (for the boy we continue to knit in one color, for the girl we knit what is in brackets with the color of the body) – 7 sc,
(1U, 3 sbn, 1U), 1U, 7 sbn, 1U, (1U, 3 sbn, 1U) – (26 sbn)
How we knit handles: decrease – we knit the first loop in the canvas, the second with with a pen, then with a pen 1 sb, then we will also halve the second decrease, the first part knit with a handle, the second in the canvas.
54 (55) row (For the boy mouse we continue to knit in one color, for the girl mouse, then what in brackets, knit with body color. We knit the handles where the brackets are) – 7 sbn, (1U, 1 sbn, 1U), 9 sb, (1U, 1 sb, 1U) – (22 sb)
For the girl mouse, we continue to knit with the color of the body, for the boy with the color of the shirt
55 (56) row (before the last two decreases in the boy we change to body color) – 1U, 3 sbn, 4U, 3 sbn, 3U – (14 sbn)
56 (57) row – 2 sb, 1U, 5 sb, 1U, 3 sb – (12 sb)
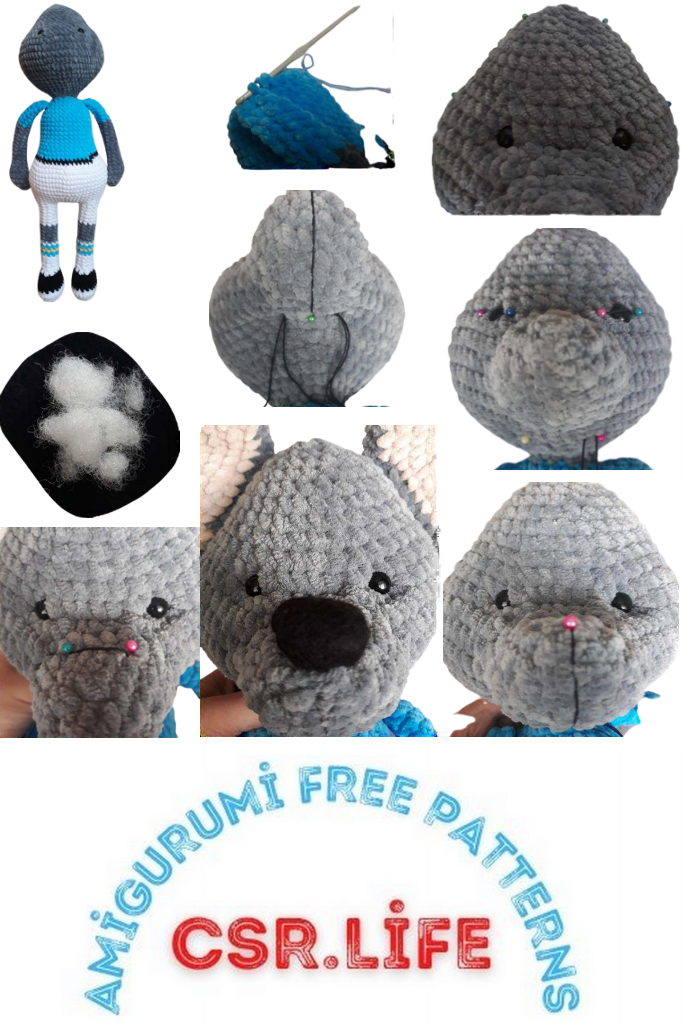
Head
57 (58) row – (1 sc, 1p) x 6 – (18 sc)
58 (59) row – (2 sbn, 1P) x 6 – (24 sbn)
59 (60) row – (3 sc, 1p) x 6 – (30 sc)
60 (61) row – (4 sbn, 1P) x 6 – (36 sbn)
61 (62) row – (5 sc, 1P) x 6 – (42 sc)
62 (63) row – (6 sc, 1P) x 6 – (48 sc)
63 (64) row – 5 sbn, 1P, 4 sbn, 1P, 10 sbn, 1P, 20 sbn, 1P, 5 sbn – (52sbn) – underlined columns should be in the middle of the muzzle
64 (65) row – 1P, 5 PRS, 1P, 4 PRS, 1P, 5 PRS, 2P, 5 PRS, 1P, 20 PRS, 1P, 5 PRS, 1P – (60sc)
65 (66) row – 8 sbn, 1P, 4 sbn, 1P, 16 sbn, 1P, 20 sbn, 1P, 8 sbn – (64bn)
66 – 68 (67 – 69) – 64 sc – (3 rows)
69 (70) row – 1U, 6 sb, 1U, 4 sb, 1U, 7 sb, 1U, 7 sb, 1U, 20 sb, 1U, 8 sb – (58sc)
70 (71) row – 6 sbn, 1U, 4 sbn, 1U, 13 sbn, 2U, 16 sbn, 2U, 7 sbn – (52bn)
We stuff the neck and the beginning of the head well (I inserted cotton swabs into the neck).
71 (72) row – 5 sbn, 1U, 4 sbn, 1U, 5 sbn, 1U, 4 sbn, 2U, 14 sbn, 2U, 4bn, 1U – (44sc)
72 (73) row – 4 sbn, 1U, 4 sbn, 1U, 8 sbn, 1U, 16 sbn, 1U, 4 sbn – (40bn)
73 (74) row – 3 sbn, 1U, 4 sbn, 1U, 6 sbn, 1U, 16 sbn, 1U, 3 sbn – (36sbn)
74 – 75 (75 – 76) – 36 sc – (2 rows)
We insert the eyes between 71 (72) and 72 (73) rows. Between the eyes 8 loops
76 (77) row – (4 sc, 1U) x 6 – (30 sc)
We stuff our heads. And we continue as we knit.
77 (78) row – (3 sc, 1U) x 6 – (24 sc)
78 (79) row – (2 sc, 1U) x 6 – (18 sc)
79 (80) row – (1 sc, 1U) x 6 – (12 sc)
80 (81) row – 6U – (6 sc)
We close knitting.
Muzzle
1 row – from blue to blue 4 sc, from blue to blue 1P, 1 sc, from blue to red 1P, 1 sc, From red to blue 1P, 2sc,
1P, from blue to white 1 sc, 1P, from white to blue 1 sc, 1P – (22sc)
We put a marker, we continue to knit in a spiral.
2 row – 4 sbn, 1U, 5 sbn, 4 sst, 5 sbn, 1U – (20sbn)
3 row – 4 sbn, 1U, 4 sbn, 4 sst, 4 sbn, 1U – (18bn)
4 row – 4 sbn, 1U, 3 sbn, 4 sst, 3 sbn, 1U – (16bn)
5 row – 4 sbn, 1U, 2 sbn, 2U, 2 sbn, 1U – (12sbn)
5 row – 4 sbn, 1U, 2 sbn, 2U,
2 sbn, 1U – (12sbn)
6 row – 4 sbn, 1U, 1 sbn, 2
sst, 1 sbn, 1U – (10sbn)
We stuff the muzzle.
7 row – 5U – (5 sc)
We close knitting.
Muzzle and Head Shaping
1. I start sewing the ears along the bottom marker and when I return to the beginning, I go down one more row down. And it turns out that the ear originates at the level eye.
Between markers distance 8 rows.
2. Tails at the threads with which I pull, I leave it longer, because then with ponytails I’m still pulling my muzzle.
I insert a needle into a pink marker, I bring it out into blue, I turn it into pink and take it out next to pink, i.e. in the next column. I’m pulling to dimples of the mouth formed and the eye became a place. I tie in two knots, with the need to repeat, I do not hide the threads.
The second eye is similar (I take another thread), yellow, pink, blue next to yellow. We tie, we do not hide the thread.
3. With the threads that we have left, we will pull up the face. We take a thread and insert it into the hole that is formed by it, bring it out to purple marker, put into a pink marker, output to another dimple, tighten, tie. (We tighten without fanaticism, we just a little you need to make the muzzle snub-nosed).
Then we repeat the same manipulations with the second pair of markers, can be done in reverse order so as not to pile up nodules. (Dimple, blue, pink, neighboring dimple, tighten, tie)
We take a thread from any side (more authentically, insert it into the dimple and output in a green marker, start in pink and display in the dimple (if you need to draw a thread twice, then we output it to a green marker and repeat manipulation). We tighten quite a bit, we form gutter of the muzzle, make sure that the place of the spout does not flatten.
We hide all the threads.
Spout
At the rectangle, round off the corners, tighten in a circle, add some filler. We form a nose, I have it
slightly extended to the side.
Mouth
We start knitting from red marker.
1 row – from red to red 3 sc, from red to blue 1 sc, from blue to pink 1sc, from pink to red 1sc, from red to pink 3 sc. (9 sc)
2 row – turn knitting, 1U, 5 sbn, 1U. (7 sc).
We close knitting, hide the threads.
Tongue
You can just glue the red felt. I knitted one row of red plush yarn. (1 row in 3 sc). The threads are more authentic.
Then I just tied him in the mouth. Thus the child can put your fingers in your mouth and drag your tongue.
Girl’s Clothes
I knit the first row of the dress in a circle, one sc in every column. I start from the side so that the color transition is what ahead is not so conspicuous.
Then we form and sew on a tulle. We knit bows.
Collar. We begin to knit in the last row of the dress. By 2ch in each column. On the handles I knit on the movable parts. (The idea is a T-shirt on shoulders)
Boy’s Clothes
We knit the black belt along one sc in each column. Start knitting side to color transition, that ahead is not so rushed into eyes. Form straps belt and buckle.
Form the laces on the sneakers.
We knit a collar: In the last row of the shirt, we introduce a twist into the center and dial 3 ch, in the next table 1 dn, in the next 1 dn, then 1 psn, 10 sbn, 1 psn, 1sn, 1 dn. Finish knitting. I sewed collar so that it does not stick out, but you can leave it like that.
We sew buttons.
Credit: dinapolyknitting