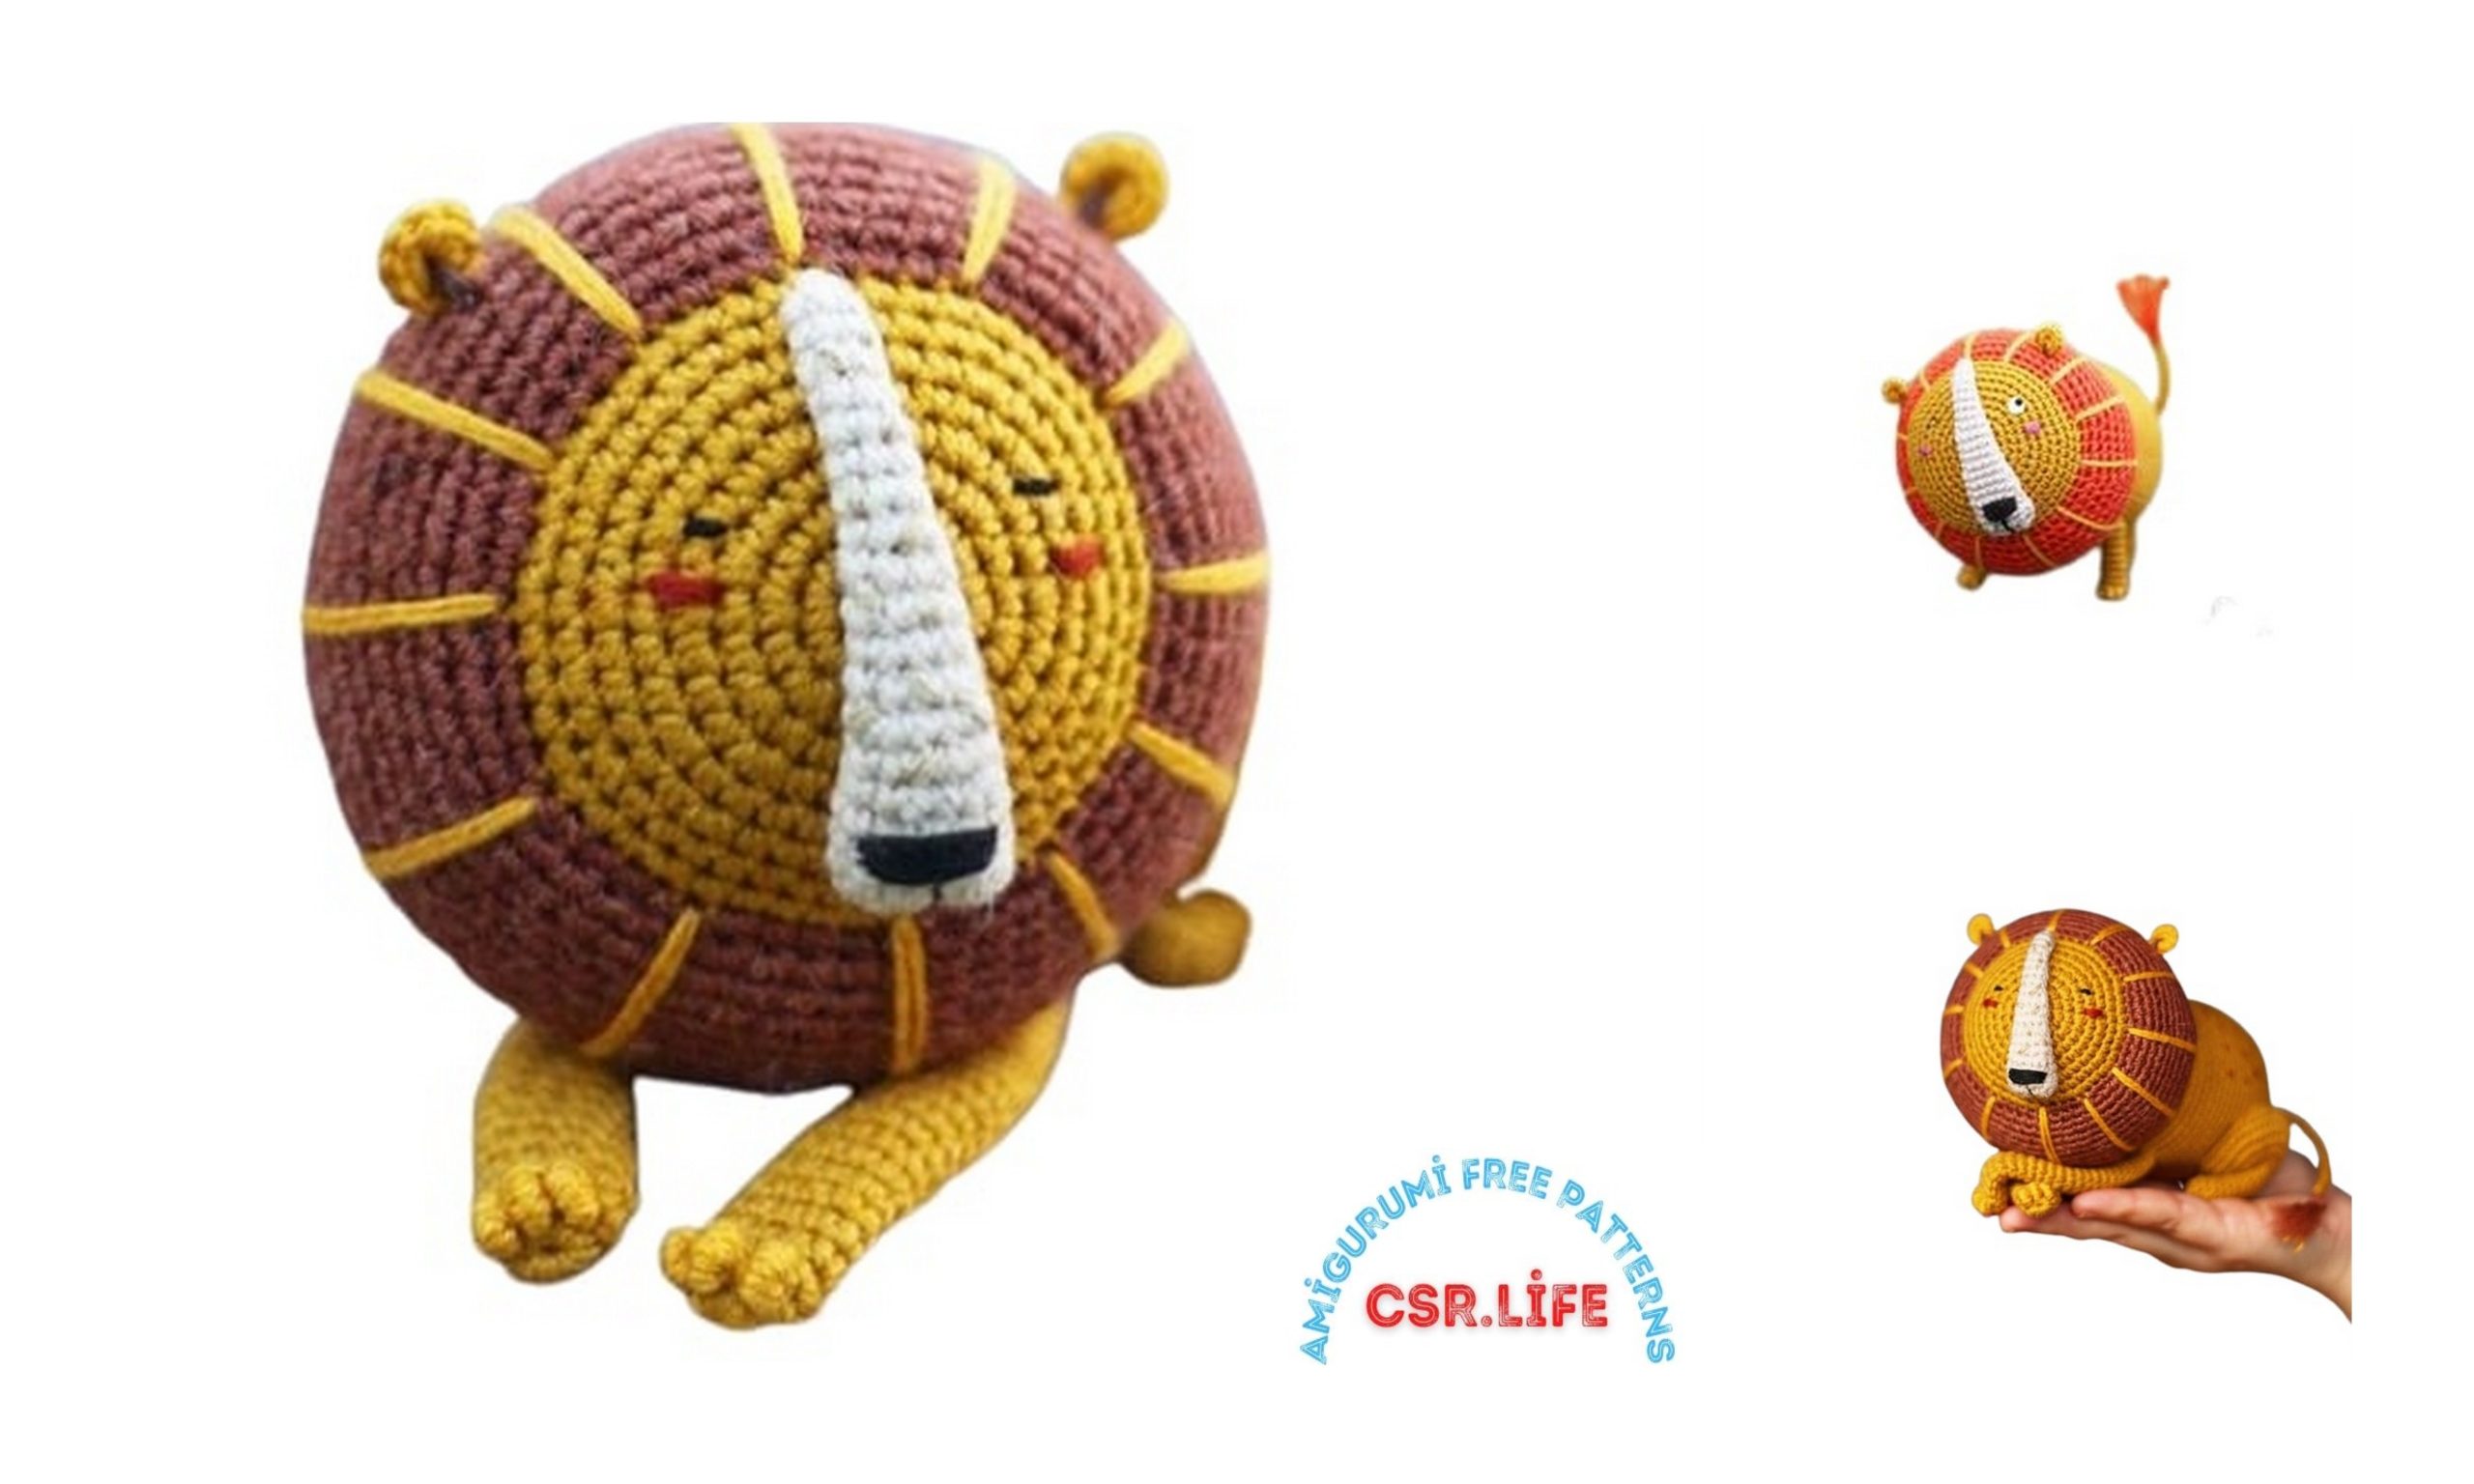
Amigurumi Lion Free Crochet Pattern
Amigurumi related to each other, we continue to bring you beautiful shares. In this article, amigurumi lion free pattern is waiting for you.
YOU WILL NEED
• Yarn of your choice in colors: mustard yellow, terracotta red and beige for crocheting and sewing pieces together;
• Embroidery thread in egg yolk color for making ears, stitching fingers and decorating the mane; . Embroidery floss and/or scraps of yarn in black, lingonberry, honey and caramel colors for decorating the face; . Crochet hook suitable for the yarn of your choice; . Toy stuffing; . Embroidery and tapestry needles, pins, stitch marker. It’s quite traditional to leave a long yarn tail for sewing at the end of making every part of the toy. But yours truly is not good at sewing at all, and therefore prefers to divide the yarn into strands and use them along with a thin sewing needle, so the stitches look more neat. Please do what’s more comfortable for you. All the pieces are mainly worked in a spiral.
ABBREVIATIONS
MR — magic ring;
ch — chain;
sl-st — slip stitch;
sc — single crochet;
dec — single crochet decrease;
inc — single crochet increase;
x n — repeat n times;
fib — work in front loops only;
(…) — number of stitches in the round.
HEAD
1. In mustard yellow: 6 sc in a MR (6)
2. inc x 6 (12)
3. (sc, inc) x 6 (18)
4. sc, (inc, 2 sc) x 5, inc, sc (24)
5. (3 sc, inc) x 6 (30)
6.2 sc, (inc, 4 sc) x 5, inc, 2 sc (36)
7. (5 sc., inc) x 6 (42)
8.3 sc., (inc, 6 sc) x 5, inc, 3 sc (48)
9. (7 sc, inc) x 6 (54)
10-11.54 sc (54)
Change to terracotta red.
12.54 sc fib (54)
13.4 sc, (inc, 8 sc) x 5, inc, 4 sc (60)
14. 34 sc, (inc, 4 sc) x 5, inc (66)
15. 35 sc, (inc, 5 sc) x 5, inc (72)
16. 36 sc, (inc, 6 sc) x 5, inc, (78)
17-19 (3 rounds). 78 sc (78)
20. (11 sc, dec) x 6 (72)
21. (10 sc, dec) x 6 (66)
22. (9 sc, dec) x 6 (60)
23. (8 sc, dec) x 6 (54)
24. (7 sc, dec) x 6 (48)
25. (6 sc, dec) x 6 (42)
26. (5 sc, dec) x 6 (36)
27. (4 sc, dec) x 6 (30)
28. (3 sc., dec) x 6 (24)
29. (2 sc., dec) x 6 (18)
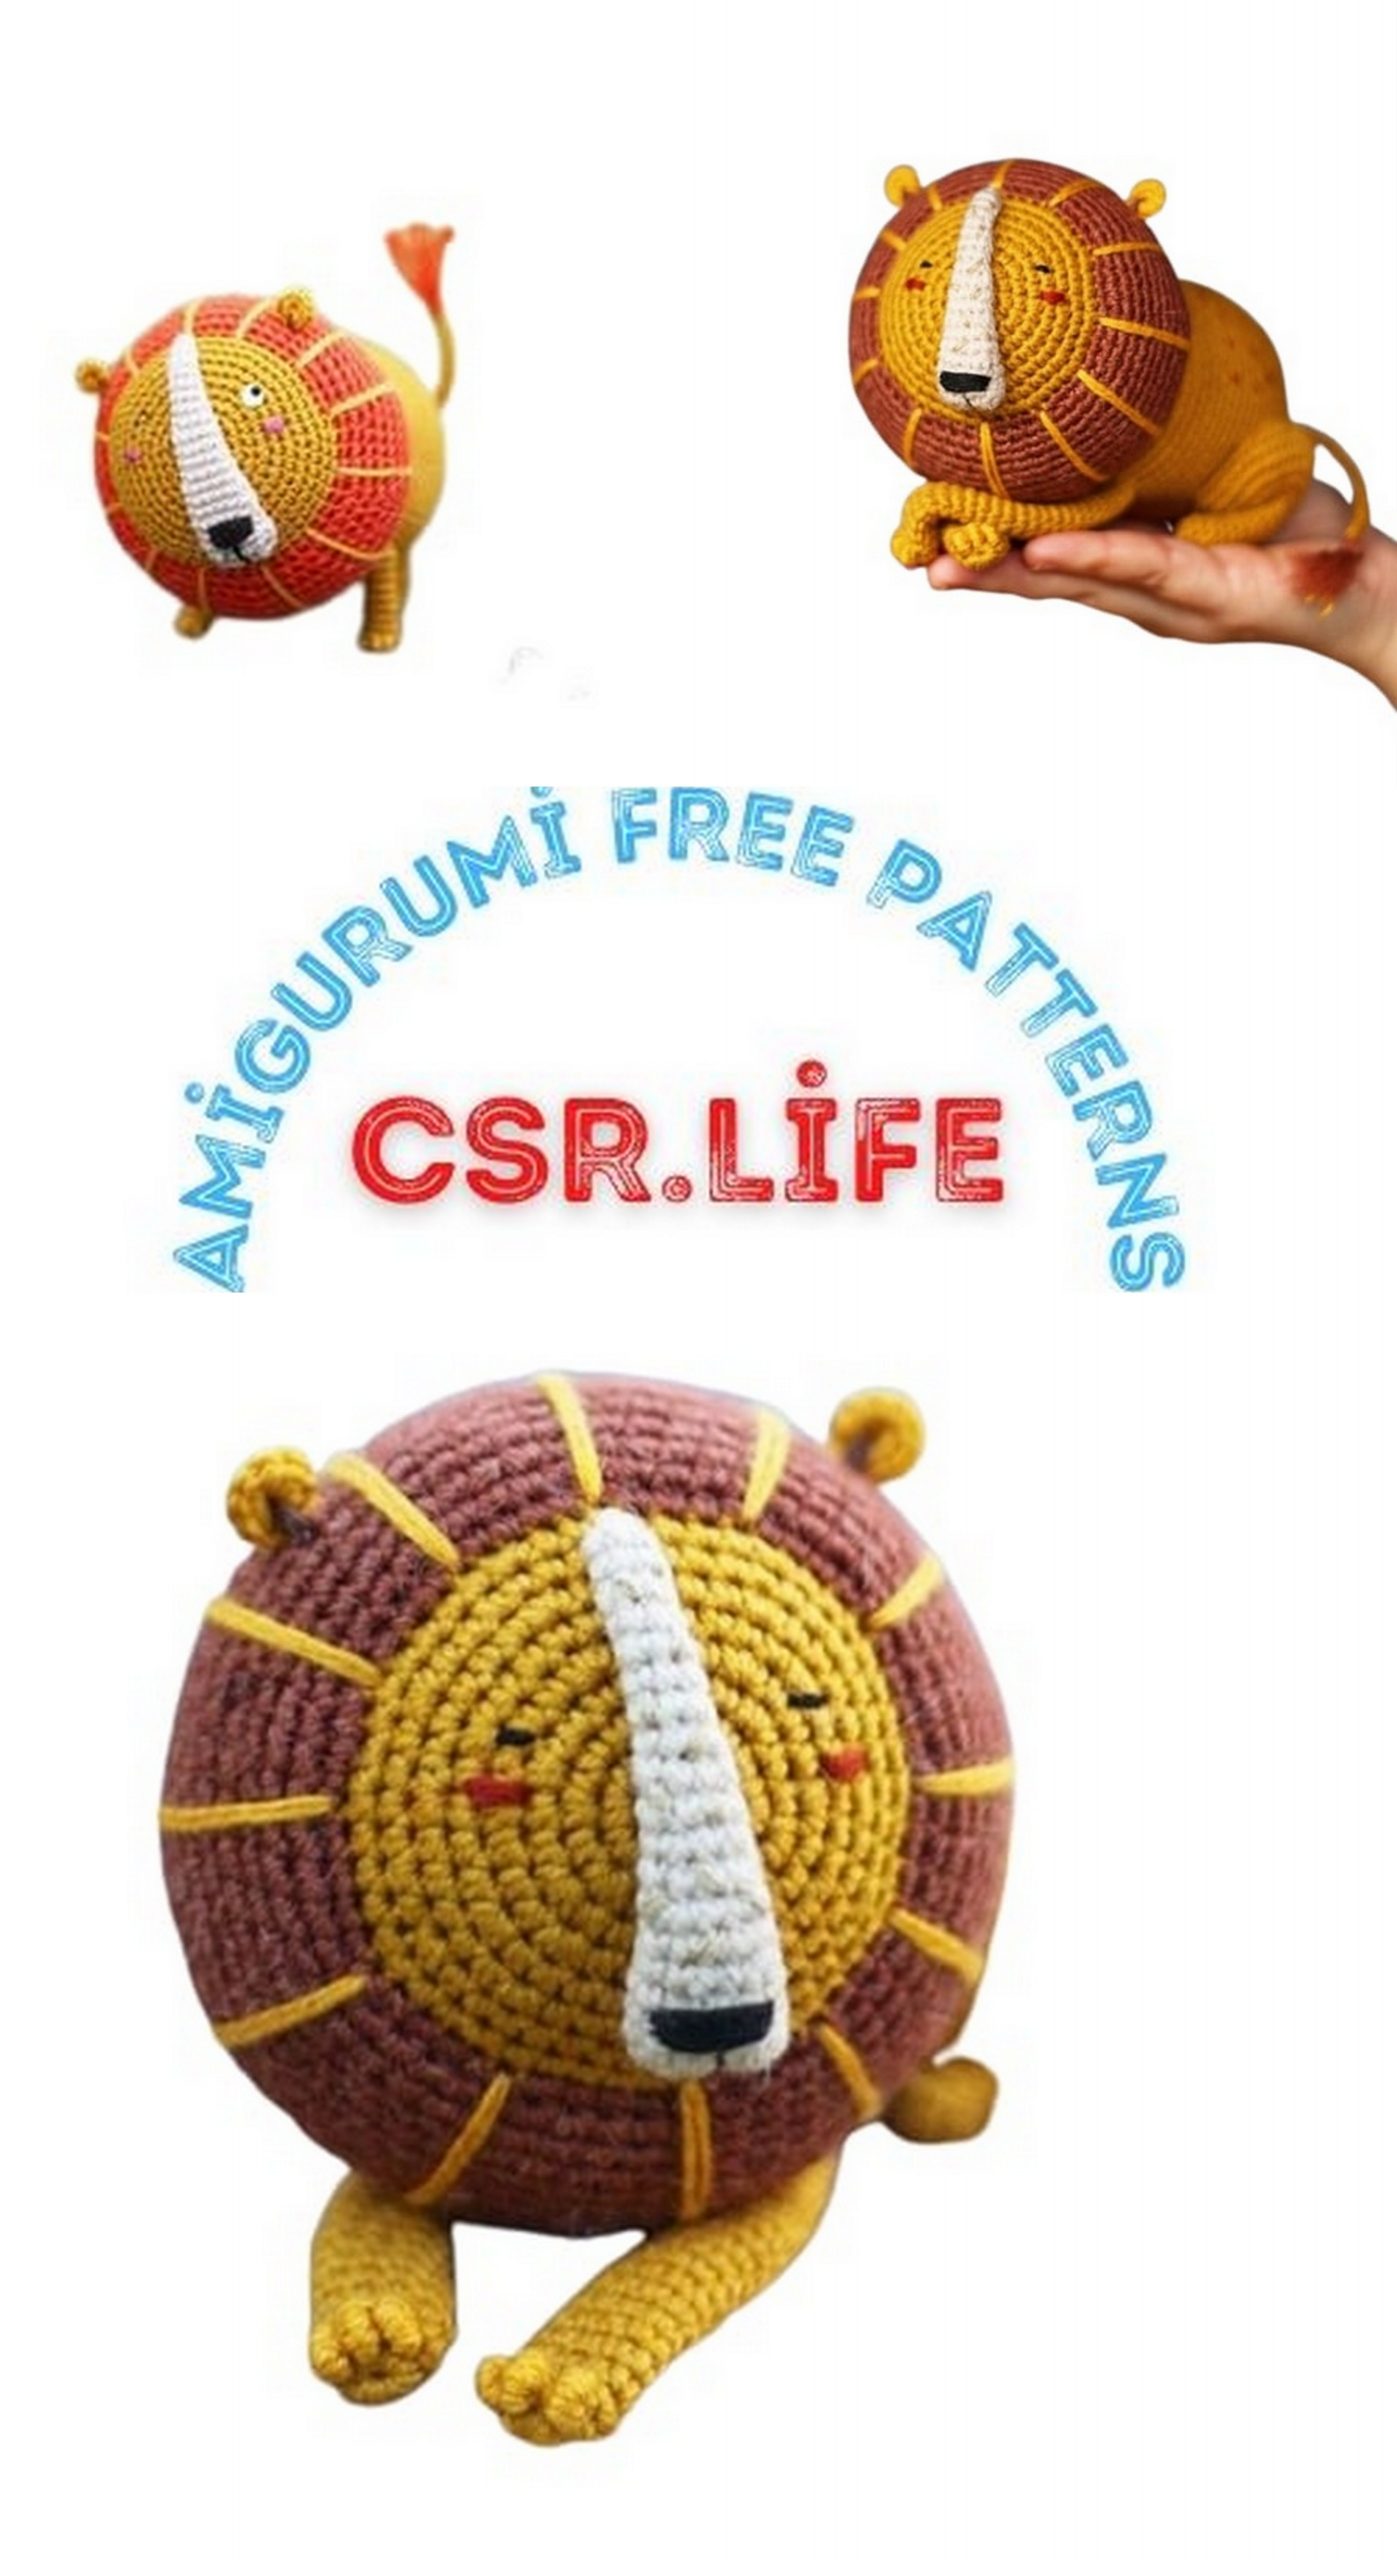
Stuff the head; don’t be too gene-rous adding fiberfill: this piece shouldn’t become spherical, we’re aiming for a burger bun shape here!
30. (sc., dec) x 6 (12)
31. dec x 6 (6)
Fasten off leaving a tail about 15 cm long and cut the yarn. Using a tapest-ry needle, weave the yarn tail through the front loop of each stitch and pull tight to close. Weave in the end.
Thread the long tapestry needle with egg yolk yellow floss and make 12 (or as many as you like) stitches around the face so that they start in the center at the back of the head, pass through the head at the base of the mane and go back to the star-ting point (see pictures).

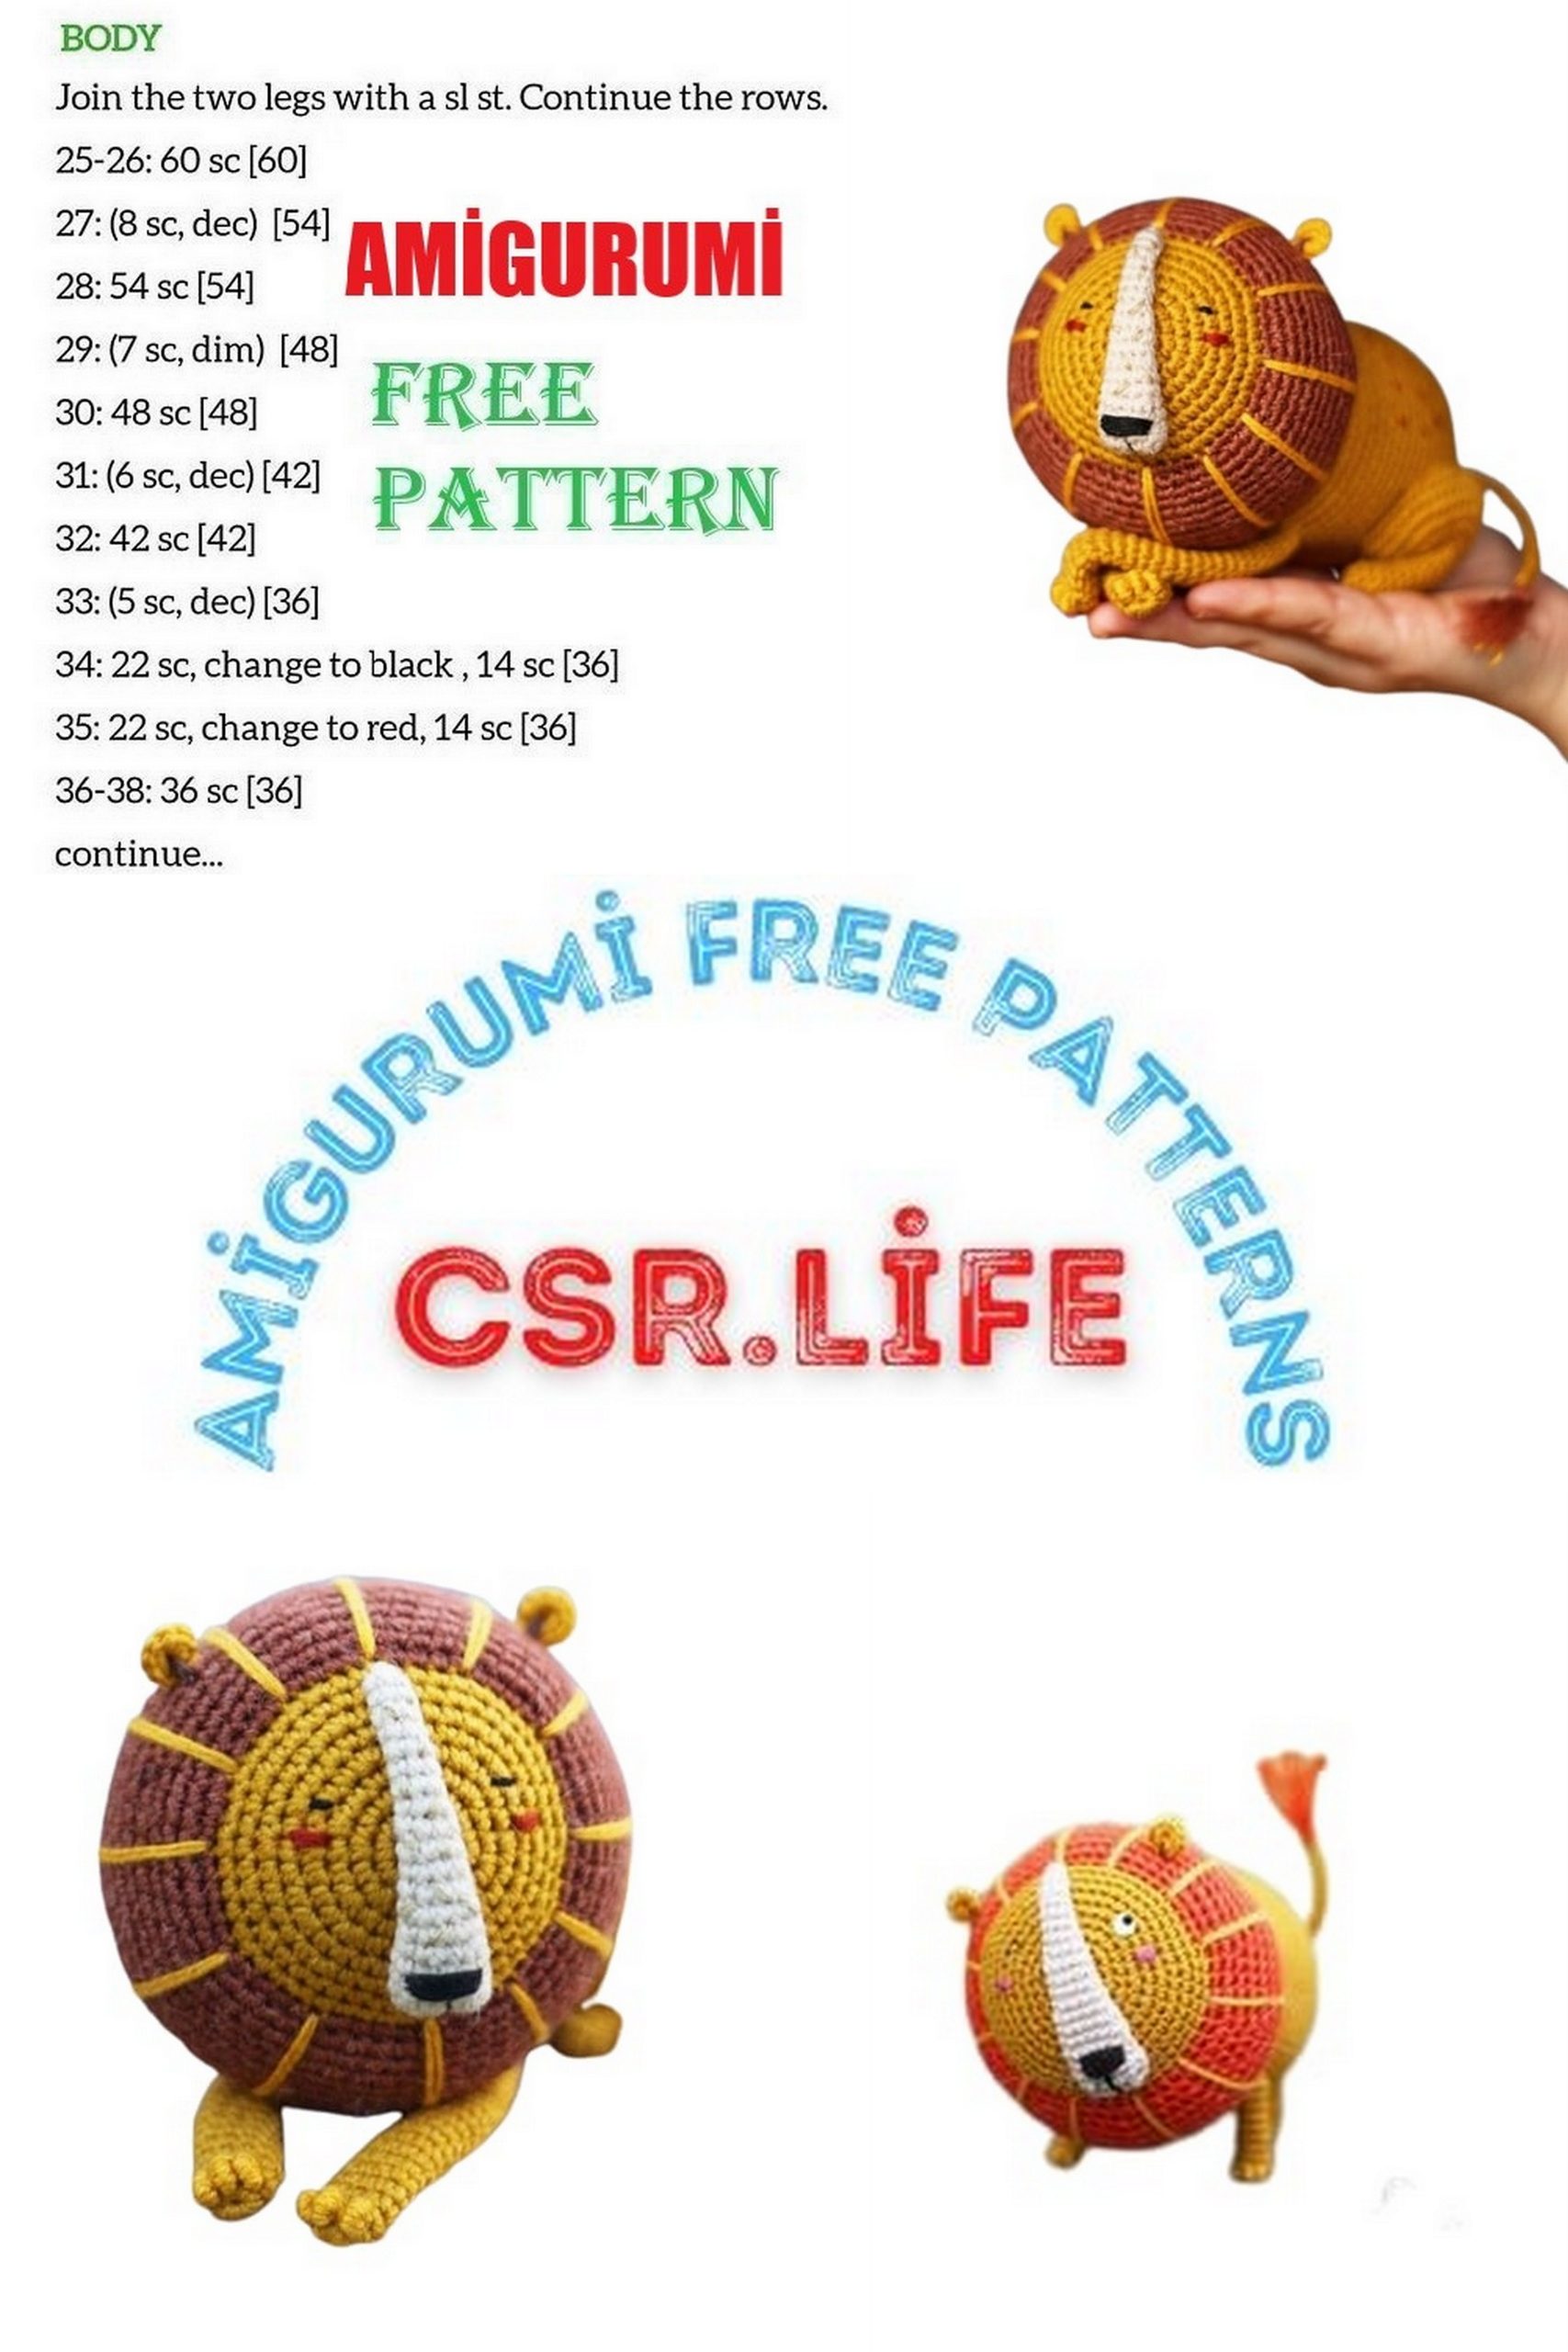
BODY
1-10. In mustard yellow, repeat r. 1-10 of the head
11.4 sc, (inc, 8 sc) x 5, inc, 4 sc (60)
12. (9 sc, inc) x 6 (66)
13-22 (10 rounds). 66 sc (66)
23. 34 sc, (dec, 4 sc) x 5, dec (60)
24. 33 sc, (dec, 3 sc) x 5, dec (54)
25. 32 sc, (dec, 2 sc) x 5, dec (48)
26. 31 sc, (dec, sc) x 5, dec (42)
27. 41 sc, slst (42) Fasten off and cut the yarn.
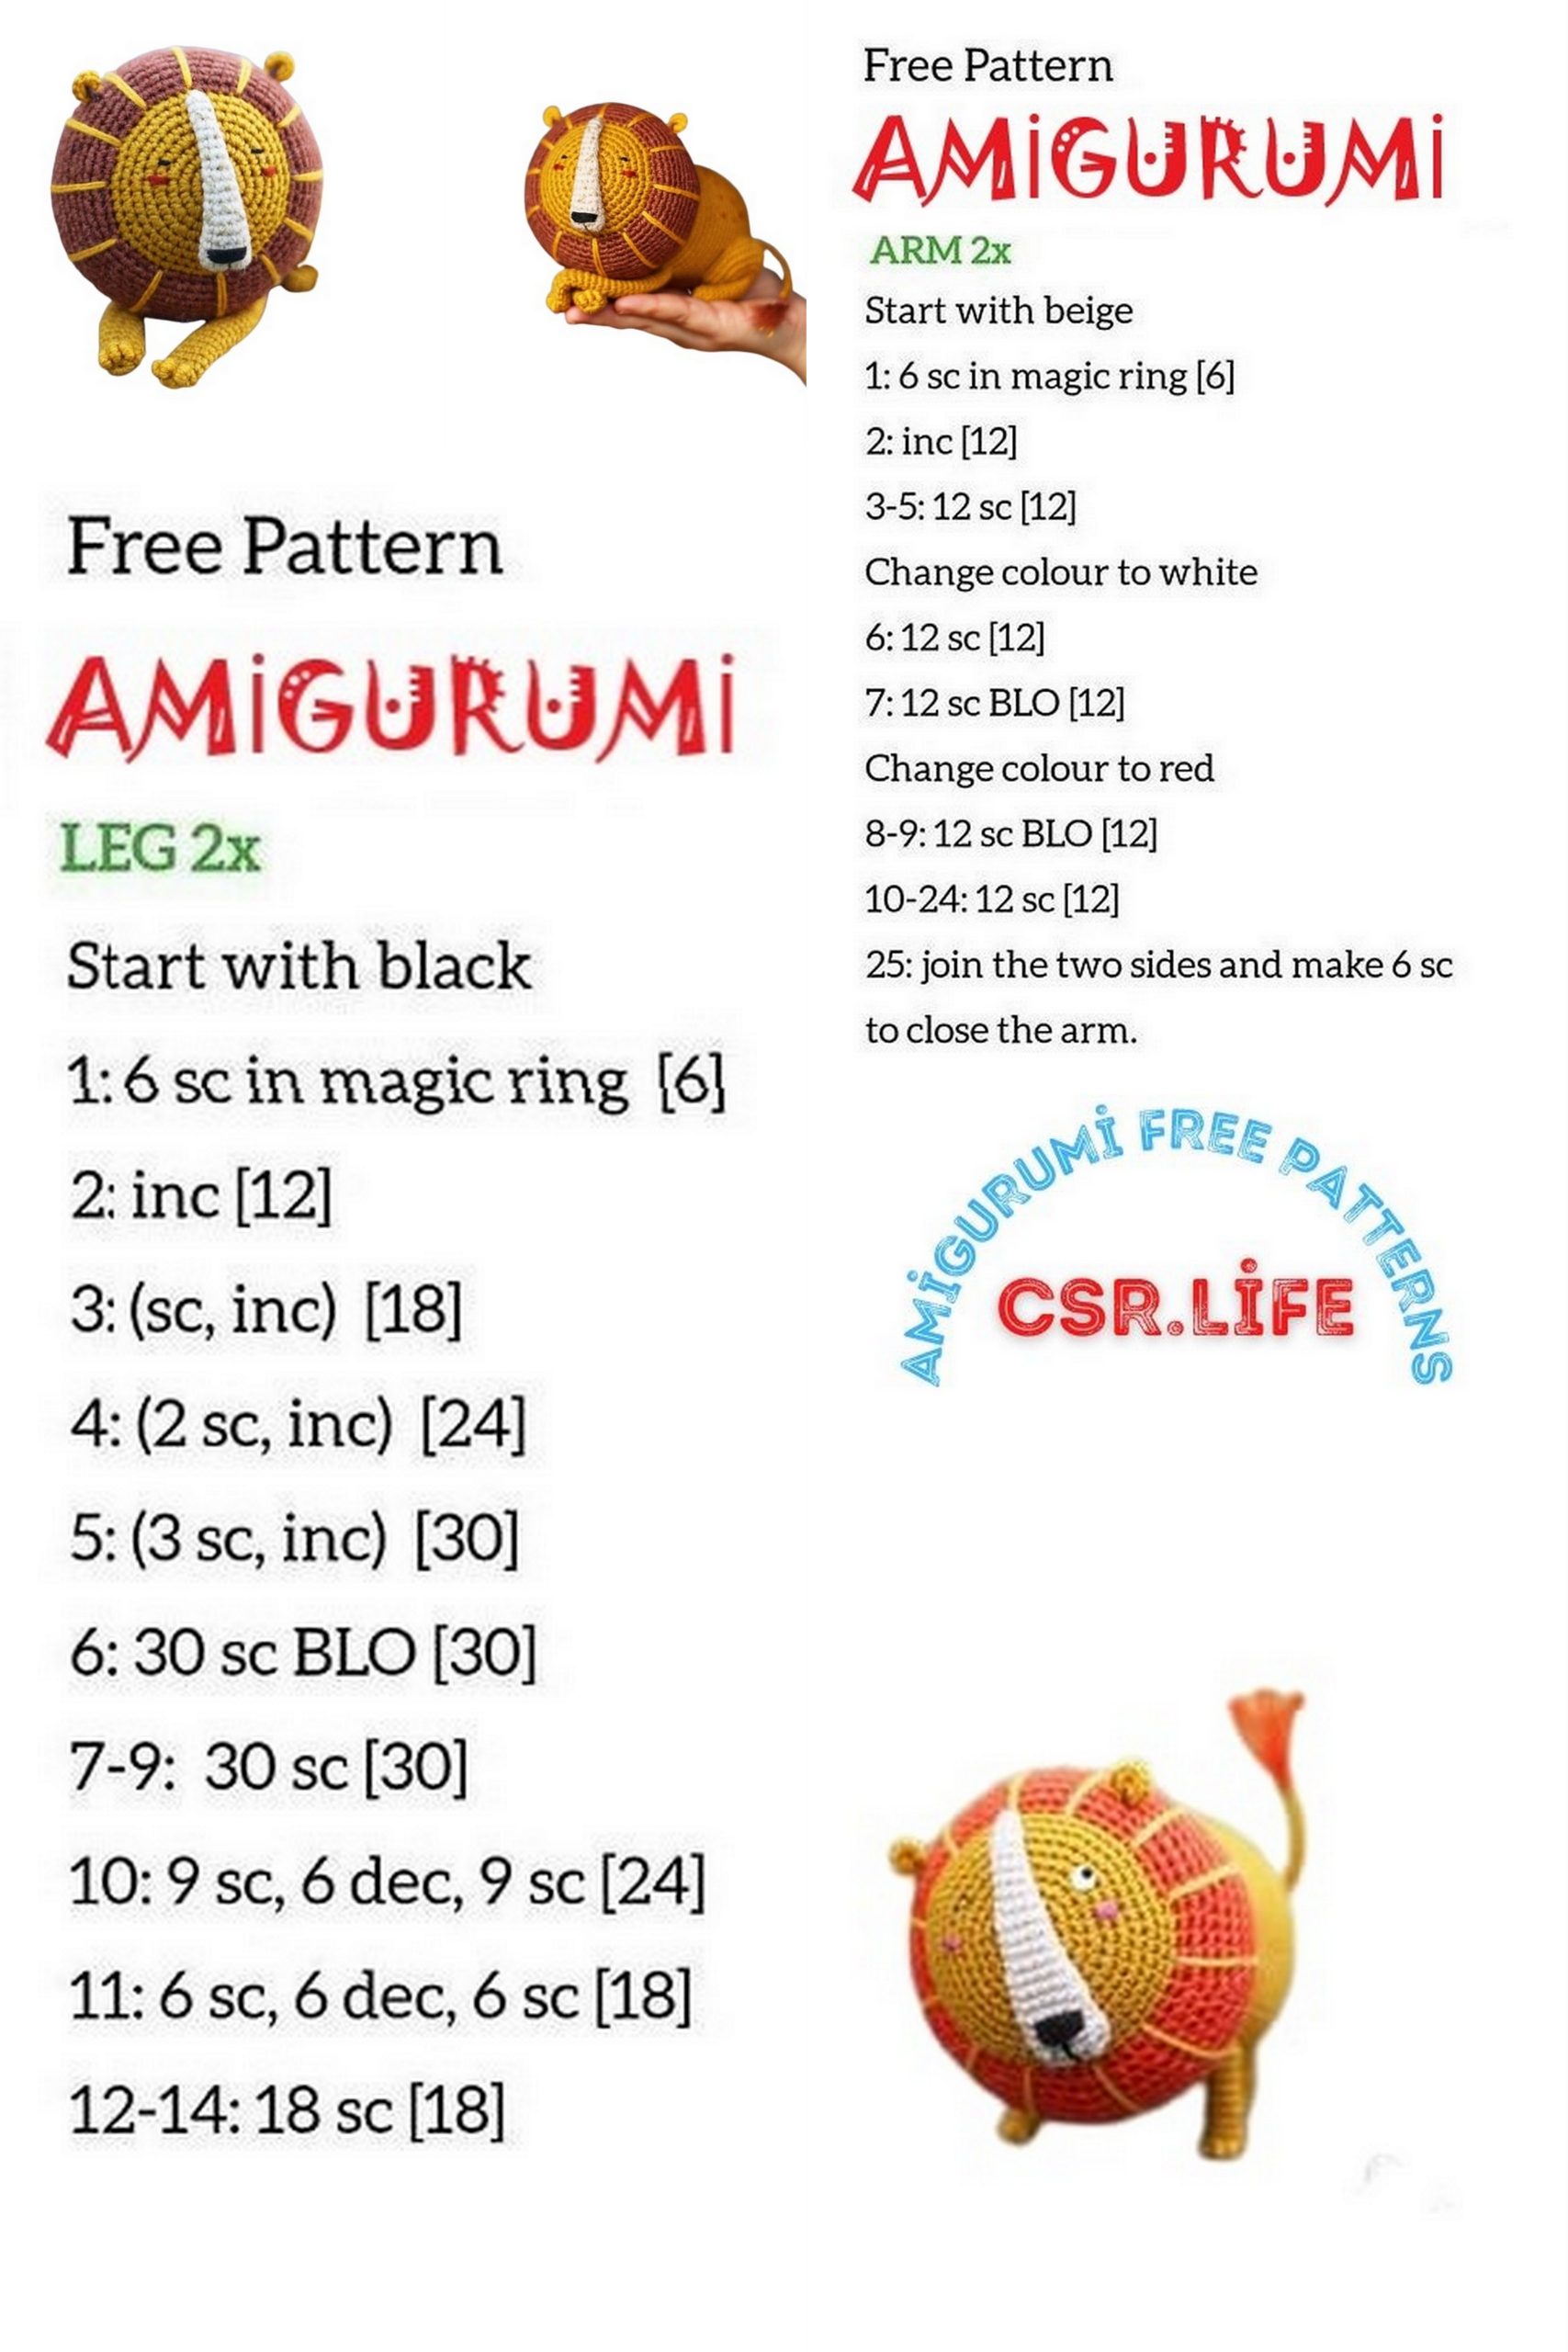
BACK LEGS (x 2)
In mustard yellow.
1.6 sc in MR
2. inc x 6 (12)
3-11 (9 rounds). 12 sc (12)
12. inc x 12 (24)
13. (3 sc, inc) x 6 (30)
14.2 sc, (inc, 4 sc) x 5, inc, 2 sc (36)
15. (5 sc., inc) x 6 (42)
16-17.42 sc (42)
18. (5 sc, dec) x 6 (36)
19. (4 sc, dec) x 6 (30)
20. (3 sc., dec) x 6 (24)
21. (2 sc., dec) x 6 (18)
Stuff the hip area lightly.
22. (sc., dec) x 6 (12)
23. dec x 6 (6)
Fasten off, cut the yarn and pull tight to close.
FRONT LEGS (x 2)
In mustard yellow.
1.5 sc in MR
2. inc x 5 (10)
3-24 (22 rounds). 10 sc (10)
Fasten off and cut the yarn. Don’t stuff the front legs!
EARS (x 2)
Using egg yolk yellow embroidery thread, sc 10 in a MR, pull tight and cut the yarn, leaving a tail for sewing.
TAIL
With mustard yellow yarn, ch 37, slst in the second ch from hook, 35 slst. Cut the yarn, leaving a tail for sewing. Make a tuft at the end of the tail using a scrap of the terra-cotta red yarn.
MUZZLE
In beige.
1. ch 6, sc in the second ch from hook, sc in the next 3 ch, sc 3 in the last ch; continue working on the other side of the chain: sc 3, inc (12)
2-4 (3 rounds). 12 sc (12)
5. (dec, 4 sc) x 2 (10)
6-7.10 sc (10)
8. (dec, 3 sc) x 2 (8)
9-10.8 sc (8)
11. (dec, 2 sc) x 2 (6)
12-18 (7 rounds). 6 sc Fasten off, cut the yarn and pull tight to close. Weave in the end.
ASSEMBLY AND FINISHING TOUCHES
• Stuff the body, pin it to the back of the head (note that the wider part of the mane should be in the bottom).
• Bend and shape the back legs, play around with them, testing out different positions on the body. Some asymmetries will make the toy look more interes-ting, but make sure that it’s stable and it doesn’t roll over onto one side. Having decided on the best option, sew the de-tails together.
• Sew the front legs and the tail onto the body.
• Embroider 3 fingers on each paw.
• Sew the ears onto the mane.
• Using yarn scraps in caramel color, make a couple of stitches in the middle of each ear.
• Sew the muzzle to the head, embroider the nose and the eyes in black.
• Make a few stitches in different colors here and there on the nose and on the body using the original lion illustration @3antsinarow as a visual aid. Your pet is ready to be cuddled! Please don’t forget to say a big thank you to Jaka Vukotit for sharing her amazing art with the world and being so inspiring! This pattern is for personal use only. It may not be reproduced by any means and used for any commercial purposes. Human beings must respect each other!