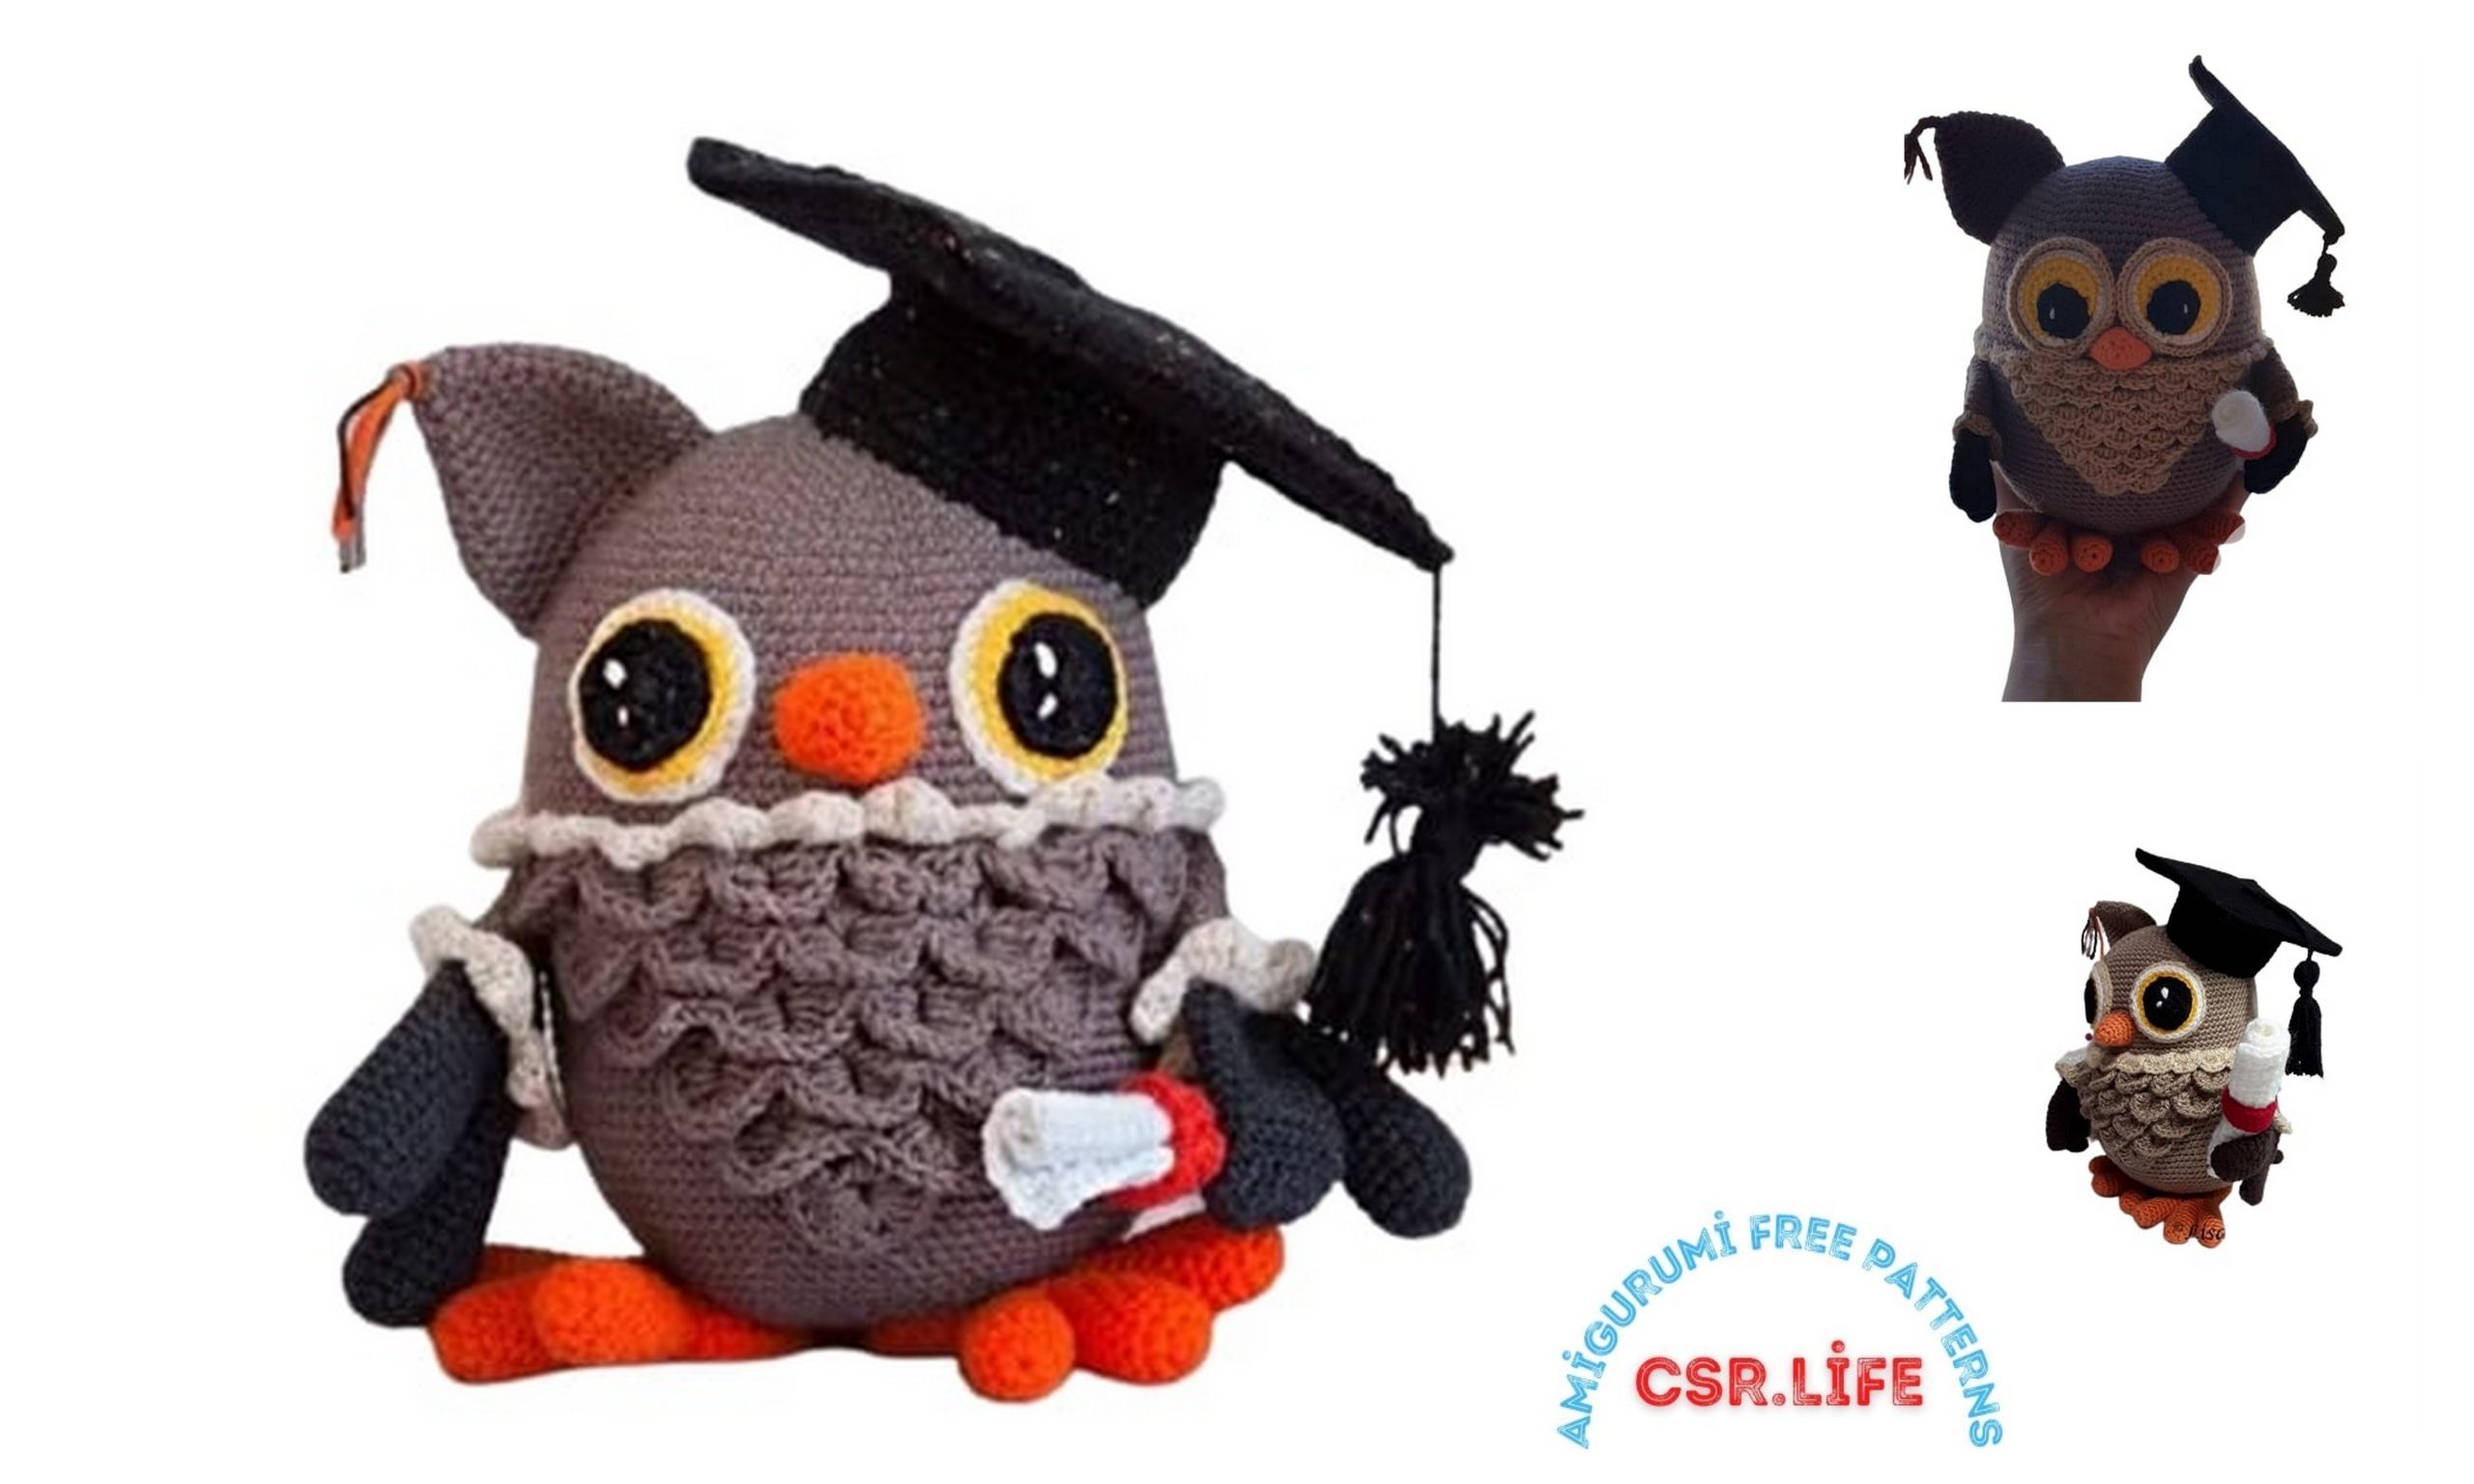
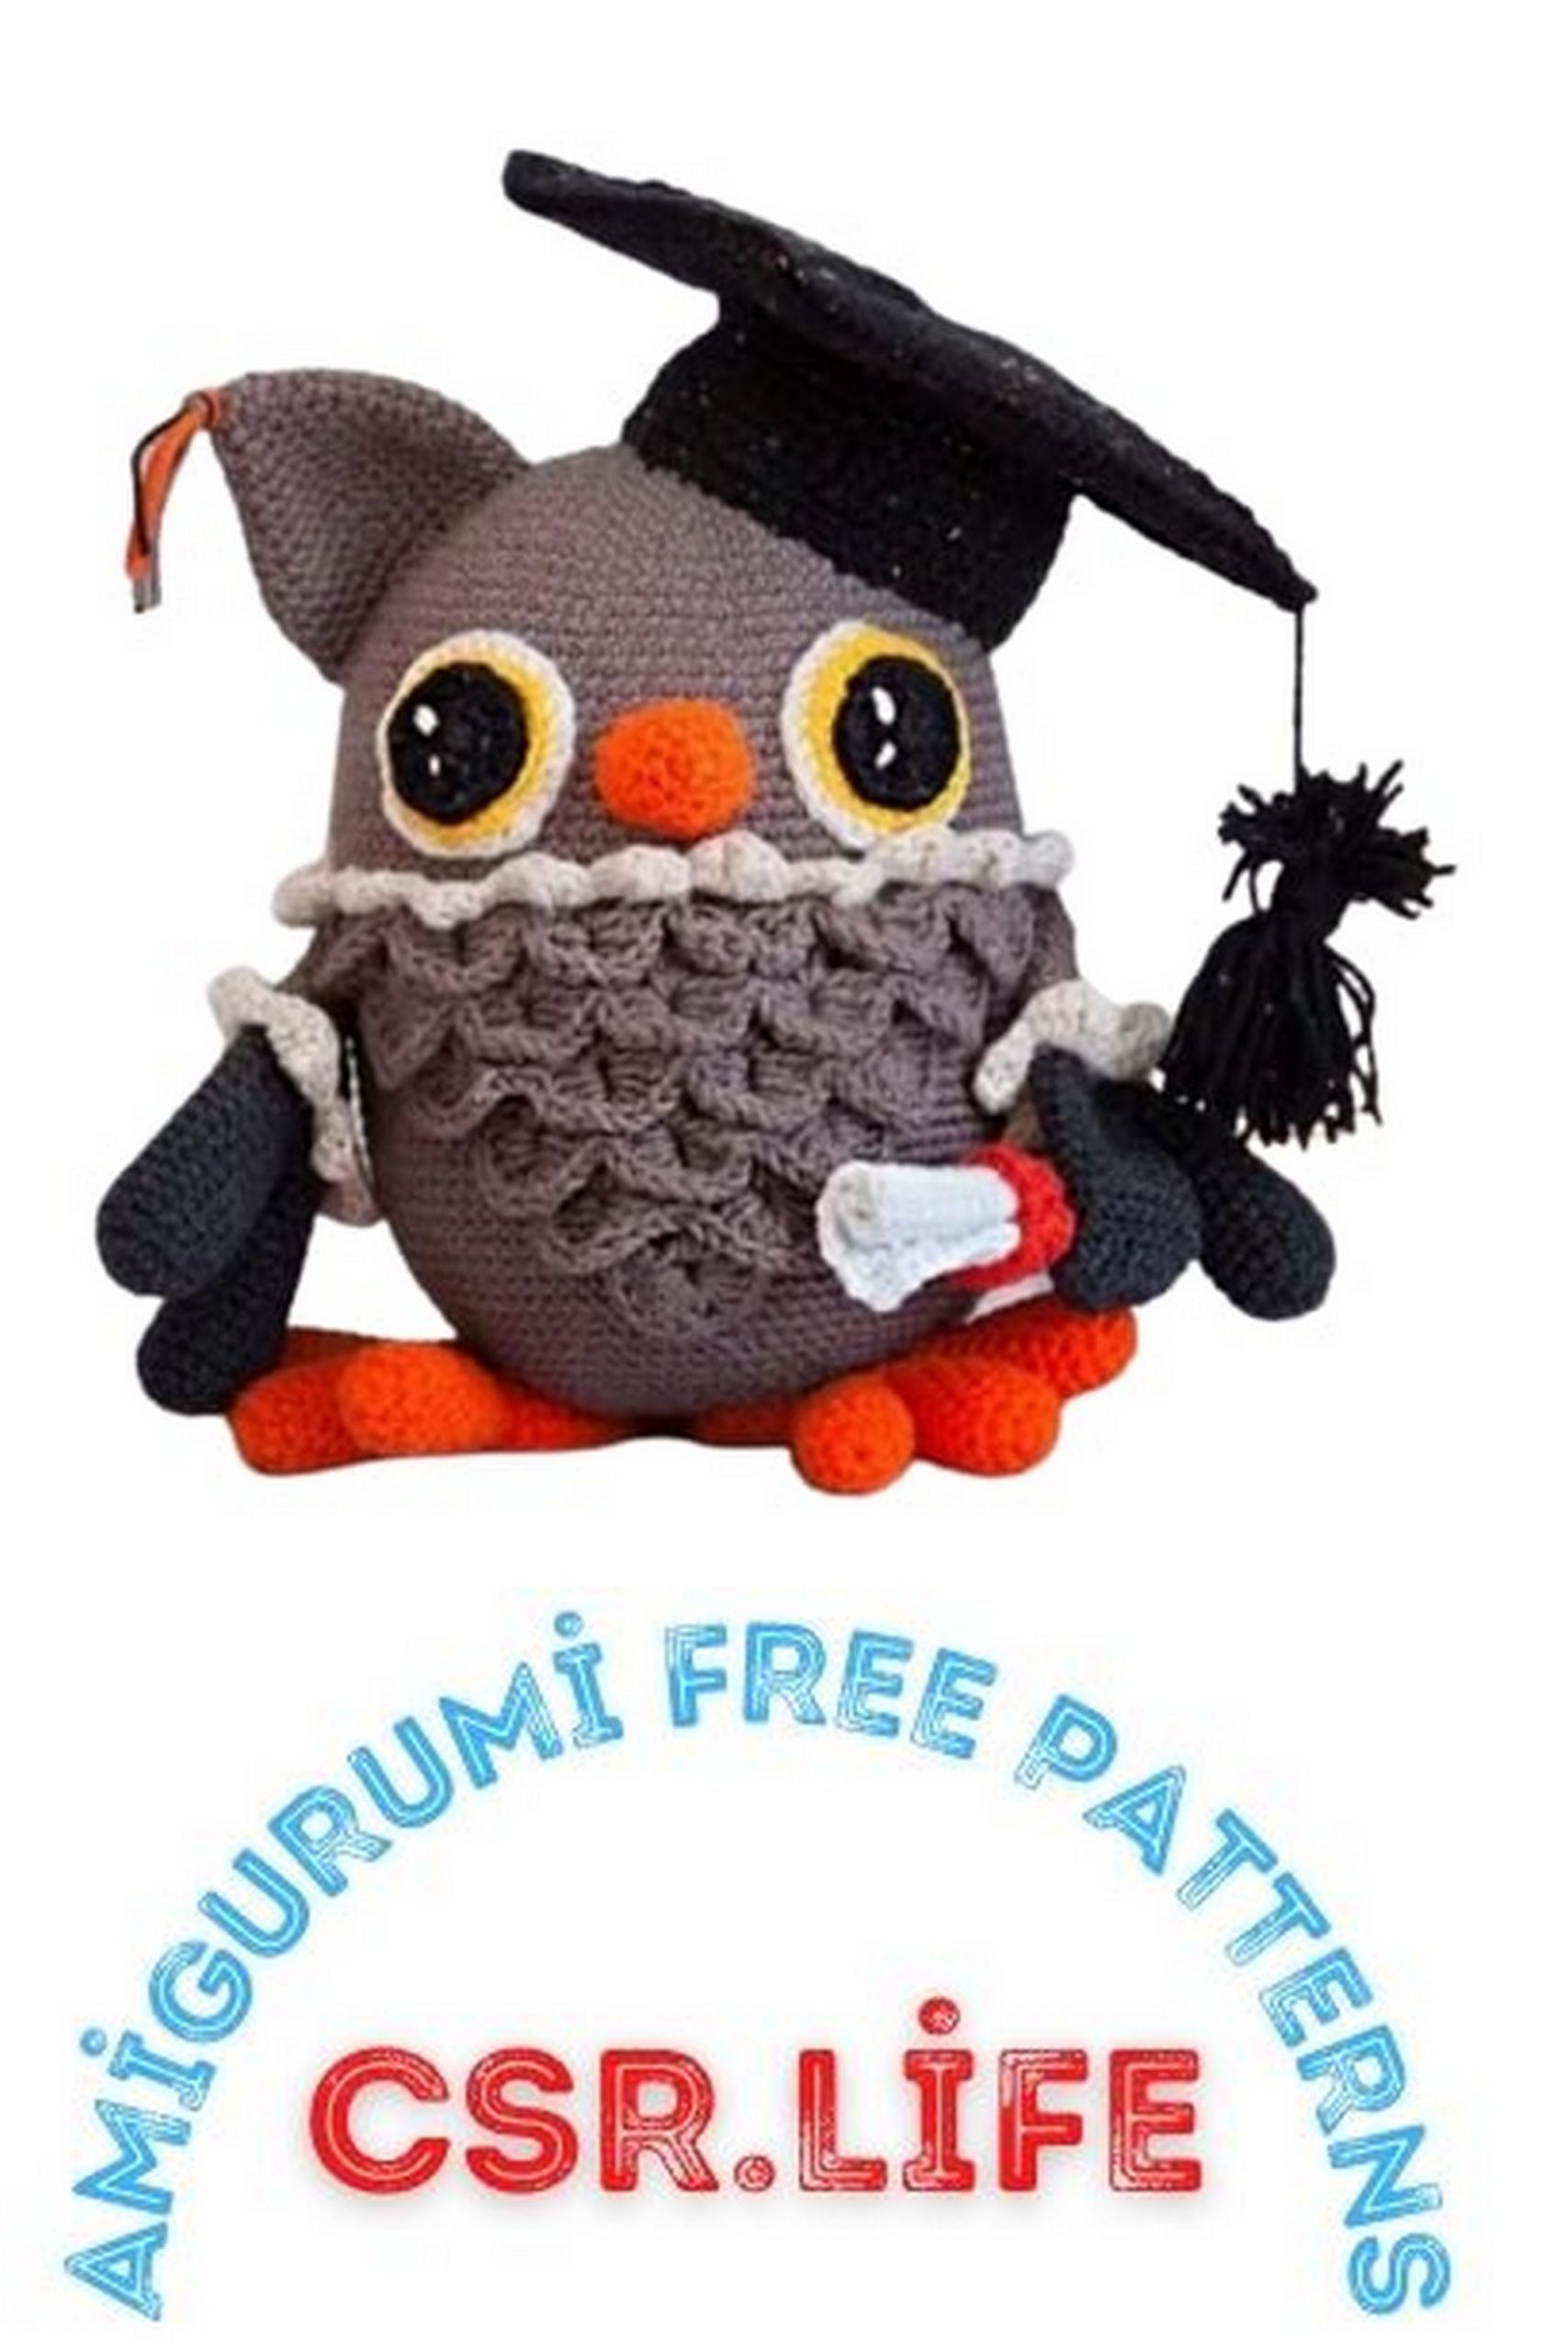
Amigurumi Wisdom The Graduation Owl Free Pattern
WISDOM THE GRADUATION OWL
A “Must have” for any Owl lovers. Wisdom can be made with or without his cap and scroll, and he’s just as adorable !
*NOTES*
I used D.K. yarn, and a 2.50mm hook. However, any weight yarn and hook is fine, and will only result in your owl being smaller or larger. (size approx. 9” if using d.k yarn and 2.50mm hook).
I used shades of brown for my owl. However, he can be made in any colours you choose, therefore, I will refer to the owls main colours as A, B, C.
*You will need*
D.K yarn in 3 colours – A B C
Colour A : Used for : Body , Ears , Wings, & Chest Feathers
Colour B : Used For : Wing Feathers & Tail
Colour C : Used for : Neck Ruffles & Wing Ruffles.
Orange : Used for : Beak & Feet.
Red : (small amount) for scroll ribbon
Black : Used for : Hat
White : Used for : scroll
Yellow : (small amount) Used for : eyes
2.50mm hook and 3.50mm hook
Small amount of thin cardboard
Stuffing
Sewing Thread
Darning needle
Stitch Markers
*NOTES*
Before you start, this pattern requires you to be able to do crocodile stitch. HOWEVER, I have also included an alternative method for the chest feathers.
So ! Lets get started !!
BODY :
Using 2.50mm hook and colour A
Make a magic ring
1. 6 sc into MR
2. 2sc into each st. (12)
3. *1sc, inc* x6 (18)
4. *2sc, inc* x6 (24)
5. *3sc, inc* x6 (30)
6. *4sc, inc.* x6 (36)
7. *5sc, inc* x6 (42)
8. *6sc, inc* x6 (48)
9. *7sc, inc * x6 (54)
10. * 8sc, inc* x6 (60)
11. *9sc, inc* x6 (66)
12. *10sc, inc* x6 ( 72)
13. *11sc, inc* x6 (78)
14. *12sc, inc* x6 (84)
15. *13sc, inc* x6 (90)
16.– 50 . 90 sc for 35 rounds (90)
51. *13sc, dec* x6 (84)
52. *12sc, dec* x6 (78)
53.*11sc, dec* x6 (72)
54.*10sc, dec* x6 (66)
55. *9sc, dec* x6 (60)
Start stuffing
56. *8sc, dec* x6 (54)
57. *7sc, dec* x6 (48)
58. * 6sc, dec* x6 (42)
59. *5sc, dec* (36)
60. *4sc, dec* x6 (30)
61. *3sc, dec* x6 ( 24)
62. *2sc , dec* x6 (18)
63. *1sc, dec* x6 (12)
64. dec x6 ( 6 )
Fasten off. Complete stuffing . Close hole and weave in ends.
BEAK
Using 2.50mm hook and ORANGE
Make a magic Ring
1. 5 sc into MR. (5)
2. 2 sc into each st. (10)
3. 10sc (10)
4. *1 sc, inc* x5 ( 15)
5. 15 sc (15)
6. *2 sc, inc* x5 (20)
Fasten off. Leave a long tail to attach to owl.
Collar Ruffles
Using 2.50mm hook and colour A
Attach yarn , with a sl.st to row 29 of the body.
*Ch.4 , skip 3 sts, sl.st to nxt st.* repeat all around the body, Sl.st to
1
st st. Fasten off. Weave in ends.
*NOTE *
If your sts. Do not work out for last 2 chains, Don’t Panic!
Simply adjust accordingly. As long as you have a foundation chain to attach your ruffles to all will be fine !
NEXT ROUND :
Holding your work upside – down , attach colour C to any Ch 4 space.
Ch3, then place 4dc in same Ch.4 space.
* Sl.st to the Sl.st of previous round , 5 dc in the next Ch.4 space *
Continue all around the body. Sl.st to join. Fasten off. Weave in Ends.
WING FEATHERS – ( Make 2 )
Using 2.50mm hook and colour B
Make a Magic Ring.
1. 6sc into MR (6)
2. 2sc in each st. (12)
3. * 1sc, inc* x6 (18)
4 – 13. sc 18 for 10 rounds (18)
Sl.st to nxt st. Fasten off.
Holding the two feathers together, join them by sl.stitching the centre 3 sts together, Fasten off.
14. Using Colour B , Attach with a sc into the st. right next to the join.
Sc 15sts around the 1st feather, then 15 sts around the 2nd feather. (30)
15. sc 30 sts around. (30)
* DO NOT STUFF*
Change to colour A
16 – 18. 30 sc for 3 rounds (30)
19. *4sc, dec* x 5 (25)
20. 25sc (25)
21. *3sc, dec* x5 (20)
22. *2sc, dec* x5 (15)
23. 15 sc (15)
24. *1 sc, dec* x5 (10)
25. 10 sc (10)
26. dec x5 (5)
*DO NOT STUFF *
Fasten off. Close hole and weave in tail.
WING RUFFLES
Using 2.50 mm hook and colour C Sl.st to where the “Feathers” join the “wing”.
*Ch 4, Skip 3, Sl.st to next st.* all around the wing. Sl.st to jon. Fasten off. Weave in ends.
NOTE: Again, as with collar ruffles, don’t worry if the chains don’t quite work out, adjust to fit.
Holding your work upside-down, and using colour C Attach to any Ch4 space and ch3. Place 4 more dc in same ch. Space. Sl.st to the sl.st of the previous round.
*5dc in nxt ch.space, sl.st to sl.st of previous round* Repeat around. Sl.st to join. Fasten off. Weave in ends.
2 nd WING
Repeat as for 1st wing, making 2 feathers in colour B, wing in colour A and wing ruffles in colour C.
EARS
(*NOTE * If making the graduation owl WITH cap, only make 1 ear. If making the owl WITHOUT cap, then make 2 ears ).
With 2.50mm hook and colour A
Make a magic ring.
1. 5sc into MR. (5)
2. 2 sc into each st (10)
3. 10 sc (10)
4. *1sc, inc* x 5 (15)
5. 15 sc (15)
6. *2sc, inc* x 5 ( 20)
7. *3sc, inc* x5 (25)
8. 25 sc (25)
9. * 4sc, inc* x5 (30)
10. * 5sc, inc* x5 (35)
11. 35 sc (35)
12. 35 sc (35)
13. * 5sc, dec* x5 (30)
14. 30 sc (30)
15. 30 sc (30)
Fasten off leaving a long tail to attach to owl. *Do NOT stuff*.
Add Tassels to tips of ears.
CHEST FEATHERS – (Crocodile stitch version)
*NOTE* – Crocodile stitch is not an easy stitch to explain in writing, but I have tried my best to break it down.
Below, you will find my written instructions for the crocodile stitch chest feathers. If you are not familiar with this stitch, or are more a “visual “ learner, there are many, many video tutorials available on Youtube,. May I suggest you watch a few first, to familiarize yourself with the stitch, before following my written instructions.
A particular favourite of mine can be found here, by “Girlybunches” but I suggest you watch a few videos, you might find a tutorial YOU prefer.
IF you still not grasp the crocodile stitch, then do not worry, I will also include an alternative method to make the chest feathers. You may find this easier.
CROCODILE STITCH VERSION
Using 2.50mm hook and colour A
1. Ch 10. Dc in 4th ch from hook. Ch1, skip 2, 2dc in next st. Ch1, skip 2, 2dc in last st.
2. Ch3, (counts as 1st dc) then place 4 more dc around the first dc post (from the top – down) ch1, (now working UP the 2nd post (which is the other half of the scale) work 5dc (from the bottom of the post to top). Sl.st between the next set of 2 posts (this will anchor your scale down).
You now have one complete scale !!
Working in the NEXT set of 2 posts, place 5dc around the first dc post, ch1, rotate your work around to gain easier access to the 2nd post, and place 5 dc around the 2nd post (working from the bottom to the top). 2 scales complete !!
3. (inc. row) ch3, then work 1 dc into the same st. ch1, work 2 dc into the centre of the scale. Ch1, work 2 dc in between the NEXT 2 posts (which are situated BETWEEN the 2 scales), Ch1, place 2dc in the centre of the
NEXT scale, ch1, place 2dc in the 3rd ch the ch3 from the 1st scale. (you should have 5 sets of 2 posts).
4. Ch3, and place 4 more dc around the 1st post. Ch1, now working UP the
2nd post, place 5dc. Sl.st BETWEEN the NEXT set of 2 posts. Working around the NEXT set of 2 posts, place 5dc DOWN the 1st post, ch1, then place 5dc UP the 2ns post. Sl.st BETWEEN the NEXT 2 posts. Working around last set f 2 posts , place 5 dc DOWN the first post, ch1, then place 5 dc UP the 2nd post.
*REMEMBER* each inc. row will add one more extra scale to your row. With that in mind, continue in this manner, repeating rows 3 and 4 until you have 5 rows of completed scales. (the last row should have 6 scales).
Fasten off leaving a long tail for attaching to chest. Or use a matching sewing thread.
Sew in place on chest of owl, with the top row of scales placed JUST underneath the neck ruffles.
ALTERNATIVE CHEST FEATHERS – (SCALLOPS)
For this method, we will work individual rows of scallops.
Row 1 will have 2 scallops, row 2 will have 3 scallops, row 3 will have 4 scallops etc…
Set of 2 Scallops
Using 2.50mm hook and colour A Ch 10. Sc in 2nd chain from hook, and in each st. across. (9)
Turn, ch1.
Sc in same st. * skip nxt st, 5dc in next st, skip nxt st, sc in nxt st*. Repeat from * to * 1 more time. Fasten off. Leave a long tail to attach to body.
Set of 3 scallops
Ch 14. Sc in 2nd chain from hook and in each st across. (13)
Turn, ch1.
Sc in same st. *skip nxt st, 5dc in next st, skip nxt st, sc in nxt st *. Repeat from * to * 2 more times. Fasten off. Leave a long tail to attach to body.
Set of 4 scallops
Ch 18. Sc in 2nd chain from hook and in each st across. (17)
Turn , ch1.
Sc in same st. *Skip next st. 5dc in next st, skip next st, sc in nxt st*. Repeat from * to * 3 more times. Fasten off. Leave a long tail to attach to body.
Set of 5 scallops
Ch 22. Sc in 2nd chain from hook and in each st across. (21)
Turn, ch 1.
Sc in same st. * skip next st, 5dc in next st, skip next st, sc in nxt st *.
Repeat from * to * 4 more times. Fasten off. Leave a long tail for attaching to body.
Set of 6 scallops
Ch 26. Sc in 2nd ch from hook and in each st across. (25)
Turn, ch1.
Sc in same st. *skip nxt st, 5dc in nxt st, skip nxt st, sc in nxt st* . repeat from * to * 5 more times. Fasten off. Leave a long tail for attaching to body.
*If you feel like u need to add more rows of feathers, simply chain multiples of 4 + 2.
So a row of 7 scallops you would chain 30
A row of 8 scallops you would chain 34 etc…
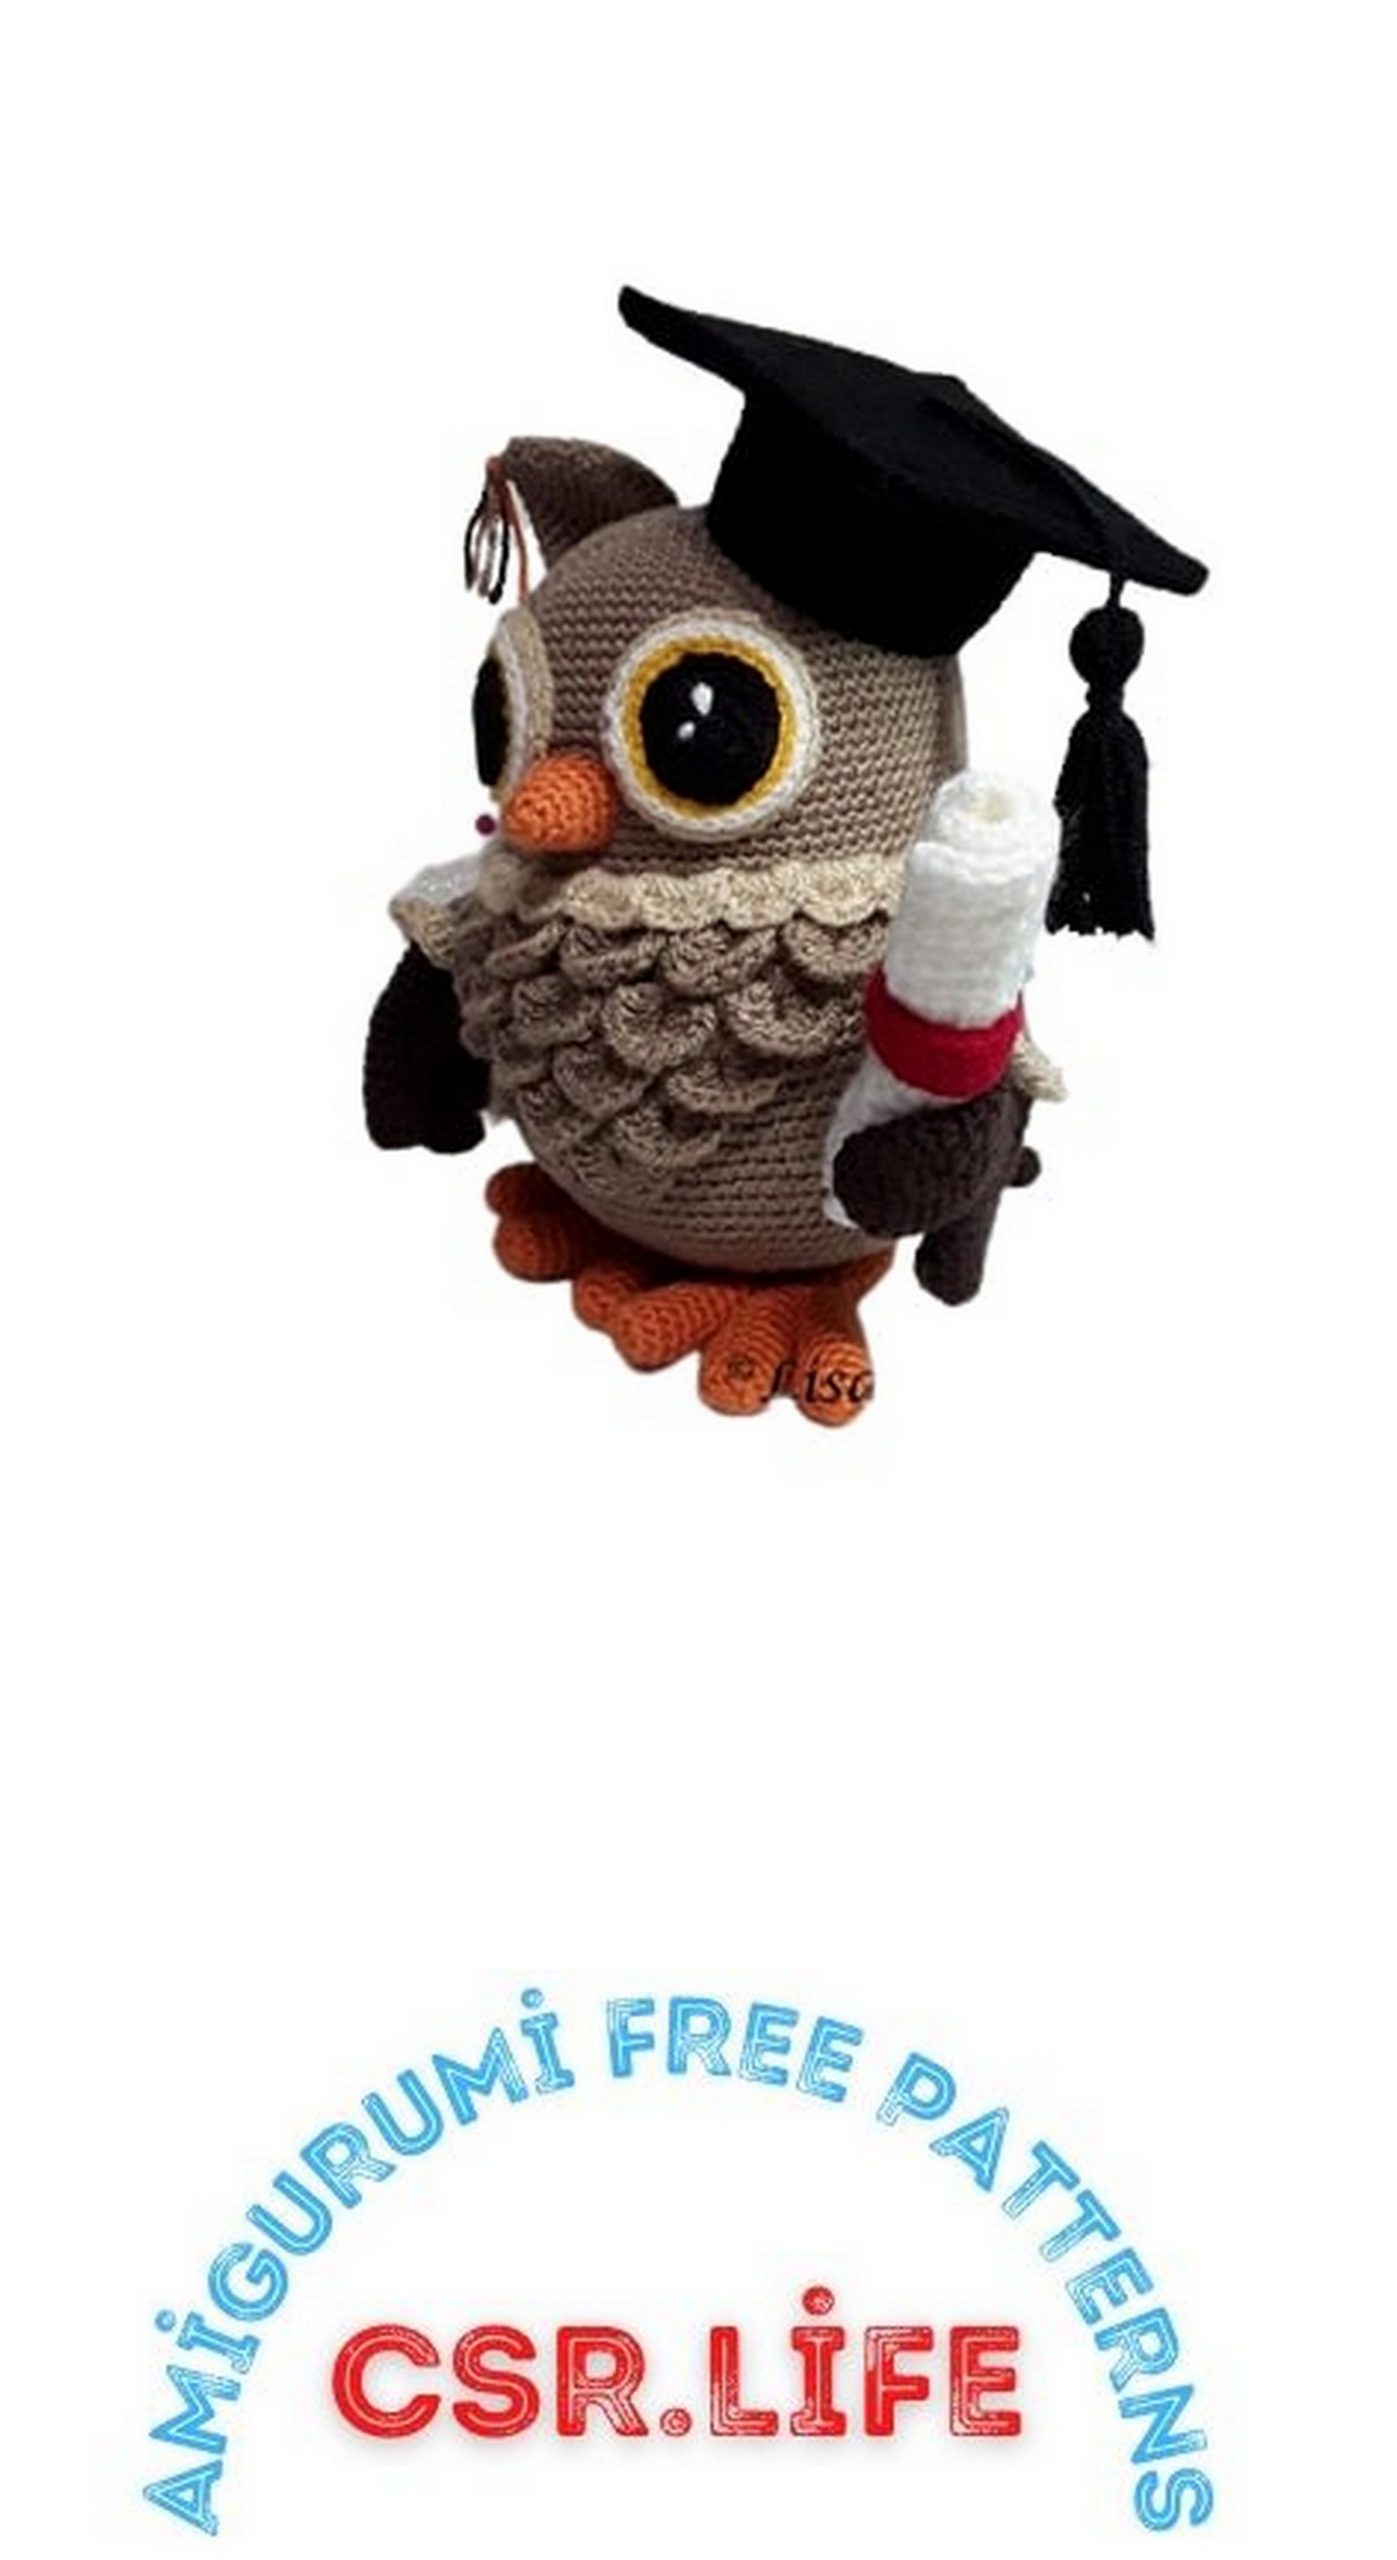
Arrange and pin your individual rows of feathers to the owls chest. Placing the top row JUST underneath the neck ruffles, and SLIGHLY overlapping each row (as shown in above picture).
TOES – MAKE 3
Using a 2.50mm hook and colour ORANGE
Make a Magic Ring.
1. 6sc into MR (6)
2. 2sc into each st. (12)
3 -10 12 sc for 8 rounds (12)
Fasten off.
Place 2 toes side by side . join with 4sc. Fasten off.
Count 2 sts from join, and in the 3rd stitch, join the next toe with 4 sc.
Fasten off.
*Your 3 toes should all now be joined together and sittng side by side*.
STUFF TOES.
FOOT
Using 2.50mm hook and colour ORANGE
Holding the toes, attach yarn to the stitch right nxt to the joining stitch, of the 1st and middle toes.
1. Sc 8 sts around 1st toe, 2sc across middle toe, 8 sc around 3rd toe, and 2 sc across middle toe. (20)
2. Sc 3, dec, sc 8, dec, sc 5. (18)
3. Sc 18 (18)
4. Sc 3, Inc, sc 8, Inc, sc 5. (20)
5. Sc 3, Inc, sc 9 , Inc , sc 6 (22)
6. Sc 3, Inc , Sc 10, Inc , Sc 7 . (24)
7 – 10. 24 sc for 4 rounds (24)
11. * sc 2 , dec* x 6 (18)
12. *sc1, dec* x 6 (12)
13 – 15 . 12 sc for 3 rounds (12)
16. *dec* x 6 ( 6 )
* DO NOT STUFF FOOT *
Fasten off. Close hole and weave in ends.
Repeat toes and foot for 2nd foot.
TAIL
Using 2.50mm hook, and colour B
Make a Magic Ring.
1. 6 sc into MR (6)
2. 2 sc into each st. (12)
3 – 6. 12 sc for 4 rounds (12)
Fasten off.
Make 1 more piece the same (from rounds 1 – 6) but do NOT fasten off.
7. Hold the 2 pieces together, and join with 1 sc. Sc 12 sts around 1st feather, then 12 sts around 2nd feather (24)
8. 24 sc (24)
9. * 6sc, dec* x3 (21)
10. 21 sc (21)
11.* 5sc, dec * x 3 (18)
12. 18 sc ( 18)
13. 18 sc (18)
Do NOT stuff.
Flatten , and sc the 2 edges together to close opening,
Fasten off, leaving a long tail for attaching to owl.
Sew to round 45 of body.
EYES
Using 2.50 mm hook and colour BLACK
1. Make A Magic Ring
2. 6 sc into the Magic Ring (6)
3. 2 sc into each stitch (12)
4. * 1sc, inc* x6 (18)
Fasten off. Weave in ends.
Using 2.50mm hook and colour YELLOW
Make a Magic Ring
1. 10 hdc into MR (10)
2. 2 hdc into each st. (20)
3. * 1sc, inc* x 10 (30)
Fasten off. Weave in ends.
Using 2.50mm hook and colour WHITE
In B.L.O join to any stitch of the yellow round. Sl.st in each st around. (30)
Fasten off. Weave in ends.
Using 2.50mm hook and colour C
With right side of work facing, join to the yellow round of stitches on the back of work. ( they will look like little running stitches) see pic below.
Sc in each stitch around. Join with a sl. st. Fasten off. Weave in ends.
Add white highlight to pupil and attach to the eye.
GRADUATION HAT
BRIM:
Using a 2.50mm hook , and colour BLACK Ch. 50 and join with a sl.st.
*Ch. 1 , sc in each st. around and join with a sl.st* (50)
Repeat for 7 more rounds or until the brim of hat is desired height.
Fasten off. Weave in ends.
Cut a strip of thin card and place it inside the circumference of the brim to stiffen it and keep it rigid. Tape the ends together to hold in place.

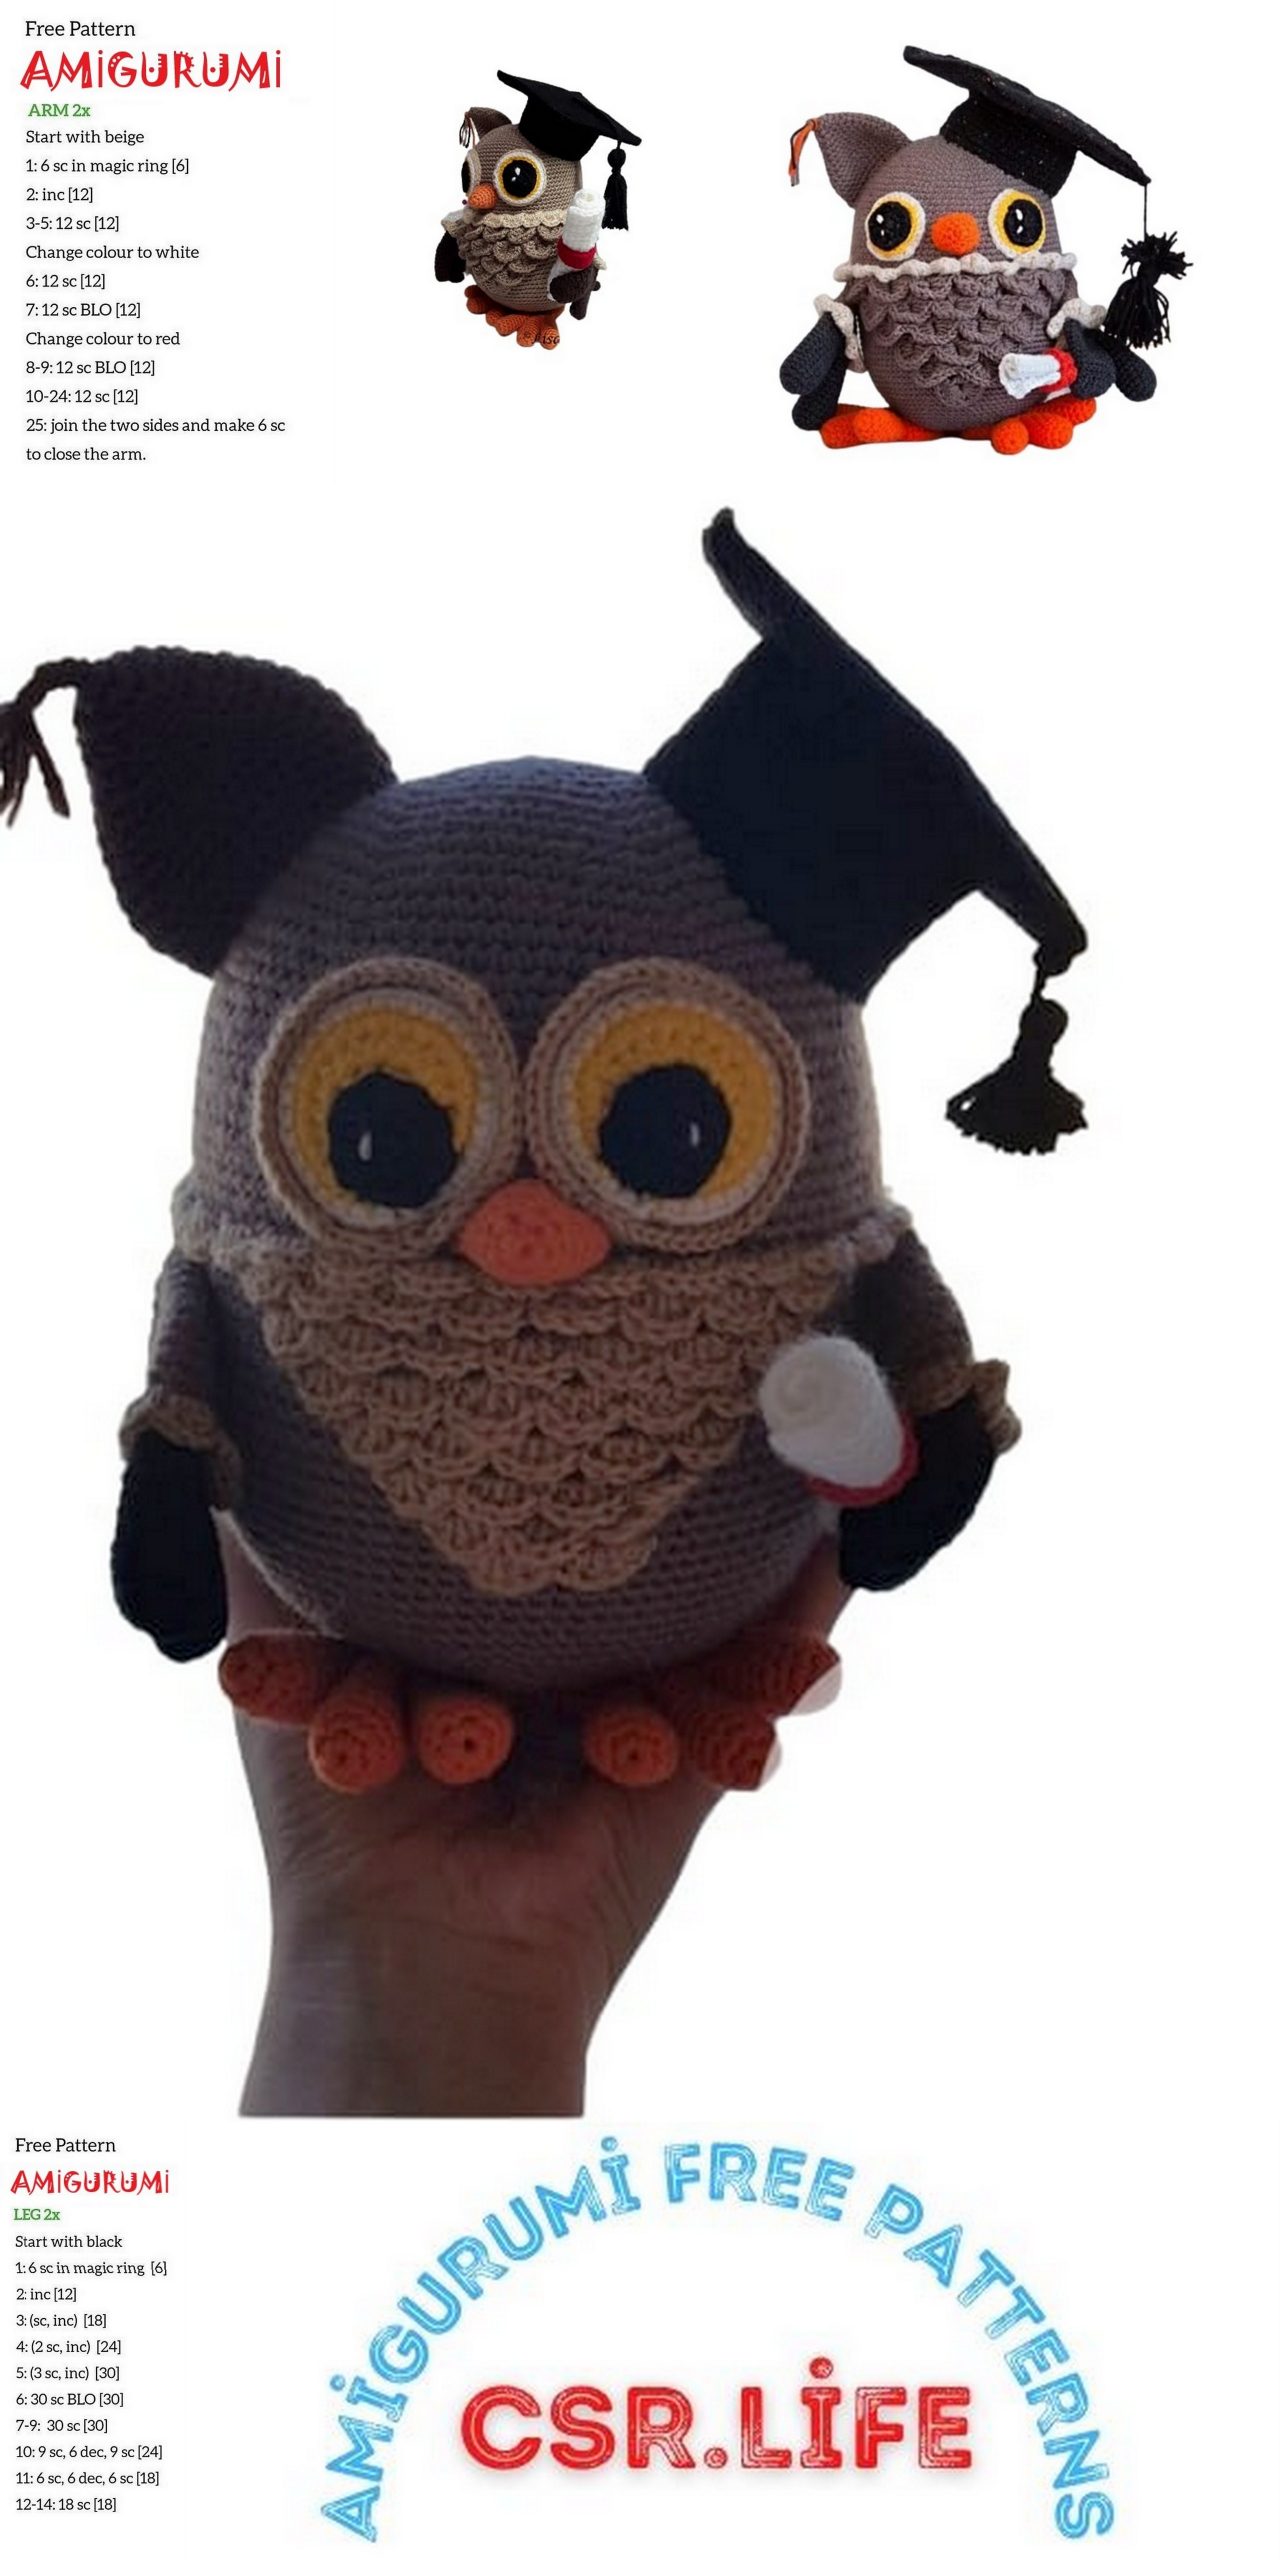
TOP OF HAT (Make 2 )
Using a 2.50mm hook and colour BLACK
Ch. 25
*Sc into the 2nd chain from hook and in each st across. (24)
Ch.1 , turn.
*sc in same stitch, and each stitch across (24)
Repeat for 23 rows, or until your piece is perfect square.
Fasten off. Weave in ends.
Make a 2nd square piece exactly the same size as the first. But do NOT fasten off.
Make a tassel, and attach to centre of 2nd square. (it’s easier to do this step now rather than later).
Holding the wrong sides of the 2 squares together, sc around 3 sides of the squares, placing 3sc in each corner.
Cut a square of thin card slightly smaller than the crocheted squares.
Place card inside the 2 squares. If it does not fit, simply trim until it does fit.
Sc along the 4th side of the squares . Fasten off. Weave in ends.
Pin brim in place in the centre of the square ( the side without the tassel). Sew into place.
SCROLL
Using 3.50 mm hook and colour WHITE
Ch. 22
Sc in 2nd ch. From hook and in each st. across. (21)
Ch. 1, turn.
*Sc in same st, and each st. across (21) Ch1, turn.*
Repeat from * to * for 18 more rows. Fasten off. Weave in ends.
Roll up tight, and with white sewing thread, stitch through the scroll to hold it in place . just a few strategically placed stitches should do the trick.
RIBBON
Using a 2.50mm hook, and colour RED
Ch 20. Sl.st to join.
(you may need to chain more or less as long as it fits snugly around your scroll).
*ch.1, sc around, sl.st to join.*
Repeat from * to * 3 more times. Fasten off. Weave in ends.
Place ribbon round the scroll.
Pin eyes and beak in place. When happy with the position, sew into place.
Pin 1 ear into position if doing the graduation owl. Pin hat into place (where the other ear would be). Play around with them until you are happy with their position and then sew into place.
OR if NOT making graduation owl, pin the TWO ears into position, and sew into place.
Sew wings to side of body.
Sew feet to bottom of body (leaving toes visible).
Sew tail to round 45 of body.
Using matching sewing thread, the same colour as the wing feathers (his hand) Position the scroll in his “hand” and carefully sew into place. Making sure you “catch” the scroll with the thread, but being careful that no stitches can be seen on the scroll from the visible side.
CONGRATULATIONS !! YOU ARE NOW THE PROUD OWNER OF
“WISDOM THE OWL”
I hope that you enjoyed using my free pattern.
All that I ask in return, is that you give myself, Lisa Wears, credit as the designer.
Please do not sell this pattern, or translate this pattern without my permission.