Amigurumi Veterinary Doll Free Pattern
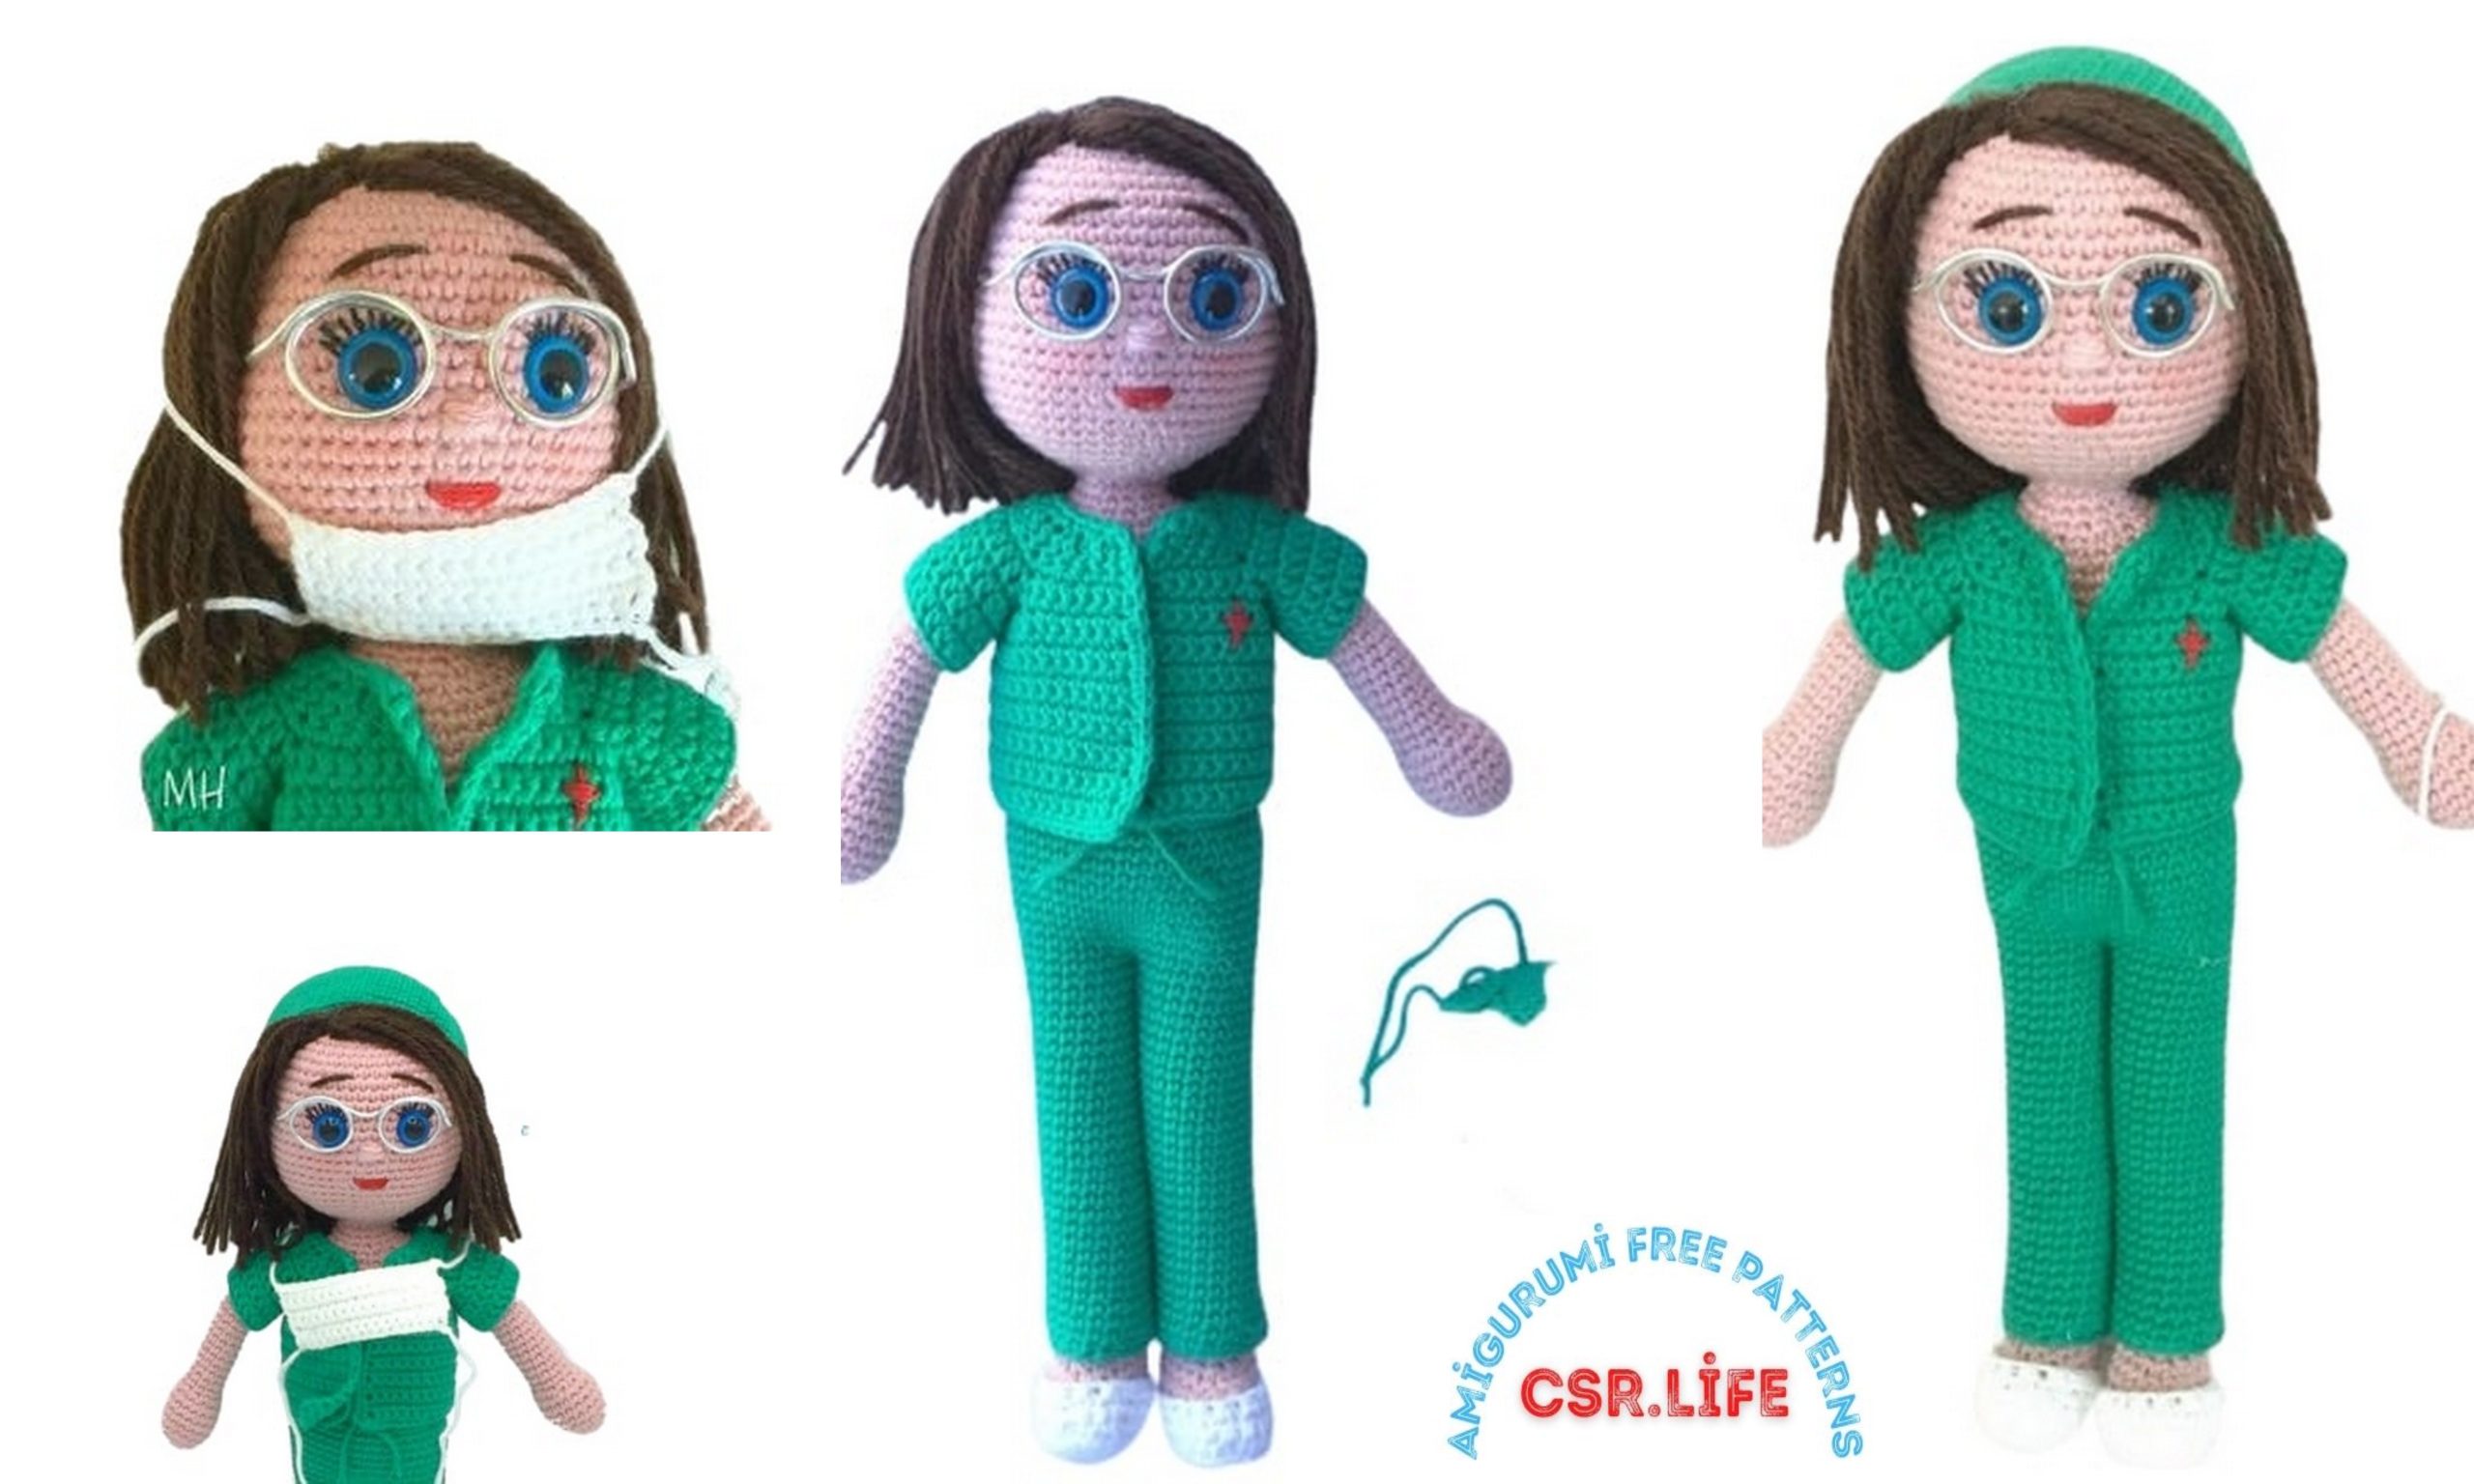
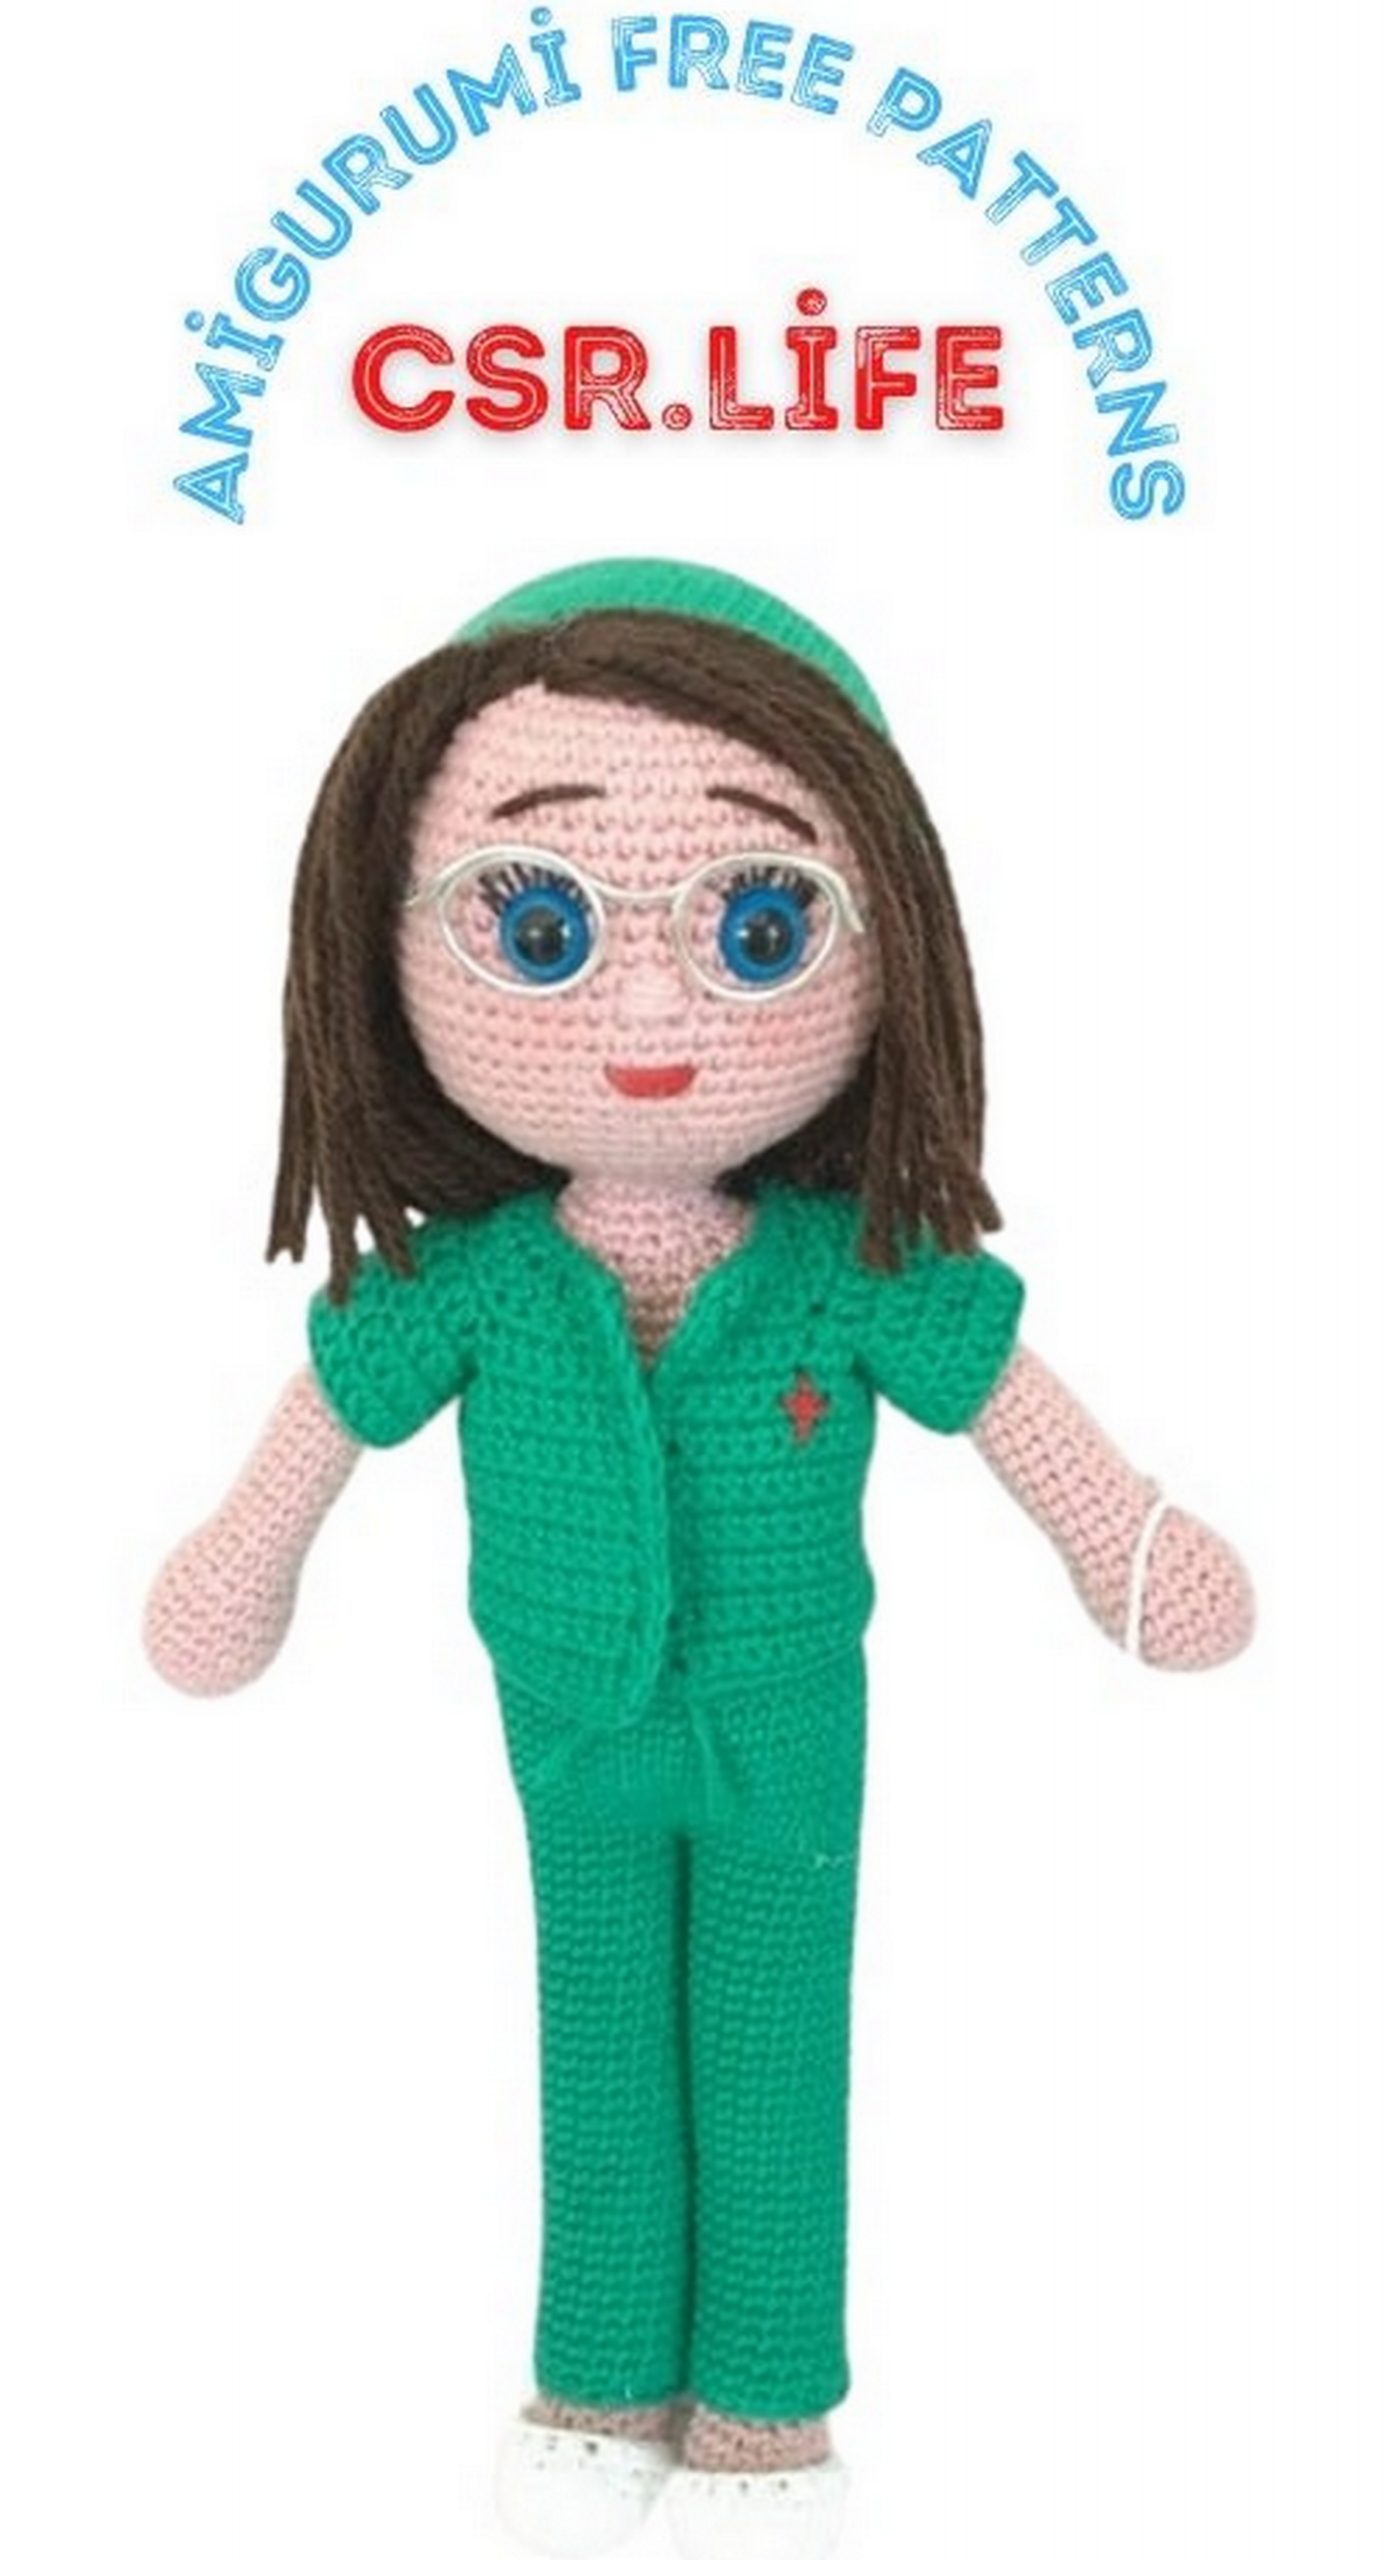
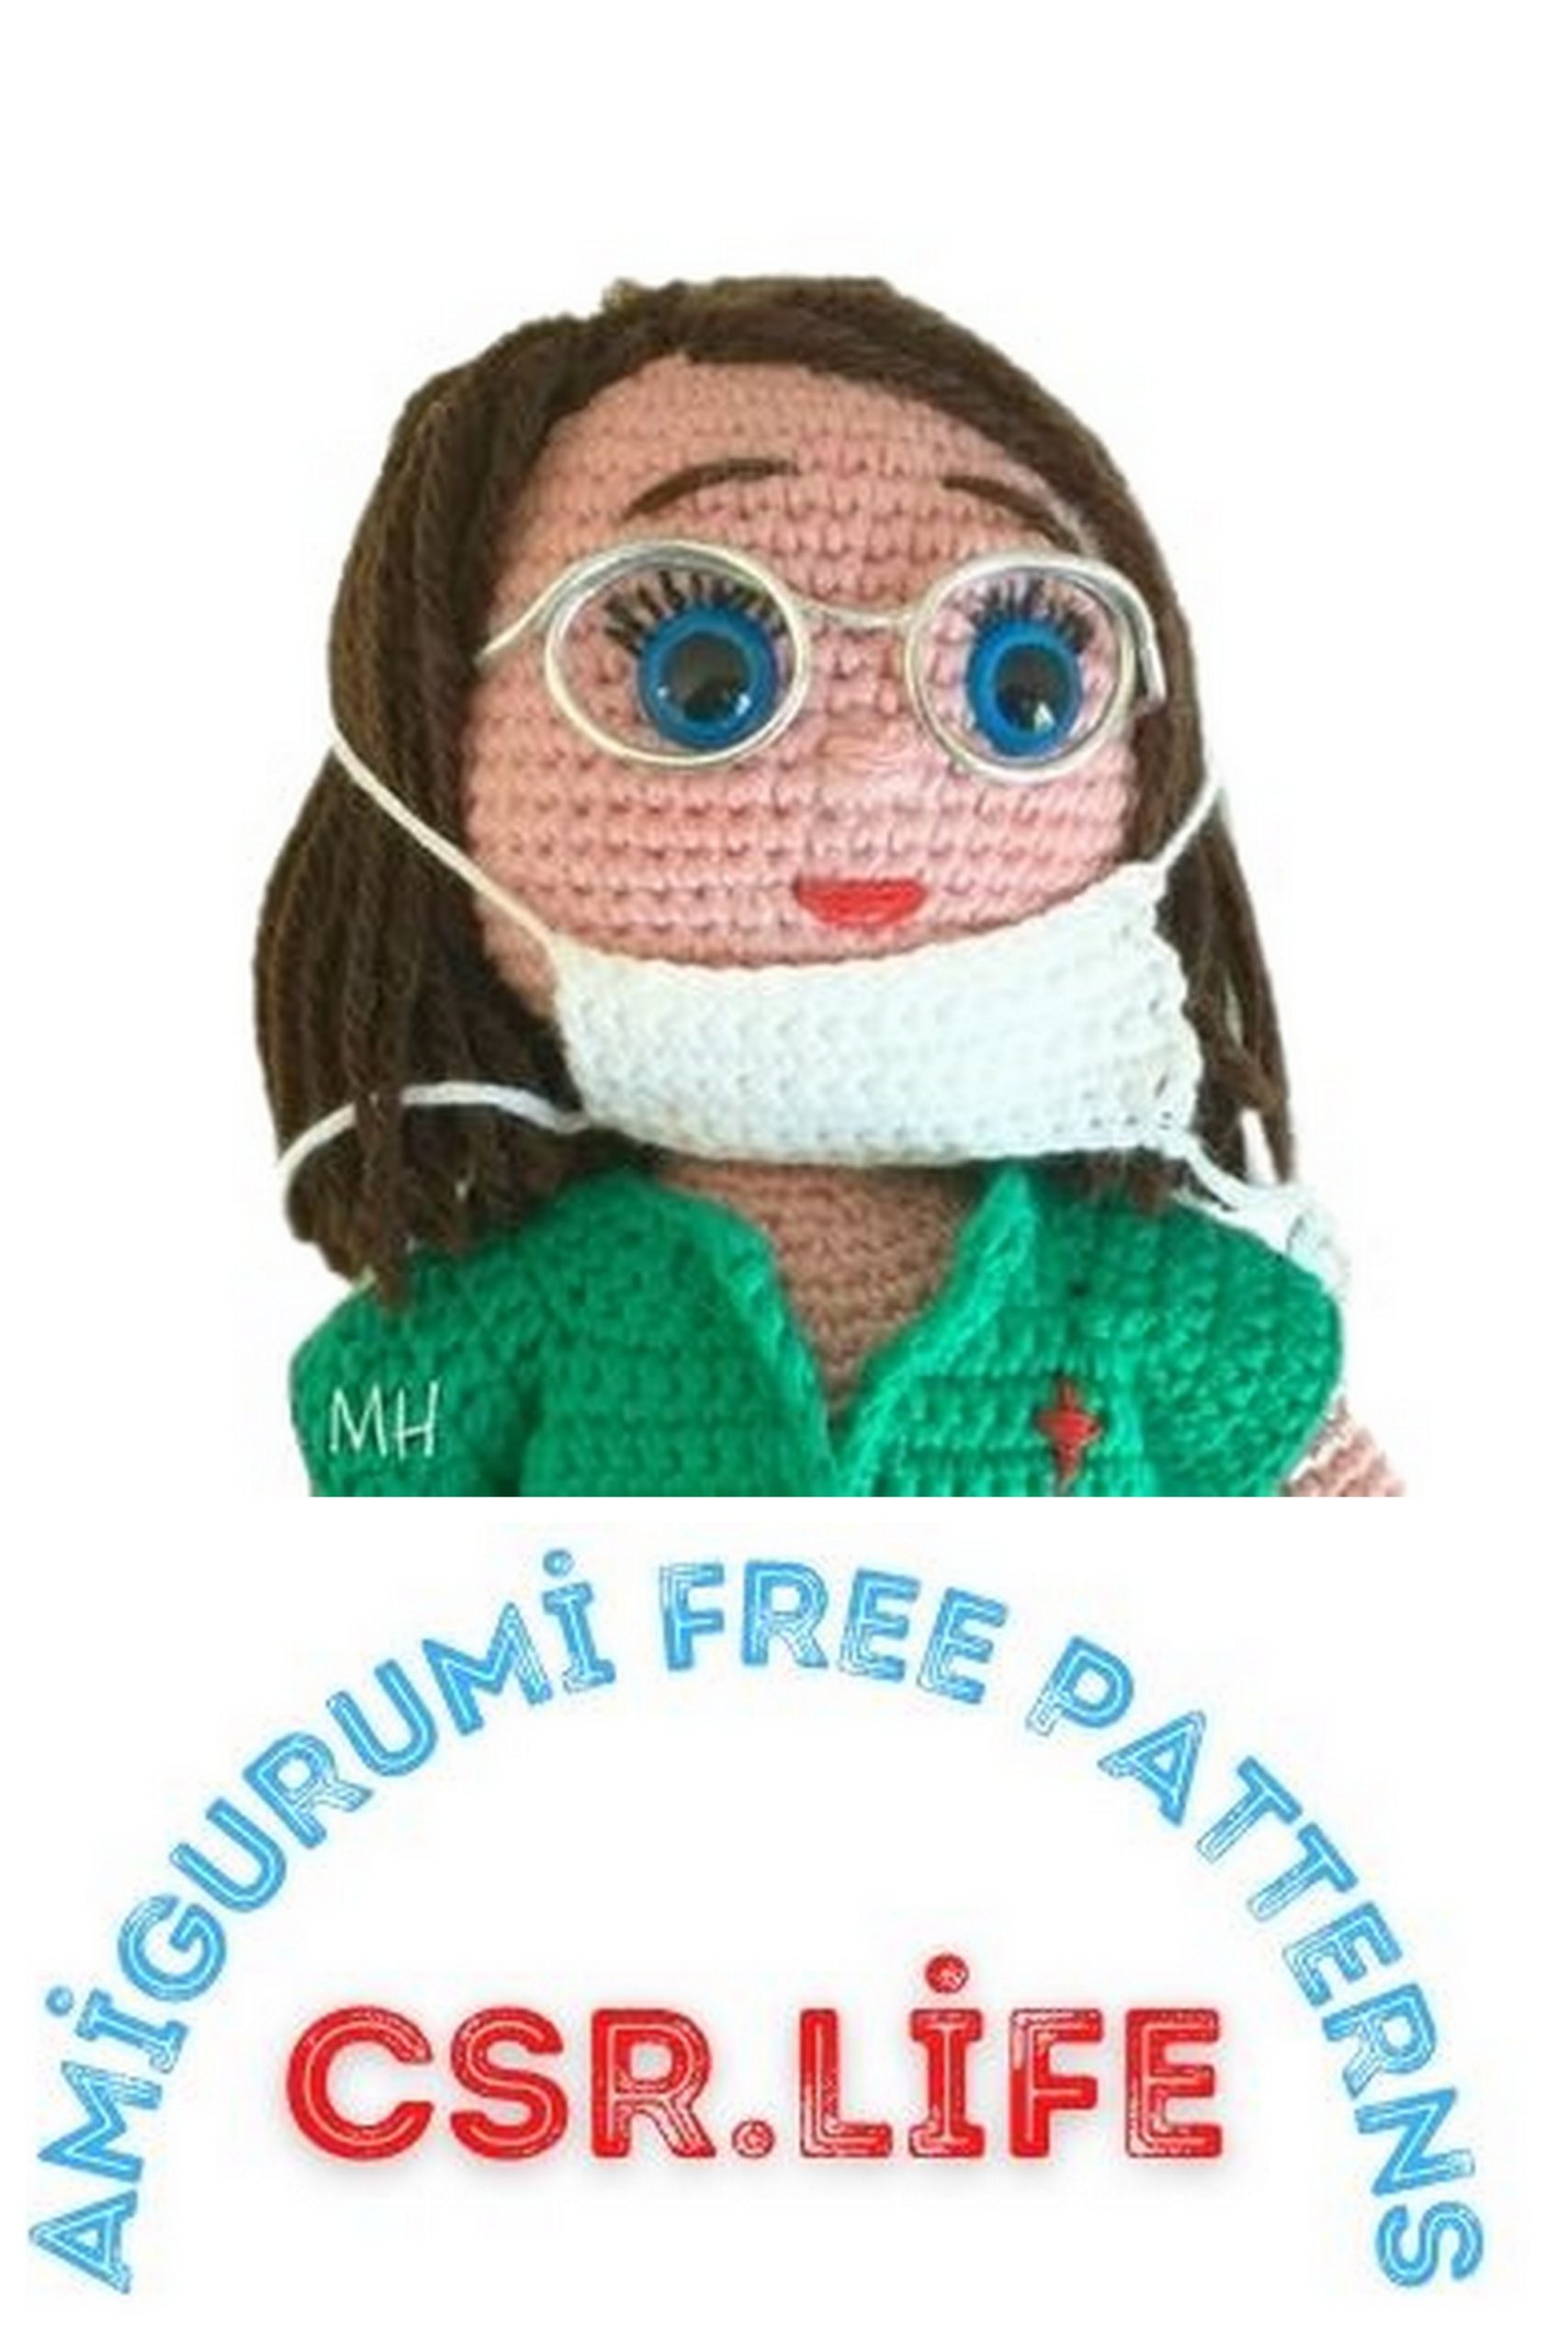
Surgeon or Veterinary Amigurumi, Free Pattern
It has taken me a long time, but since a friend told me that I needed a vet doll
Amigurumi I have been thinking about how to do it.
The clothes are removable because the children like the most is to undress the dolls (the ones you have you already know).
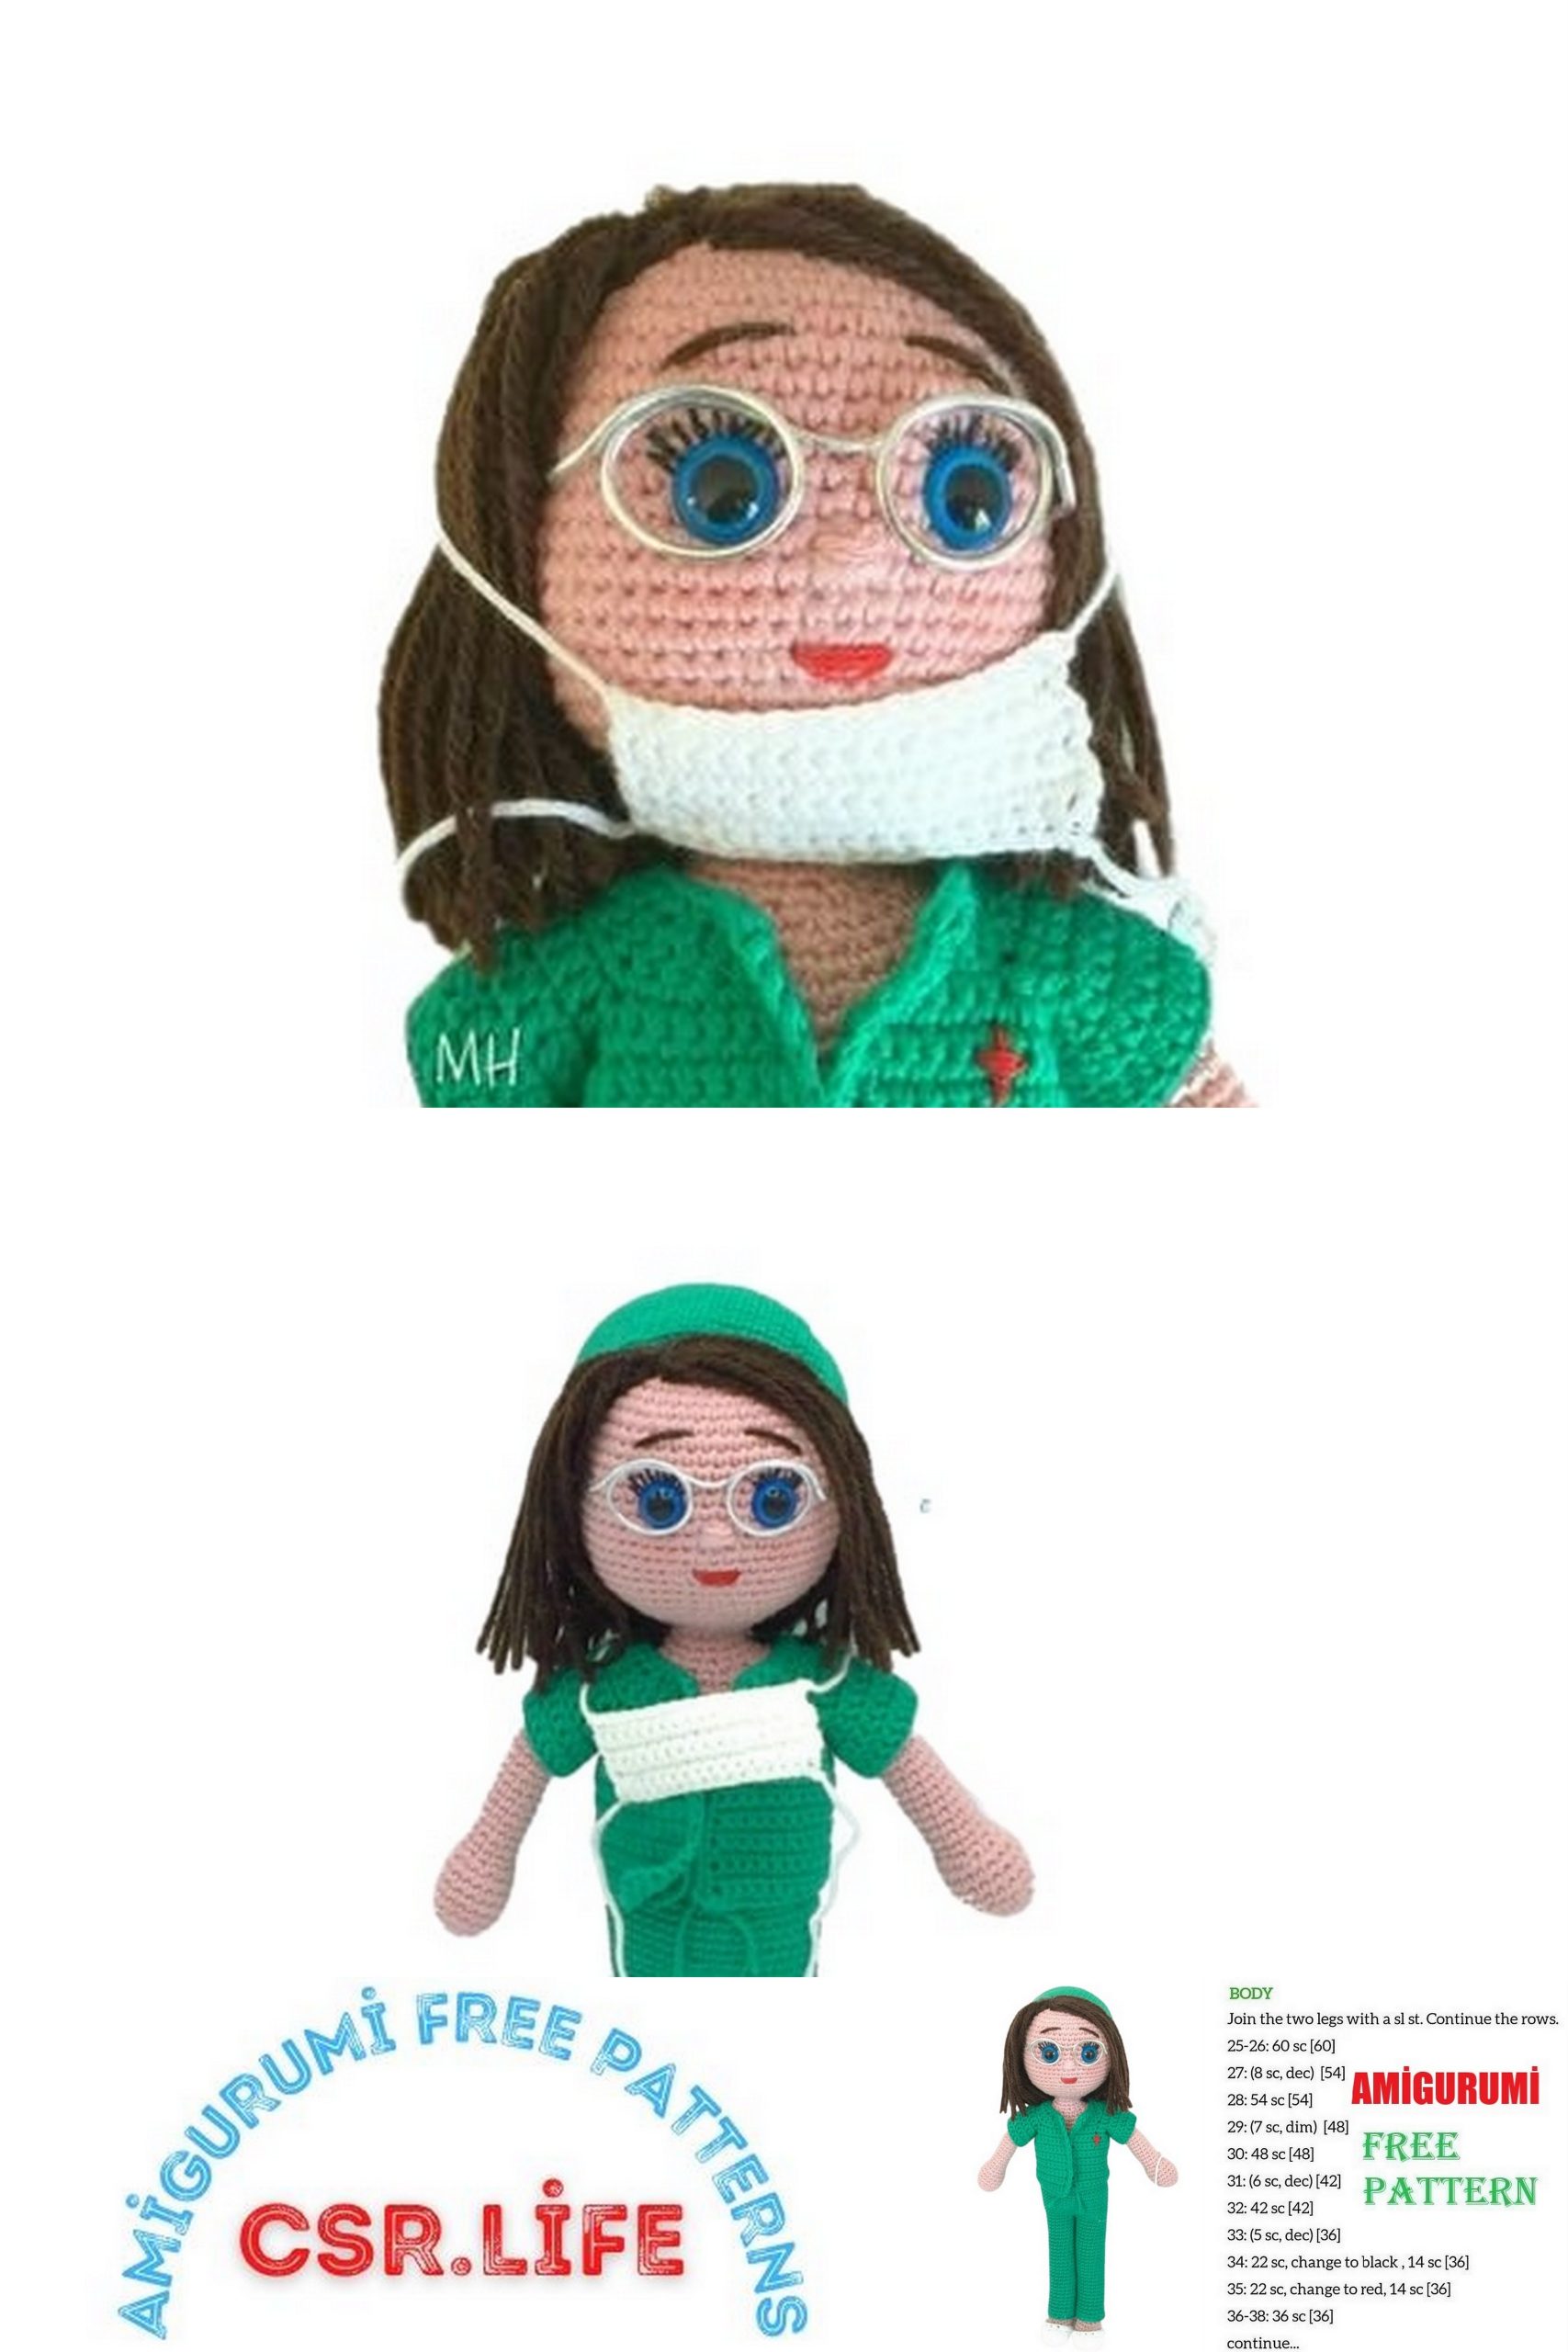
This time the doll is wearing glasses (after studying myopia is a classic) and also mask and hat in case you have to go into the operating room.
To make this doll I have used:
– pink, white green mercerized cotton yarn
– blue safety eyes
– magic wire
– brown wool for hair and eyebrows
– 2mm and 2.5mm crochet hook
– red embroidery thread
– wool needle
– padding for amigurumi (cushion padding, artificial cotton)
– blush and permanent marker for details
dc = double crochet or double crochet
hdc = half double crochet or half double crochet
sl-st = slip stitch or slip stitch
ch = CHAİN
HEAD
It is woven in a spiral pink color.
This time I have modified the pattern a little to give it shape.
We start with a magic ring.
1.- Magic ring into 8 sc (8)
2.- 1 inc, 1 sc, 6 inc (15)
3.- 1 sc, 1 inc, 2 sc, 1 inc, 1 sc, 1 inc, 1 sc, 1 inc, 1 sc, 1 inc, 1 sc, 1 inc, 1 sc, 1 inc (22)
4.- 2 sc, 1 inc, 3 sc, 1 inc, 3 sc, 1 inc, 2 sc, 1 inc, 3 sc, 1 inc, 3 sc, 1 inc (28)
5.- 1 inc, 4 sc, 1 inc, 5 sc, 1 inc, 5 sc, 1 inc, 4 sc, 1 inc, 5 sc (33)
6.- 3 sc, 1 inc, 5 sc, 1 inc, 6 sc, 1 inc, 6 sc, 1 inc, 5 sc, 1 inc, 3 sc (38)
7.- 5 sc, 1 inc, 6 sc, 1 inc, 7 sc, 1 inc, 7 sc, 1 inc, 6 sc, 1 inc, 2 sc (43)
8.- 8 sc, 1 inc, 9 sc, 1 inc, 10 sc, 1 inc, 10 sc, 1 inc, 2 sc (47)
9.- 11 sc, 1 inc, 14 sc, 1 inc, 15 sc, 1 inc, 4 sc (50)
10.- 1 sc in each point (50)
11.- 1 sc, 1 inc, 48 sc (51)
12-13.- 1 sc in each point (51)
14.- 13 sc, 1 inc, 25 sc, 1 inc, 11 sc (53)
15.- 40 sc, 1 inc, 12 sc (54)
16.- 26 sc, 1 inc, 26 sc, 1 inc (56)
17-18.- 1 sc in each point (56)
19.- 13 sc, 1 dec, 26 sc, 1 dec, 13 sc (54)
20.- 1 dec, 25 sc, 1 dec, 25 sc (52)
21.- 13 sc, 1 dec, 24 sc, 1 dec, 11 sc (50)
22.- 2 sc, 1 dis, 23 sc, 1 dec, 21 sc (48)
23.- 7 sc, 1 dec, 8 sc, 1 dec, 8 sc, 1 dec, 7 sc, 1 dec, 8 sc, 1 dec (43)
24.- 4 sc, 1 dec, 5 sc, 1 dec, 6 sc, 1 dec, 5 sc, 1 dec, 5 sc, 1 dec, 5 sc, 1 dec, 1 sc (37)
25.- 1 sc, 1 dec, 5 sc, 1 dec, 5 sc, 1 dec, 6 sc, 1 dec, 5 sc, 1 dec, 5 sc (32)
26.- 2 sc, 1 dec, 4 sc, 1 dec, 3 sc, 1 dec, 3 sc, 1 dec, 4 sc, 1 dec, 3 sc, 1 dec, 1 sc (26)
27.- 1 sc, 1 dec, 2 sc, 1 dec, 2 sc, 1 dec, 3 sc, 1 dec, 2 sc, 1 dec, 2 sc, 1 dec, 2 sc (20)
28.- 3 sc, 1 dec, 8 sc, 1 dec, 5 sc (18)
We close with 1 sl-st leaving a long strand to join the body.
The eyes are positioned between rounds 14 and 15.
The tabs are painted with a fine permanent marker.
The eyebrows are embroidered with thread of a color similar to the hair.
The nose is embroidered between both eyes.
The mouth is embroidered with red thread.
The hair is made of thicker wool, hair by hair. I have only made the upper layers and from there I have
combed and glued with the silicone gun (in this way the volume is not excessive and is better).
The glasses are very simple, but I have made you a mini video tutorial so that they are perfect
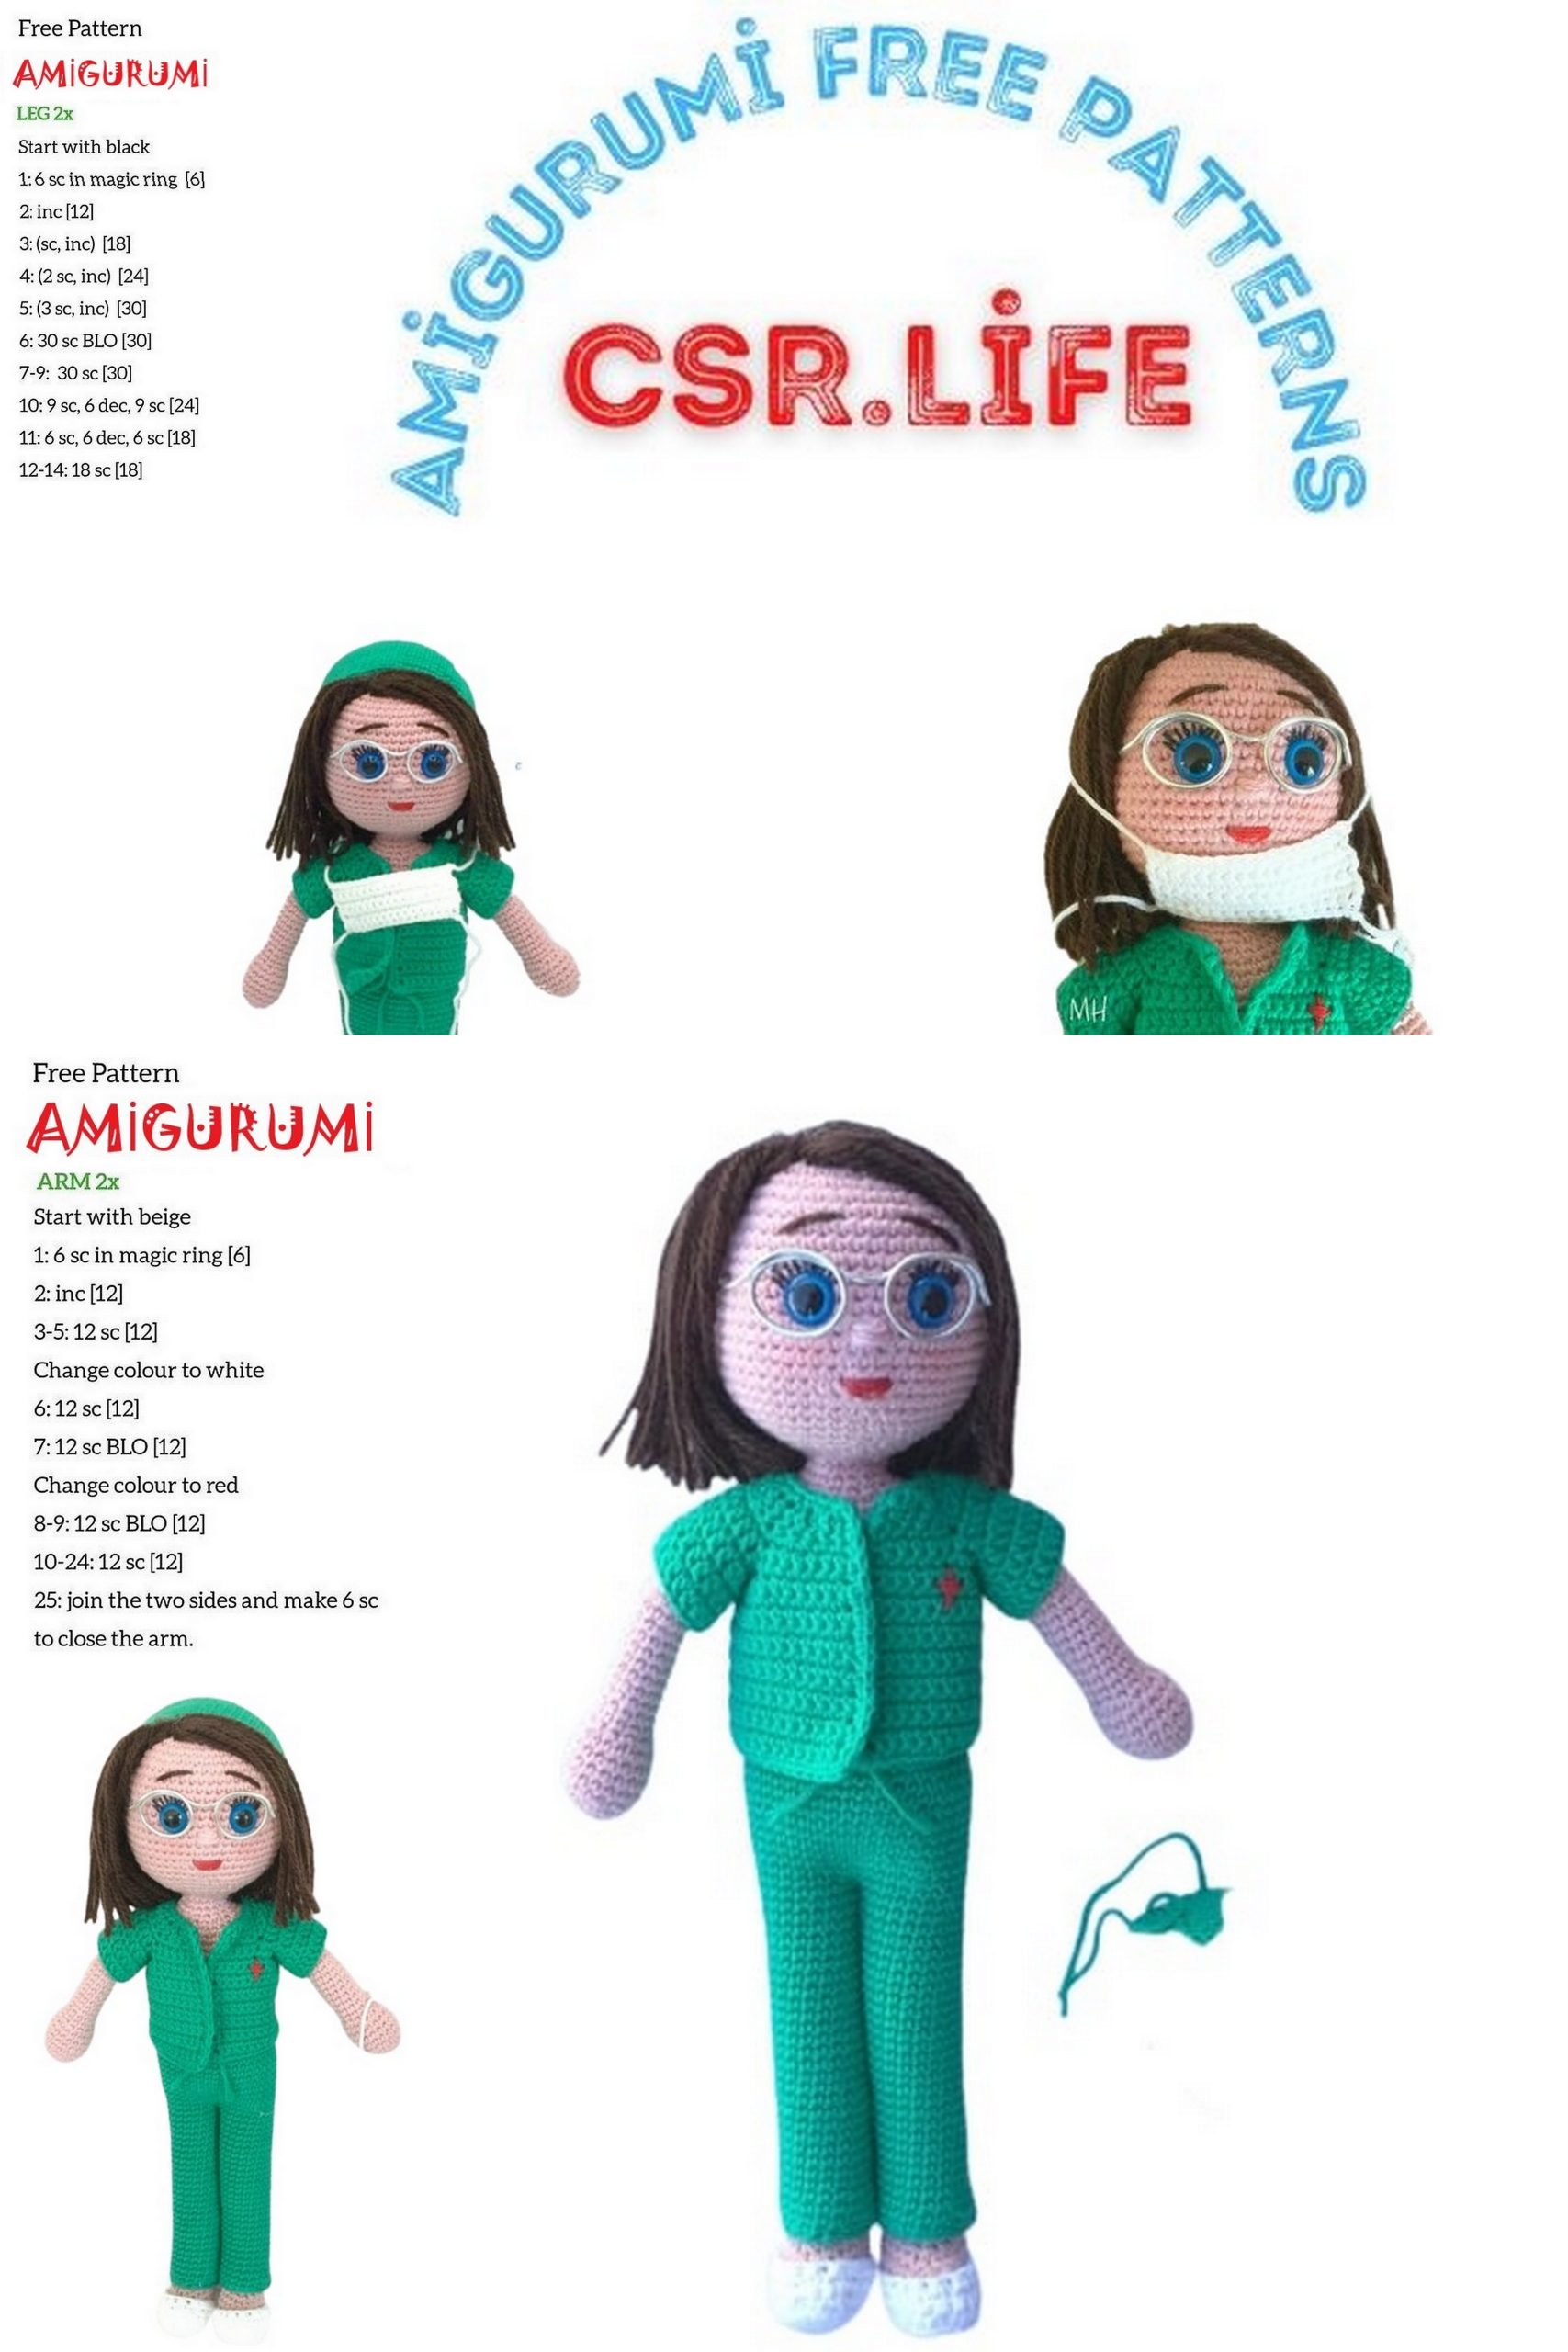
ARMS
The arms are spirally woven, for which we need a lap marker.
We make two and reserve them to join the body when we finish it.
We start in pale pink with a magic ring.
1.- Magic ring into 6 sc (6)
2.- 6 inc (12)
3.- 1 sc in each point (12)
4.- 1 sc, 1 inc, repeat until the end (18)
5-8.- 1 sc in each point (18)
9.- 1 sc, 1 dec, repeat until the end (12)
10-20.- 1 sc in each point (12)
21.- To shape the elbow we make 2 sc, 2 inc, 3 sc, 2 dec, 1 sc (12)
22-27.- 1 sc at each point
We fill.
In each arm we leave a strand to join the body.
LEGS
First the legs are performed separately, and then they are brought together to make the body. They are made in turns
joined and not spiral (that is, we close each round with 1 sl-st and start the next with 1 ch).
First we make the legs, obviously two.
We make 5 chains. We knit in pink.
1.- 1 sc in the second chain, 1 sc in each of the following two chains, 3 sc in the last chain. We turn the piece and on the other side we make 1 sc in each of the following two chains and 2 sc in the last chain (10)
2.- 1 inc, 2 sc, 3 inc, 2 sc, 2 inc (16)
3.- 1 inc, 4 sc, 4 inc, 4 sc, 3 inc (24)
4.- Taking only the strand behind each point, 1 sc at each point (24)
5.- 1 sc in each point (24)
6.- 7 sc, 3 dec, 1 sc at each point until the end of the round (21)
7.- 6 sc, 3 dec, 1 sc in each point to the last two points, 1 dec (17)
8.- 5 sc, 3 dec, 1 sc at each point until the end of the round (14)
9-39.- 1 sc in each point (14)
BODY
The body is made by joining the two legs.
We work in the traditional way, not in a spiral. We use the pale pink color.
We place one leg next to the other taking care to position them well and do as follows.
1.- 14 sc (one leg), 3 chains, 14 sc (the other leg), 3 sc (one in each chain we have made (34)
2-3.- 1 sc in each point (34)
4.- 32 sc, 1 inc on each side of the body (36)
5.- 34 sc, 1 inc on each side of the body (38)
6-9.- 1 sc in each point (38)
10.- 34 sc, 1 dec on each side of the body (36)
11.- 1 sc in each point (36)
12.- 4 sc, 1 dec, repeat until the end (30)
13-16.- 1 sc in each point (30)
17.- 4 sc, 1 inc, repeat until the end (36)
18-24.- 1 sc in each point (36)
Now with a wool needle we join the arms to the sides of the body, sewing three sc of the body with 3 sc of each arm (and we will be free 9 sc from each arm and 30 from the body). Look closely at the position of the elbows and hands before sewing them !!
1.- 1 sc in each point that is free of the body and arms (48)
2.- 1 sc in each point (48)
3.- 6 sc, 1 dec, repeat until the end (42)
4.- 5 sc, 1 dec, repeat until the end (36)
5.- 4 sc, 1 dec, repeat until the end (30)
6.- 3 sc, 1 dec, repeat until the end (24)
7.- 2 sc, 1 dec, repeat until the end (18)
8.- 1 sc in each point (18)
We fill the legs and arms, and finally the body. Do not overfill your legs to be able to put the pants on without problems !!!!
We stuff the head.
We sew the head and body point by point.
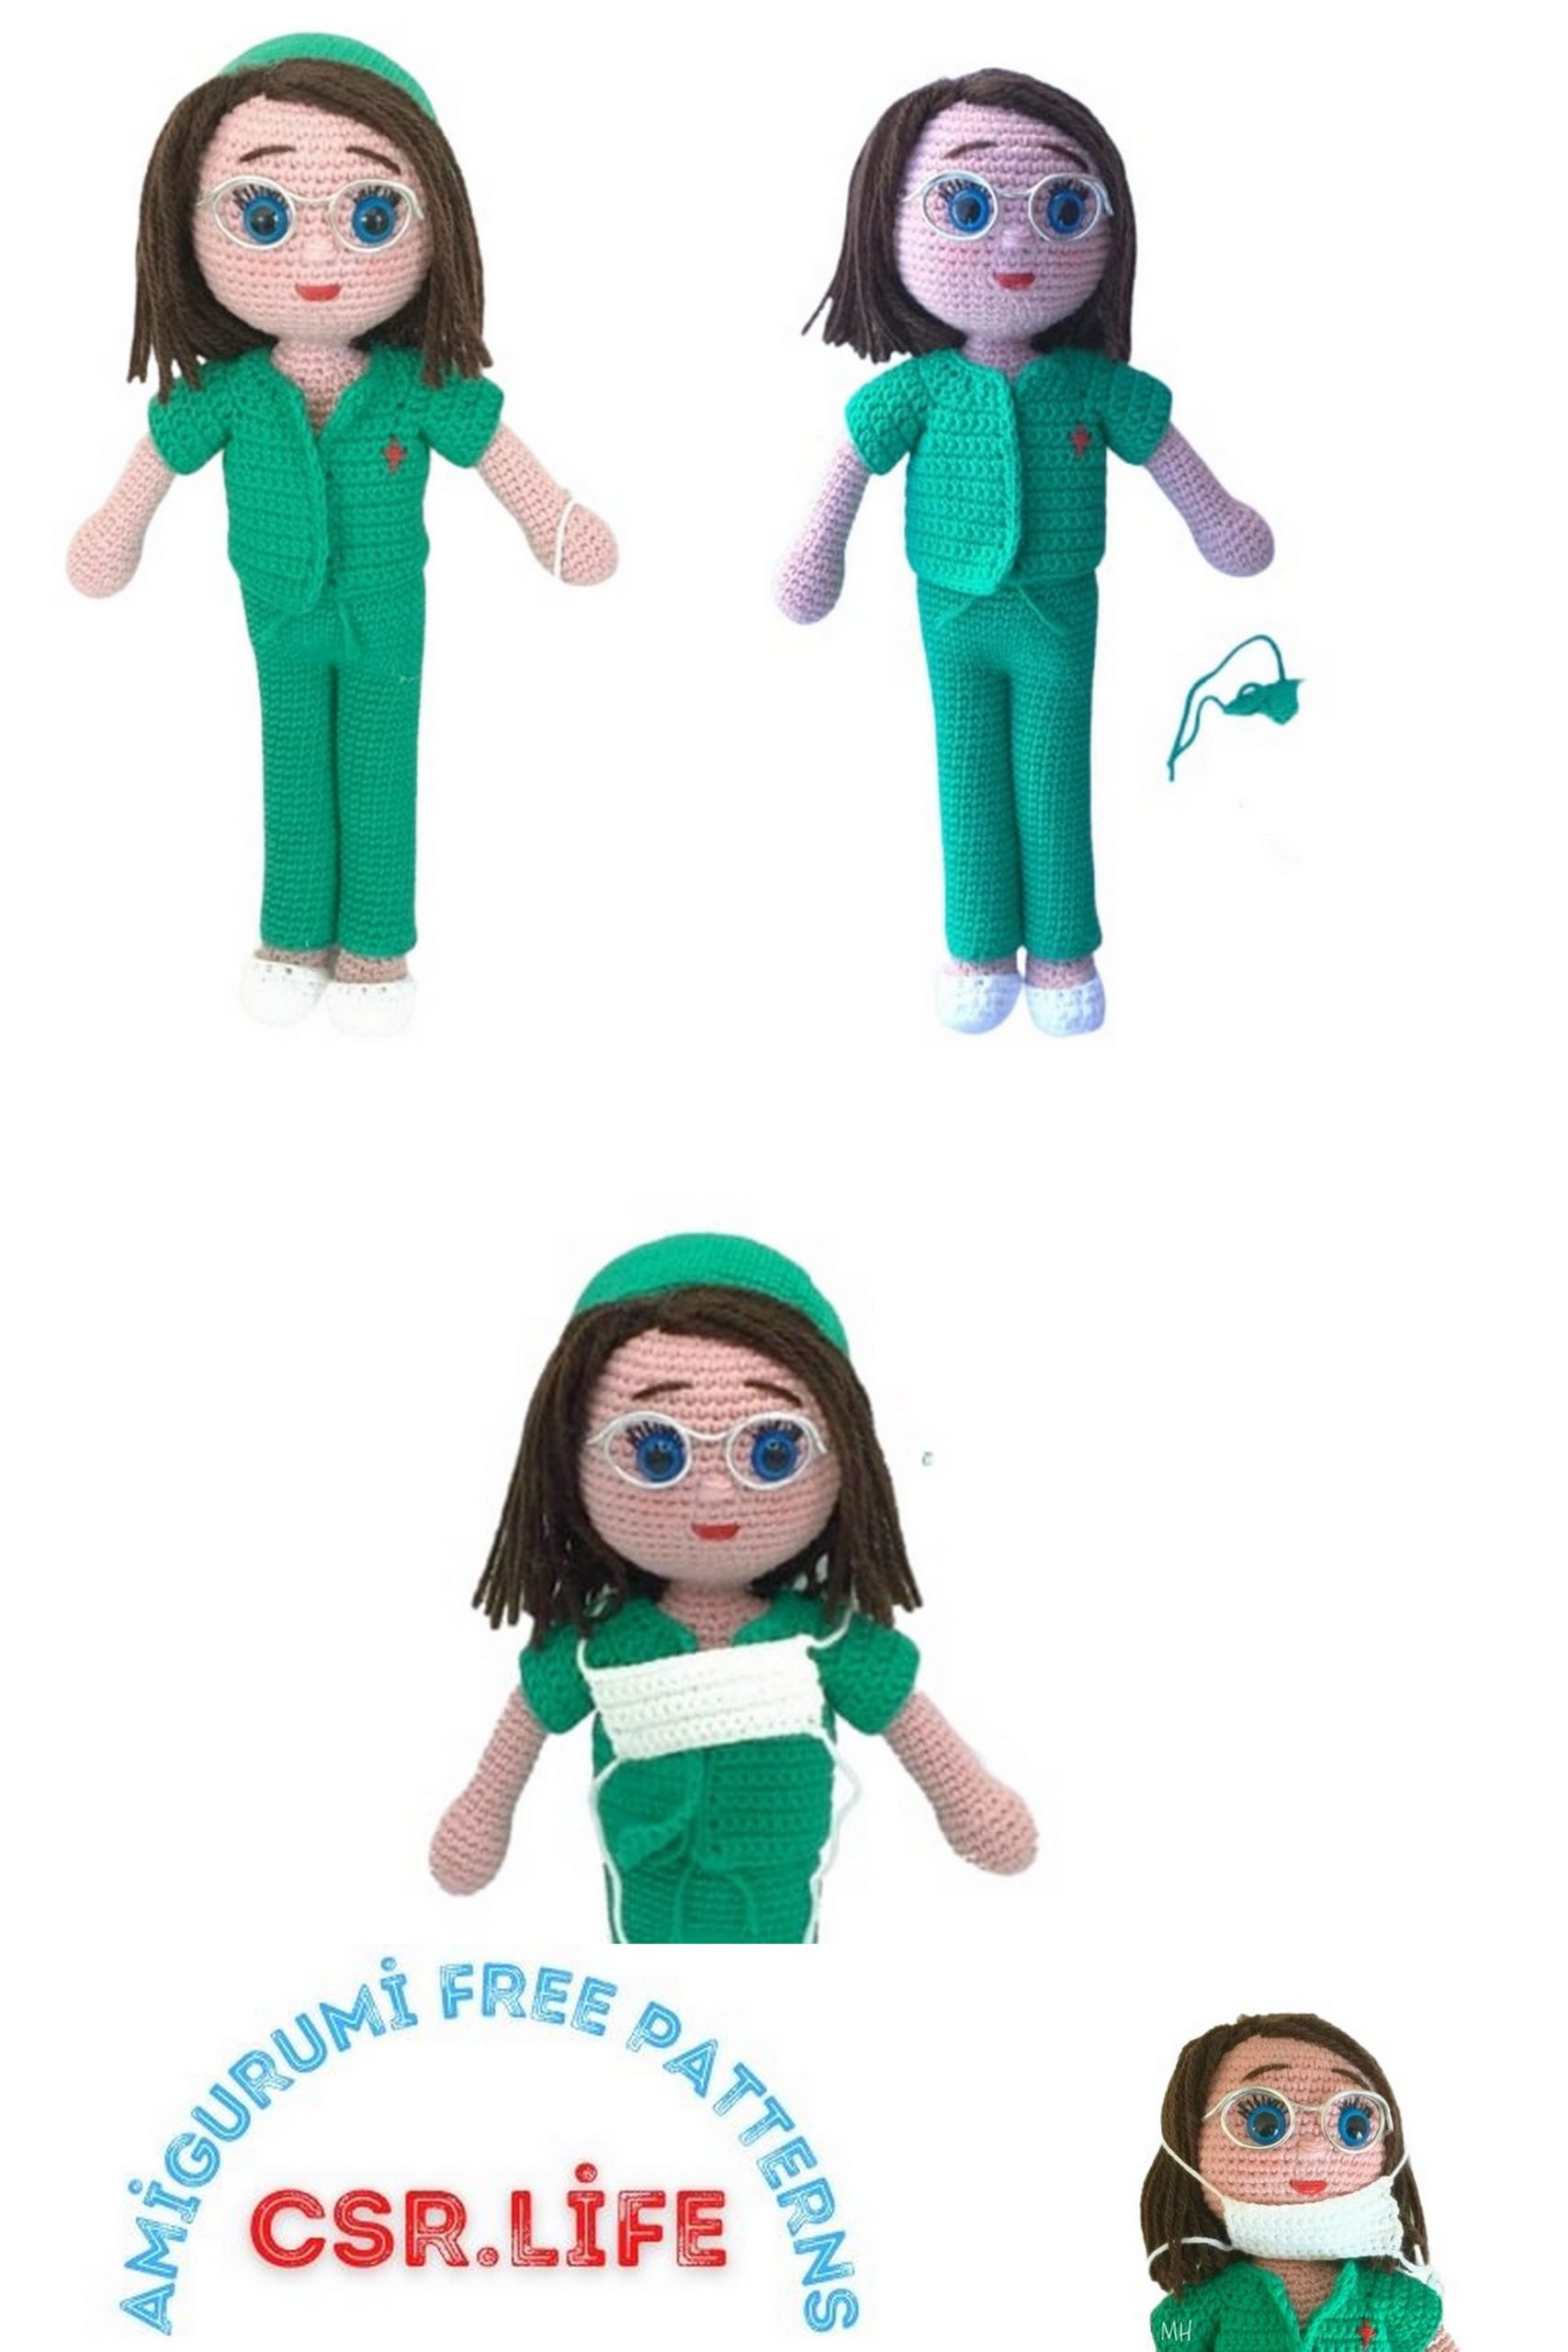
JACKET
It is woven in rows and not in twists.
It is woven in green color.
1.- 34 chains + 2 to turn the piece.
2.- We turn the piece and make 34 dc (34)
3.- 3 sc, (1 sc, 1 inc) 14 times, 3 sc (48)
4.- 7 sc, 10 chains in the air jumping 10 sc, 14 sc, 10 chains in the air jumping 10 sc, 7 sc (48): this is how we manufacture the sleeves.
5.- 1 sc at each point (including the chains we had lifted) (48)
6-18.- 1 sc in each point (18)
We lift 1 chain and make 1 sc around the entire jacket to make the finish more beautiful.
To make the sleeves we raised 1 dc in each of the 20 points that were free in the armhole and we do 4 turns of 20 dc woven in continuous rounds (not spiral).
To tie the jacket we sew a strand of green wool in each of the two parts inside the jacket. In this way it will be knotted and kept closed but it will be removable.
In my case I have embroidered a red cross on the front of the jacket.
PANTS
They are woven in green, starting with the legs.
Leg warmers
We do two.
They are woven in joined turns, not spirals.
1.- We make 18 chains. We join them with 1 pe to work in v u elt a s.
2-30.- 1 pa in each point
High part of the pants We join the two legs and we do:
1.- 18 sc of one leg + 18 sc of the other (36)
2.- 6 sc, 1 inc, repeat until the end (42)
3-8.- 1 sc in each point (42)
9.- 19 sc, 1 dec, 19 sc, 1 dec (40)
10.- 1 sc in each point (40)
11.- 18 sc, 1 dec, 18 sc, 1 dec (38)
12-13.- 1 sc in each point (38)
With the wool needle we pass a piece of thread around the waist to gather the pants.
CLOGS
They are made in joined and not spiral turns (that is, we close each round with 1 sl-st and start the next with 1 ch).
We use 1 crochet slightly higher than the one used to make the legs (I have used one of 2.5 mm, since that the legs are made with a 2 mm one).
We make 5 chains. We knit in white.
1.- 1 sc in the second chain, 1 sc in each of the following two chains, 3 sc in the last chain. We turn the piece and on the other side we make 1 sc in each of the following two chains and 2 sc in the last chain (10)
2.- 1 inc, 2 sc, 3 inc, 2 sc, 2 inc (16)
3.- 1 inc, 4 sc, 4 inc, 4 sc, 3 inc (24)
4.- Taking only the strand behind each point, 1 sc at each point (24)
5.- 7 sc, 3 dec, 1 sc at each point until the end of the round (21)
6.- 6 sc, 3 dec of hdc, 1 sc in each point to the last two points, 1 dec (17)
We close and place.
MASK
It is woven in rows and not in turns. It is made in white color.
We start by making 16 chains and one more for the first point.
We make 7 rows of 16 sc.
We leave two strands at each end to tie the mask.
HAT
It is made in traditional fabric, not in a spiral.
It is woven in green color.
1.- Magic ring into 6 sc (6)
2.- 6 inc (12)
3.- 1 sc, 1 inc, repeat until the end (18)
4.- 2 sc, 1 inc, repeat until the end (24)
5.- 3 sc, 1 inc, repeat until the end (30)
6.- 4 sc, 1 inc, repeat until the end (36)
7.- 5 sc, 1 inc, repeat until the end (42)
8.- 6 sc, 1 inc, repeat until the end (48)
9.- 7 sc, 1 inc, repeat until the end (54)
10.- 8 sc, 1 inc, repeat until the end (60)
11.- Taking only the back strand of each stitch 1 sc in each stitch (60)
12-19.- 1 sc in each point (60)
To finish with a wool needle we pass a thread around the entire hat leaving the ends loose for knotting (and slightly furrowed like real operating room caps).
I hope you liked the pattern. You know that if you find any fault you just have to leave it to me in comments (writing patterns is the least I like it, but I try to understand each other).
For me the best is how customizable it is, allowing lots of variations (changing hair, clothes, uniform, glasses, …).