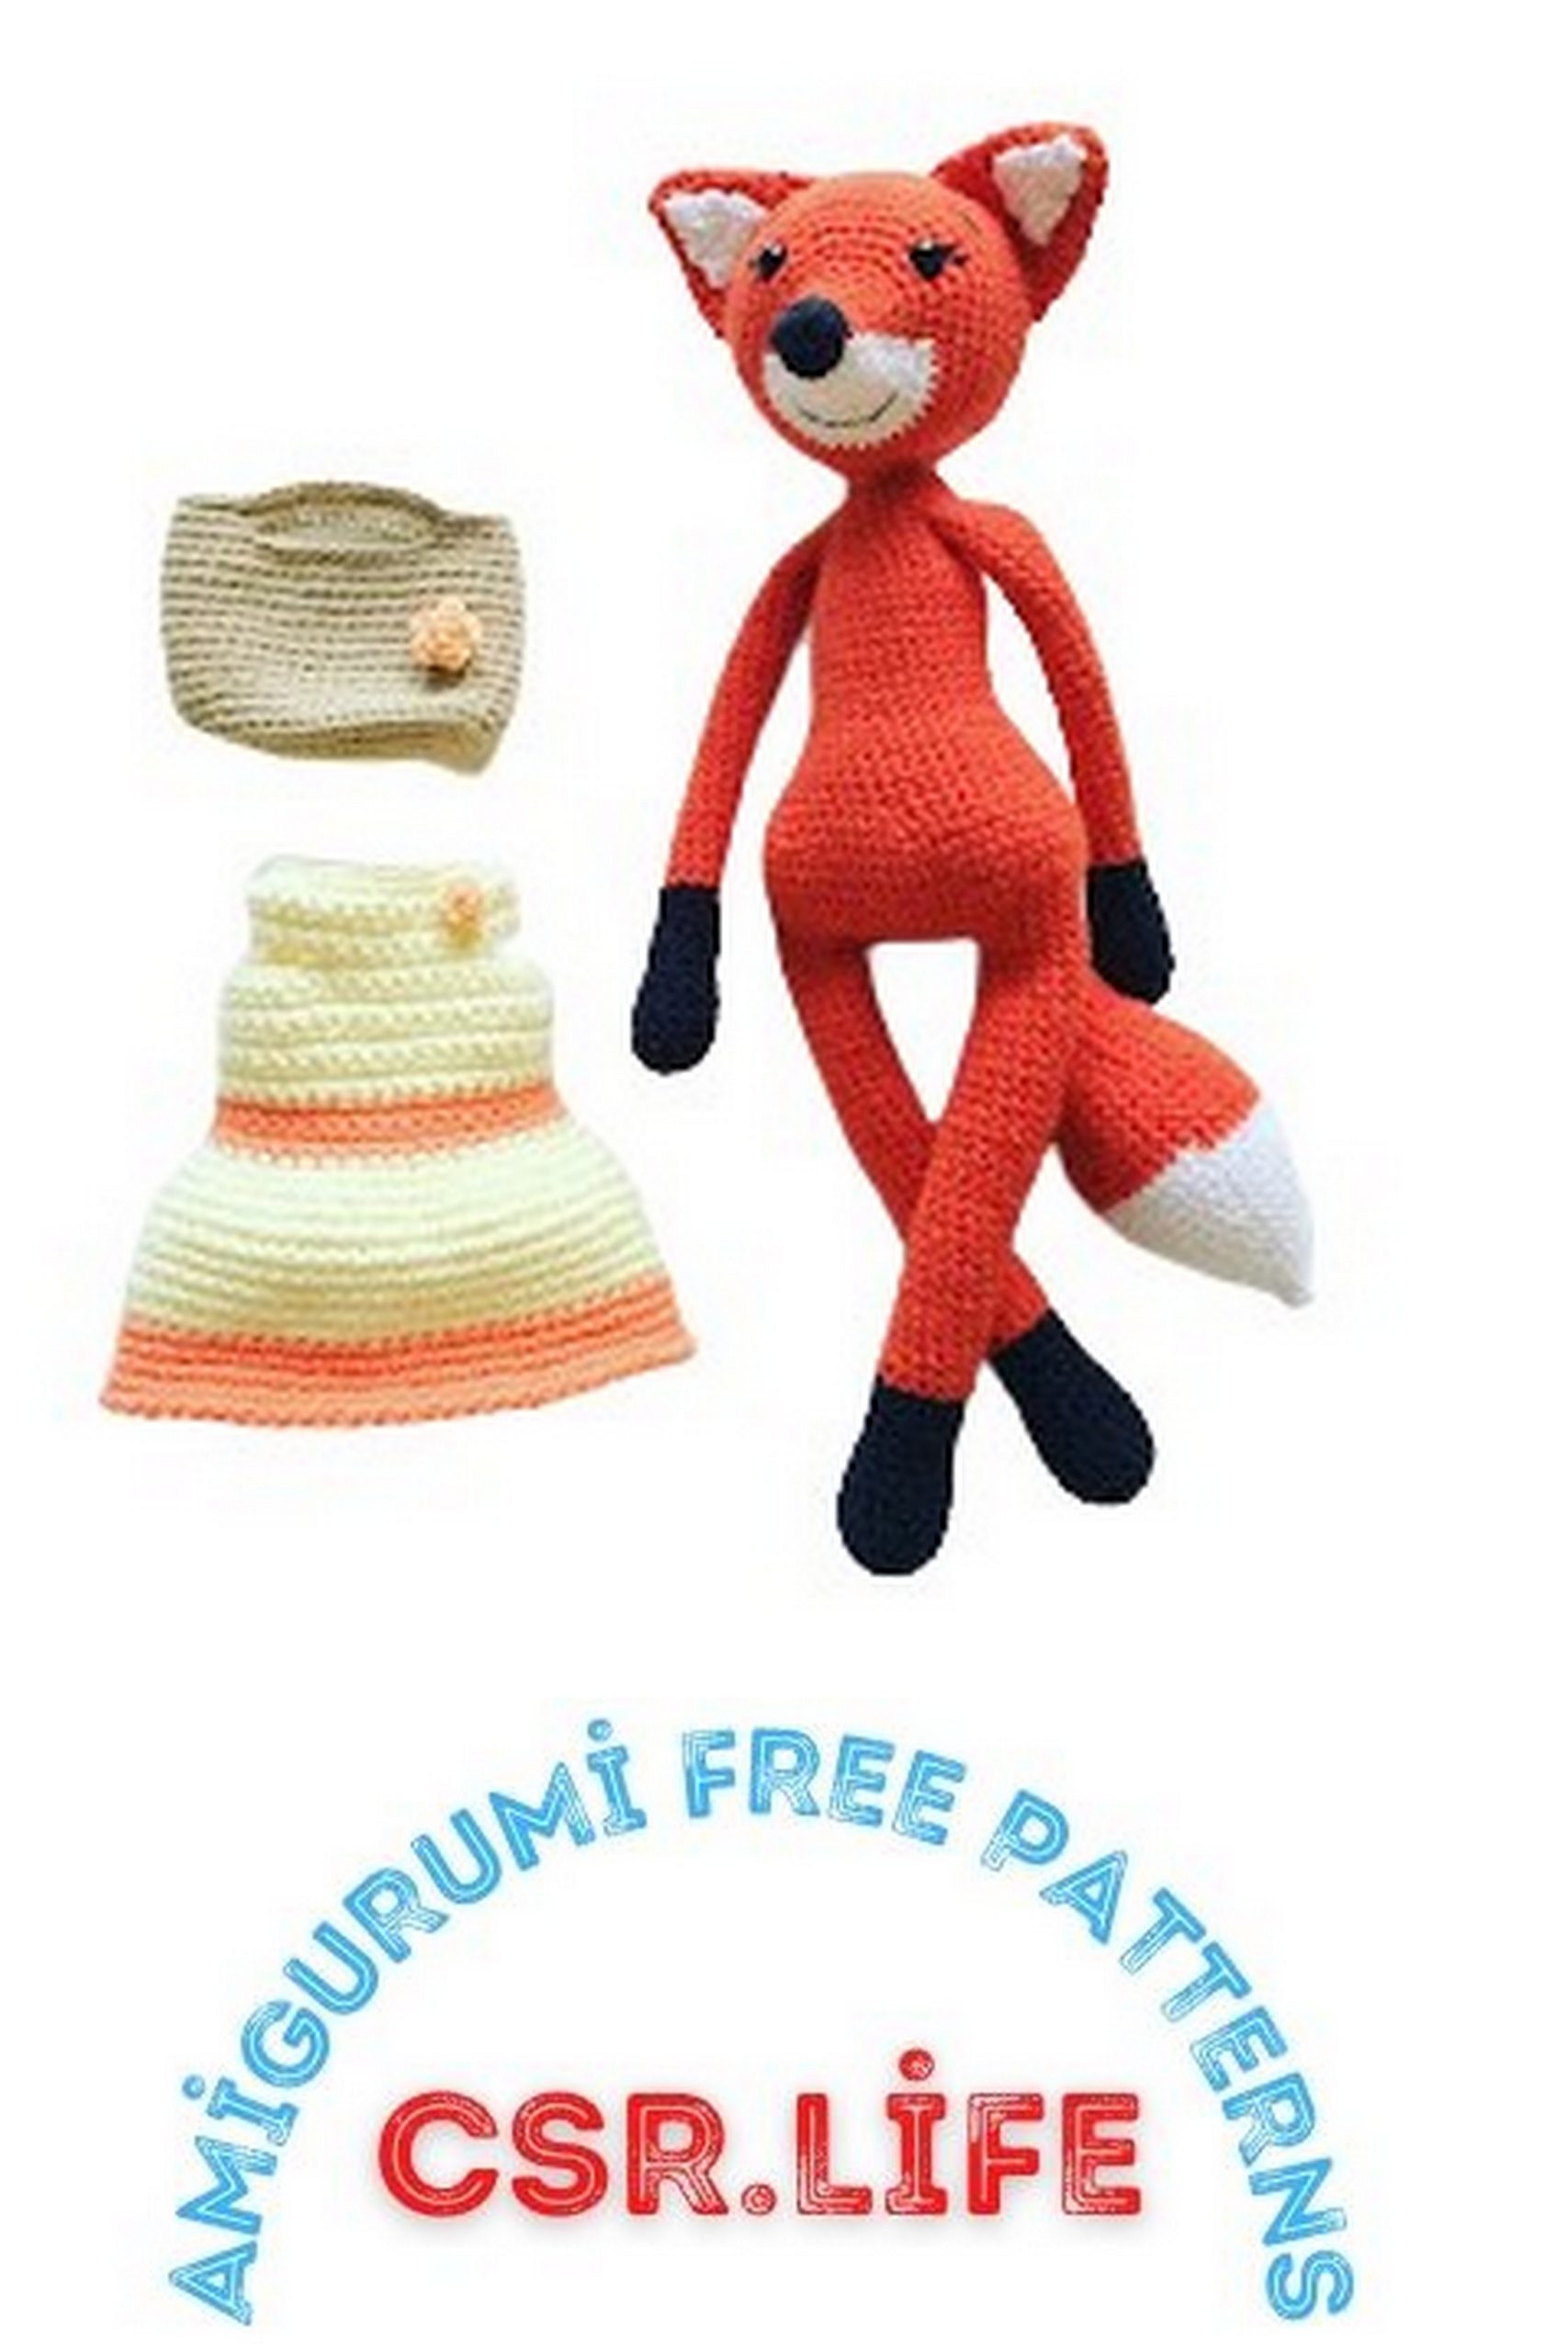
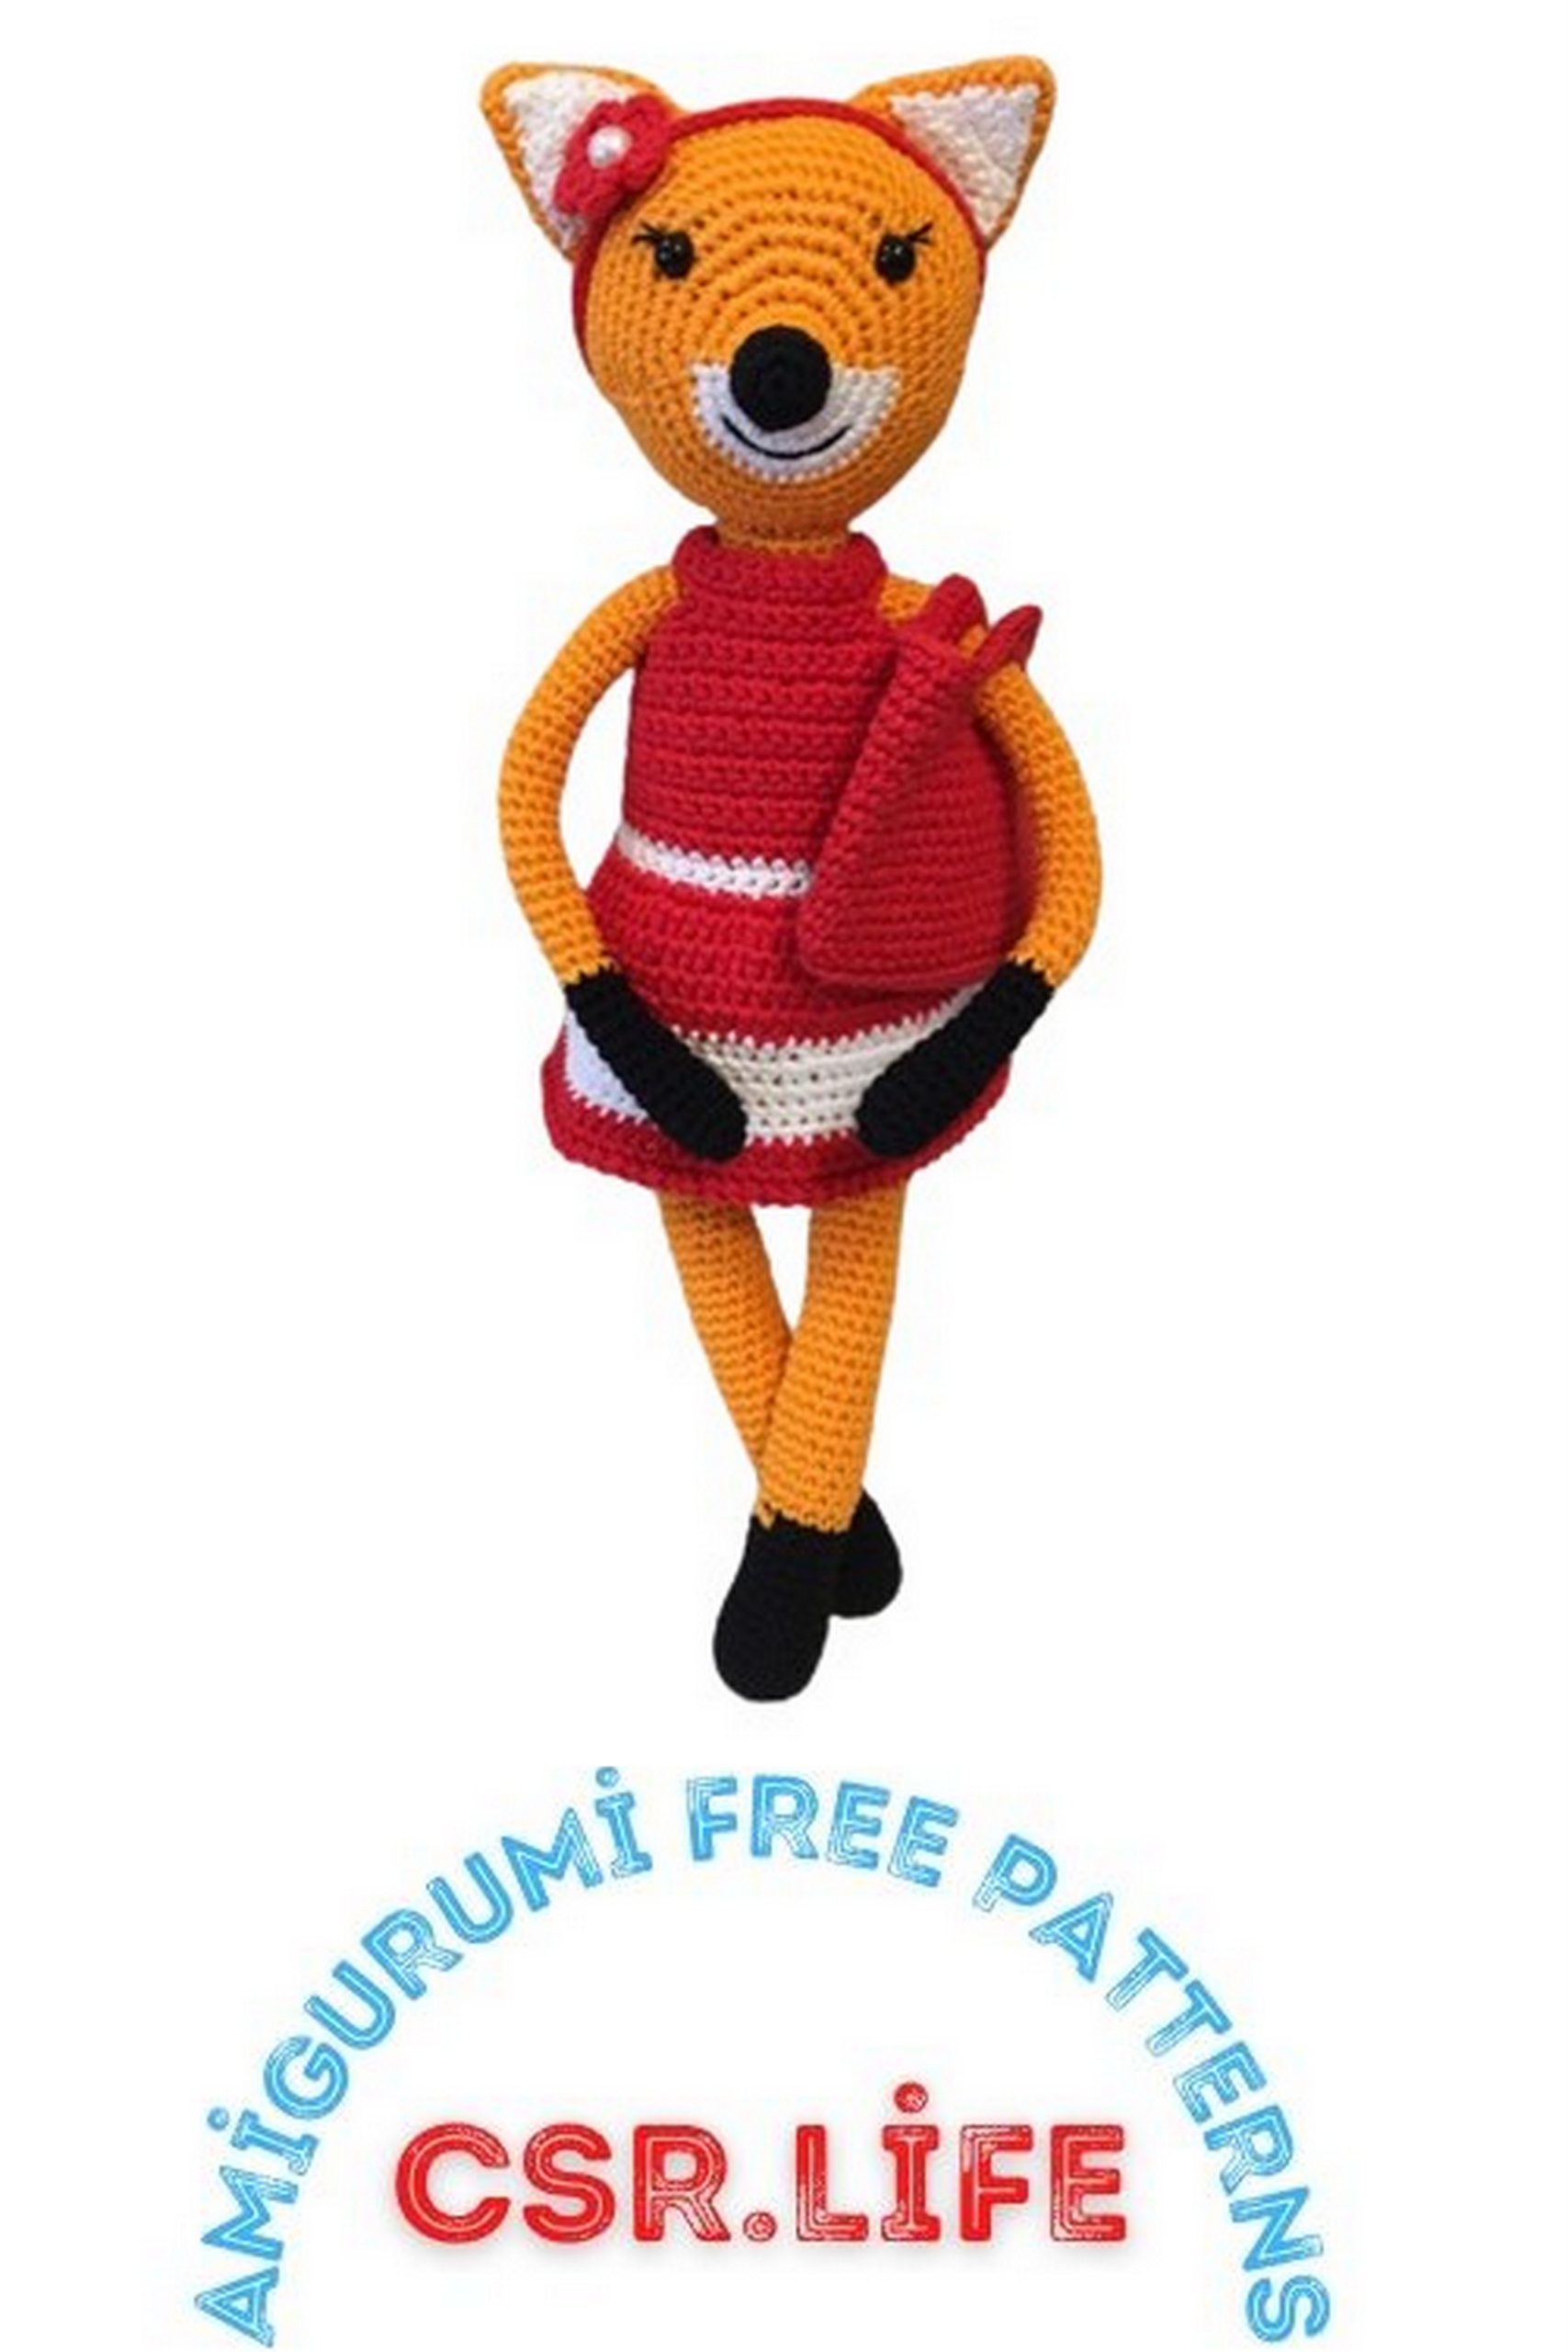
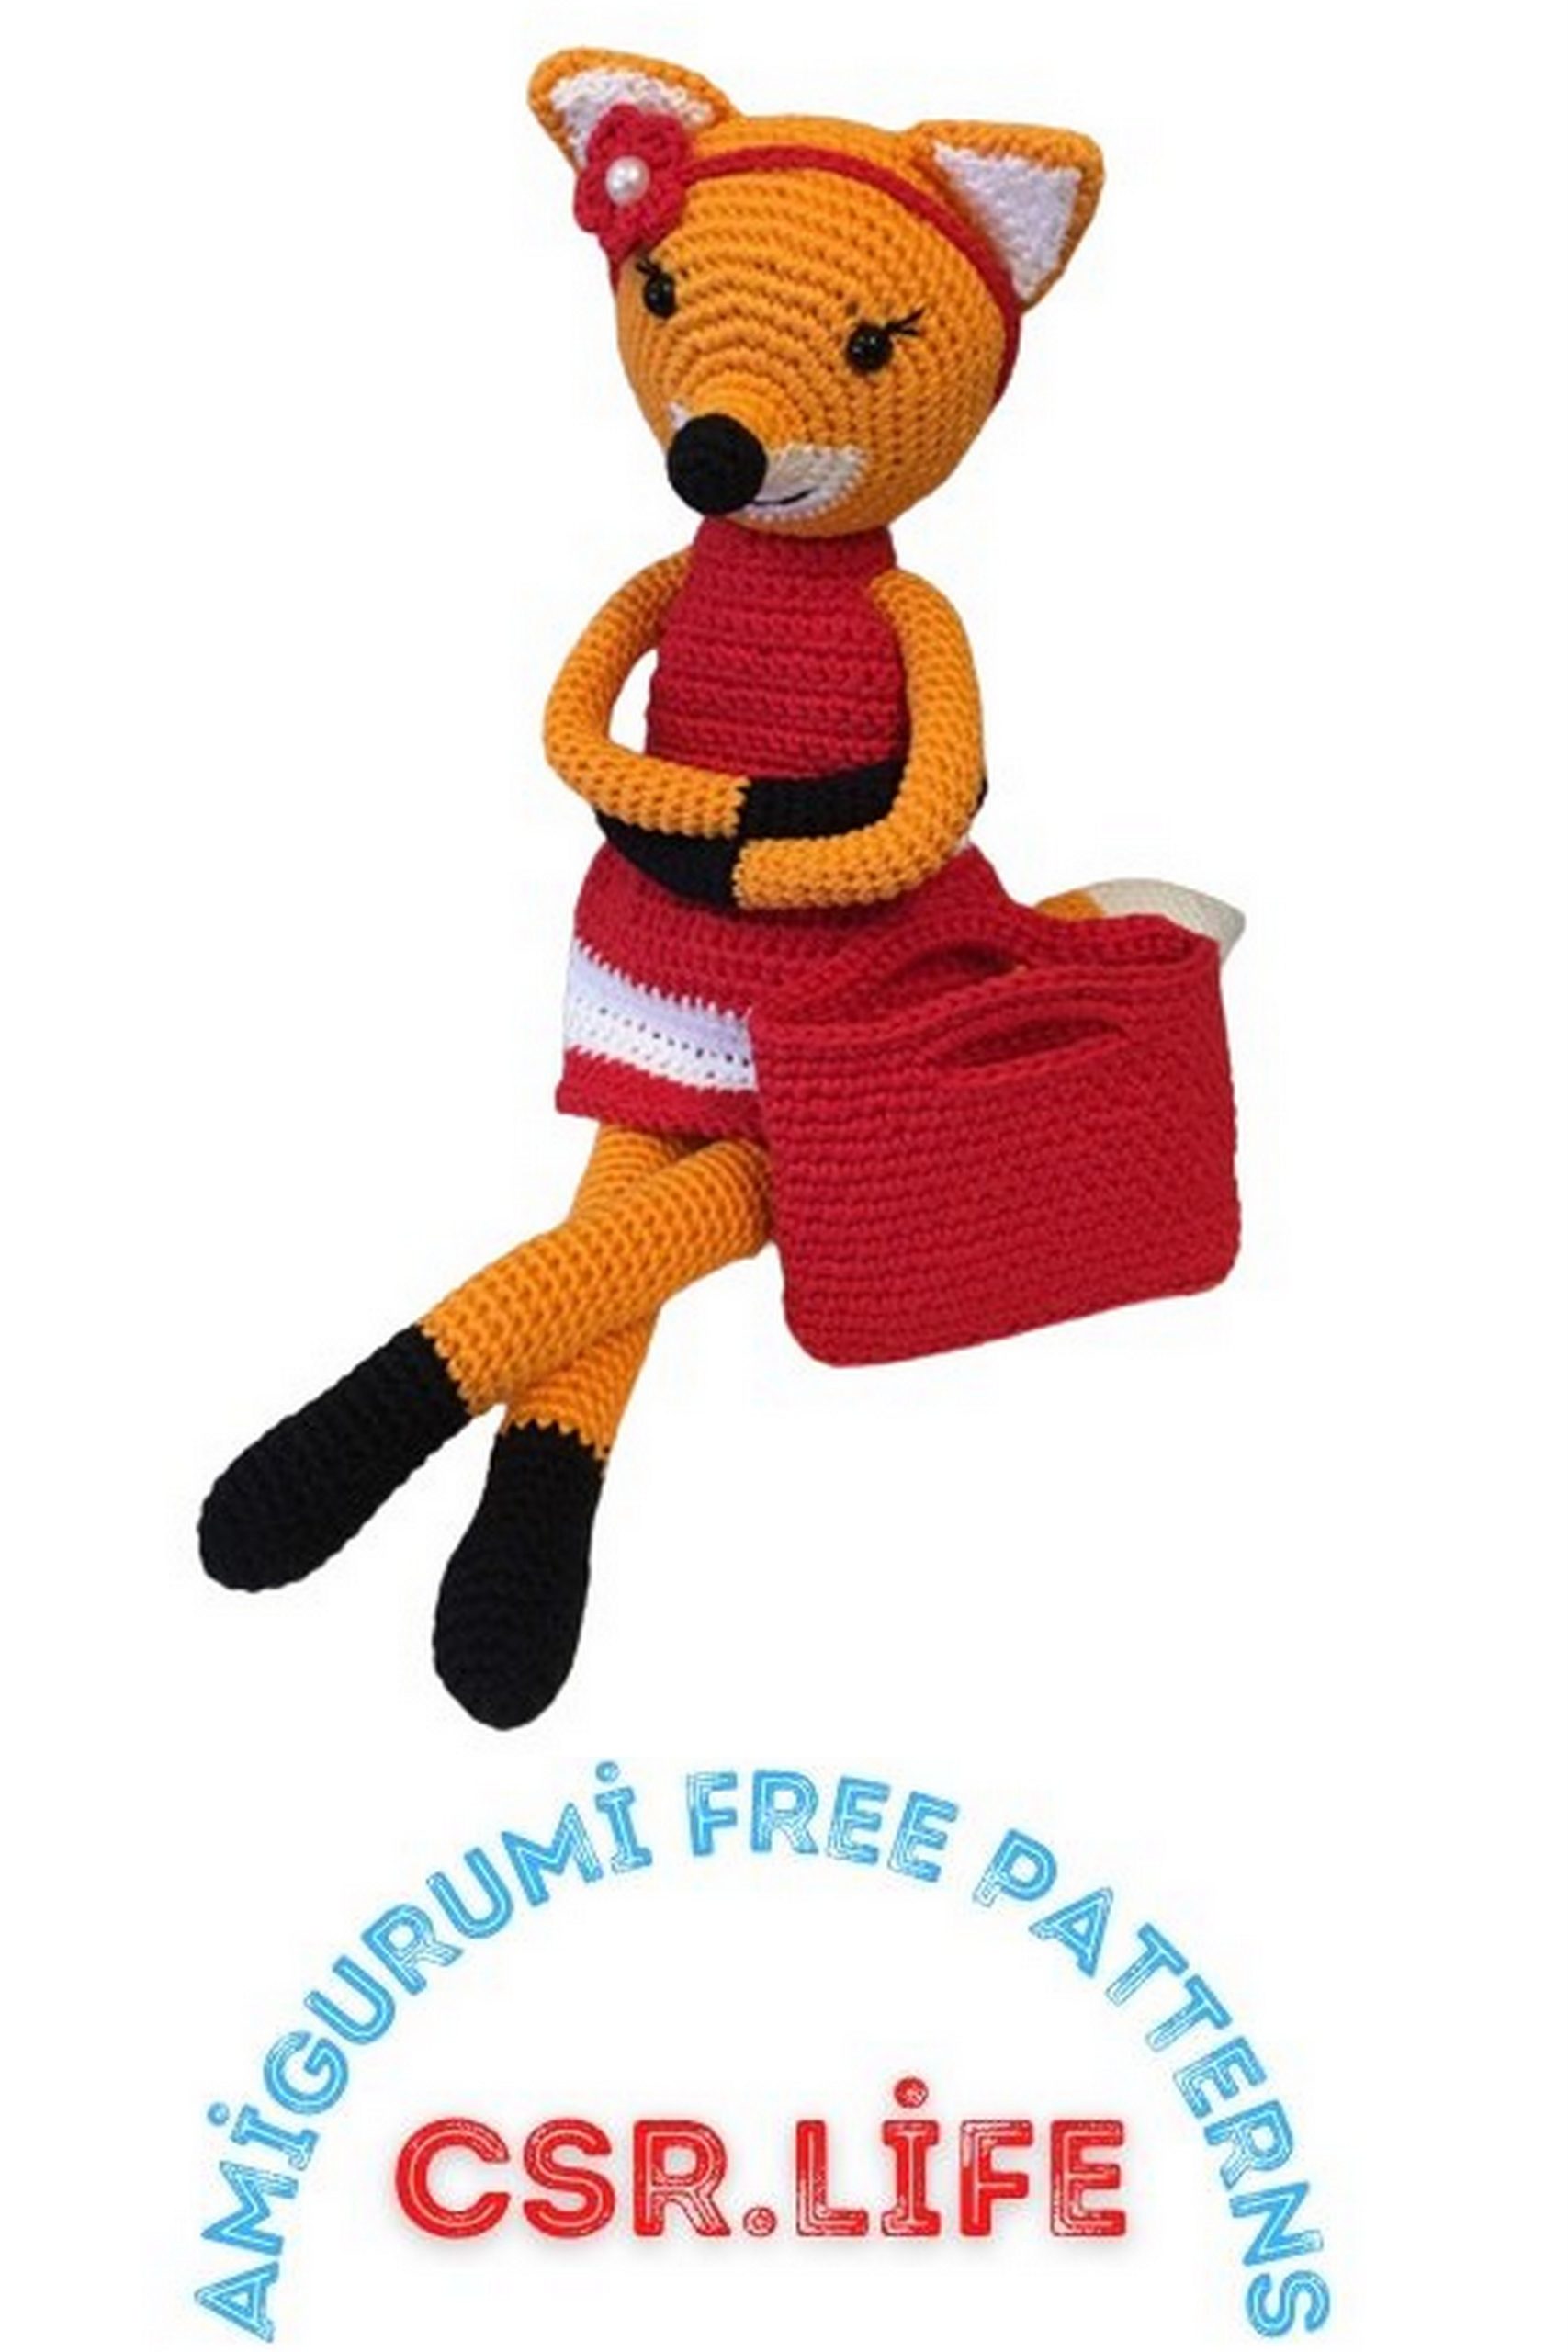
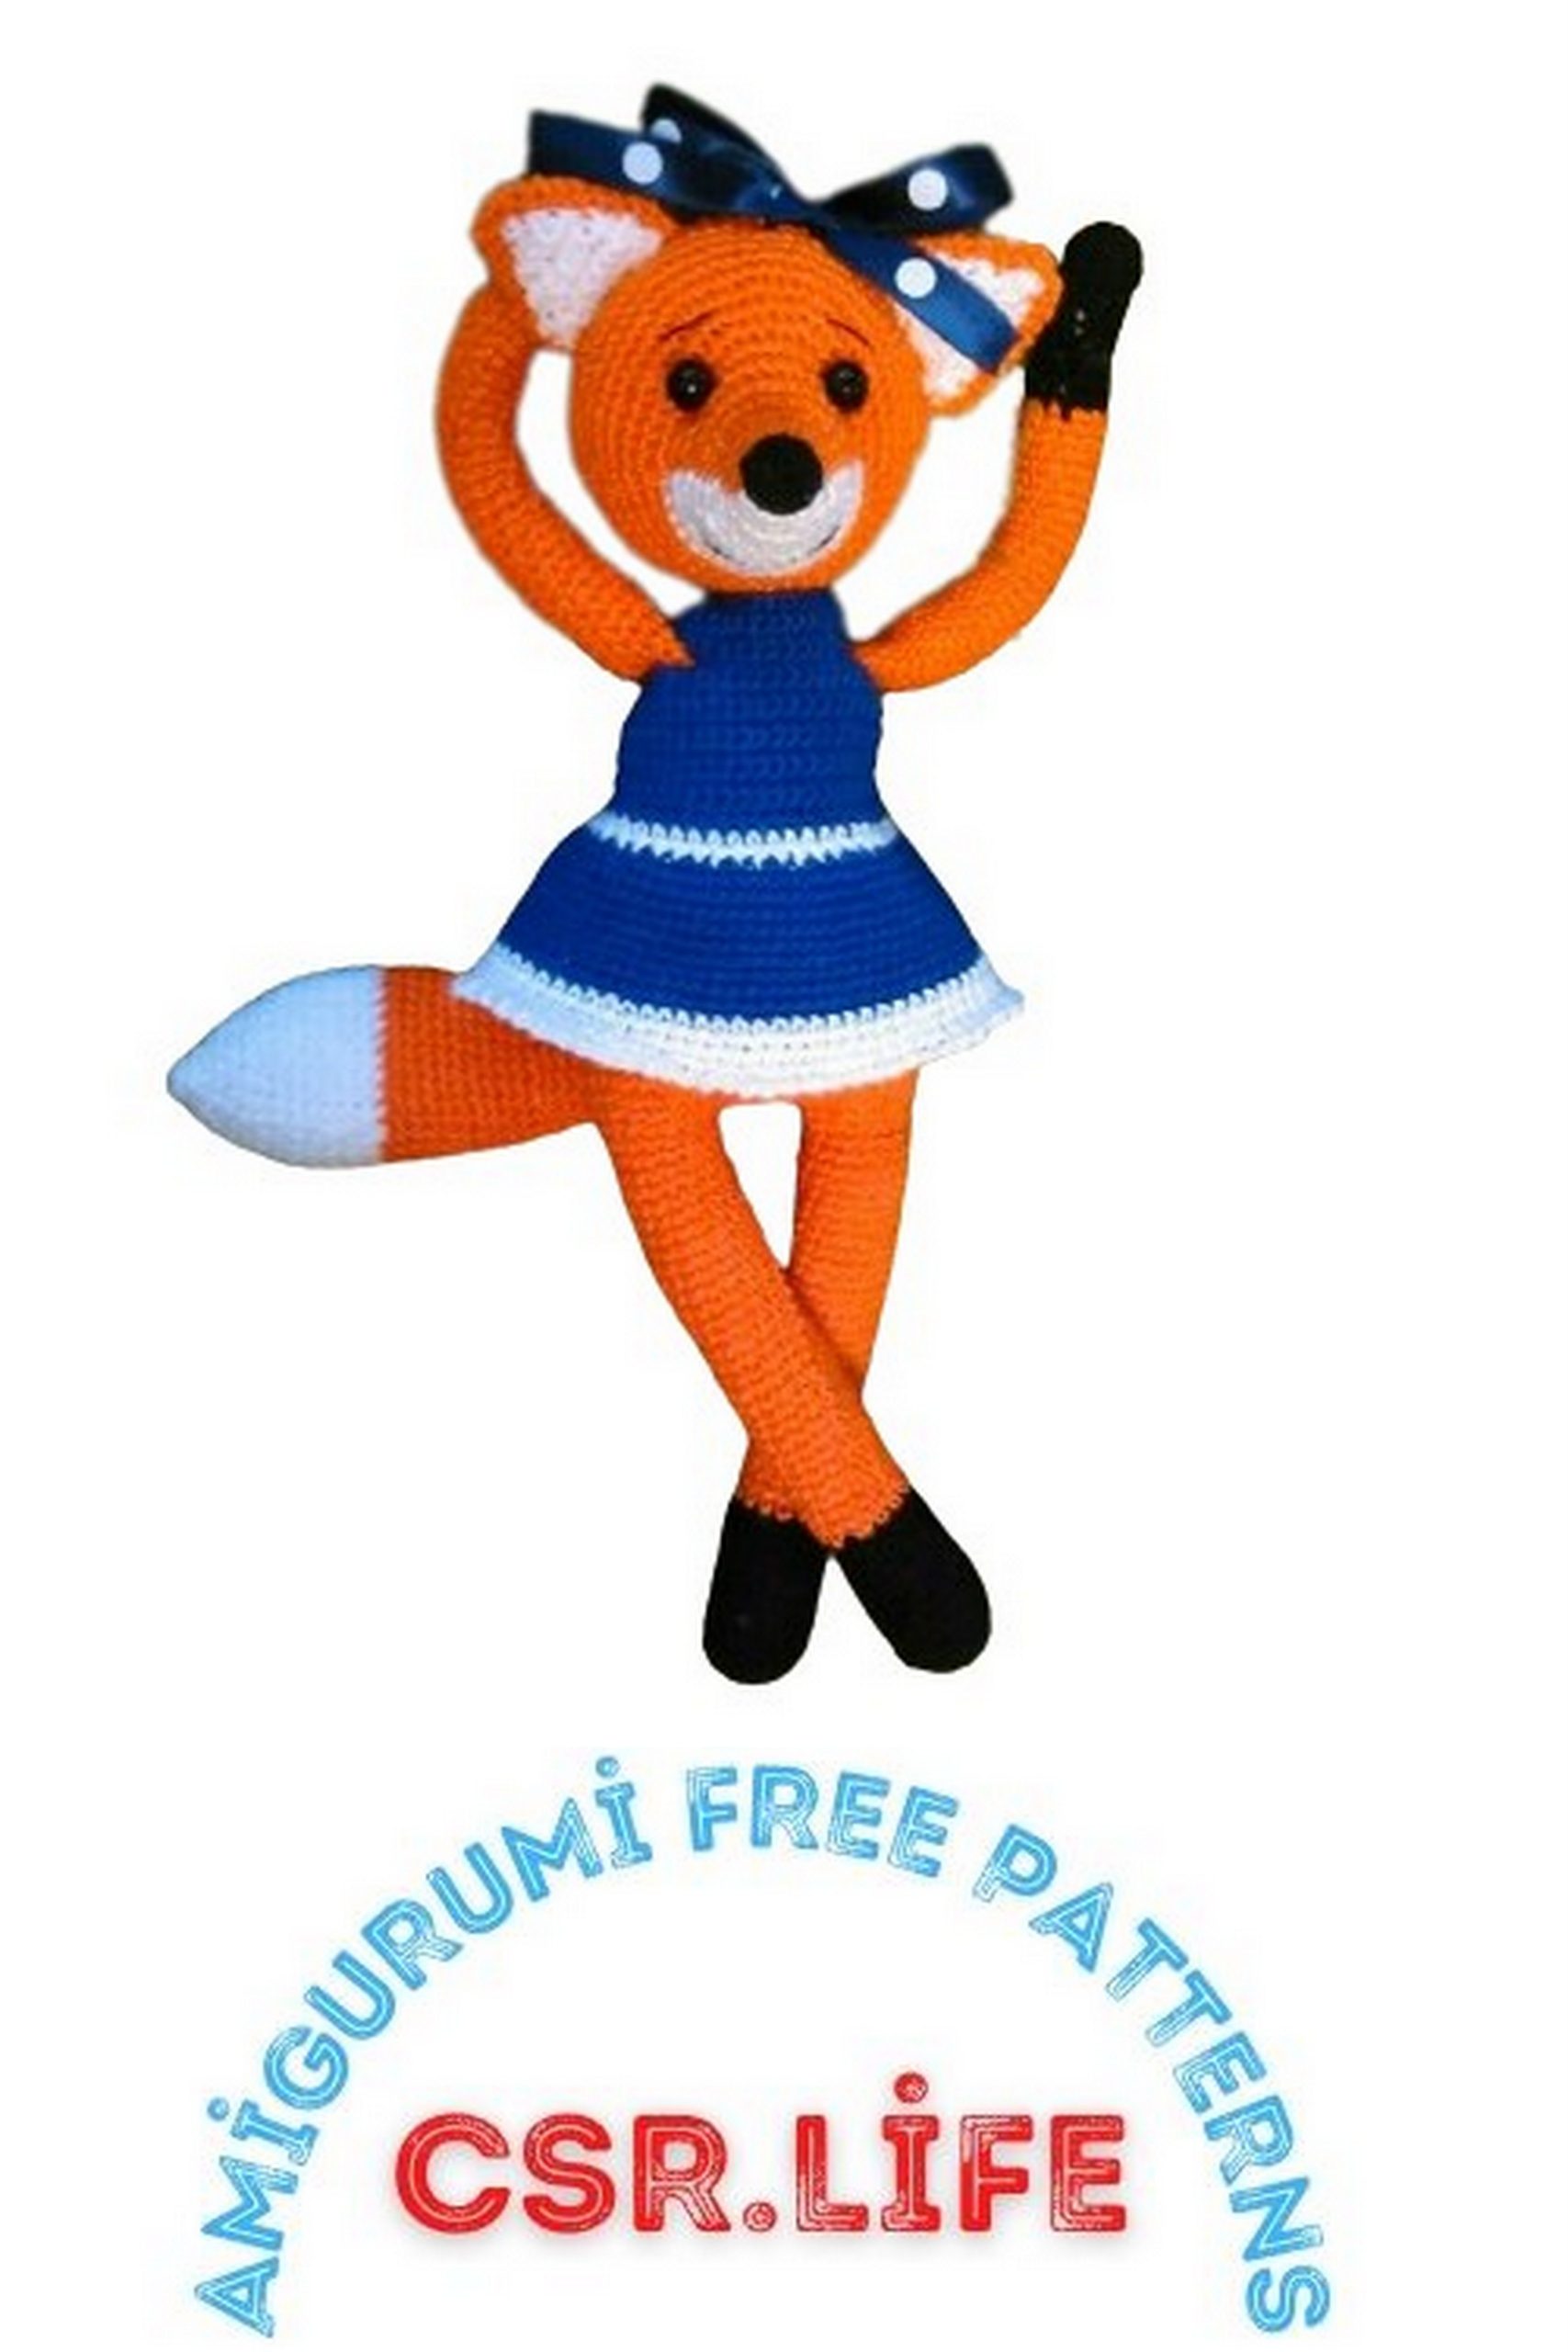
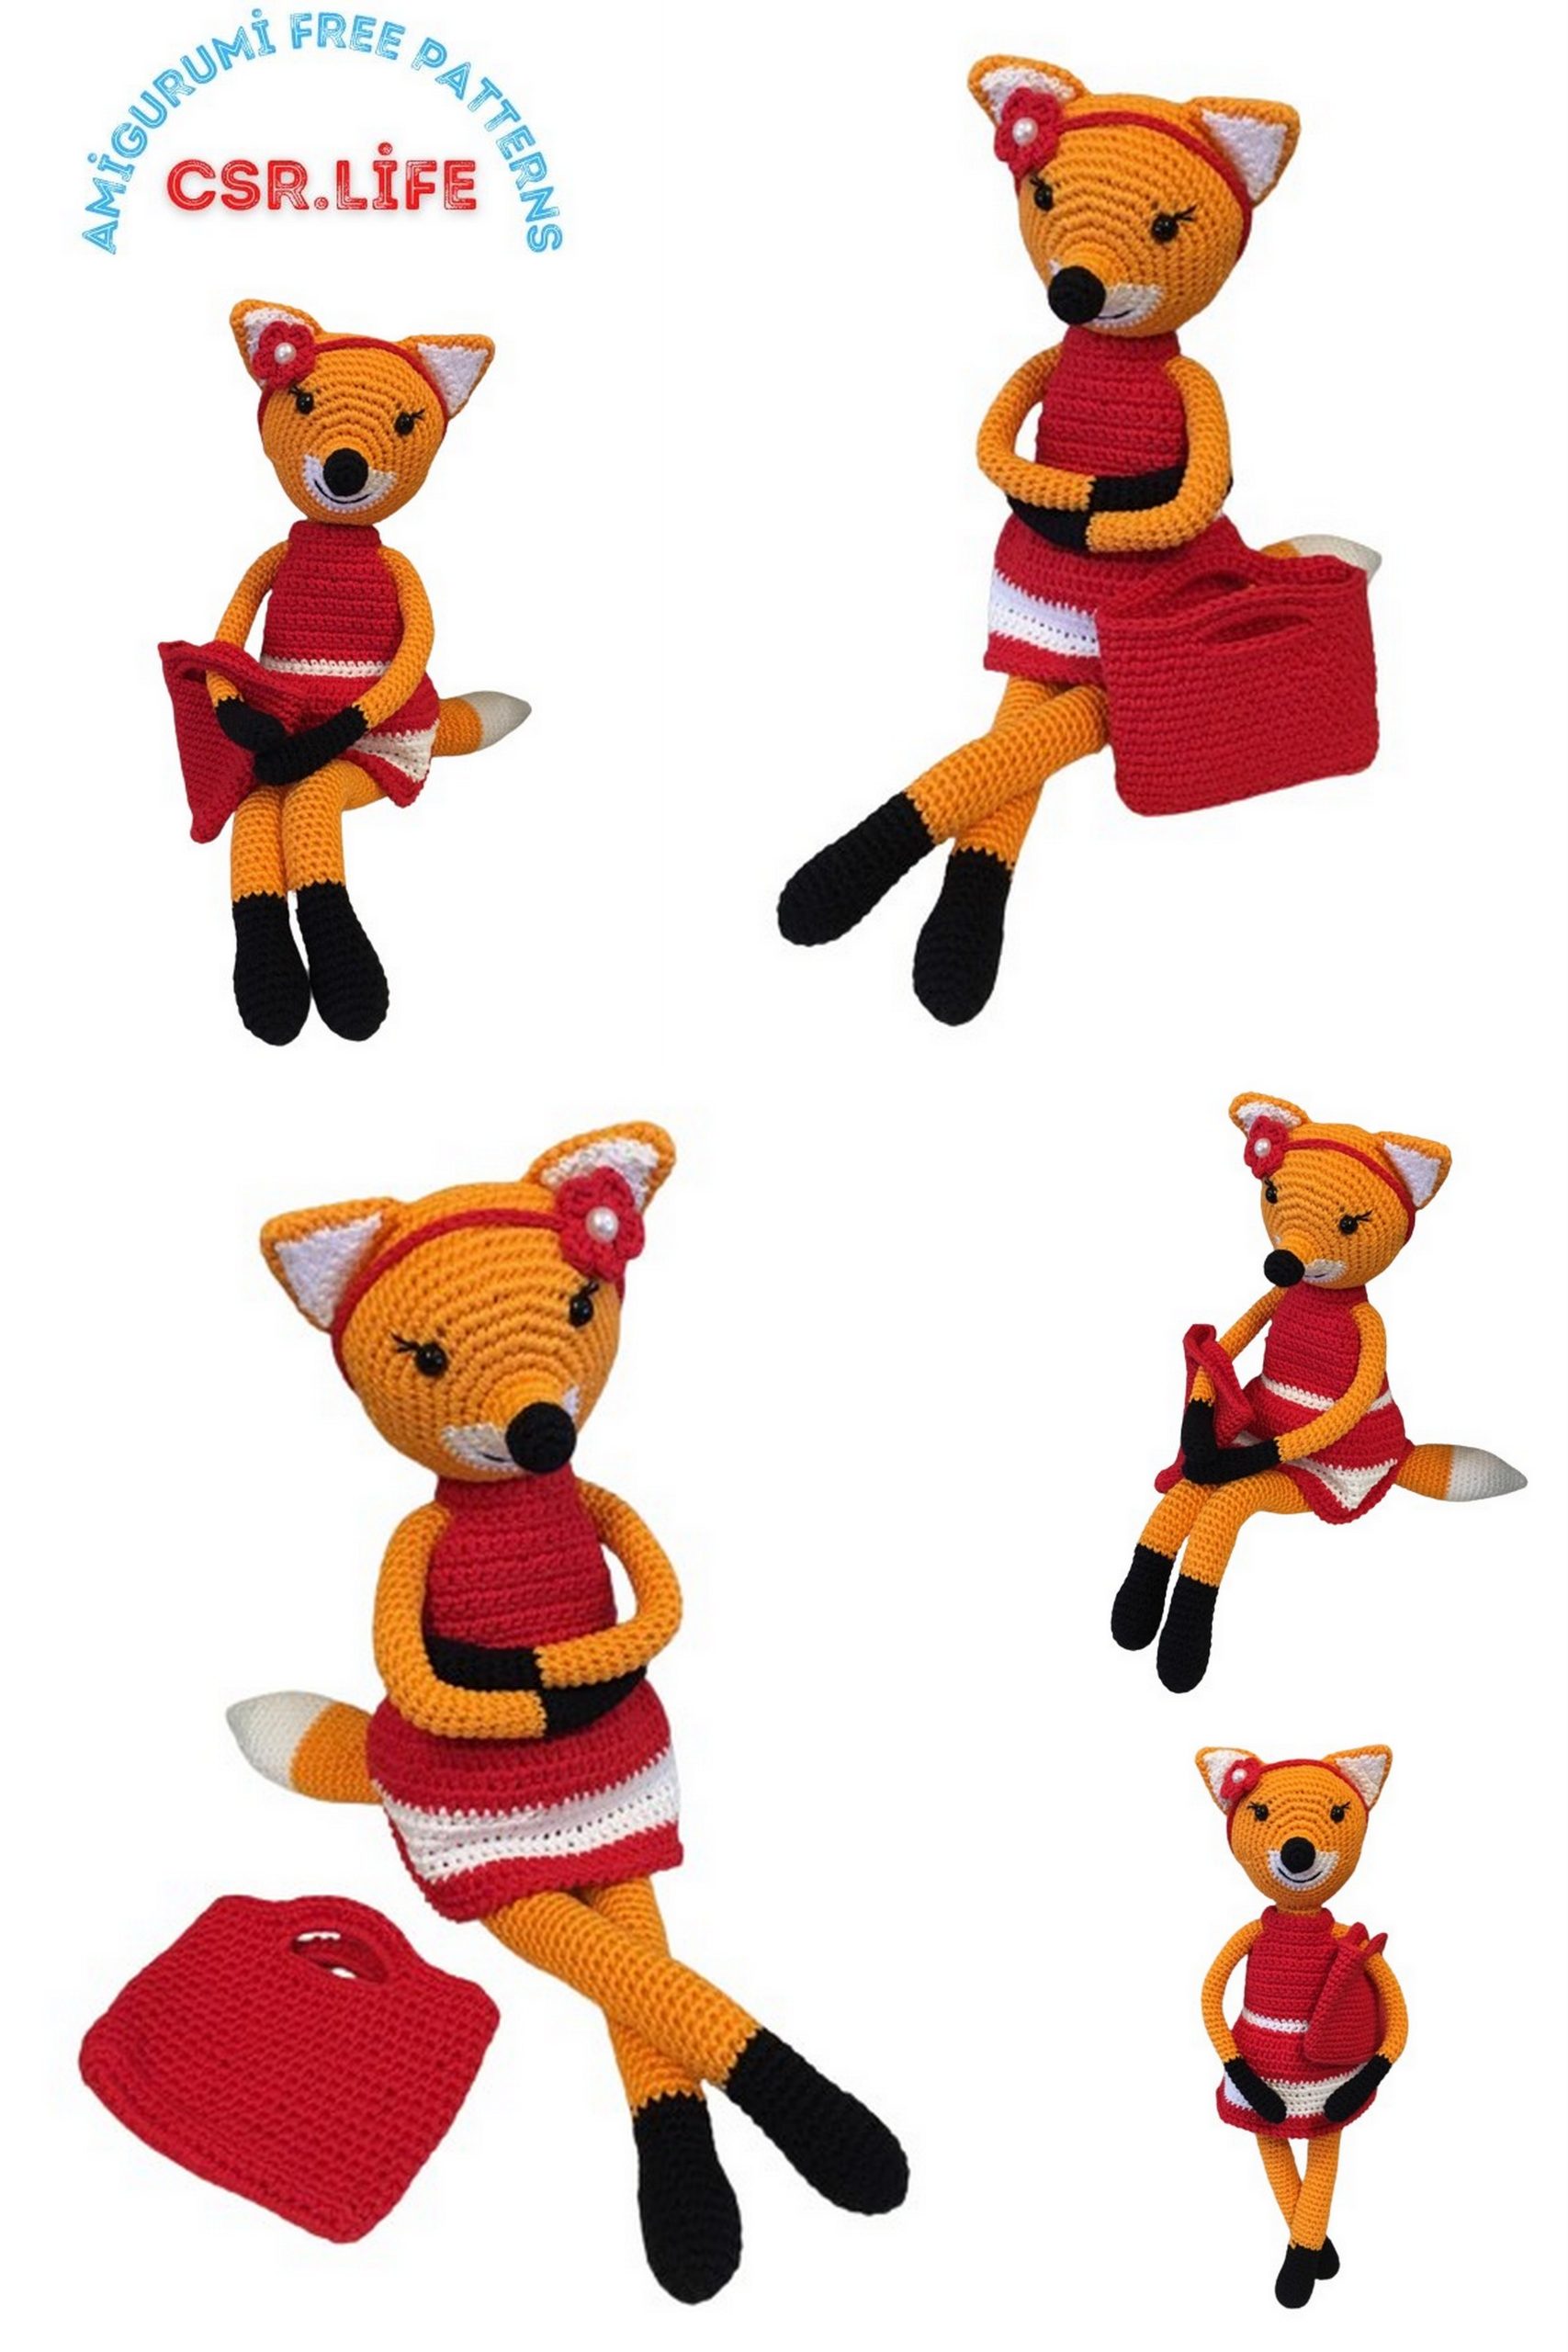
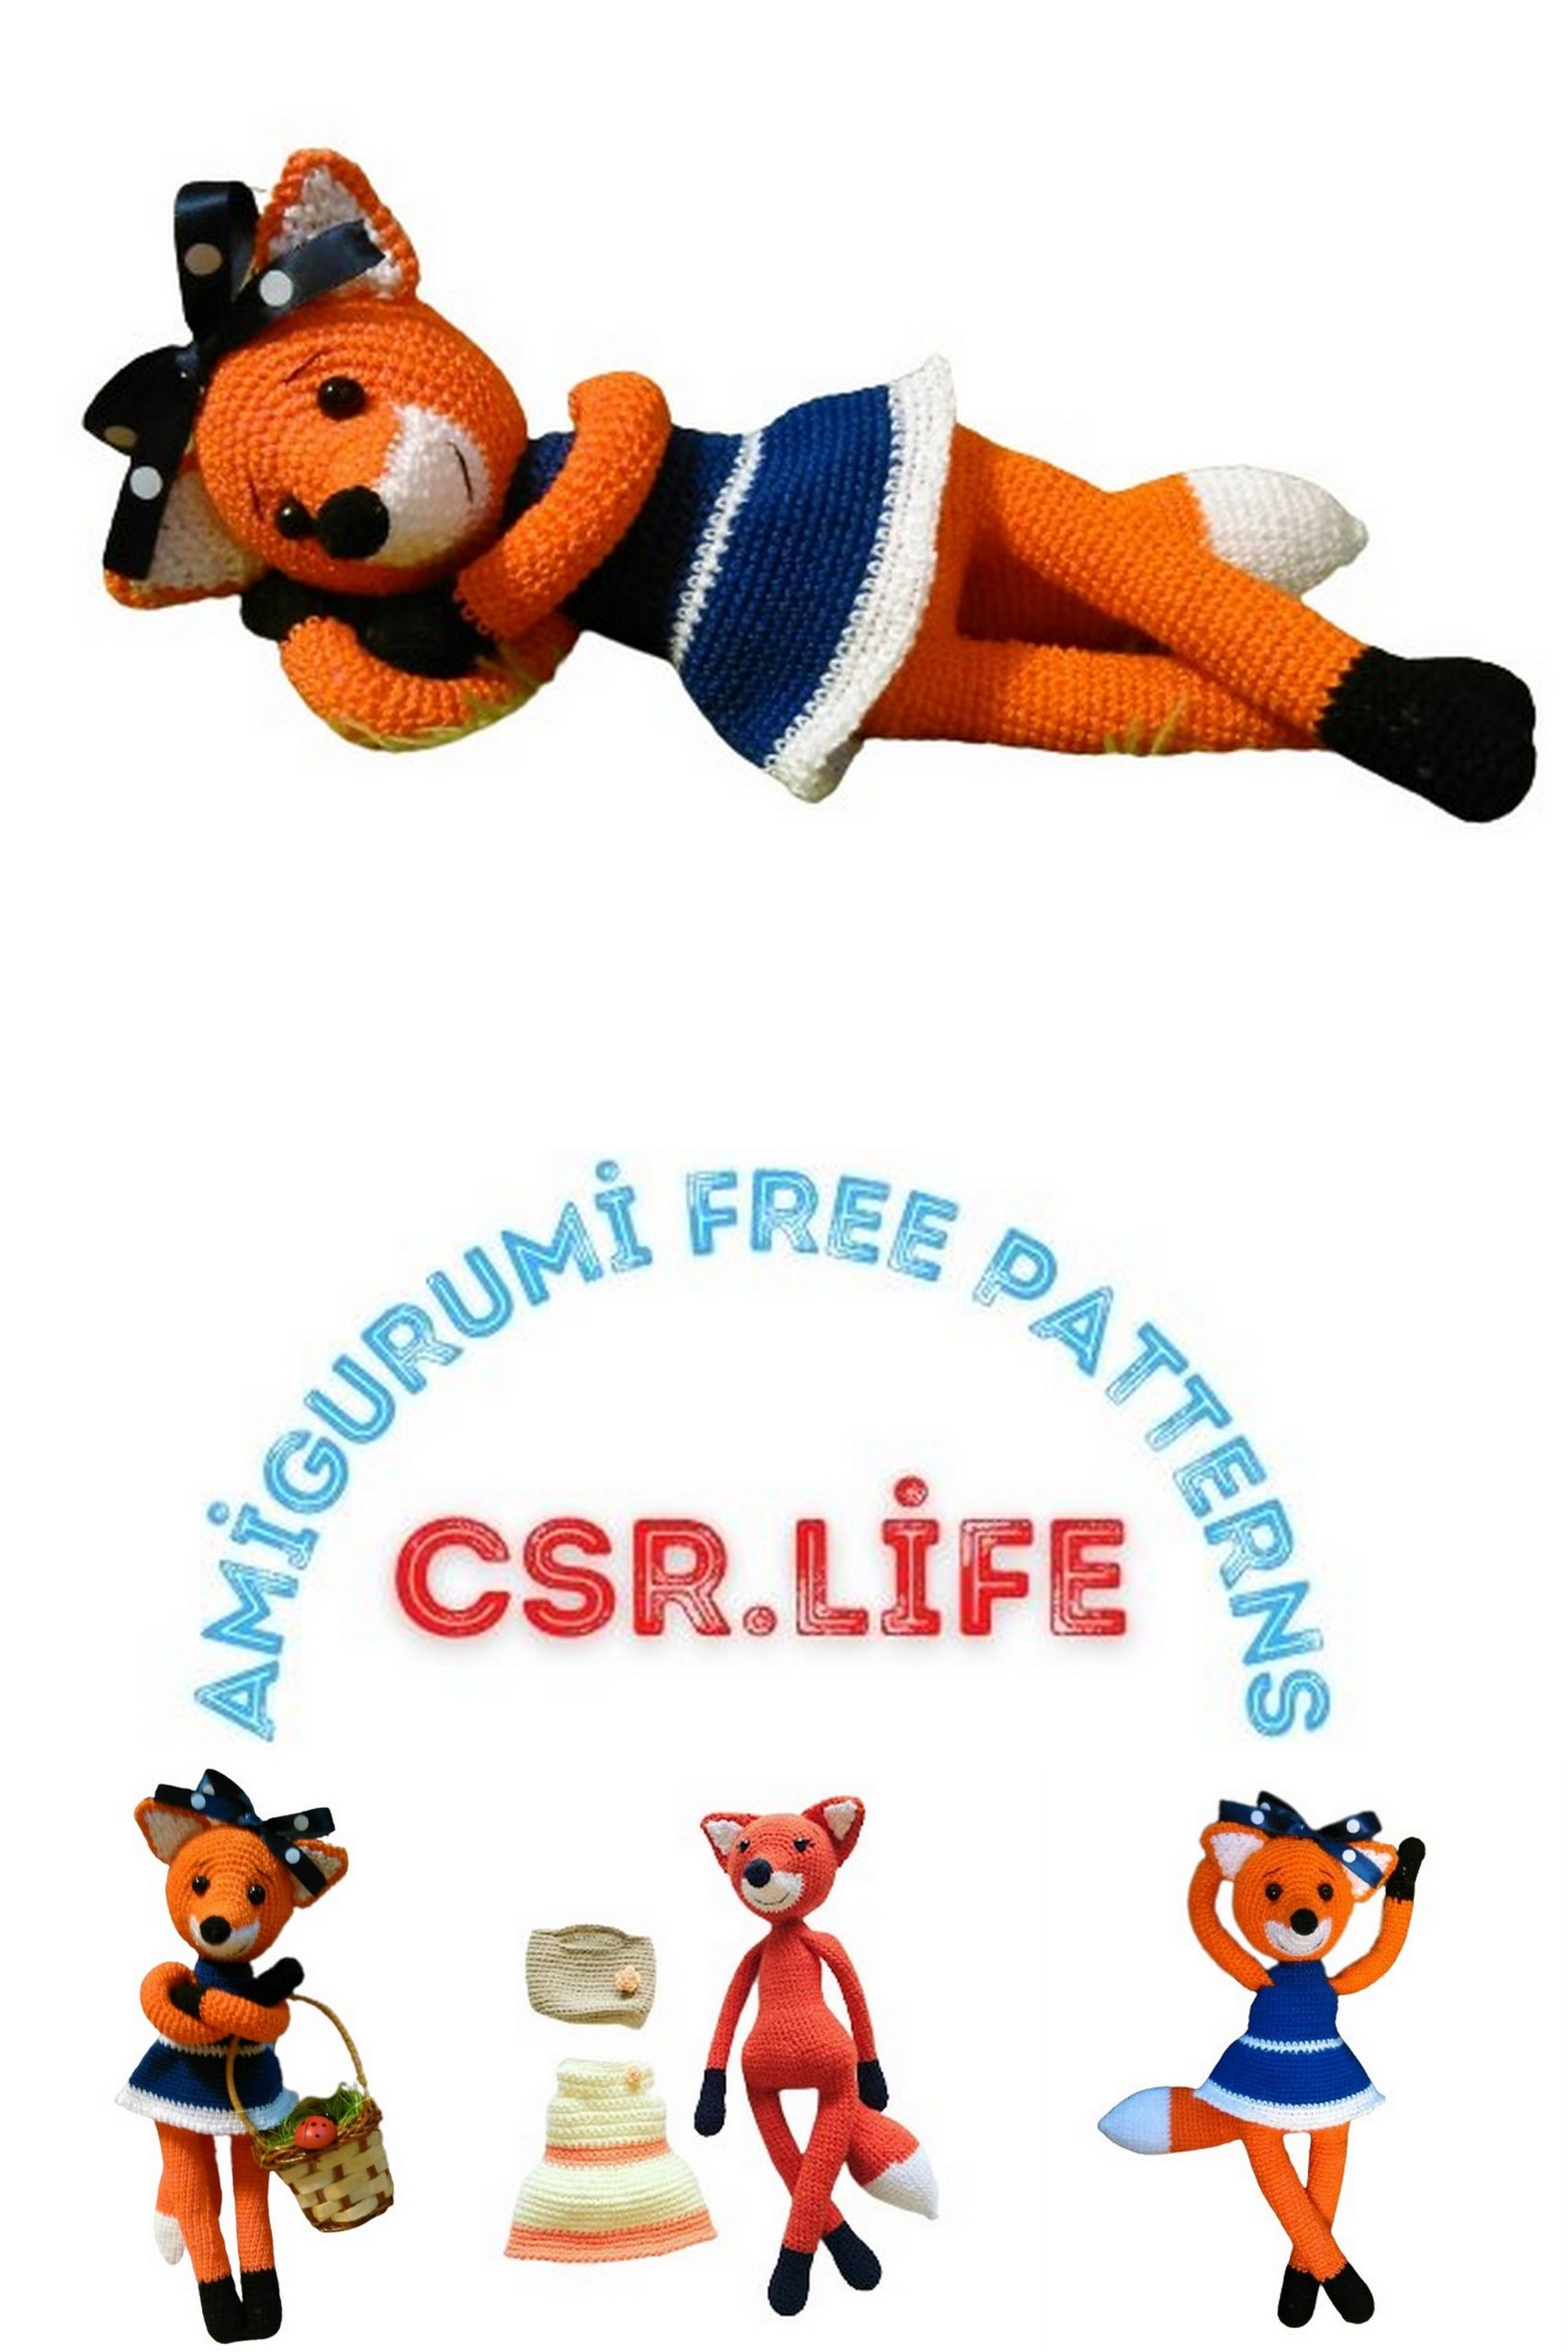
Cute Girl Fox Amigurumi Free Pattern – Crochet Toy DIY
Welcome to our adorable world of crochet crafts! If you’re looking to create a charming and cuddly amigurumi toy, you’re in the right place. In this step-by-step tutorial, we’ll guide you through making a ‘Cute Girl Fox Amigurumi‘ with our free pattern. Whether you’re a seasoned crocheter or a beginner, this project is perfect for adding a touch of handmade sweetness to your life. So, grab your crochet hook and let’s get started on crafting your very own lovable fox friend!
Discover the joy of crafting with our ‘Cute Girl Fox Amigurumi Free Pattern.’ Crochet your way to creating an irresistible amigurumi toy that’s perfect for gifting or keeping as a cherished handmade treasure. Follow our easy-to-follow tutorial and bring this adorable fox character to life with your crochet skills.
To create a fox, you will need:
Yarn in orange, black, and white colors – for the fox itself, as well as beige, yellow, and coral colors – for the dress and purse. You can choose any other yarn that is convenient for you.
Crochet hook 2.0
Toy stuffing
Toy eyes or black beads
Needle for sewing the pieces together
Black Iris thread for embroidering the face
When using the specified materials, the finished toy will be approximately 30-35 cm tall.
We will be crocheting our Fox as follows: the arms, legs, tail, and body will all be one piece. So, if you want your toy to sit and have bendable arms, stuff the pieces only up to one-third. Our guide will be the color change in the yarn. Stuff the pieces just above the color change level.
All photos in the tutorial are clickable: click to enlarge.
Abbreviations:
sc – single crochet
ch – chain
inc – increase (2 sc in one stitch)
dec – decrease (2 sc together)

PATTERN
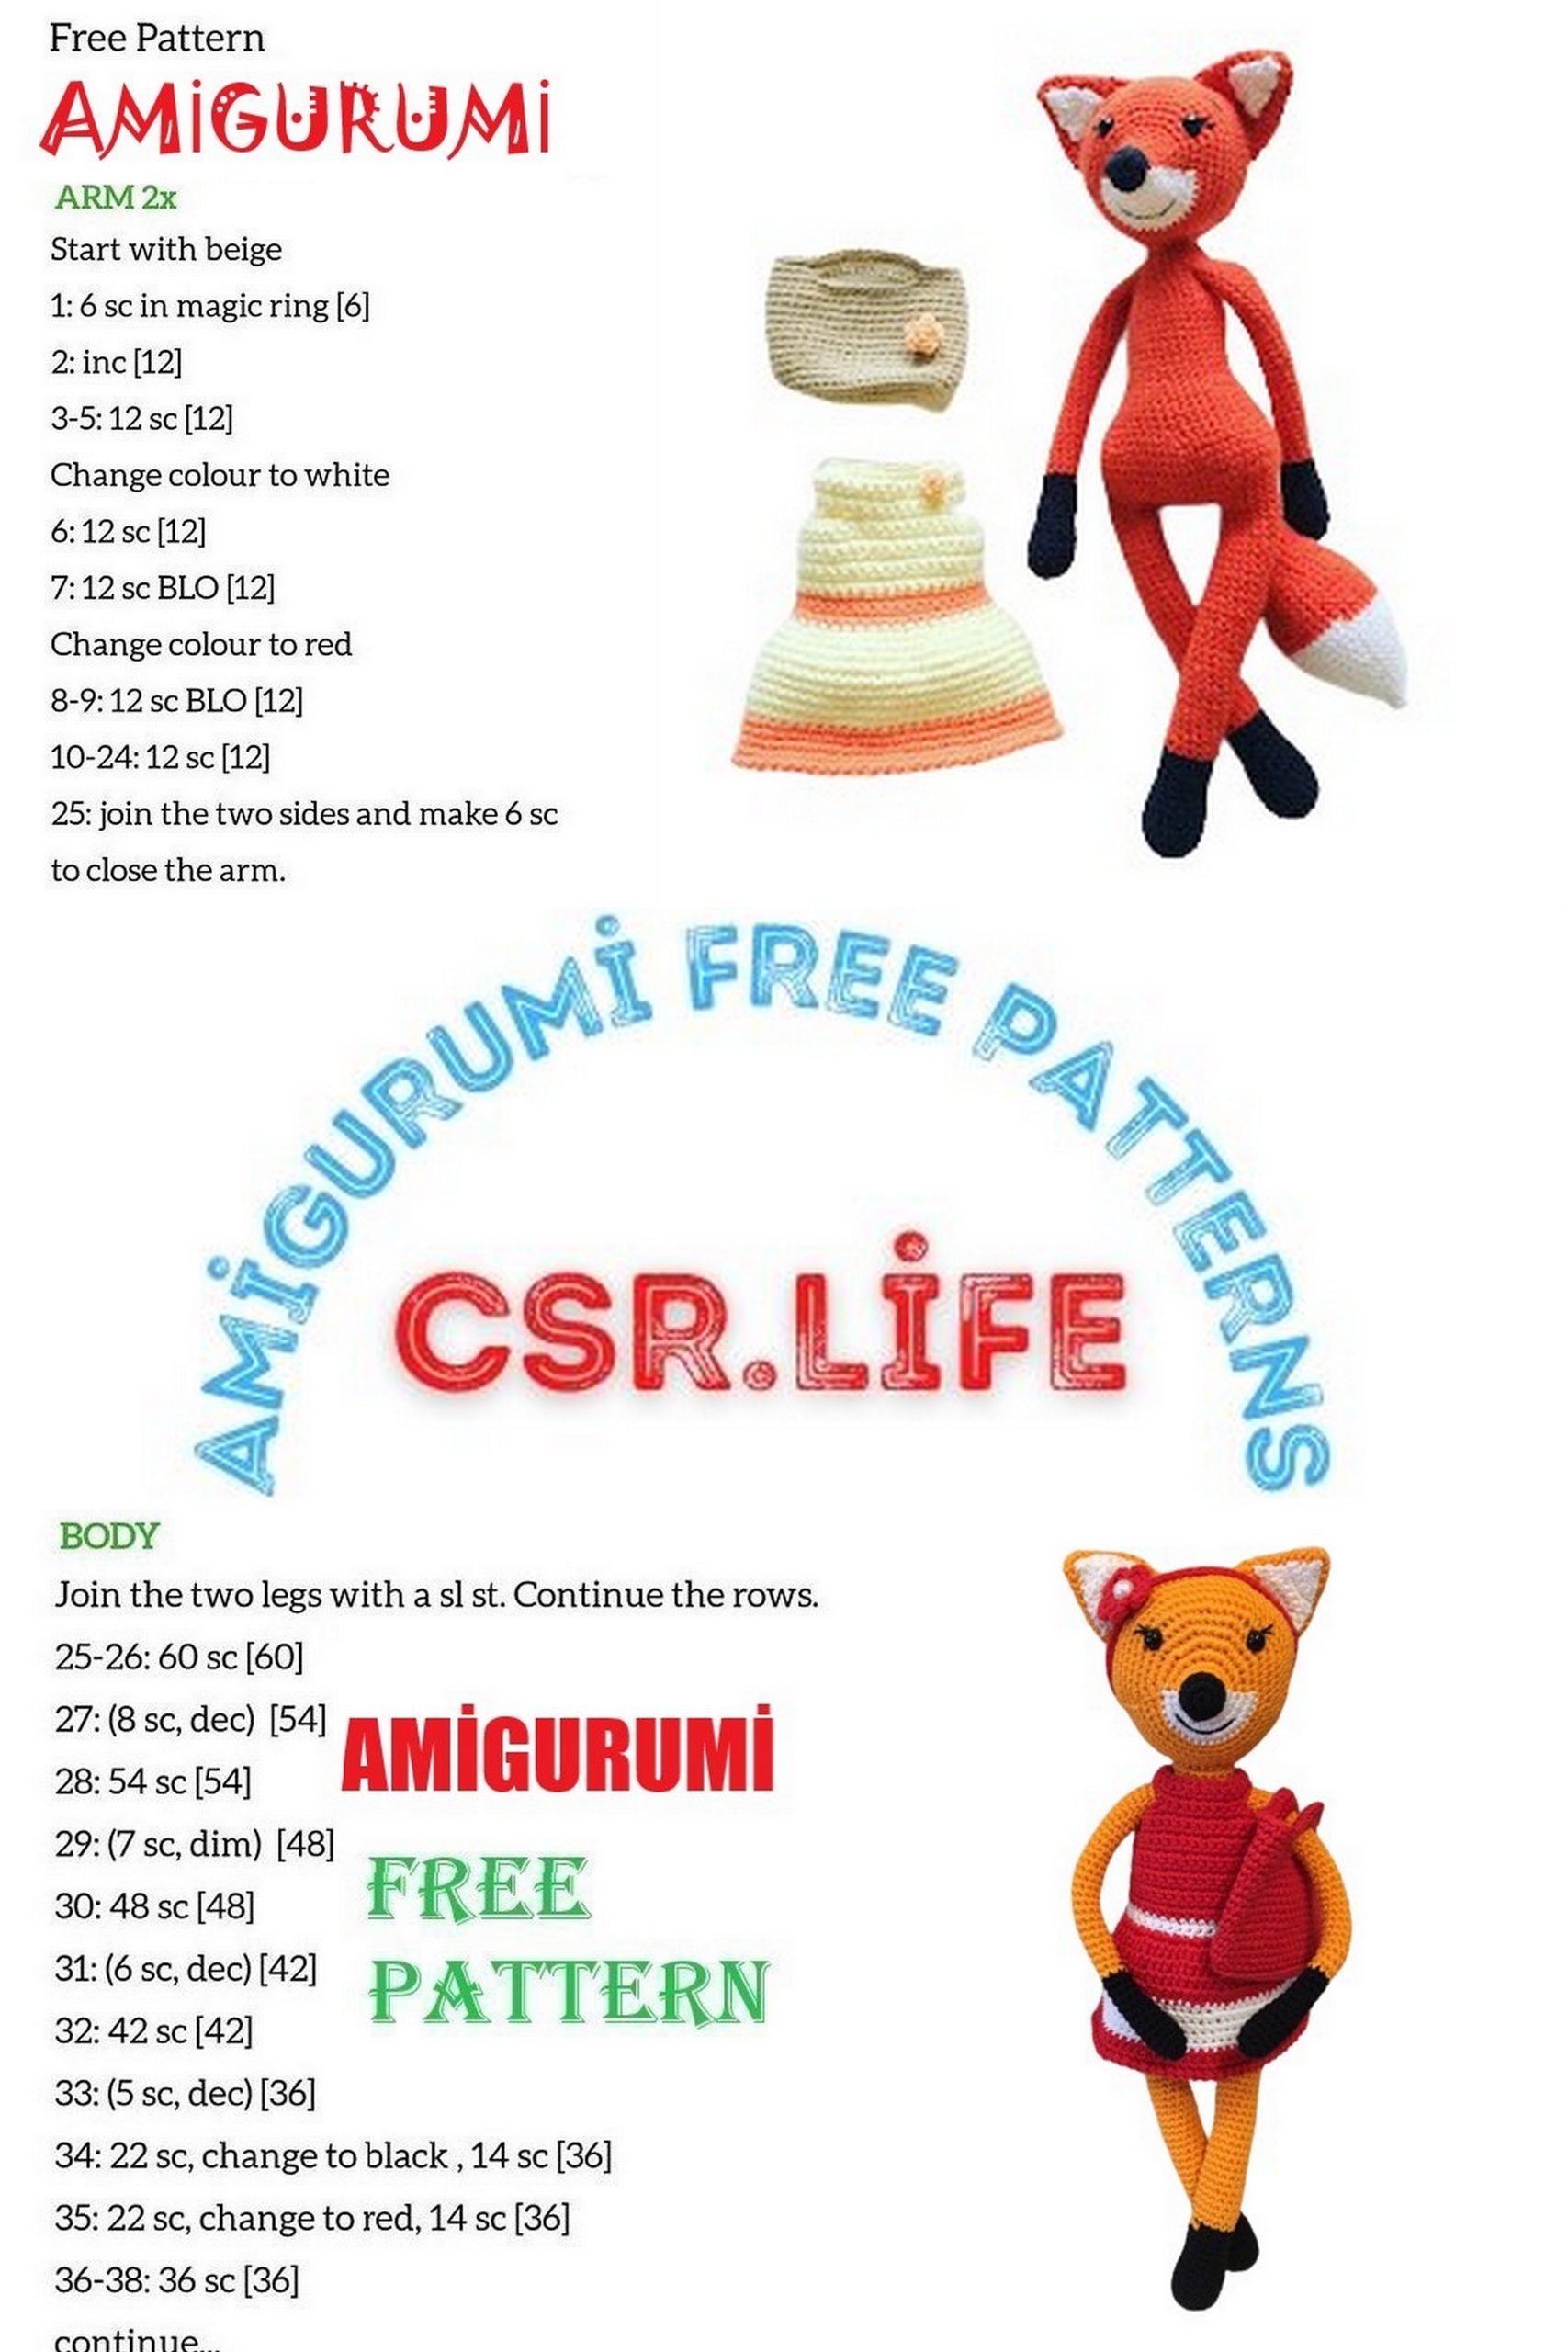
ARM (2 pieces):
Start crocheting the piece with black yarn:
Row 1: 6 sc in amigurumi ring (6)
Row 2: 6 inc (12)
Rows 3-7: 12 sc (12)
Row 8: (4 sc, dec) x 2 times (10)
Rows 9-13: 10 sc (10)
Switch to orange yarn:
Rows 14-41: Crochet 28 rows with 10 sc (10)
Cut the yarn, leaving a small tail (about 5 cm) to secure.
TAIL:
Begin crocheting the piece with white yarn:
Row 1: 6 sc in amigurumi ring (6)
Row 2: 6 sc (6)
Row 3: 6 inc (12)
Row 4: 12 sc (12)
Row 5: (1 sc, inc) x 6 times (18)
Row 6: 18 sc (18)
Row 7: (2 sc, inc) x 6 times (24)
Row 8: 24 sc (24)
Row 9: (3 sc, inc) x 6 times (30)
Rows 10-14: Crochet 5 rows with 30 sc (30)
Switch to orange yarn:
Rows 15-19: Crochet 5 rows with 30 sc (30)
Row 20: (3 sc, dec) x 6 times (24)
Rows 21-24: Crochet 4 rows with 24 sc (24)
Row 25: (2 sc, dec) x 6 times (18)
Rows 26-31: Crochet 6 rows with 18 sc (18)
Row 32: (1 sc, dec) x 6 times (12)
Rows 33-38: Crochet 6 rows with 12 sc (12)
Cut the yarn, leaving a small tail (about 5 cm) to secure.
LEG (2 pieces):
Note that we will not cut the yarn for the right leg. We will only stuff the legs to one-third or one-half, so the Fox can sit.
Begin crocheting the piece with black yarn:
Row 1: 6 sc in amigurumi ring (6)
Row 2: 6 inc (12)
Row 3: (1 sc, inc) x 6 times (18)
Rows 4-8: Crochet 5 rows with 18 sc (18)
Row 9: (4 sc, dec) x 3 times (15)
Rows 10-14: Crochet 5 rows with 15 sc (15)
Switch to orange yarn:
Rows 15-44: Crochet 30 rows with 15 sc (15)
Cut the yarn, leaving a small tail (about 5 cm) – RIGHT LEG.
Crochet the LEFT LEG in the same way, but do not cut the yarn; we will continue crocheting the body from it.
BODY:
Place both legs with the color change upwards (photo 1).
Crochet 3 sc around the left leg. Then, crochet a chain of 6 ch, attach the right leg at the bend between the front and back parts (photos 2, 3), 15 sc around the right leg, 6 sc around the chain of ch (photo 4), 15 sc around the left leg, 6 sc around the chain of ch (42) (photo 5). Now, place a marker and crochet 42 sc (photo 6).
Row 1: (6 sc, inc) x 6 times (48).
Row 2: (7 sc, inc) x 6 times (54).
Rows 3-5: 54 sc (54).
Row 6: 43 sc, then crochet 6 sc by inserting the hook into the loops of the tail (photo 7). Move the marker immediately behind the tail (photo 8).
Row 7: 48 sc, then crochet 6 sc into the tail (54) (photo 9).
The marker remains behind the tail.
Row 8: (7 sc, dec) x 6 times (48).
Row 9: (6 sc, dec) x 6 times (42).
Rows 10-14: Crochet 5 rows with 42 sc (42).
Row 15: (5 sc, dec) x 6 times (36).
Rows 16-25: Crochet 10 rows with 36 sc (36).
Row 26: (4 sc, dec) x 6 times (30).
Row 27: 30 sc (30).
Row 28: (3 sc, dec) x 6 times (24).
Row 29: 3 sc, then 5 sc by inserting the hook into the loops of the arm, 7 sc, then 5 sc by inserting the hook into the loops of the second arm, 4 sc (24).
Row 30: 3 sc, then 5 sc on the arm, 7 sc, then 5 sc on the second arm, 4 sc (24).
Row 31: 24 sc (24).
Row 32: (2 sc, dec) x 6 times (18).
Rows 33-34: 18 sc (18).
Stuff the body tightly as you crochet, especially around the neck area. Cut the yarn and leave a long end (about 25-35 cm) for sewing the head.
HEAD:
The head is crocheted in a continuous spiral without turning. At the end of each row, slip stitch (ss) into the first stitch of the row.
Always make the first stitch into the same stitch where you made the ss.
The turning chain does not count as a stitch.
In rows where two colors are used, join the new color by working the last half of the last stitch of the old color with the new color yarn.
Begin with a white amigurumi ring for the nose/muzzle:
Row 1: 8 sc into the ring. Pull the tail to close the ring. Slip stitch into the first stitch of the row.
Row 2: 1 ch. Insert the marker into the stitch where you will begin working. Continue row 2: 4 sc with white, switch to orange, 4 sc with orange, slip stitch (8).
NOTE: Work row 2 as follows: 1 ch, sc in the stitch where the ss was made, 3 sc, complete the last (4th) sc with orange yarn (color change), 4 sc, complete the last (8th) sc with white yarn (color change), skip the ss and 1 ch from the previous row, work the ss into the marked stitch. Continue working in this manner.
Row 3: 1 ch (see figure 1), (1 sc, inc) – 2 times, switch to orange (see figure 2) (1 sc, inc) – 2 times, switch to white, ss (12).
Row 4: 1 ch, 6 sc, switch to orange, 6 sc, switch to white, ss (12).
Row 5: 1 ch, (2 sc, inc) – 2 times, orange (2 sc, inc) – 2 times, white, ss (16).
Row 6: 1 ch, 8 sc, orange, 8 sc, white, ss (16).
Row 7: 1 ch (see figure 3), (3 sc, inc) – 2 times, orange, (3 sc, inc) – 2 times, white, ss (20).
Row 8: 1 ch, 10 sc, orange, 10 sc, white, ss (20).
Row 9: 1 ch, (sc, inc) – 5 times, orange, (sc, inc) – 5 times, white, ss (30).
Row 10: 1 ch, 15 sc, orange, 15 sc, white, ss (30).
Row 11: 1 ch (2 sc, inc) – 5 times, orange, (2 sc, inc) – 5 times, white, ss (40).
Cut the blue yarn; further crochet with orange.
Row 12: 1 ch (see figure 4), 20 sc, (3 sc, inc) – 5 times, ss (45).
Row 13: 1 ch, 20 sc, (4 sc, inc) – 5 times, ss (50).
Row 14: 1 ch, (4 sc, inc) around, ss (60).
Rows 15-16: 1 ch, 60 sc, ss (60).
Row 17: 1 ch, (5 sc, inc) around, ss (70).
Rows 18-21: 1 ch, 70 sc, ss (70).
Row 22: 1 ch, (5 sc, dec) around (60).
If you are using ready-made eyes, you can attach them at this stage. Place them between rows 12 and 13, with a gap of 10 sc.
Row 23: 1 ch, (13 sc, dec) – 4 times, ss (56).
Row 24: 1 ch, 56 sc (56).
Row 25: 1 ch, (5 sc, dec) around, ss (48).
Row 26: 1 ch, 48 sc.
Row 27: 1 ch, (4 sc, dec) around, ss (40).
Row 28: 1 ch, 40 sc, ss.
Row 29: 1 ch, (3 sc, dec) around, ss (32).
Row 30: 1 ch, 32 sc, ss.
Row 31: 1 ch, (2 sc, dec) around, ss (24).
Row 32: 1 ch, 24 sc.
Lightly stuff the muzzle and shape it with your fingers to give it the desired shape. Make sure the muzzle doesn’t twist.
Row 33: 1 ch, (sc, dec) around, ss (16). Stuff the head.
Row 34: 1 ch (dec) around, ss (8).
Row 35: 1 ch, (dec) around, ss (4).
Cut the yarn. Tighten the 4 sc using a needle and hide the end.
EAR (2 pieces):
Crochet in a spiral without slip stitches or turning chains. Use orange yarn.
Row 1: 6 sc in the amigurumi ring.
Row 2: (2 sc, inc) around (8).
Row 3: (3 sc, inc) around (10).
Row 4: (4 sc, inc) around (12).
Row 5: (5 sc, inc) around (14).
Row 6: (6 sc, inc) around (16).
Row 7: (7 sc, inc) around (18).
Row 8: (8 sc, inc) around (20).
Row 9: (9 sc, inc) around (22).
Join the edges of the ear and crochet 11 sc while inserting the hook through both halves. Leave a thread for sewing – about 10 cm.
TRIANGLES for the ears (2 pieces):
Crochet with white yarn a chain of 10 ch. Work in turning rows.
Row 1: Starting from the second loop from the hook, crochet 9 sc, 1 ch (9).
Row 2: Dec, 5 sc, dec, 1 ch (7).
Row 3: 7 sc, 1 ch (7).
Row 4: Dec, 3 sc, dec, 1 ch (5).
Row 5: 5 sc, 1 ch (5).
Row 6: Dec, 1 sc, dec, 1 ch (3).
Row 7: Decrease over 3 loops. Cut the yarn and fasten it, leaving a 10 cm tail for sewing.
NOSE:
Crochet with black yarn.
Row 1: 6 sc into the amigurumi ring (6).
Row 2: Inc in each stitch around (12).
Rows 3-4: 12 sc (12).
Cut the yarn, fasten off, leaving a 10 cm tail for sewing.
Now, you can assemble the head. Sew the white triangles onto the ears, then attach the ears to the head. Attach the nose. Embroider the facial features. The head is ready!
If you are making the toy for a young child, you can simply sew the head to the body (after stuffing the neck tightly). If the toy is for an older child, you can add a wire frame connecting the head and body to strengthen the neck and head.
PURSE:
Chain 21 ch.
Row 1: Starting from the second ch from the hook, crochet 19 sc, 3 sc in the last ch, 18 sc, 2 sc in the first ch (42).
Row 2: Inc, 18 sc, 3 inc, 18 sc, 2 inc (48).
Row 3: 48 sc through the back loops (48).
Rows 4-16: 48 sc through both loops (48).
Row 17: Fold the purse in half, so you have 24 sc on each side. Now, crochet 6 sc, 16 ch (over 12 sc), 6 sc on one side. Then, crochet 6 sc, 16 ch (over 12 sc), 6 sc on the other side.
Row 18: 56 sc (56).
Row 19: 56 ss (56).
Cut the yarn, fasten off, and hide the ends.
DRESS:
The dress is crocheted with two colors: main and additional. Start with the main color. Work in turning rows. Chain 35 ch.
Row 1: Starting from the second ch from the hook, crochet 34 sc, 1 ch (34).
Row 2: 30 sc, 3 ch (over 2 sc), 2 sc, 1 ch (32).
Row 3: 2 sc, 2 sc in the 3-ch chain space, 2 sc, 12 ch (over 6 sc), 10 sc, 12 ch (over 6 sc), 6 sc, 1 ch (22).
Row 4: 6 sc, 12 sc in the chain space, 10 sc, 12 sc in the chain space, 6 sc, 1 ch (46).
Rows 5-7: 46 sc, 1 ch (46).
Row 8: 42 sc, 3 ch (over 2 sc), 2 sc, 1 ch (44).
Row 9: 2 sc, 2 sc in the 3-ch chain space, 42 sc, 1 ch (46).
Rows 10-16: 46 sc, 1 ch (46).
Change the yarn color from the main color to the additional color.
Rows 17-18: 46 sc, 1 ch (46).
Change the yarn color from the additional color to the main color.
Row 19: Join the edges of the dress and continue to work in the round: (1 sc, inc) around (68).
Rows 20-28: 2 ch (counts as first half-double crochet), 1 hdc in the same st, 67 hdc, 1 ss (68).
Change the yarn color from the main color to the additional color.
Rows 29-31: 2 ch (counts as first half-double crochet), 1 hdc in the same st, 67 hdc, 1 ss (68).
Row 32: Edge the dress as follows: (1 sc, 1 ch) around (68).
Cut the yarn, fasten off, and hide the ends.
Now, you can decorate the dress and purse as desired.
Note: The dress and purse instructions are given for the Fox made with YarnArt Jeans yarn, 150m in 50g, and a 2.0 mm crochet hook. If you are using a different yarn or making adjustments to the pattern, you may need to adapt the initial stitch count accordingly.