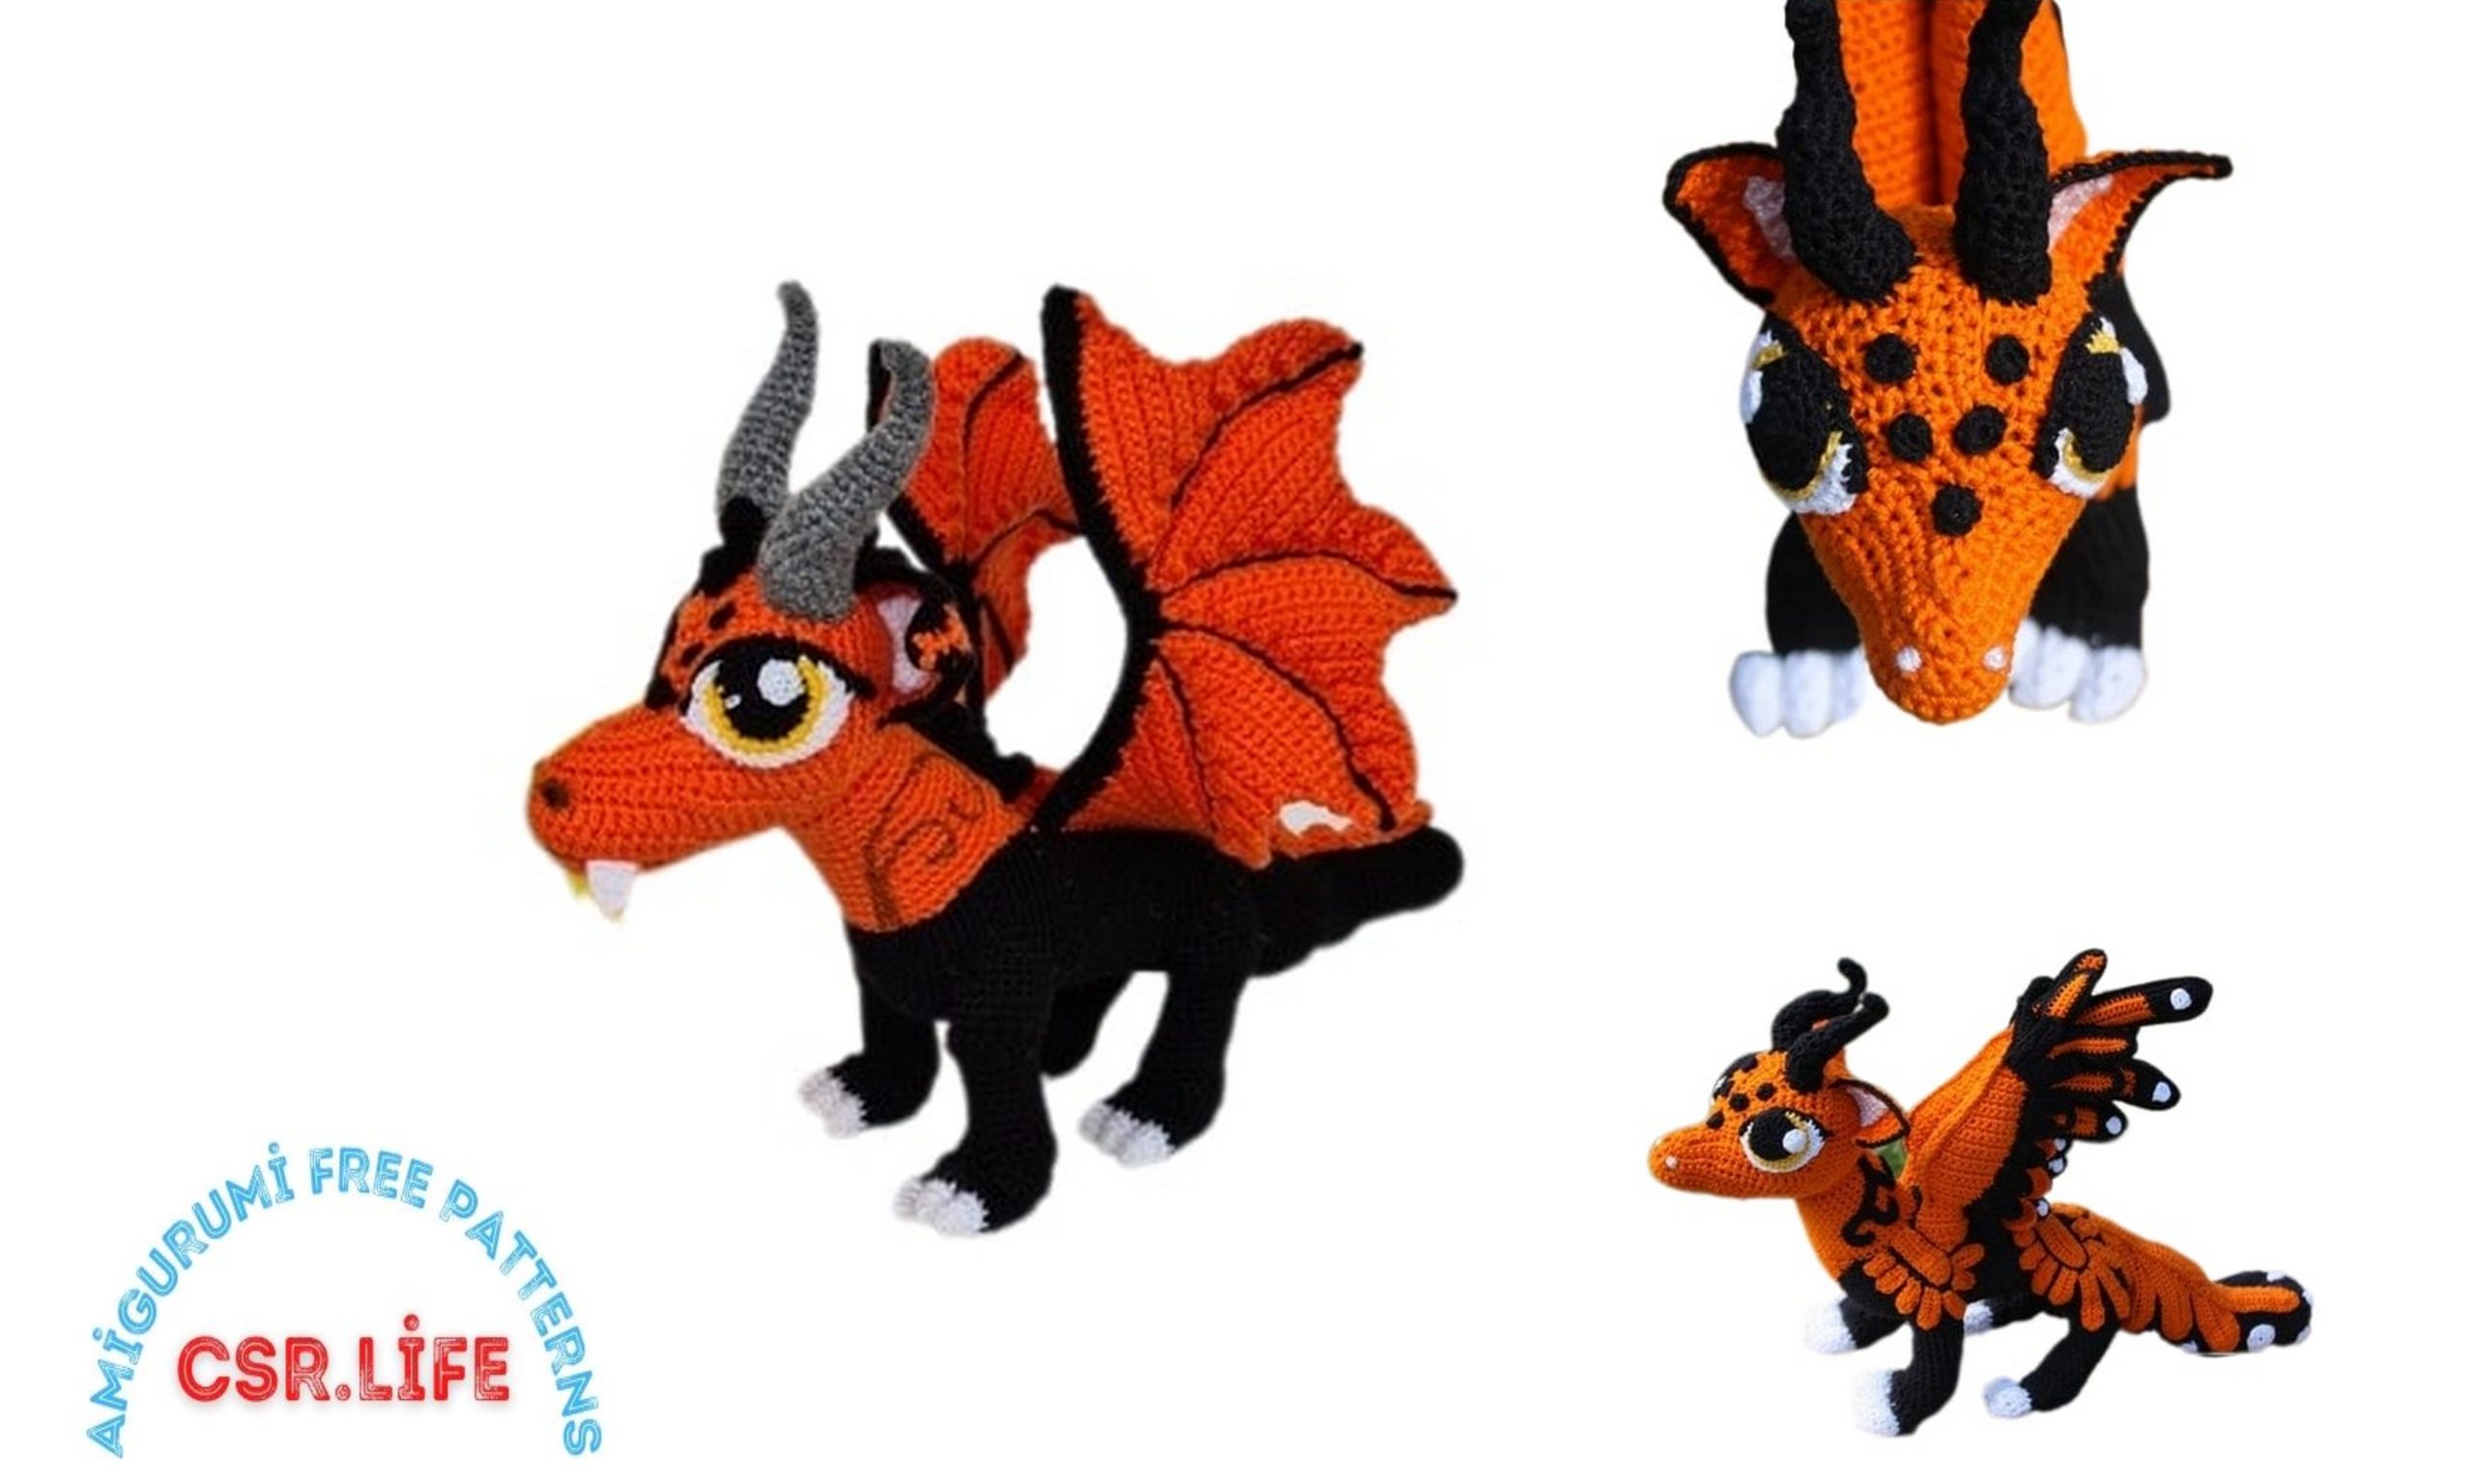
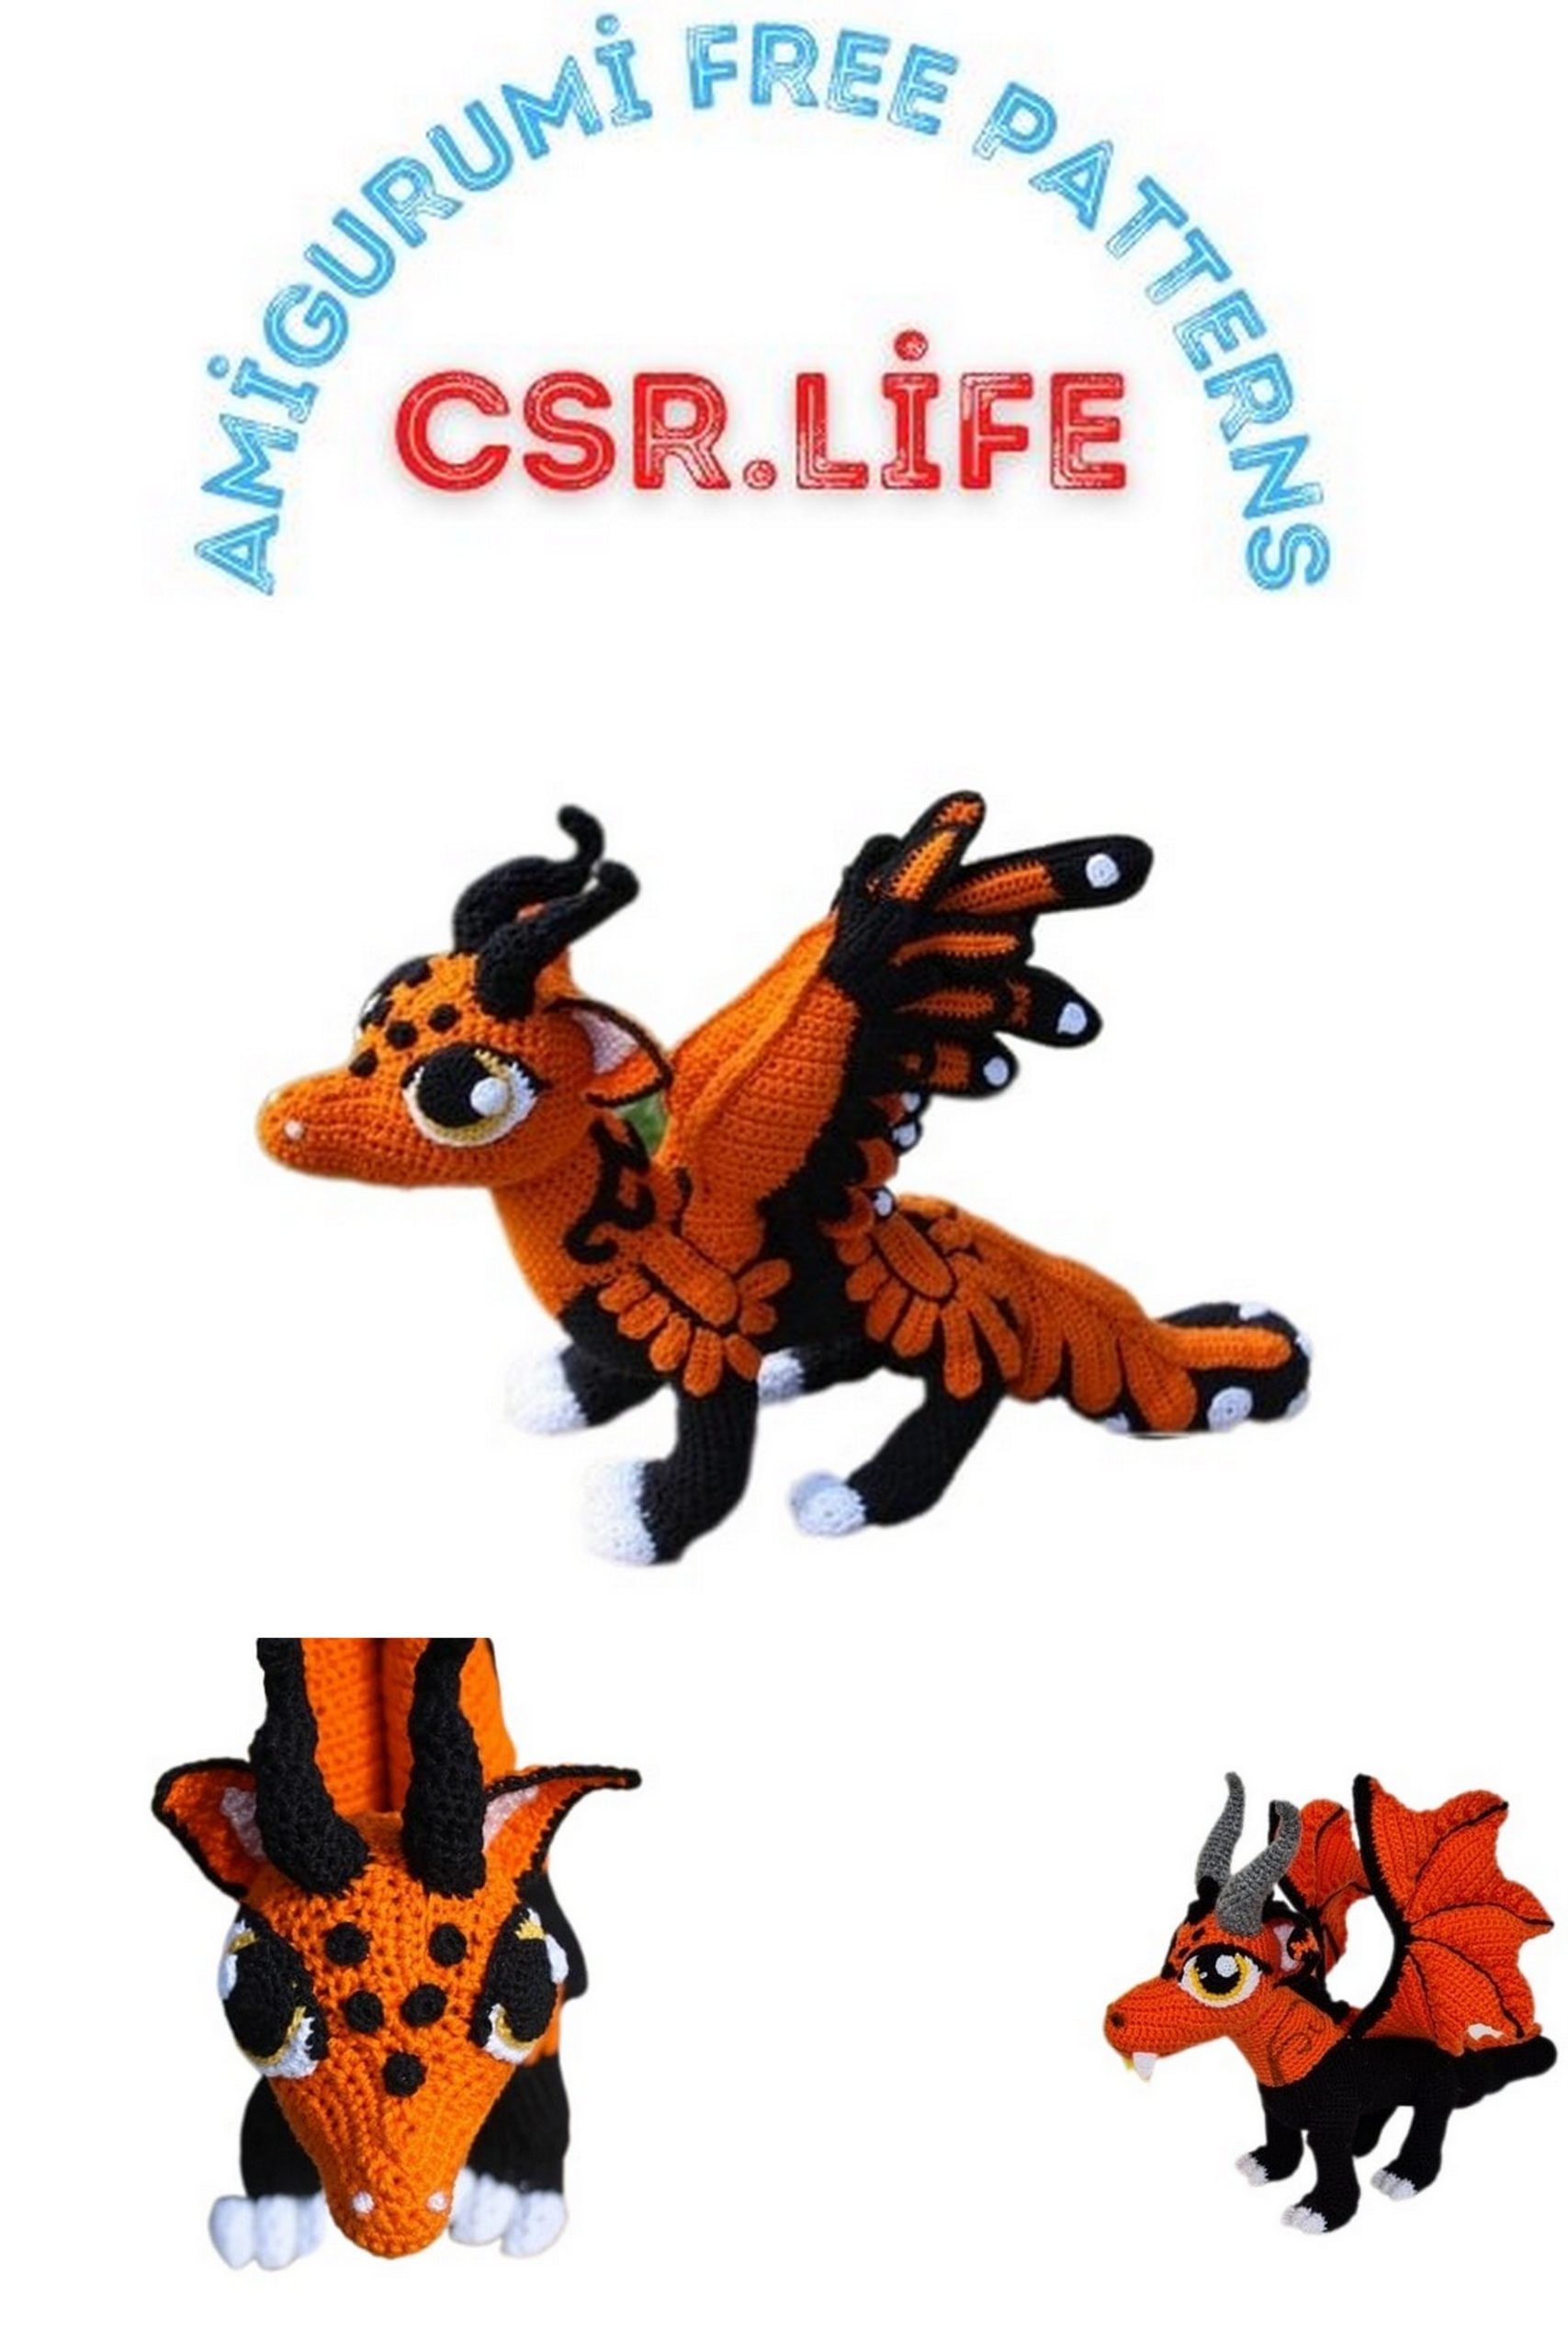
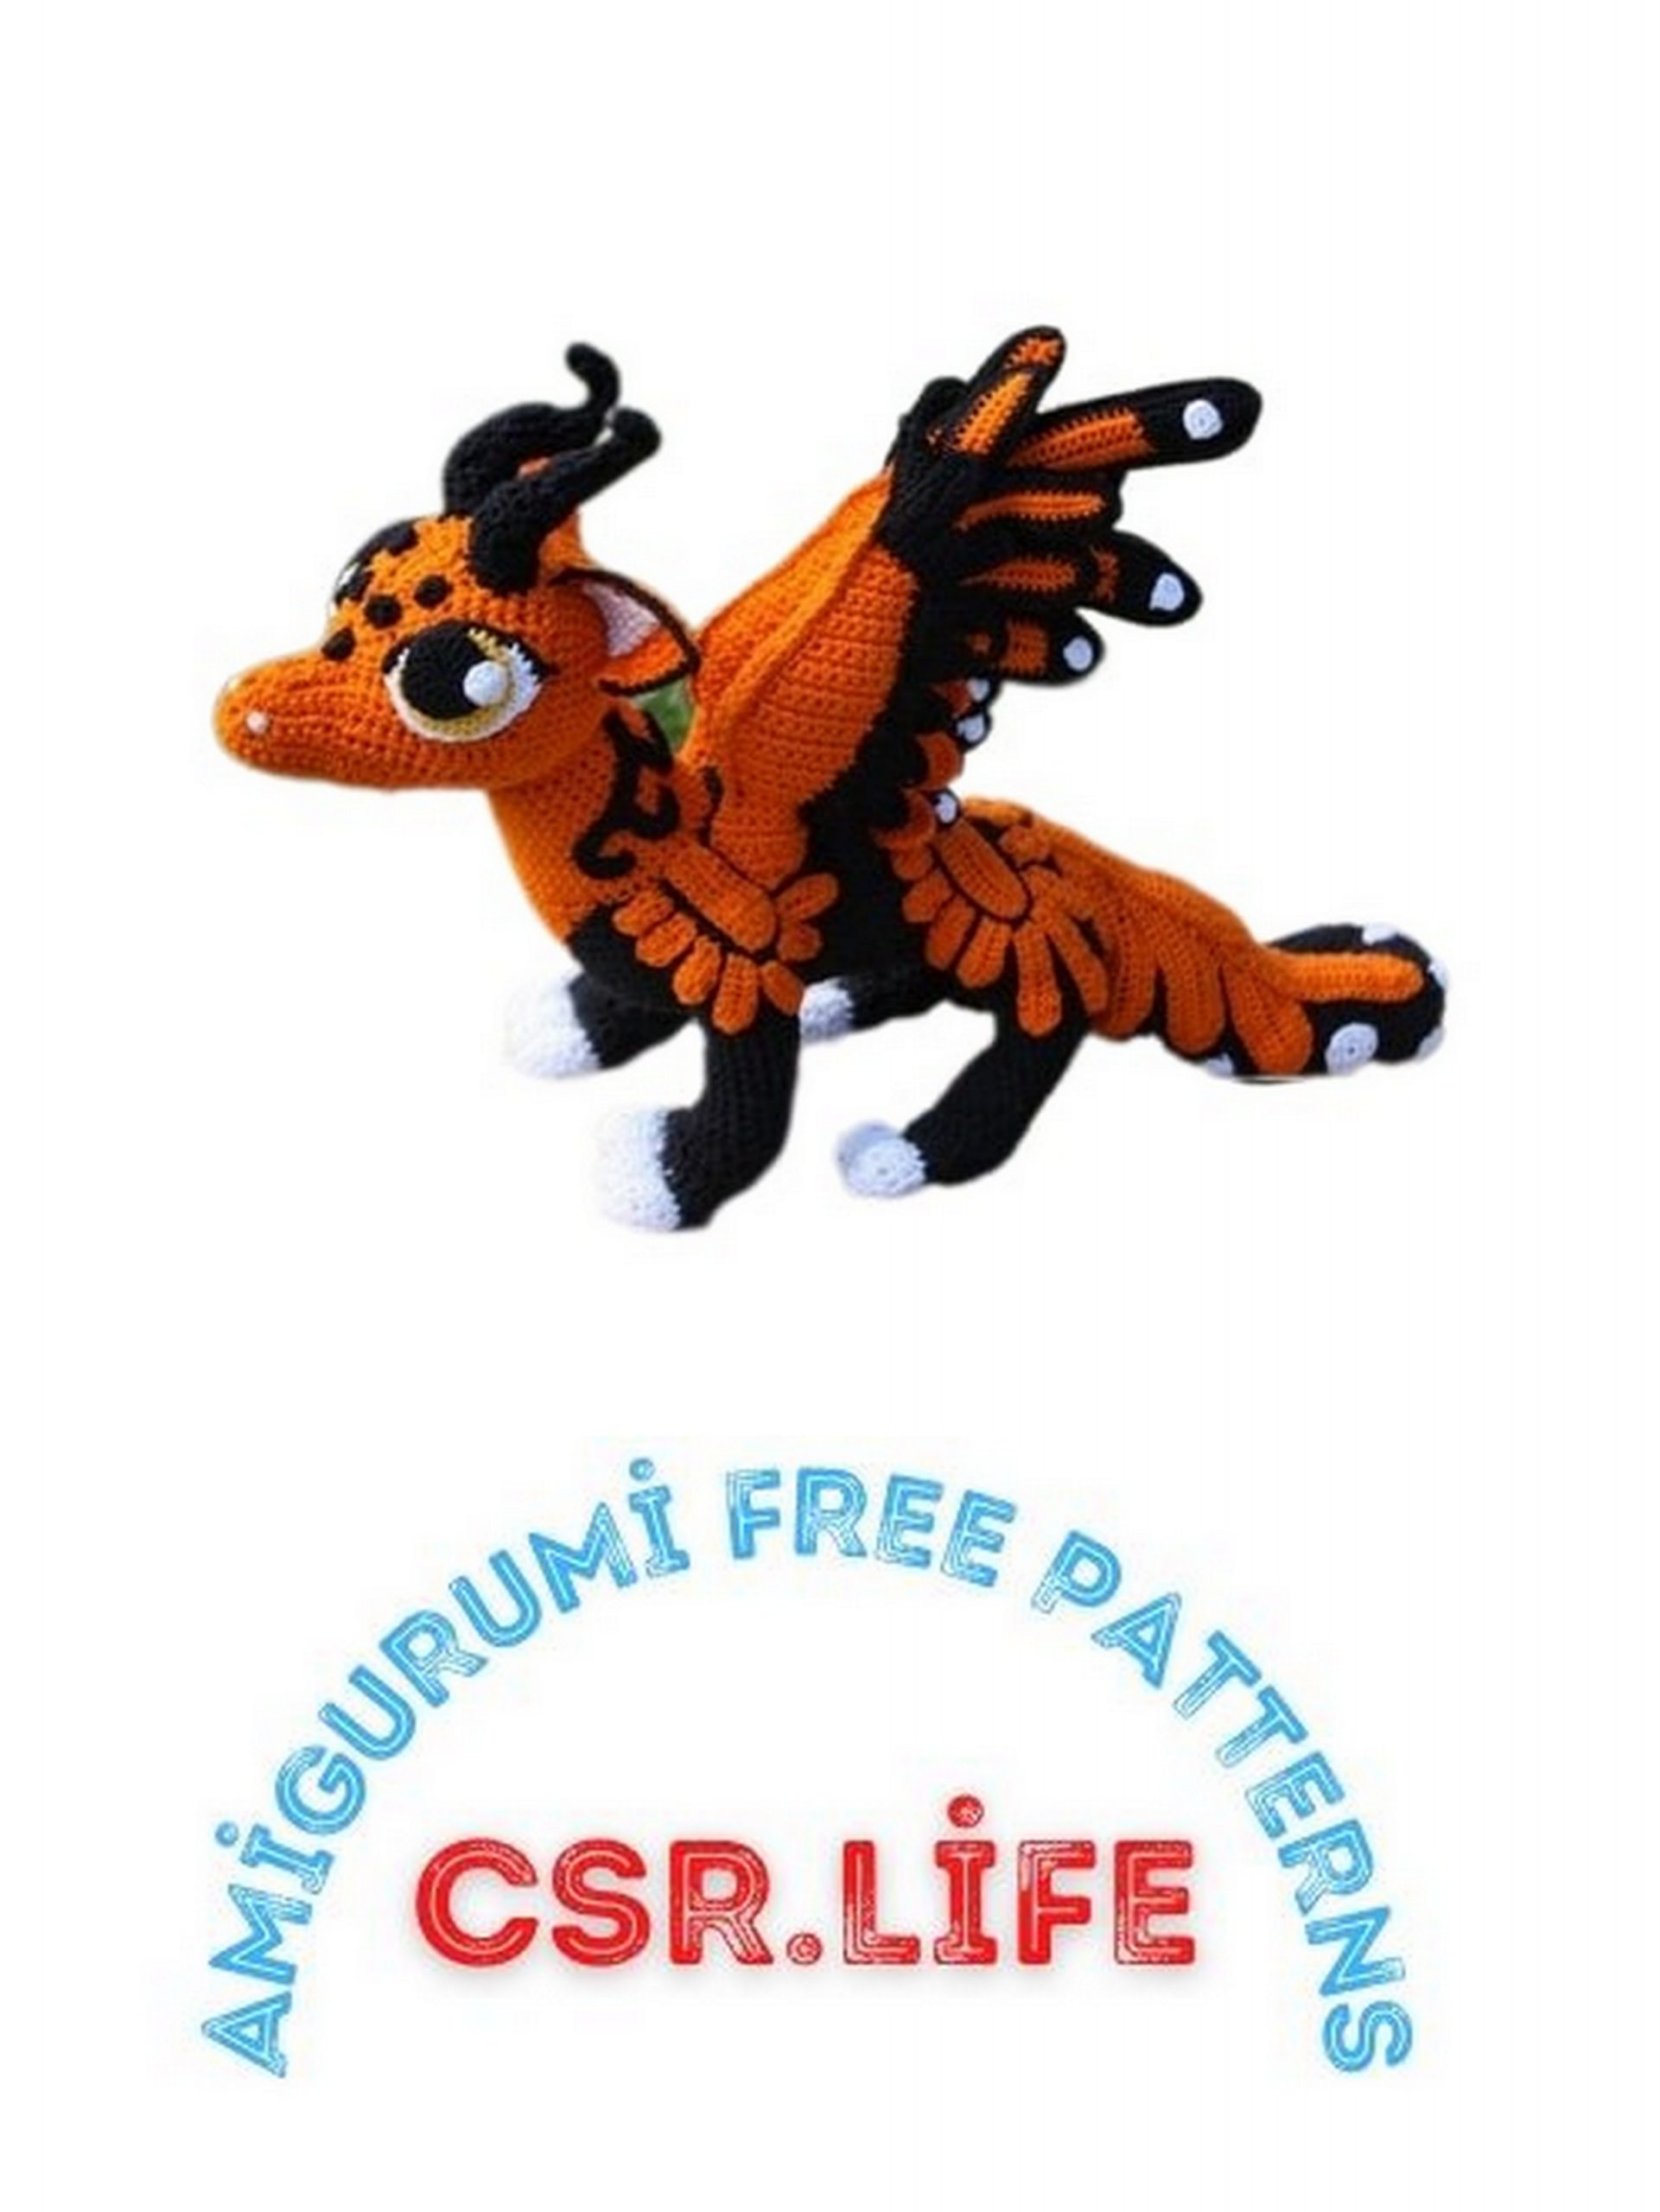
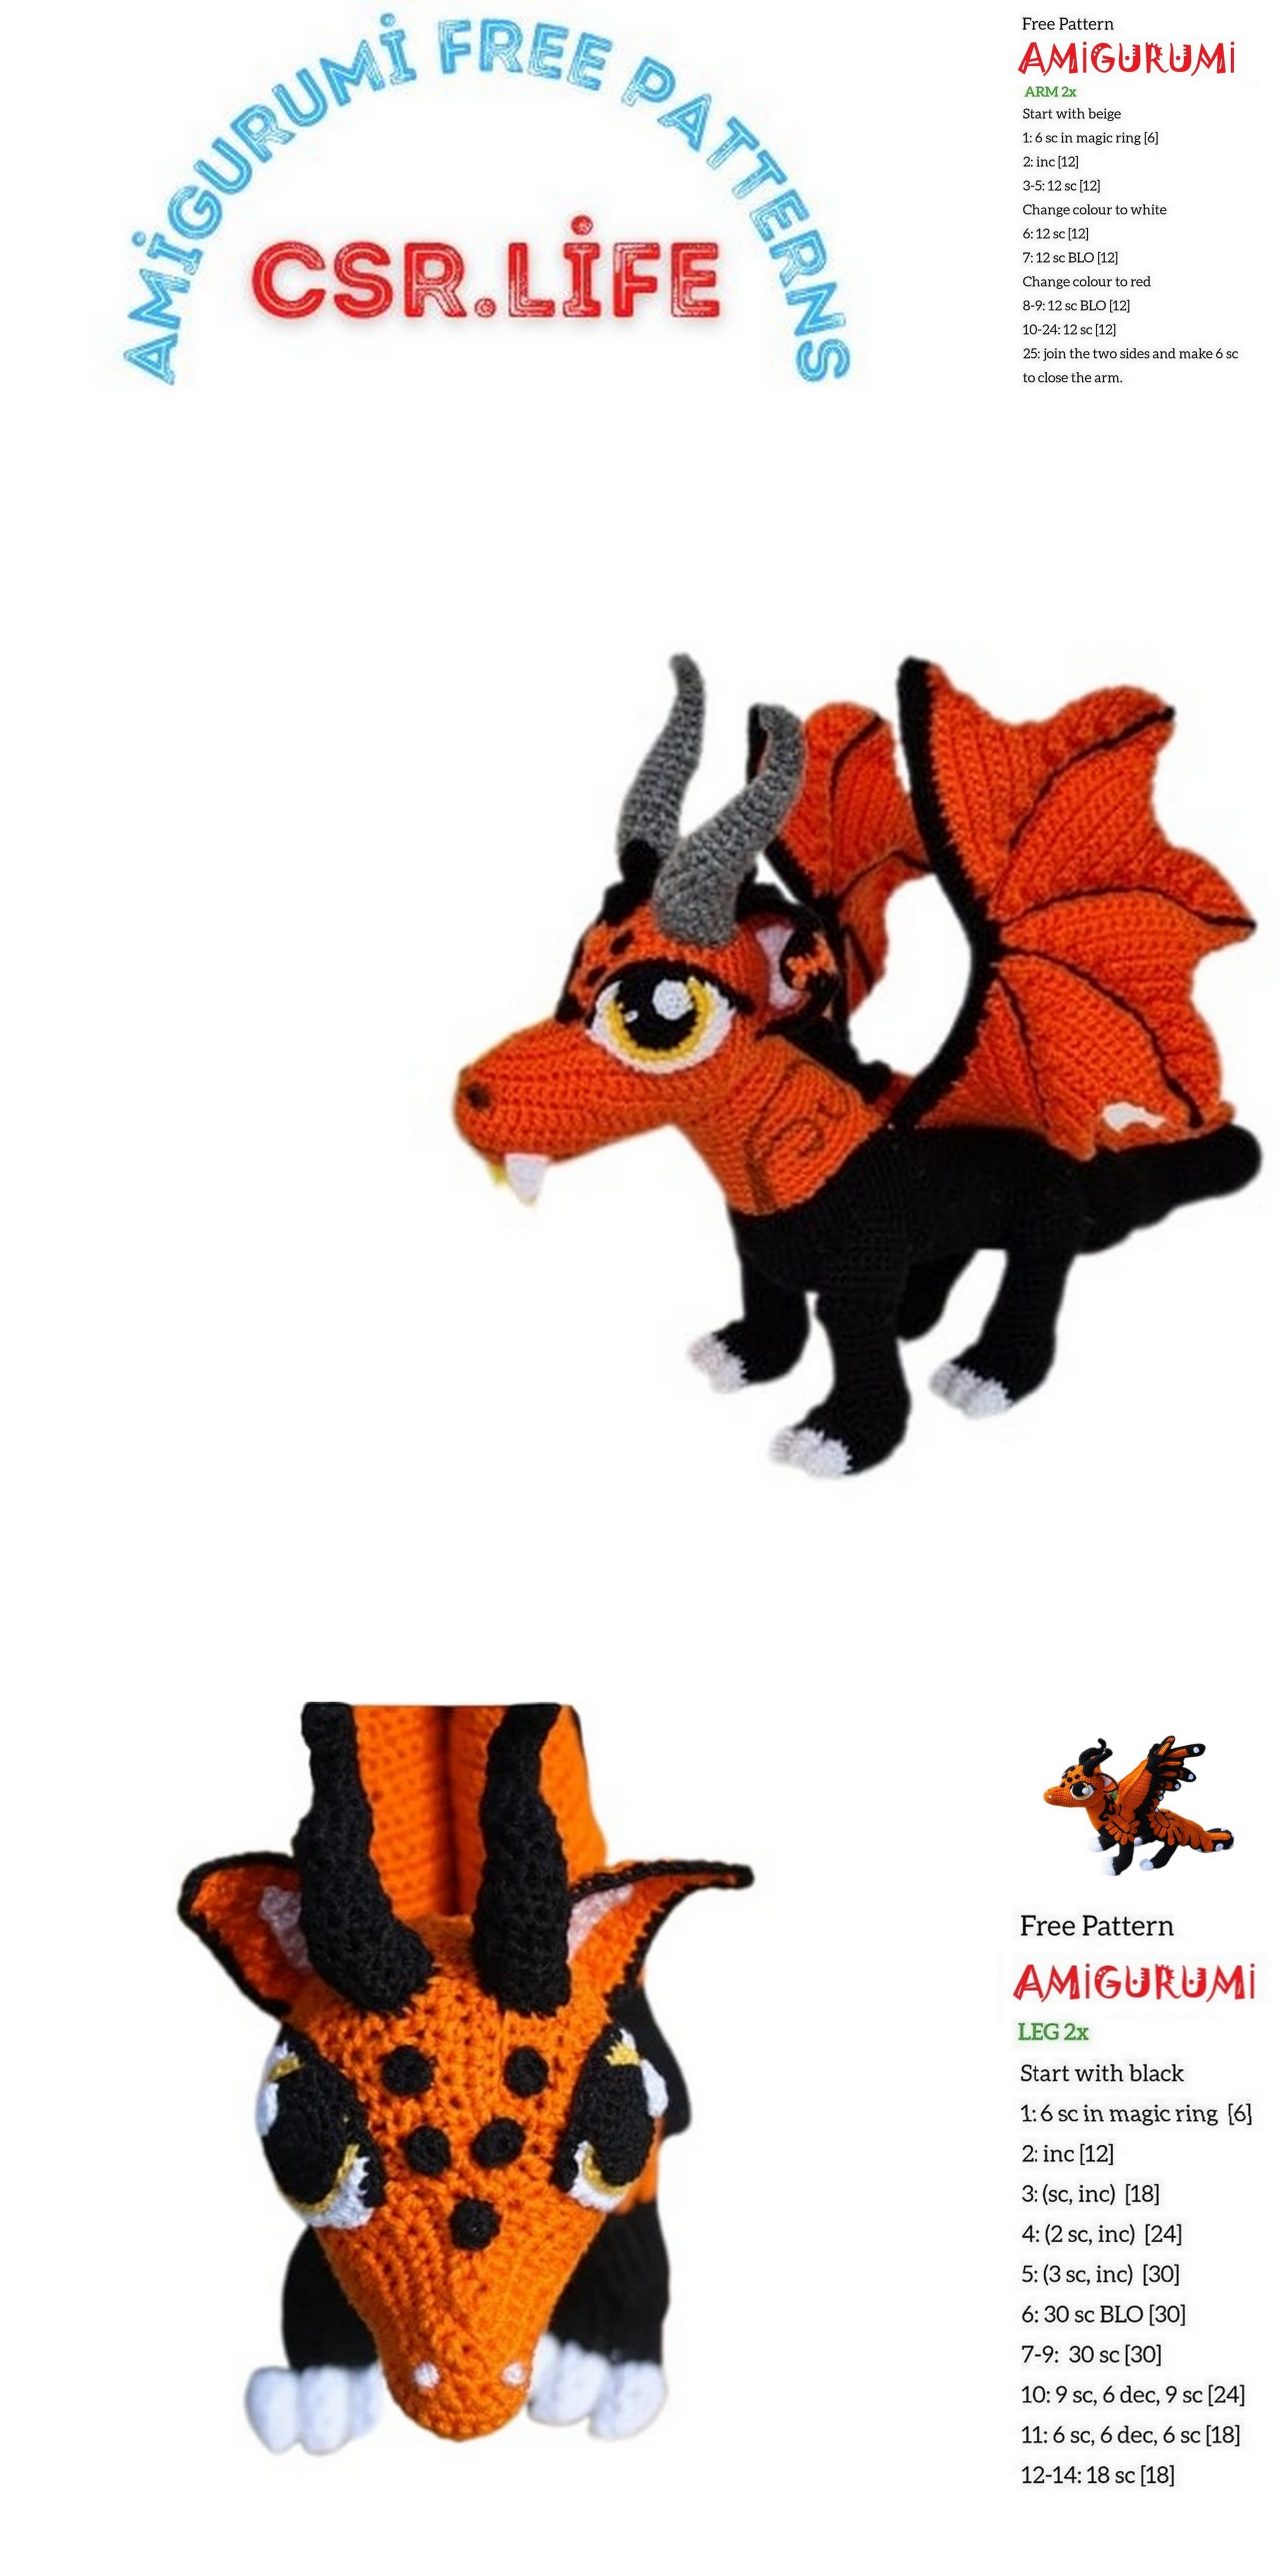
Reyna the Monarch Dragon Amigurumi Free Crochet Pattern
Wonderful amigurumi animal patterns are on this site for free. In this article, I shared with you the amigurumi dragon pattern.
Reyna the Monarch Dragon
Materials:
Size 10 crochet thread: 350yd per ball. 2 balls of orange, 2 balls of black, 1 ball of yellow, 2 ballsof white, and 1 ball of pink. (Please note: these are crochet thread not yarn.) Often not largeamounts are needed and some thread could be estimated and unwound for use as your secondthread.
Hook 2.75mm for double thread
Hook 1.80mm for single thread
Large eye needle
Instructions:
All rounds are done continuously and all rows are finished with one chain and turn unlessotherwise indicated.
Work in all tails after assembly.
Assembly instructions can be found between each piece.
Abbreviations:
ss slip stitch sc single crochet
hdc half double crochet dc double crochet
fo fasten off mr magic ring
sc_tog single crochet specified number of sts together
st stitch ch chain
llt leave long tail
HEAD:
2 CH, DOUBLE THREAD ORANGE
1.Rd: 6sc into second chain fromhook
2.Rd: 2sc in each = 12st
3.Rd: (1sc, 2sc in next) x 6 = 18st
4.Rd: (2sc, 2sc in next) x 6 = 24st
5.Rd: (3sc, 2sc in next) x 6 = 30st
6.Rd: (4sc, 2sc in next) x 6 = 36st
7.Rd: (5sc, 2sc in next) x 6 = 42st
8.Rd: (6sc, 2sc in next) x 6 = 48st
9.Rd: sc in each = 48st
10.Rd: (7sc, 2sc in next) x 6 = 54st
11.-16. Rd: sc in each = 54st (6 rounds)
17.Rd: (7sc, sc2tog) x 6 = 48st
18.Rd: (6sc, sc2tog) x 6 = 42st
19.Rd: (5sc, sc2tog) x 6 = 36st
20.Rd: (4sc, sc2tog) x 6 = 30st
21.Rd: (3hdc, hdc2tog) x 6 = 24st
22.Rd: hdc2tog x 6, sc2tog x 6 = 12st, Stuff
23.Rd: sc2tog x 6= 6sc, fasten off
FACE:
15 CH, DOUBLE THREAD, ORANGE
- Row: starting in second ch from hook: 13sc, 3sc in next ch, opposite side of ch: 13sc = 29st, 2ch, turn
- Row: 7hdc, 6sc, (2sc in next) x 3, 6sc, 7hdc = 32st, 2ch, turn
- Row: 2hdc in next, 8hdc, 4sc, (1sc, 2sc in next) x 3, 4sc, 8hdc, 2hdc in next = 37st, 2ch, turn
- Row: 2hdc in next, 8hdc, 5sc, (2sc in next, 2sc) x 3, 5sc, 8hdc, 2hdc in next = 42st, ch, turn
- Row: in Frontloops: sc around = 42st, 2ch, turn
- Row: 3dc, 7hdc, 22sc, 7hdc, 3dc = 42st, 2ch, turn
- Row: 2dc in next, 7dc, 5hdc, 3sc, (sc2tog, sc) x 3, sc2tog, 2sc, 5hdc, 7dc, 2dc in next = 40st, 2ch, turn
- Row: 6dc, 5hdc, 18sc, 5hdc, 6dc = 40st, 2ch, turn
- Row: 6dc, 5hdc, 7sc, sc2tog x 2, 7sc, 5hdc, 6dc = 38st, 2ch, turn
- Row: 6dc, 5hdc, 6sc, sc2tog x 2, 6sc, 5hdc, 6dc = 36st, 2ch, turn
- Row: 6dc, 5hdc, 4sc, sc6tog, 4sc, 5hdc, 6dc = 31st, 2ch, turn
- Row: 2dc in next, 4dc, 4hdc, 2sc, skip the next 9sts, 2sc, 4hdc, 4dc, 2dc in next = 24st, 2ch, turn
- Row: 2dc in next, 4dc, 3hdc, 2sc, sc4tog, 2sc, 3hdc, 4dc, 2dc in next = 23st, 2ch, turn
- Row: 2dc in next, 3dc, 2hdc, 3sc, sc5tog, 3sc, 2hdc, 3dc, 2dc in next = 21st, 2ch, turn
- Row: 2dc, 4hdc, 9sc, 4hdc, 2dc = 21st, fo, llt
Assembly:
Stitch holes together on top of face. Attach to head on the side you ended withoverlapping by about half. Pin it in place. Stuff as you go.
NECK:
30 CH – USE SS TO MAKE A RING, DOUBLE THREAD ORANGE, LLT
- Rd: 30sc = 30st
- – 4. Rd: sc in each = 30st (3 rounds)
- Rd: (5sc, 2sc in next) x 5 = 35st
- – 8. Rd: sc in each = 35st (3 rounds)
- Rd: (6sc, 2sc in next) x 5 = 40st
- – 12. Rd: sc in each = 40st (3 rounds), ch and turn after last round
- Row: skip next, sc2tog, 11sc, sc2tog = 13st, ch, turn
- Row: skip next, sc2tog, 8sc, sc2tog = 10st, ch, turn
- Row: skip next, sc2tog, 7sc = 8st, ch, turn
- Row: skip next, sc2tog, 5sc = 6st, ch, turn
- Row: skip next, sc2tog, 3sc = 4st, ch, turn
- Row: sc2tog x 2 = 2st, ch, turn
- Row: sc2tog = 1st, fo, llt
Assembly:
Pin straight end of neck to head from the edge of the face on the bottom to thecenter of the back of the head. If you want a different angle to the head this is where youwould change it. Stitch evenly around the neck.
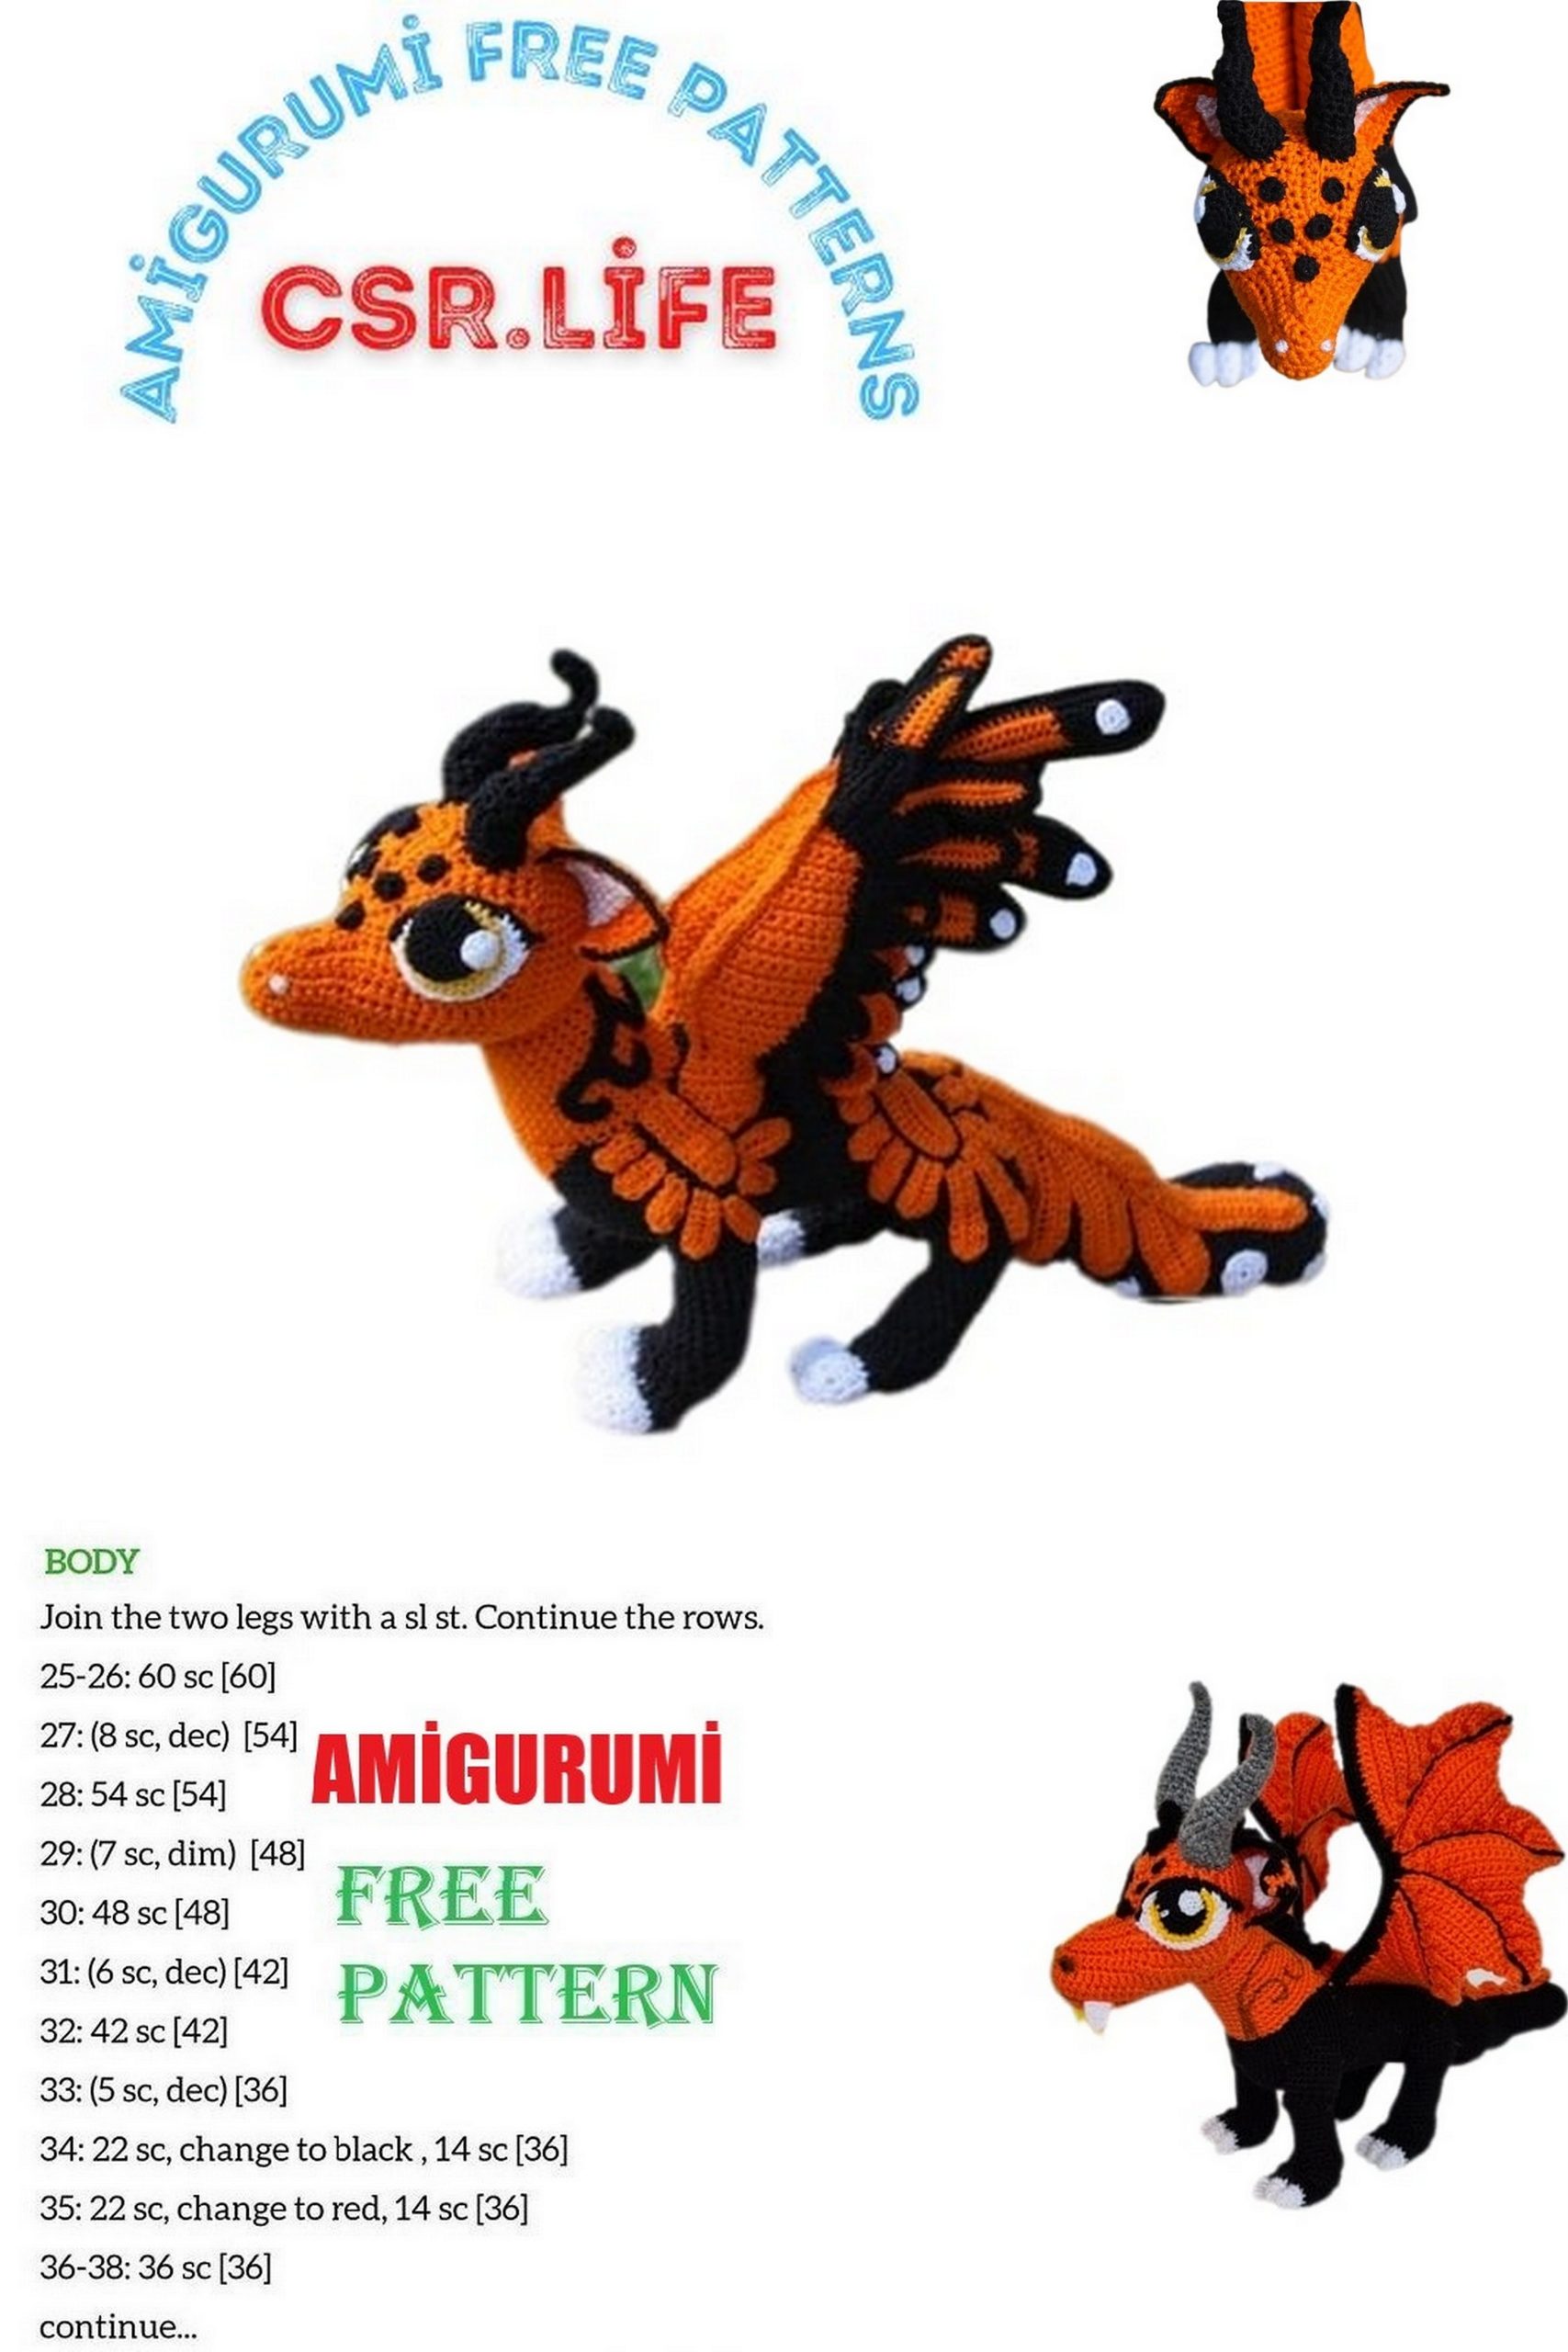
BODY:
2 CH, DOUBLE THREAD, BLACK
- Rd: 6sc into second chain from hook
- Rd: 2sc in each = 12st
- Rd: (1sc, 2sc in next) x 6 = 18st
- Rd: (2sc, 2sc in next) x 6 = 24st
- Rd: (3sc, 2sc in next) x 6 = 30st
- Rd: (4sc, 2sc in next) x 6 = 36st
- Rd: (5sc, 2sc in next) x 6 = 42st
- Rd: (6sc, 2sc in next) x 6 = 48st
- – 9. Rd: sc in each = 48st (5 rounds)
- Row: 32sc, 1 ss, ch, turn
- Row: A) skip ss, 2sc, 28hdc, 2sc, ss, ch, turn
B) skip ss, 2sc, 28hdc, 2sc, sc in (a) ch, 14sc, sc in (b) ch
- – 14. Rd: sc in each = 48st (4 rounds)
- Row: 32sc, 1 ss, ch, turn
- Row: A) skip ss, 2sc, 28hdc, 2sc, ss, ch, turn
B) skip ss, 2sc, 28hdc, 2sc, sc in (a) ch, 14 sc, sc in (b) ch
17.-18. Rd: sc in each = 48st (2 rounds)
19.Rd: (6sc, sc2tog) x 6 = 42st
20.-24. Rd: sc in each = 42st (5 rounds)
25.Rd: (5sc, sc2tog) x 6 = 36st
26.-32. Rd: sc in each = 36st (7 rounds)
33.Row: 22sc, 1 ss, ch, turn
34.Row: A) skip ss, 2sc, 18hdc, 2sc, ss, ch, turn
B) skip ss, 2sc, 18hdc, 2sc, sc in (a) ch, 12 sc, sc in (b) ch
35.-41. Rd: sc in each = 36st (7 rounds)
42.Rd: (4sc, sc2tog) x 6 = 30st
43.Rd: (3sc, sc2tog) x 6 = 24st
44.Rd: (2sc, sc2tog) x 6 = 18st
45.Rd: (1sc, sc2tog) x 6 = 12st, stuff body.
46.Rd: sc2tog x 6 = 6st
47.Rd: sc2tog x 3 = 3st, fasten off
Assembly:
Attach the neck to the body on the bigger end.
FRONT LEGS:
DOUBLE THREAD, MR, MAKE 2, WHITE, BLACK
White
Start with the toes: double thread, 9ch – connect with ss,make 6 total
- Rd: 1sc in each = 9st
- Rd: 3sc, 3hdc, 3sc = 9st
- Rd: sc2tog, 1sc, hdc2tog, 1hdc, sc2tog, 1sc = 6st
- Rd: sc2tog, hdc2tog, sc2tog = 3st, 1ss, fo
Add the toes to the feet starting in the beginning row fromthe claws, three each foot. As you add the toes make surethe curve goes towards the top of the foot.
Black
- Rd: 7sc in the third toe beginning in last st, 5sc in second toe beginning in 2 nd after the last st, 9sc in the first toe beginning in 2 nd after the last st, sc in last 4 sts of second toe, sc in last 2 sts of third toe. = 27st
- Rd: (Right) sc2tog, 5sc, 2tog x 2, 5sc, sc2tog, 9sc = 23st (left) 9sc, sc2tog, 5sc, sc2tog x 2, 5sc, sc2tog = 23st
- Rd: (2sc, sc2tog) x 5, 3sc = 18st
- Row: 4sc, ss, ch, turn
- Row: a)Skip 1, 2sc, 10hdc, 2sc, ss, ch, turn
b) Skip 1, 2sc, 10hdc, 2sc, ss in (a) row ch, ch, turn
c) Skip 1, 2sc, 10hdc, 2sc, ss in (b) row ch, ch, turn
d) Skip 1, 2sc, 10hdc, 2sc, sc in (a) row ch, 2sc, sc in (b) row
10.-17. Rd: sc in each = 18st (8 rounds)
- Row: 13sc, ss, ch, turn
- Row: a) skip ss, 2sc, 7hdc, 2sc, ss, ch, turn
b) skip ss, 2sc, 7hdc, 2sc, sc in row a, 5sc, sc in row b
- (right) Rd: 6sc, (2sc in next) x 6, 6sc (left) Rd: (2sc in next) x 6, 12sc
- (Both) Rd: sc in each = 24st
- (Right) Row: ch, turn, 15sc, ch, turn (Left) Row: 9sc, ch, turn
- Row: sc2tog, 11sc, sc2tog = 13st
- Row: sc2tog, 9sc, sc2tog = 11st
- Row: sc2tog, 7sc, sc2tog = 9st
- Row: sc2tog, 5sc, sc2tog, = 7st
- Row: sc2tog, 3sc, sc2tog, = 5st, fo, llt
Assembly:
Wait to attach front legs until after back legs are put on. There is a little more room to move these legs around to keep the legs squared up for stability. When you place them put them in the natural shoulder position stuffing firmly as you go. It needs to be firm to support the weight. I wanted the legs to be closer together so I did some additional stitching in the underarm area to hold them in more. Stitch the gaps between the toes together beginning 1/3 down the toes on the bottom touching sections. This will make them more forward facing and hide any stuffing peeking through at the junction.
BACK LEGS:
DOUBLE THREAD, MR, MAKE 2, BLACK, WHITE
White
Start with the toes: double thread, 9ch – connect with ss, make 6 total
- Rd: 1sc in each = 9st
- Rd: 3sc, 3hdc, 3sc = 9st
- Rd: sc2tog, 1sc, hdc2tog, 1hdc, sc2tog, 1sc = 6st
- Rd: sc2tog, hdc2tog, sc2tog = 3st, 1ss, fo
Add the toes to the feet starting in the beginning row from the claws, three each foot. As you add the toes make sure the curve goes towards the top.
Black
- Rd: 7sc in the third toe beginning in last st, 5sc in second toe beginning in 2 nd st after the last st, 9sc in the first toe beginning in 2 nd st after the last st, sc in last 4 sts of second toe, sc in last 2 sts of third toe. = 27st
- Rd: (left) sc2tog, 5sc, 2tog x 2, 5sc, sc2tog, 9sc = 23st (right) 9sc, sc2tog, 5sc, sc2tog x 2, 5sc, sc2tog = 23st
- Rd: (2sc, sc2tog) x 5, 3sc = 18st
- Row: 4sc, ss, ch, turn
- Row: a)Skip 1, 2sc, 10hdc, 2sc, ss, ch, turn
b) Skip 1, 2sc, 10hdc, 2sc, ss in (a) row ch, ch, turn
c) Skip 1, 2sc, 10hdc, 2sc, ss in (b) row ch, ch, turn
d) Skip 1, 2sc, 10hdc, 2sc, sc in (a) row ch, 2sc, sc in (b) row
10.-17. Rd: 8sc, 2sc in next, 7sc, sc2tog = 18st (8 rounds)
18.Rd: (5sc, 2sc in next) x 3 = 21st
19.Rd: (6sc, 2sc in next) x 3 = 24st
20.-21. Rd: sc in each = 24st (2 rounds)
22.Row: (left) 16sc, ch, turn, 6sc, (2sc in next) x 6, ch, turn (right) 4sc, ch, turn, (2sc in next) x 6, 6sc, ch, turn
23.Row: (left) (2sc in next) x 6, 12sc = 24st, ch, turn (right) 12sc, (2sc in next) x 6 = 24st, ch, turn
24.Row: (both) sc2tog, 20sc, sc2tog = 22st, ch, turn
25.Row: (left) sc2tog, 4sc, sc2tog, 5sc, sc2tog, 5sc, sc2tog = 18st, ch, turn (right) sc2tog, 5sc, sc2tog, 5sc, sc2tog, 4sc, sc2tog = 18st, ch, turn
26.Row: (left) sc2tog, 2sc, sc2tog, 3sc, sc2tog, 5sc, sc2tog = 14st, ch, turn (right) sc2tog, 5sc, sc2tog, 3sc, sc2tog, 2sc, sc2tog = 14st, ch, turn
27.Row: (both) sc2tog, 4sc, sc2tog, 4sc, sc2tog = 11st, ch, turn
28.Row: (left) sc2tog, 3sc, sc2tog, 2sc, sc2tog = 8st, ch, turn (right) sc2tog, 2sc, sc2tog, 3sc, sc2tog = 8st, ch, turn
29.Row: (both) sc2tog, 4sc, sc2tog = 6st, ch, turn
30.Row: (both) sc2tog, 2sc, sc2tog = 4st, fo, llt
Assembly:
Attach the back legs leaving room for the tail at the end. Stuff firmly. Stitch the gaps between the toes as done with the front legs.
TAIL:
30 CH – MAKE A RING WITH SS, DOUBLE THREAD, LLT, BLACK
1.Rd: sc in each = 30st
2.-7. Rd: 15sc, 15hdc = 30st (6 rounds)
8.Rd: (8sc, sc2tog) x 3 = 27st
9.-14. Rd: sc in each = 27st (6 rounds)
15.Rd: (7sc, sc2tog) x 3 = 24st
16.Row: 16sc, ss, ch, turn
17.Row: a) skip ss, 2sc, 13hdc, 2sc, ss, ch, turn
b) skip ss, 2sc, 13hdc, 2sc, ss in row a, ch, turn
c) skip ss, 2sc, 13hdc, 2sc, ss in row b, ch, turn
d) skip ss, 2sc, 13hdc, 2sc, sc in row a, 5sc, 1sc in row b
18.-23. Rd: sc in each = 24st (6 rounds)
24.Rd: (2sc, sc2tog) x 6 = 18st
25.Row: 8sc, ss, ch, turn
26.Row: a) skip ss, 2sc, 7hdc, 2sc, ss, ch, turn
b) skip ss, 2sc, 7hdc, 2sc, ss in row a, ch, turn
c) skip ss, 2sc, 7hdc, 2sc, ss in row b, ch, turn
d) skip ss, 2sc, 7hdc, 2sc, ss in row a, ch, turn
e) skip ss, 2sc, 7hdc, 2sc, ss in row b, ch, turn
f) skip ss, 2sc, 7hdc, 2sc, sc in row a, 5sc, sc in row b
27.Rd: sc in each = 18st
28.Row: 11sc, ss, ch, turn
29.Row: a) skip ss, 2sc, 7hdc, 2sc, ss, ch, turn
b) skip ss, 2sc, 7hdc, 2sc, ss in row a, ch, turn
c) skip ss, 2sc, 7hdc, 2sc, ss in row b, ch, turn
d) skip ss, 2sc, 7hdc, 2sc, sc in row a, 5sc, sc in row b
30.Rd: 16sc, sc2tog = 17st
31.Row: 10sc, ss, ch, turn
32.Row: a) skip ss, 2sc, 6hdc, 2sc, ss, ch, turn
b) skip ss, 2sc, 6hdc, 2sc, ss in row a, ch, turn
c) skip ss, 2sc, 6hdc, 2sc, ss in row b, ch, turn
d) skip ss, 2sc, 6hdc, 2sc, sc in row a, 5sc, sc in row b
- Rd: 15sc, sc2tog = 16st
- Rd: Sc each = 16st
- Rd: 14sc, sc2tog = 15st
- Rd: Sc each = 15st
- Rd: 13sc, sc2tog = 14st
- Rd: Sc each = 14st
- Row: 10sc, ss, ch, turn
- Row: a) skip ss, 2sc, 5hdc, 2sc, ss, ch, turn
b) skip ss, 2sc, 5hdc, 2sc, ss in row a, ch, turn
e) skip ss, 2sc, 5hdc, 2sc, ss in row b, ch, turn
f) skip ss, 2sc, 5hdc, 2sc, sc in row a, 3sc, sc in row b
- Rd: sc in each = 14st
- Rd: 12sc, sc2tog = 13st
- Rd: Sc each = 13st
- Rd: 11sc, sc2tog = 12st
- Rd: Sc each = 12st
- Rd: 10sc, sc2tog = 11st
- Rd: Sc each = 11st
- Row: 3sc, ss, ch, turn
- Row: a) skip ss, 1sc, 4hdc, 1sc, ss, ch, turn
b) skip ss, 1sc, 4hdc, 1sc, ss in row a, ch, turn
c) skip ss, 1sc, 4hdc, 1sc, ss in row b, ch, turn
d) skip ss, 1sc, 4hdc, 1sc, sc in row a, 3sc, sc in row b
- Rd: 9sc, sc2tog = 10st
- Rd: Sc each = 10st
- Rd: 8sc, sc2tog = 9st
- Rd: Sc each = 9st
- Rd: 7sc, sc2tog = 8st
- Rd: Sc each = 8st
- Rd: 6sc, sc2tog = 7st
- Rd: Sc each = 7st
- Rd: 5sc, sc2tog = 6st
- Rd: Sc each = 6st
- Rd: 4sc, sc2tog = 5st
- Row: ss, ch, turn
- Row: a) skip ss, 2sc, ss, ch, turn
b) skip ss, 2sc, sc in row a, 1sc, sc in row b
63.Rd: sc in each = 5st
- Rd. 3sc, sc2tog = 4st
- Rd: 2sc, sc2tog = 3st
- Rd: sc in each = 3st
- Rd: sc3tog = 1st, fo
Assembly:
Attach tail to the rump and the very top of the thighs with the curve resting on theground. This adds to the stability of the piece. Stuff as you go. Be sure the tip of the tail doesn’tgo into the back leg.
Tail
color strips – make 8, orange, single thread, 1.8mm24ch
- Row: starting in second ch from hook, 22sc, 3sc in next, in other side of ch: 22sc = 47st, ch, turn
- Row: 23sc, 3sc in next, 23sc = 49, ch, turn
- Row: 24sc, 3sc in next, 24sc = 51, ch, turn
Assembly:
Starting near the base, alternate sides, with first six up to the curve. The seventh is placed at the curve and up over the previously applied strips. The eighth is placed slightly overlapping the seventh and up over the first six. Stitch within the last row of stitches to keep a nice clean edge.
Tail spots – white, single thread, 1.8mm
Extra Small make 1
- Rd: 4sc in MR, fo, llt
Small make 2
- Rd: 5sc in MR, fo, llt
Medium make 7
- Rd: 6sc in MR, fo, llt
Large make 2
- Rd: 7sc in MR, fo, llt
Extra Large make 2
- Rd: 8sc in MR, fo, llt
Extra, Extra Large make 2
- Rd: 9sc in MR, fo, llt
Extra, Extra, Extra Large make 2
- Rd: 6sc in MR
- Rd: 2sc in each = 12st, ss, fo, llt
Assembly:
Under the tail color strips place 4 medium spots (2 on each side). Then, starting after the color strips, begin with the largest spots down to the smallest as you go down the tail.
Body
color strips – orange, single thread, 1.8mm
Front:
Extra Large make 2 (one right, one left)(both)10ch
(Left) 1. Row: starting in second ch from hook, 2sc in next, 5sc,2hdc, 3dc in next, in other side of ch: 2hdc, 5sc, 1ss = 20st, ch, turn
(Right) 1. Row: starting in second ch from hook, 1ss, 5sc, 2hdc, 3dc in next, in other side of ch:2hdc, 5sc, 2sc in next = 20st, ch, turn
(Left) 2. Row: 1ss, 5sc, 3hdc, 3dc in next, 3hdc, 6sc, 1ss = 22, fo, llt
(Right) 2. Row: 1ss, 6sc, 3hdc, 3dc in next, 3hdc, 5sc, 1ss = 22, fo, llt
Large, make 6
8ch
- Row: starting in second ch from hook, 4sc, 2hdc, 3hdc in next, in other side of ch: 2hdc, 4sc 15st, fo, llt
Medium, make 4
7ch
- Row: starting in second ch from hook, 3sc, 2hdc, 3hdc in next, in other side of ch: 2hdc, 3sc = 13st, fo, llt
Small, make 2
6ch
- Row: starting in second ch from hook, 2sc, 2hdc, 3hdc in next, in other side of ch: 2hdc, 2sc = 11st, fo, llt
Extra small, make 2
5ch
- Row: starting in second ch from hook, 1sc, 2hdc, 3hdc in next, in other side of ch: 2hdc, 1sc =9st, fo, llt
Assembly:
Place the extra-large strip from the edge of the neck over the curve of the shoulder, center the 3 large strips just off the tip and attach, place 1 medium strip next on each side of the first strip, follow these with 1 small on the bottom side and then 1 extra small on the bottom side. Repeat on the other side. Leave enough room between each piece to allow black to show through between them. (After I created the wings, I decided to replace the top two strips seen in the picture with the wings for placement.)
Back:
Extra Large, make 2
12ch
- Row: starting in second ch from hook, 10sc, 3sc in next, in other side of ch: 10sc = 23st, ch, turn
- Row: 11sc, 3sc in next, 11sc = 25, fo, llt
Large, make 4
12ch
- Row: starting in second ch from hook, 8sc, 2hdc, 3hdc in next, in other side of ch: 2hdc, 8sc = 23st, fo, llt
Medium, make 6
8ch
- Row: starting in second ch from hook, 4sc, 2hdc, 3hdc in next, in other side of ch: 2hdc, 4sc =15st, fo, llt
Small, make 5
5ch
- Row: starting in second ch from hook, 2sc, 1hdc, 3dc in next, in other side of ch: 1hdc, 2sc =9st, fo, llt
Extra small, make 2
4ch
- Row: starting in second ch from hook, 1sc, 1hdc, 3dc in next, in other side of ch: 1hdc, 1sc =7st, fo, llt
Assembly:
Place the extra-large strips with corners touching at the center back and over the curve of the thigh, center the 2 large strips just off the tip and attach, place 1 medium strip behind and 2 in front of the large. Follow these with 2 small on the front and then 1 extra small on the back. (After both sides are attached there will be just enough room for 1 small between them in the back.) Repeat on the other side. Leave enough room between each piece to allow black to show through between them.
EYES:
SINGLE THREAD – WHITE, YELLOW, BLACK, MAKE 2, HOOK 1.8mm
Black
- Rd: 6sc in MR = 6st
- Rd: 2sc in each = 12st
- Rd: (1sc, 2sc in next) x 6 = 18st
- Rd: (2sc, 2sc in next) x 6 = 24st, ss, fo, llt
Yellow: 3ch
- Rd: 1sc, 3sc in next, (on other side of ch) 2sc in next = 6st
- Rd: 2sc in each = 12st
- Rd: (1sc, 2sc in next) x 6 = 18st
- Rd: (2sc, 2sc in next) x 6 = 24st
- Rd: (3sc, 2sc in next) x 6 = 30st, ss, fo, llt
White, 4ch
- Rd: 2sc, 3sc in next, (on other side of ch) 1sc, 2sc in next = 8st
- Rd: 2sc in each = 16st
- Rd: (1sc, 2sc in next) x 8 = 24st
- Rd: (2sc, 2sc in next) x 8 = 32st
- Row: 3sc, ss, ch, turn
- Row: skip 1, 1ss, 1sc, 2hdc, 1sc, 13ss, 1sc, 2hdc, 1sc, 1ss, fo, llt
Light spot, white
- Rd: 6sc in MR = 6st, fo, llt
Assembly:
Sew the black pupil into the yellow iris with one side lining up. Sew the yellow iris onto the white lining up the straighter edge with the part that has the pupil closest to the edge.
Place the light spot on the back of the pupil going over into the iris a little. Next, do the eyeliner (below). Remember to make the second eye a mirror image. Place on face. Be careful of the angle of the eye as this can make a difference in the mood of the dragon.
Eyeliner, black
- Starting at front corner of the eye, along the top edge, through all layers, 17sc, 2ch, fo, llt
WINGS:
MAKE 2, 2CH, DOUBLE THREAD, ORANGE
- Row: 2sc in second ch from hook = 2st, ch, turn
- Row: 3sc in next, 2sc in next = 5st, ch, turn
- Row: 4sc, 3sc in next = 7st, ch, turn
4.-5. Row: Sc in each (2 rows)
- Row: 3sc in next, 4sc, sc2tog = 8st, ch, turn
- Row: 7sc, 3sc in next = 10st, ch, turn
- Row: 8sc, sc2tog = 9st, ch, turn
9.-10. Row: Sc in each (2 rows)
- Row: 8sc, 2sc in next = 10st, ch, turn
- Row: 10sc = 10st, ch, turn
- Row: 9sc, 2sc in next = 11st, ch, turn
14.-15. Row: Sc in each (2 rows)
- Row: 2sc in next, 10sc = 12st, ch, turn
- Row: 11sc, 2sc in next = 13st, ch, turn
- Row: 2sc in next, 12sc = 14st, ch, turn
19.-20. Row: Sc in each (2 rows)
- Row: sc2tog, 11sc, 2sc in next = 14s, ch, turn
- Row: 2sc in next, 13sc = 15st, ch, turn
- Row: 13sc, sc2tog = 14st, ch, turn
24.-25. Row: Sc in each (2 rows)
- Row: sc2tog, 12sc = 13st, ch, turn
- Row: sc2tog, 9sc, sc2tog = 11st, ch, turn
- Row: sc2tog, 7sc, sc2tog = 9st, fo first one made, do not fo second one created
Repeat steps 1-28 to create second side.
Sc both sides of wing together, 2sc in tip of wing to turn the corner.
When back up to row 28 work in a round around both sides.
- Rd: 7sc, sc4tog, 7sc = 15st
- Rd: left wing: 18sc, ch, turn (This is more than 1 full round.)
Right wing: ch, turn, 18sc, ch, turn (This is more than 1 full round.)
- Row: 10sc = 10st, ch, turn
- Row: sc2tog, 6sc, sc2tog = 8st, ch, turn
- Row: (2sc, sc2tog) x 2 = 6st, ch, turn
- Row: (sc2tog) x 3 = 3st, ch, turn
- Row: sc3tog, ch, fasten off
Assembly:
Stuff firmly. Finish the stuffing as you sew it into place so it stays firm all the way to the bottom and maintains its shape. Position this below the neck and above the shoulder body strips with the wing tips pointing toward the sky.
WING FEATHERS:
ORANGE, BLACK, WHITE, SINGLE THREAD, HOOK 1.8mm
Back layer of top feathers
Use black (b) and orange (o)
Large make 2
(b) 9ch (o) 19ch
- Row: starting in second ch from hook, (o) 18sc, (b) 8sc, 3sc in next, in other side of ch: 8sc, (o) 18sc = 55st, ch, turn
- Row: (o) 18sc, (b) 9sc, 3sc in next, 9sc, (o) 18sc = 57st, ch, turn
- Row: (b) 28sc, 3sc in next, 28sc = 59st, fo, llt
Make another for the other side of the feather. Sc around the edges piecing the front and back of the feathers together with black, 3sc at the tip of the feather. Leave the bottom edge of the feather open.
Feather spots, white, single thread. Make one for each feather.
- Rd: 6sc in MR
Assembly:
Position the spot in the center of the black and stitch it on. Stuff and attach the large feather, spot facing out, toward the tip of the wing. Have it pointing between the ceiling and the wall. Place the stitches on each side of the wing over the seam using matching colors.
Repeat on other wing.
Medium make 2
(b) 7ch (o) 17ch
- Row: starting in second ch from hook, (o) 16sc, (b) 6sc, 3sc in next, in other side of ch: 6sc, (o)
16sc = 47st, ch, turn
- Row: (o) 16sc, (b) 7sc, 3sc in next, 7sc, (o) 16sc = 49st, ch, turn
- Row: (b) 24sc, 3sc in next, 24sc = 51st, fo, llt
Make another for the other side of the feather. Sc around the edges piecing the front and back of the feathers together with black, 3sc at the tip of the feather. Leave the bottom edge of the feather open.
Feather spots, white, single thread. Make one for each feather.
- Rd: 5sc in MR
Assembly:
Position the spot in the center of the black and stitch it on. Stuff and attach the medium feather (spot facing out) below the large feather. Place the stitches on each side of the wing over the seam using matching colors. Repeat on other wing.
Small make 2
(b) 5ch (o) 15ch
- Row: starting in second ch from hook, (o) 14sc, (b) 4sc, 3sc in next, in other side of ch: 4sc, (o) 14sc = 39st, ch, turn
- Row: (o) 14sc, (b) 5sc, 3sc in next, 5sc, (o) 14sc = 41st, ch, turn
- Row: (b) 20sc, 3sc in next, 20sc = 43st, fo, llt
Make another for the other side of the feather. Sc around the edges piecing the front and back of the feathers together with black, 3sc at the tip of the feather. Leave the bottom edge of the feather open.
Feather spots, white, single thread. Make one for each feather.
- Rd: 4sc in MR
Assembly:
Position the spot in the center of the black and stitch it on. Stuff and attach below the medium feather. Place the stitches on each side of the wing over the seam using matching colors. Repeat on other wing.
Back layer of bottom feathers
Use black
Small make 2
10ch
- Row: starting in second ch from hook, 8sc, 3sc in next, in other side of ch: 8sc = 19st, ch, turn
- Row: 9sc, 3sc in next, 9sc = 21st, fo, llt
Make another for the other side of the feather. Sc around the edges piecing the front and back of the feathers together with black, 3sc at the tip of the feather. Leave the bottom edge of the feather open.
Feather spots,
white, single thread. Make one for each feather.
- Rd: 3sc in MR
Assembly: Position the spot in the center of the top portion and stitch it on. Stuff and attach, spot facing out, below the small top feather. Place the stitches on each side of the wing over the seam. Repeat on other wing.
Medium make 2
12ch
- Row: starting in second ch from hook, 10sc, 3sc in next, in other side of ch: 10sc = 23st, ch, turn
- Row: 11sc, 3sc in next, 11sc = 25st, fo, llt
Make another for the other side of the feather. Sc around the edges piecing the front and back of the feathers together with black, 3sc at the tip of the feather. Leave the bottom edge of the feather open.
Feather spots, white, single thread. Make one for each feather.
- Rd: 3sc in MR
Assembly: Position the spot in the center of the top portion and stitch it on. Stuff and attach, spot facing out, below the small feather. Place the stitches on each side of the wing over the seam. Repeat on other wing.
Large make 2
14ch
- Row: starting in second ch from hook, 12sc, 3sc in next, in other side of ch: 12sc = 27st, ch, turn
- Row: 13sc, 3sc in next, 13sc = 29st, fo, llt
Make another for the other side of the feather. Sc around the edges piecing the front and back of the feathers together with black, 3sc at the tip of the feather. Leave the bottom edge of the feather open.
Feather spots, white, single thread. Make one for each feather.
- Rd: 3sc in MR
Assembly:
Position the spot in the center of the top portion and stitch it on. Stuff and attach, spot facing out, below the medium feather. Place the stitches on each side of the wing over the seam. Repeat on other wing.
Middle layer of top feathers
Using black (b) and orange (o)
Medium make 4
(o) 15ch
- Row: starting in second ch from hook, (o) 13sc, 3sc in next, in other side of ch: 13sc = 29st, ch, turn
- Row: (b) 14sc, 3sc in next, 14sc = 31st, fo, llt
Make another for the other side of the feather. Sc around the edges piecing the front and back of the feathers together with black, 3sc at the tip of the feather. Leave the bottom edge of the feather open.
Assembly:
Attach at tip of wing ¼ inch in front of back row of feathers, have it pointing just above where the first in the back row is. Reserve 2 medium feathers for later. Place the stitches on the bottom of the feather and 2/3 up and across the back of each feather. Repeat on other wing.
Note:
The reason for doubling the thickness of the feathers at this point is to give them more substance and less curling. It also allows you to stitch through the back layer without it showing. Do not stuff.
Large make 2
(o) 18ch
- Row: starting in second ch from hook, (o) 16sc, 3sc in next, in other side of ch: 16sc = 35st, ch, turn
- Row: (b) 17sc, 3sc in next, 17sc = 37st, fo, llt
Make another for the other side of the feather. Sc around the edges piecing the front and back of the feathers together with black, 3sc at the tip of the feather. Leave the bottom edge of the feather open.
Assembly:
Attach ¼ inch in front of back row of feathers, have it overlap the first a bit. Place the reserve medium feather now. You can look at the photos for an idea on placement. Place the stitches on the bottom of the feather and 2/3 up and across the back of each feather. Repeat on other wing.
Small make 2
(o) 10ch
- Row: starting in second ch from hook, (o) 8sc, 3sc in next, in other side of ch: 8sc = 19st, ch,
turn
- Row: (b) 9sc, 3sc in next, 9sc = 21st, fo, llt
Make another for the other side of the feather. Sc around the edges piecing the front and back of the feathers together with black, 3sc at the tip of the feather. Leave the bottom edge of the feather open.
Assembly: Attach below the medium feather. Place the stitches on the bottom of the feather and 2/3 up and across the back of each feather. Repeat on other wing.
Middle layer of bottom feathers
Using orange
Small make 2
8ch
- Row: starting in second ch from hook, 7sc, 3sc in next, in other side of ch: 7sc = 17st, ch, turn
- Row: 8sc, 3sc in next, 8sc = 19st, fo, llt
Make another for the other side of the feather. Sc around the edges piecing the front and back of the feathers together with black, 3sc at the tip of the feather. Leave the bottom edge of the feather open.
Assembly:
Attach below last feather. Place the stitches on the bottom of the feather and 2/3 up and across the back of each feather. Repeat on other wing.
Medium make 2
10ch
- Row: starting in second ch from hook, 8sc, 3sc in next, in other side of ch: 8sc = 19st, ch, turn
- Row: 9sc, 3sc in next, 9sc = 21st, fo, llt
Make another for the other side of the feather. Sc around the edges piecing the front and back of the feathers together with black, 3sc at the tip of the feather. Leave the bottom edge of the feather open.
Assembly:
Attach below the small feather. Place the stitches on the bottom of the feather and 2/3 up and across the back of each feather. Repeat on other wing.
Large make 2
12ch
- Row: starting in second ch from hook, 10sc, 3sc in next, in other side of ch: 10sc = 23st, ch, turn
- Row: 11sc, 3sc in next, 11sc = 25st, fo, llt
Make another for the other side of the feather. Sc around the edges piecing the front and back of the feathers together with black, 3sc at the tip of the feather. Leave the bottom edge of the feather open.
Assembly:
Attach below medium feather. Place the stitches on the bottom of the feather and 2/3 up and across the back of each feather. Repeat on other wing.
Front layer of feathers
Using black
Extra Large make 6
12ch
- Row: starting in second ch from hook, 10sc, 3sc in next, in other side of ch: 10sc = 23st, fo, llt
Make another for the other side of the feather. Sc around the edges piecing the front and back of the feathers together with black, 3sc at the tip of the feather. Leave the bottom edge of the feather open.
Assembly:
Attach ¼ inch in front of last row, over the first placed in that row. Use another XL feather as the next, overlapping the first. Save 2 XL feathers for later. Place the stitches on the bottom of the feather and 2/3 up and across the back of each feather. Repeat on other wing.
Medium make 4
10ch
- Row: starting in second ch from hook, 8sc, 3sc in next, in other side of ch: 8sc = 19st, fo, llt
Make another for the other side of the feather. Sc around the edges piecing the front and back of the feathers together with black, 3sc at the tip of the feather. Leave the bottom edge of the feather open.
Assembly:
Attach below last feathers. Save 2 medium feathers for later. Place the stitches on the bottom of the feather and 2/3 up and across the back of each feather. Repeat on other wing.
Small make 6
8ch
- Row: starting in second ch from hook, (o) 6sc, 3sc in next, in other side of ch: 6sc = 15st, fo, llt
Make another for the other side of the feather. Sc around the edges piecing the front and back of the feathers together with black, 3sc at the tip of the feather. Leave the bottom edge of the feather open.
Assembly:
Attach 3 feathers below the last feather. Attach the saved medium feather. Place the stitches on the bottom of the feather and 2/3 up and across the back of each feather.
Repeat on other wing.
Large make 2
11ch
- Row: starting in second ch from hook, 9sc, 3sc in next, in other side of ch: 9sc = 21st, fo, llt
Make another for the other side of the feather. Sc around the edges piecing the front and back of the feathers together with black, 3sc at the tip of the feather. Leave the bottom edge of the feather open.
Assembly:
Attach below the medium feather. Attach the saved XL feather. Place the stitches on the bottom of the feather and 2/3 up and across the back of each feather. Repeat on other wing.
HORNS
– MAKE 2, DOUBLE THREAD, MR, BLACK
- Rd: 3sc in mr = 3st
- Rd: 2sc, 2sc in next = 4st
- Rd: 3sc, 2sc in next = 5st
- Rd: Sc2tog, 1sc, 2sc in next, 1sc = 5st
- Rd: Sc2tog, 1sc, 2sc in next, 1sc = 5st
- Rd: Sc2tog, 1sc, 2sc in next x 2 = 6st
- Rd: sc2tog, 1sc, 2sc in next, 2sc = 6st
- Rd: Sc2tog, 1sc, 2sc in next x 2, 1sc = 7st
- Rd: sc2tog, 1sc, 2sc in next, 3sc = 7st
- Rd: 2sc in next, 6sc = 8st
- Rd: 2sc in next, 3sc, sc2tog, 2sc = 8st
- Rd: 2sc in next x 2, 2sc, sc2tog, 2sc = 9st
- Rd: 2sc, 2sc in next, 2sc, sc2tog, 2sc = 9st
- Rd: 2sc in next x 2, 3sc, sc2tog, 2sc = 10st
- Rd: 2sc in next x 2, 3sc, sc2tog, 3sc = 11st, ss, ch, turn
- Row: a) skip ss, 1sc, 4hdc, 1sc, ss, ch, turn
b) skip ss, 1sc, 4hdc, 1sc, ss in row a, ch, turn
c) skip ss, 1sc, 4hdc, 1sc, ss in row b, ch, turn
d) skip ss, 1sc, 4hdc, 1sc, sc in row a, 3sc, sc in row b
- Rd: (Left) 2hdc in next x 2, 4sc, sc2tog, 3sc (Right) 3sc, sc2tog, 4sc, 2hdc in next x 2 = 12st
- Rd: (Left) 1hdc, 2hdc in next x 2, 1hdc, 3sc, sc2tog, 3sc (Right) 3sc, sc2tog, 3sc, 1hdc, 2hdc in next x 2, 1hdc = 13st, ss, fo, llt
Assembly:
Stuff the horns lightly in the tip and firm in the lower portion. Attach close together on the top of the head pointing to the back, do not cut the thread. Work the thread up the front of the horn to the tip, work it through the stitches back down halfway. Pull the thread firmly to cause the tip of the horn to curl. Work the thread partway back up and down to lock the curl in.
NECK DESIGN:
SINGLE THREAD, BLACK, 1.8MM HOOK, MAKE 2
Ch 21
- Row: starting in second ch from hook: 11sc, 11ch, turn, 10sc, (back to original ch) 5sc, 11ch,10sc, (back to original ch) 4sc, fo, llt
Assembly:
Pin in place below head joining to neck, make mirror images of each other. Try to use the natural curl to curl the tips around. Stitch around both sides of the design being careful to keep the attaching stitches under the piece.
EARS:
DOUBLE THREAD, ORANGE, BLACK, PINK, make 2
Start with orange
CH 13, llt
- Row: starting in second ch from hook: 12sc = 12st, ch, turn
- Row: sc2tog, 8sc, sc2tog = 10st, ch, turn
- Row: sc in each = 10st, ch, turn
- Row: sc2tog, 6sc, sc2tog = 8st, ch, turn
- Row: sc in each = 8st, ch, turn
- Row: sc2tog, 4sc, sc2tog = 6st, ch, turn
- Row: sc in each = 6st, ch, turn
- Row: sc2tog, 2sc, sc2tog = 4st, ch, turn
- Row: sc in each = 4st, ch, turn
- Row: sc2tog x 2 = 2st, ch, turn
- Row: sc in each = 2st, ch, turn
- Row: sc2tog = 1st, fo, llt
Sc with a single thread of black along top 2 edges of ears. At the tip of the ear do 2sc, 1ch, 2sc
to keep it pointy and help navigate the corner.
Inner ear:
pink, make 2
Ch 9
- Row: starting in second ch from hook, 8sc = 8st, ch, turn
- Row: sc2tog, 4sc, sc2tog = 6st, ch, turn
- Row: sc in each = 6st, ch, turn
- Row: sc2tog, 2sc, sc2tog = 4st, ch, turn
- Row: sc in each = 4st, ch, turn
- Row: sc2tog x 2 = 2st, ch, turn
- Row: sc in each = 2st, ch, turn
- Row: sc2tog = 1st, fo, llt
Assembly:
Sew the inner ear to the outer ear hiding the stitches. Attach the ears from behind the horns to behind and slightly below the eye. I use pins to hold placement.
FACE SPOTS:
BLACK, SINGLE THREAD, make 5
Ch 2
- Rd: starting in second ch from hook, 6sc, fo, llt
Assembly:
Create a “V” out of the spots on the front of the face between the eyes and attach.
NOSTRILS:
DOUBLE THREAD, PINK, MAKE TWO DIRECTLY ON FACE
Place the two nostrils at the top corners of the muzzle.
With the sewing needle wrap the thread around a st 3 times. Repeat on the other side.