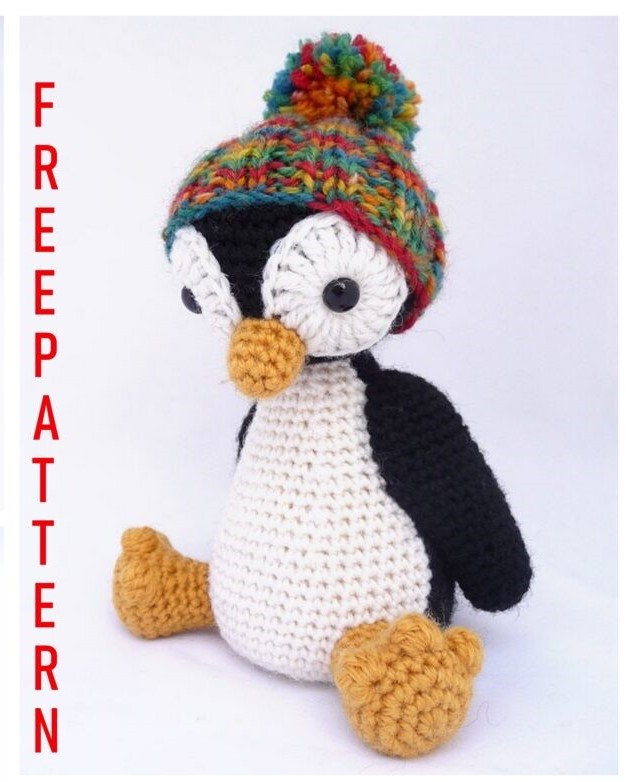
Amigurumi Cute Penguin Free Pattern
We share wonderful amigurumi free patterns with you. In this article, amigurumi penguin free pattern is waiting for you.
Gauge
The diameter of a 36 sts (starting rnd + 5 rnds) basic circle is ca. 5 cm (2”). A small variation in the gauge is ok,but if the fabric of your amigurumi is much too loose, stuffing it will be difficult (the fabric will pull apart and the stuffing will show between the stitches).
Stitches used
Single crochet (sc) in a continuous spiral following the instructions. Do not join rnds.
The eye areas are crocheted as treble crochet (tr).
The toes on the feet are double crochet bobbles.
General instructions
Unless mentioned otherwise, all pieces are fastened off by cutting the yarn and pulling it through the loop.
Leave a long tail that can be used for sewing the pieces together.
Yarn
DK weight wool yarn with gauge 20-22sts/10cm(4”), eg. Sandnes Smart Superwash, ca. 50g (1 skein) black, 50g (1 skein) white and a small amount of yellow for the penguin. Ca. 25g (½ skein) multicoloured yarn for the bobble hat (you can also make it striped or single colored).

You will need also
Crochet hook 4mm (or size to obtain gauge)
Double-pointed knitting needles 4mm
Tapestry needle
Polyester fiberfill
(Plastic granulate pellets)
Black plastic safety eyes, 12mm
Black and white perle cotton
Pompom maker or cardboard for making the pompom
Basic circle
The basic piece of an amigurumi is a cylinder shape which is sculpted by increasing and decreasing stitches. The cylinder is based on a basic circle.
The basic circle is divisible by 6,in other words there are always 6 increases (or decreases) on one round.
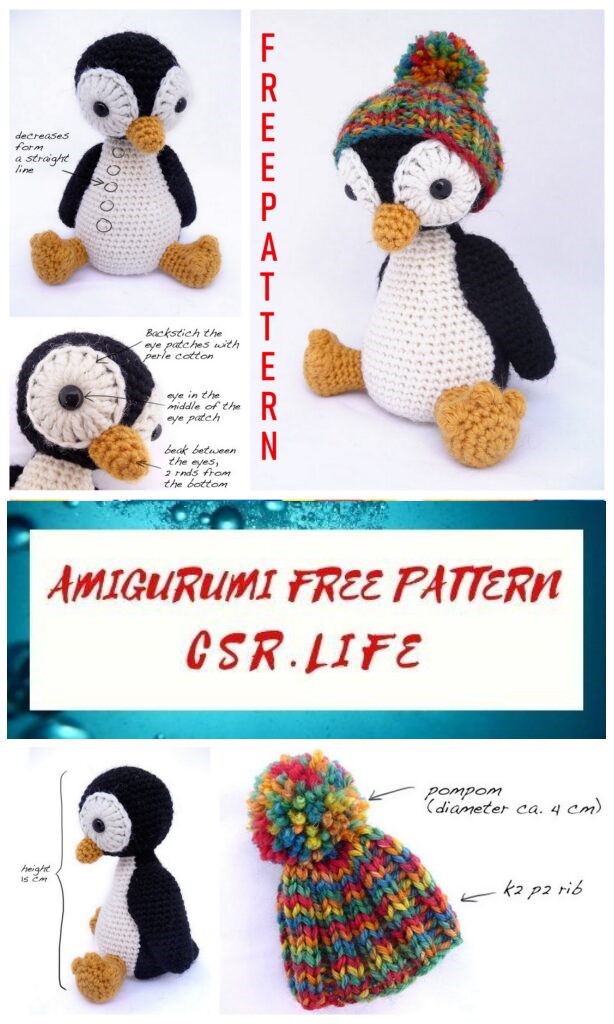
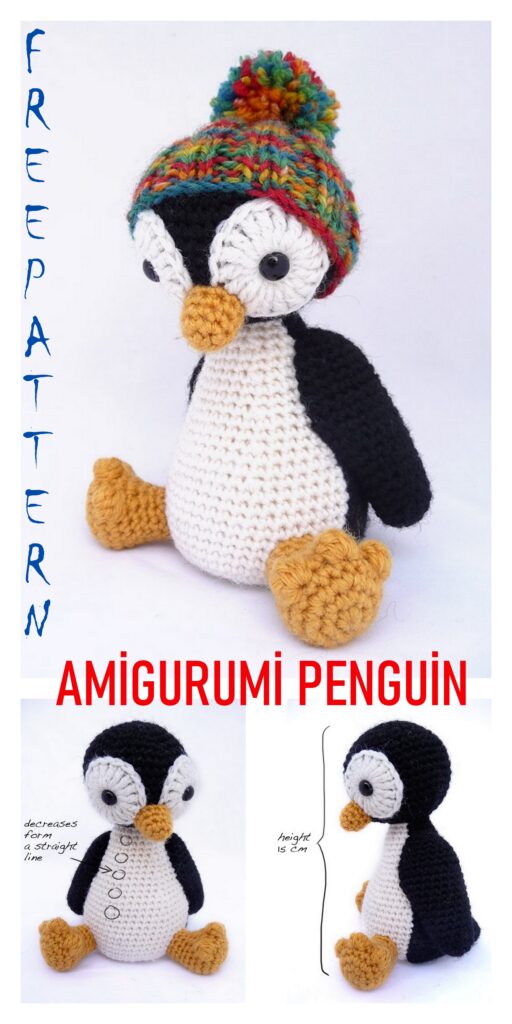
The increases form a straight line, so it’s easy to check their positions from the previous round. The basic circle is worked ina continuous spiral, the rounds are not joined. When coming to the end of the round, just continue into the first stitch of the previous round.
Make a magic loop, sc 6. Pull loop closed.
rnd 1: 2 sc in each sc around = 12 sts
rnd 2: 1 sc, 2 sc in next sc, repeat around = 18 sts
rnd 3: 2 sc, 2 sc in next sc, repeat around = 24 sts
rnd 4: 3 sc, 2 sc in next sc, repeat around = 30 sts
rnd 5: 4 sc, 2 sc in next sc, repeat around = 36 sts
rnd 6: 5 sc, 2 sc in next sc, repeat around = 42 sts
rnd 7: 6 sc, 2 sc in next sc, repeat around = 48 sts
Mark the last increase with a stitch marker, a length of yarn or a safety pin, it will ease counting the rows.
Due to the helical structure, the last stitches of the rounds without increases are not in a strict vertical line but a bit tilted to the right.
Starting loop You can start crocheting the amigurumi with a basic chain ring, but there is also a special starting loop created for them. It is called ”magic loop”.
Take the yarn to your left hand, the tail of the yarn pointing upwards. Turn your hand so that your palm is facing yourself and wrap the yarn three times around your left index finger (the tail of the yarn is the ”outermost” behind your finger).
Push the hook from the right side through the first two wraps, take the last wrap (coming from the skein) on the hook and pull it through the other two wraps. Take the yarn on the hook again and crochet 1 sc on the loop forming of two strands of yarn (this does not count asa stitch). Remove the loop from your finger and work the needful amount of stitches (usually 6 sc).
Pull the tail of the yarn so you will notice that one of the strands starts to tighten. Take the tightening strand and pull it to tighten the other strand. Now you can easily tighten the loop by pulling the tail of the yarn.
Confused? There are several videos in YouTube
explaining the ”Magic loop”, here’s a good one:
Body
Make two body pieces, one with black (back) and one with white (front). Start at bottom.
rnds 1-7: make a basic circle with 48 sts.
rnds 8-15: sc (8 rnds altogether)
rnd 16: 6 sc, sc2tog, repeat around = 42 sts.
rnds 17-18: sc
rnd 19: 5 sc, sc2tog, repeat around = 36 sts.
rnds 20-21: sc
rnd 22: 4 sc, sc2tog, repeat around = 30 sts.
rnds 23-24: sc
rnd 25: 3 sc, sc2tog, repeat around = 24 sts
rnds 26-27: sc
rnd 28: 2 sc, sc2tog, repeat around = 18 sts
rnds 29-30: sc
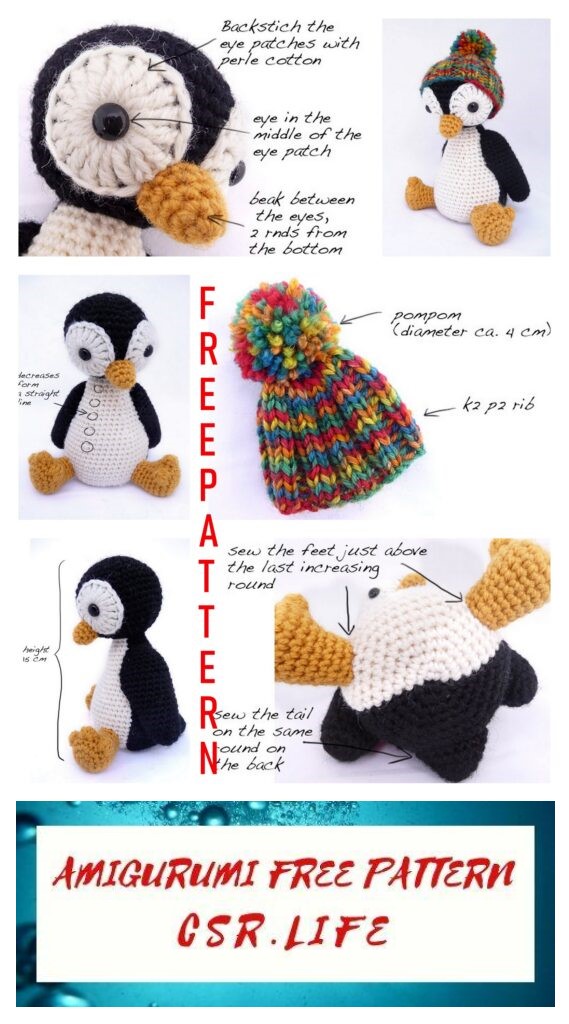
Tip: the increases on the bottom and the decreases on the upper body form a vertical line slightly tilted to right. You can check the right positions for the decreases based on the last round of the increases.
Head
Work with black yarn, starting at the top of the head.
rnds 1-6: make a basic circle with 42 sts
rnds 7- 14: sc (8 rounds altogether).
rnd 15: 5 sc, sc2tog, repeat around = 36 sts
rnd 16: 4 sc, sc2tog, repeat around = 30 sts
rnd 17: 3 sc, sc2tog, repeat around = 24 sts
rnd 18: 2 sc, sc2tog, repeat around = 18 sts
Fasten off, weave in end.
Eye patches (make 2)
Work with white yarn. Make a magic loop, ch 4 (= 1st dc), 17 tr in loop, join round with sl st (=18 sts).
Leave the magic loop a little loose so you can poke the eye shaft through it.
Beak
Work with yellow yarn, starting at the tip of the beak.
Make a magic loop with 6 sc. Tighten loop.
rnd 1: 1 sc, 2 sc in next sc, repeat around = 9 sc
rnd 2: sc
rnd 3: 2 sc, 2 sc in next sc, repeat around = 12 sc
rnd 4: sc
Wings (make 2)
Work with black yarn.
Upper piece, starting at the top of the wing:
rnd 1: make a basic circle with 12 sts
rnd 2: 2 sc, 2 sc in next sc, repeat around = 16 sts
rnd 3: 7 sc, 2 sc in 8th sc, 7 sc, 2 sc in 16th sc = 18 sts
rnd 4: 8 sc, 2 sc in 9th sc, 8 sc, 2 sc in 18th sc = 20 sts
rnd 5: 9 sc, 2 sc in 10th sc, 9 sc, 2 sc in 20th = 22 sts
rnd 6: sc
Crochet 2 sc, fasten off.
Lower piece, starting at the tip of the wing:
rnd 1: make a basic circle with 12 sts
rnd 2: sc
rnd 3: 5 sc, 2 sc 6th sc, 5 sc, 2 sc in 12th sc = 14 sts
rnd 4: sc
rnd 5: 6 sc, 2 sc in 7th sc, 6 sc, 2 sc in 14th sc = 16 sc
rnd 6: sc
rnd 7: 7 sc, 2 sc in 8th sc, 7 sc, 2 sc in 16th sc = 18 sc
rnd 8: sc
rnd 9: 8 sc, 2 sc in 9th sc, 8 sc, 2 sc in 18th sc = 20 sc
rnd 10: sc
rnd 11: 9 sc, 2 sc in 10th sc, 9 sc, 2 sc in 20th sc = 22 sc
rnd 12: sc
Crochet 2 sc, fasten off.
Tail
Work with black yarn, starting at the tip of the tail.
Make magic loop with 6 sc. Tighten loop.
rnd 1: 1 sc, 2 sc in the next sc, repeat around = 9 sts
rnd 2: 2 sc, 2 sc in the next sc, repeat around = 12 sts
rnd 3: 3 sc, 2 sc in the next sc, repeat around = 15 sts
rnd 4: 4 sc, 2 sc in the next sc, repeat around = 18 sts
rnd 5: 5 sc, 2 sc in the next sc, repeat around = 21 sts
Feet (make 2)
Differing from the other pieces, the decrease rounds are asymmetrical to give this piece the shape of a foot. Work with yellow yarn.
rnd 1-2: make a basic circle with 18 sts.
rnd 3: sc
rnd 4: 5 sc, work 1st toe (make a bobble in the next st:
*YO,insert hook in the next st,YO and draw up a loop,YO and draw through 2 loops on the hook*, repeat 5 times,YO and draw through all 6 loops on hook. The bobble will consist of 5 dc’s.), 2 sc, 2nd toe, 2 sc, 3rd toe, 6 sc
rnd 5: sc
rnd 6: 5 sc, sc2tog 4 times, 5 sc = 14 sts
rnd 7: 5 sc, sc2tog, 1 sc, sc2tog (the decreases are
positioned in line with the first and last decrease of
the previous row), 4 sc
rnd 8.-10: sc
Bobble hat
Cast on 40 sts. Join. Work on k2 p2 rib pattern until
16 rnds. K2tog until you have 10 sts left (2 rnds). Cut
yarn leaving a long tail. Using tapestry needle, pull
through remaining stitches and weave in end.
Make a small pompom (diameter ca. 4 cm / 1.5”) and
attach it to the top of the hat.
Assembly
Finish the eye patches first: poke the eye shafts
through the center of the eye patches and tighten the
magic loop, weave in end. Weave in also the yarn tail.
Position the head piece so that the yarn tail is in the
center at the back. Position the eyes on the front of
the head symmetrically, ca. 7 rnds from the bottom.
Leave a ca. 2 sts space between the eye patches.
Poke the eye shafts through to the inside of the head
and fasten with the washers.
Backstitch the eye patches on place with white
perle cotton (pull the yarn tails of the patches inside
the head with a needle so they don’t disturb the
sewing).
Slipstitch the beak between the eyes, ca. 2 rounds
from the bottom and reaching the length of 3 rounds
of the head.
Fold the body pieces flat so that there’s an
increasing and decreasing line on both sides of the
folded piece. Slipstitch the body pieces together
following the increasing and decreasing lines. Start
sewing from the center of the bottom, so it will be
easier to match the pieces together. Use the photo as
a guide.
Stuff the head and the body and slipstitch them
together, the white half of the body comes to the front.
(Put 3-4 tablespoons of granulate pellets inside the body before the polyfill to add some weight to the penguin’s bottom.)
Whipstitch the upper piece of the wing to the
lower so that the increasing sts on both pieces form a
line on the side of the wing. Use the tail of yarn of the
upper part so it’s easier to match the pieces together.
Leave an opening that is 2 sts narrower than the wing
on both ends. Stuff the wing lightly and close the
opening using the tail of yarn of the lower piece.
Slipstitch the wing to place with perle cotton, ca. 3
rnds from the top of the body and the stuffing opening
facing the body. The wing will fit naturally on place
when the stitching runs just ”below” the increasing sts
of the upper piece and is ca. 10 rnds in length – use
the photos as a guide. Sew the other wing
accordingly.
Stuff the feet and slipstitch them to place just
above the last increasing round of the bottom,
reaching the length of 4 rnds of the body.
Fold the tail to a triangular shape, one of the angles
pointing straight up. Slipstitch the tail to place just
above the last increasing round of the bottom,
reaching the length of 5 rnds of the body