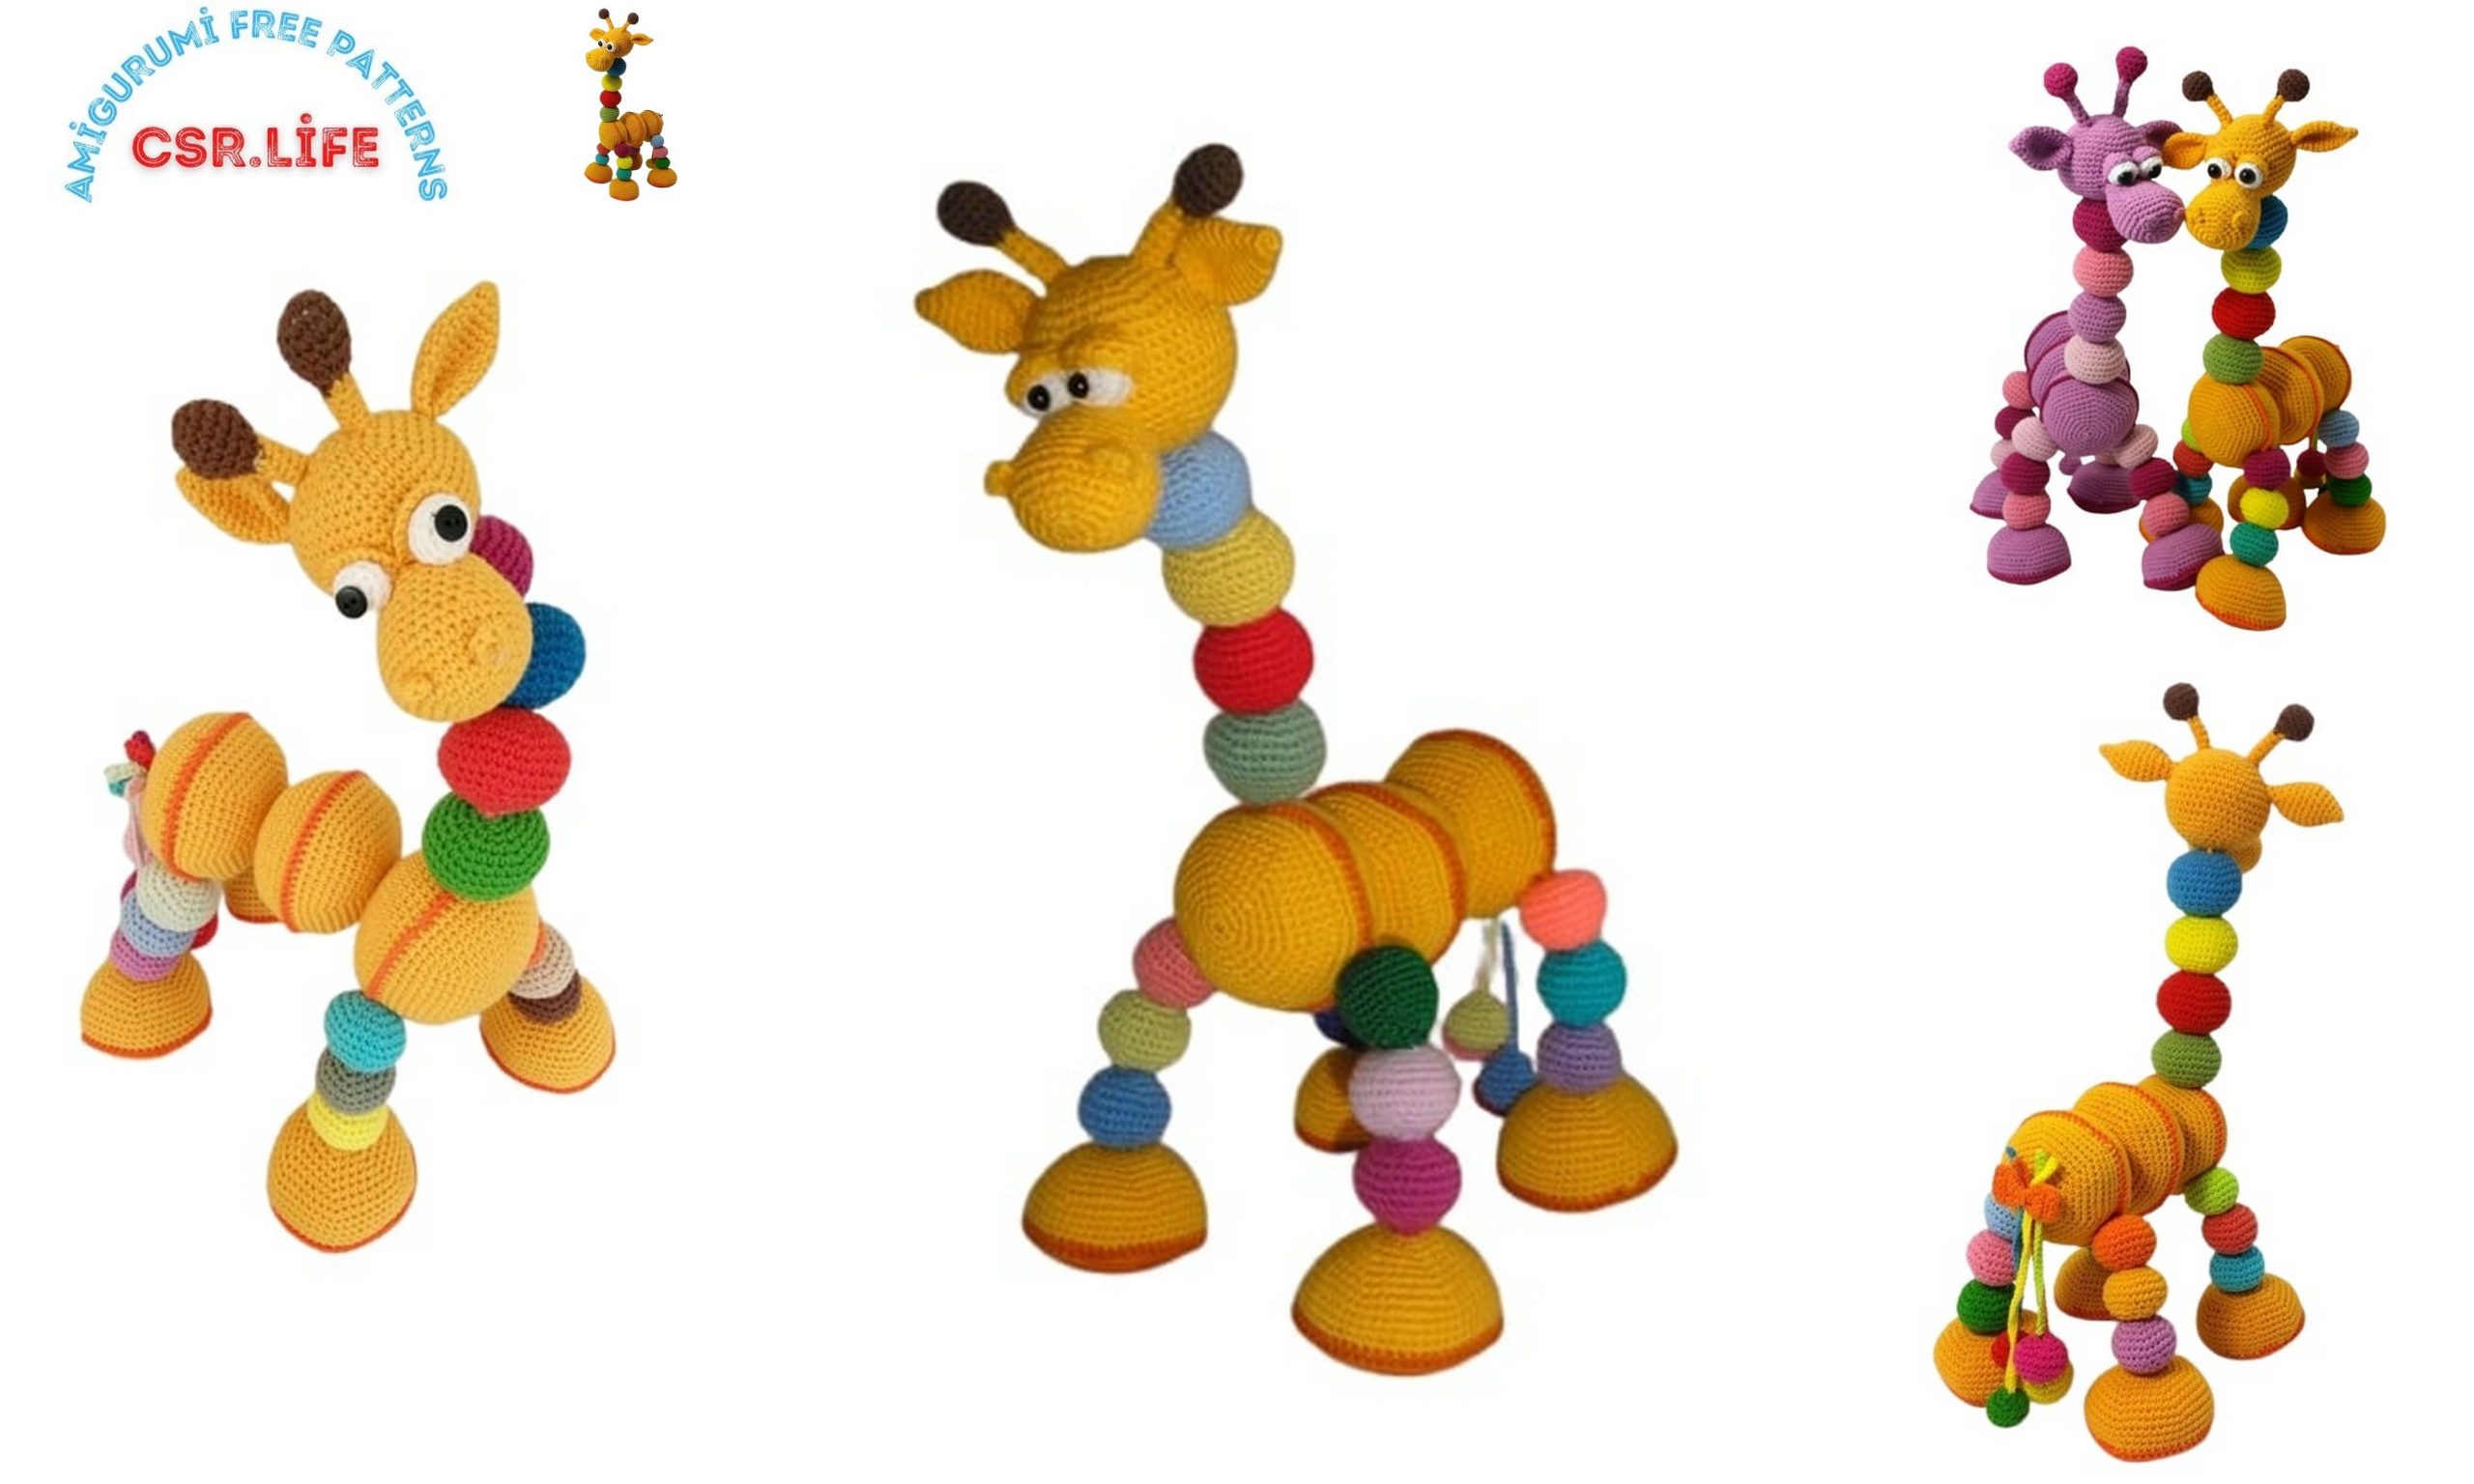
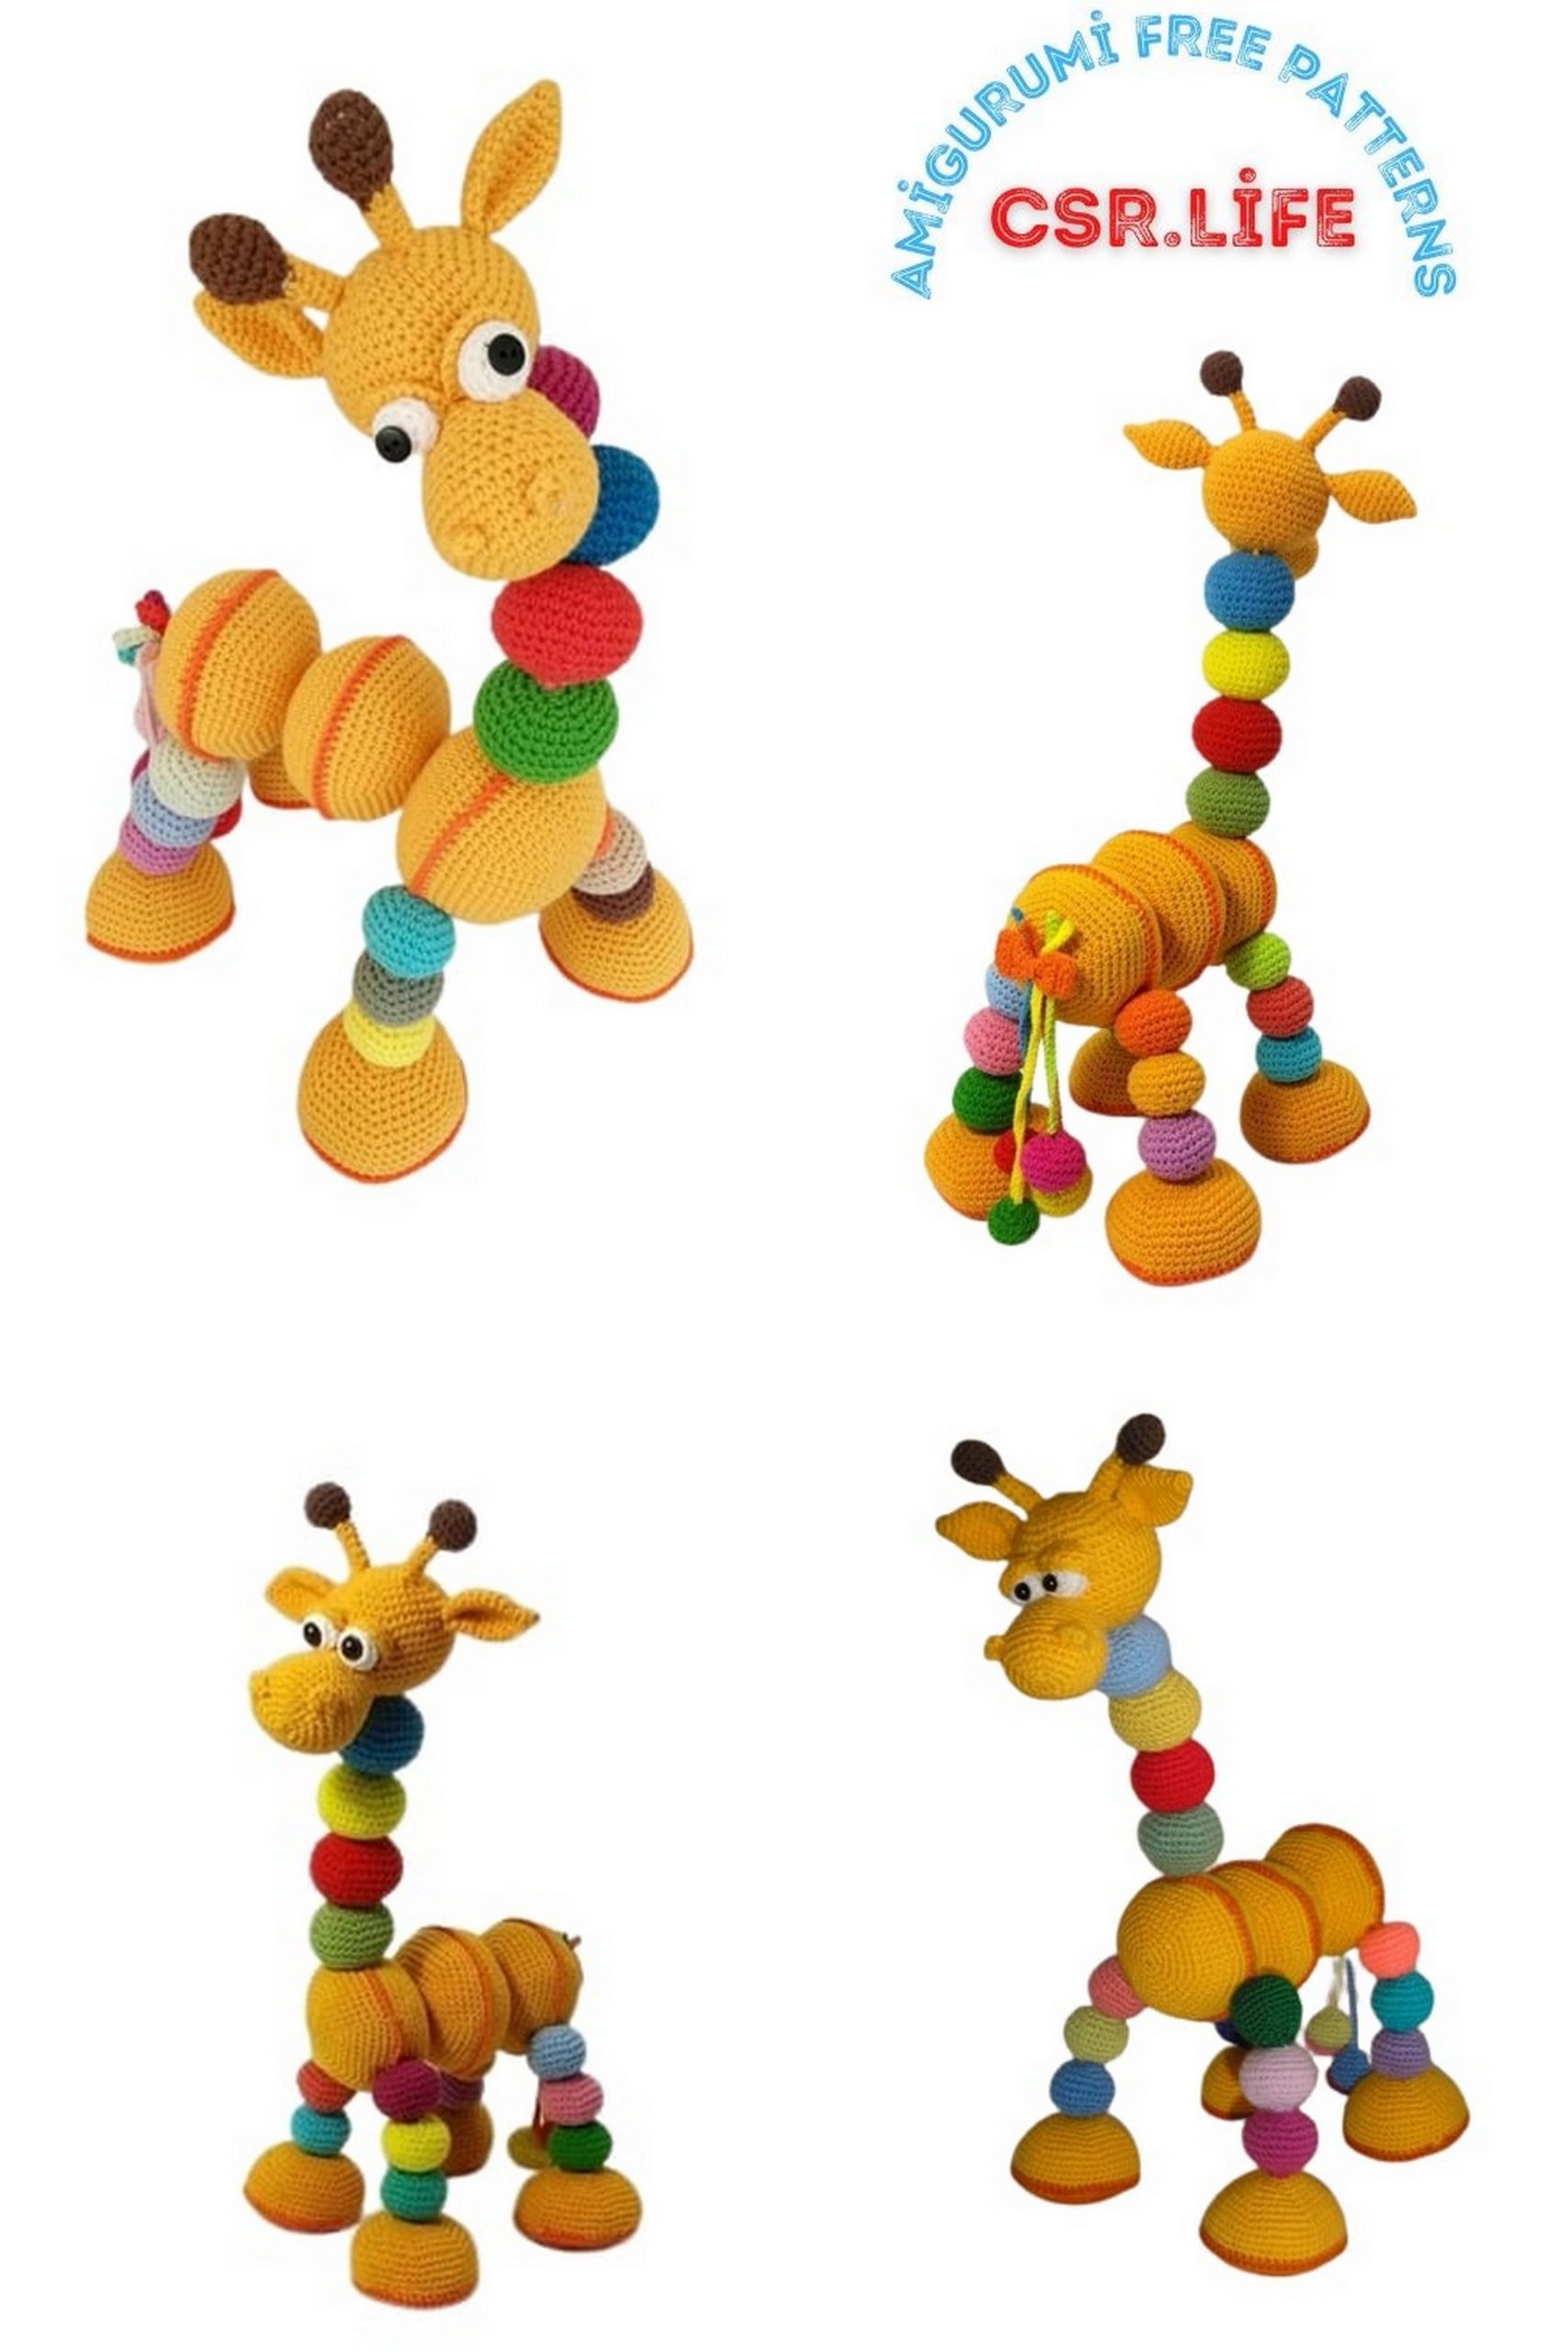
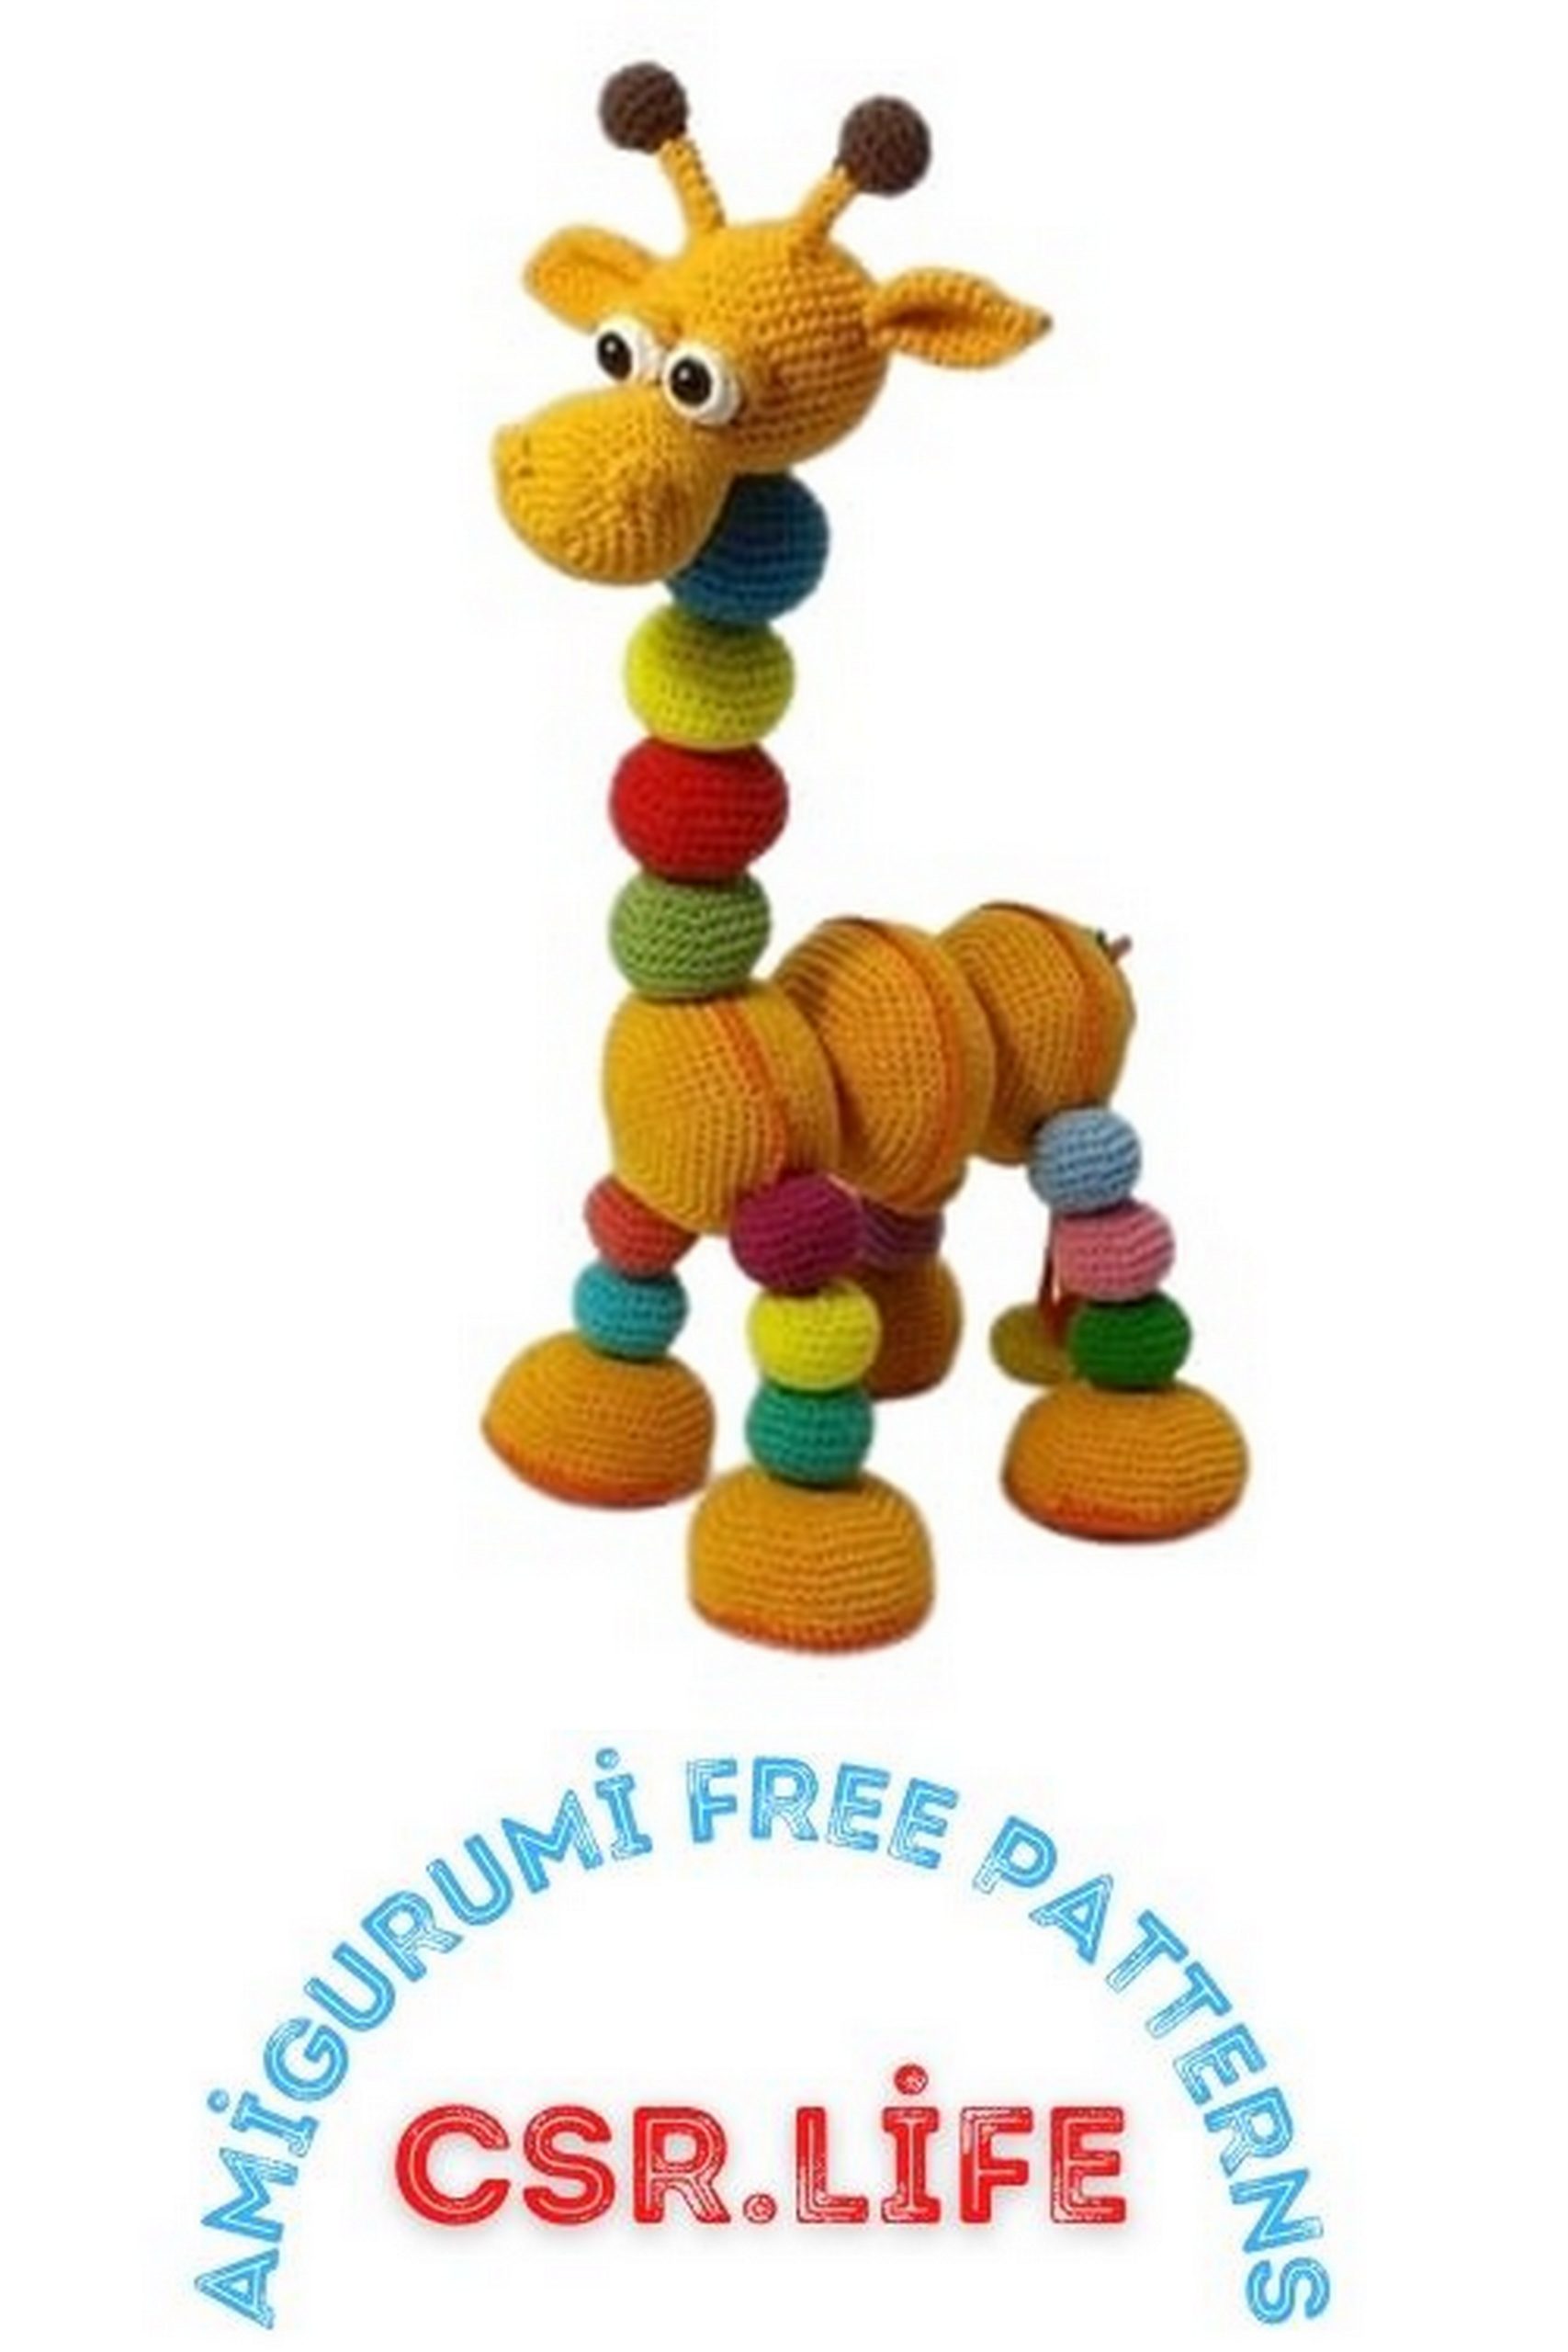
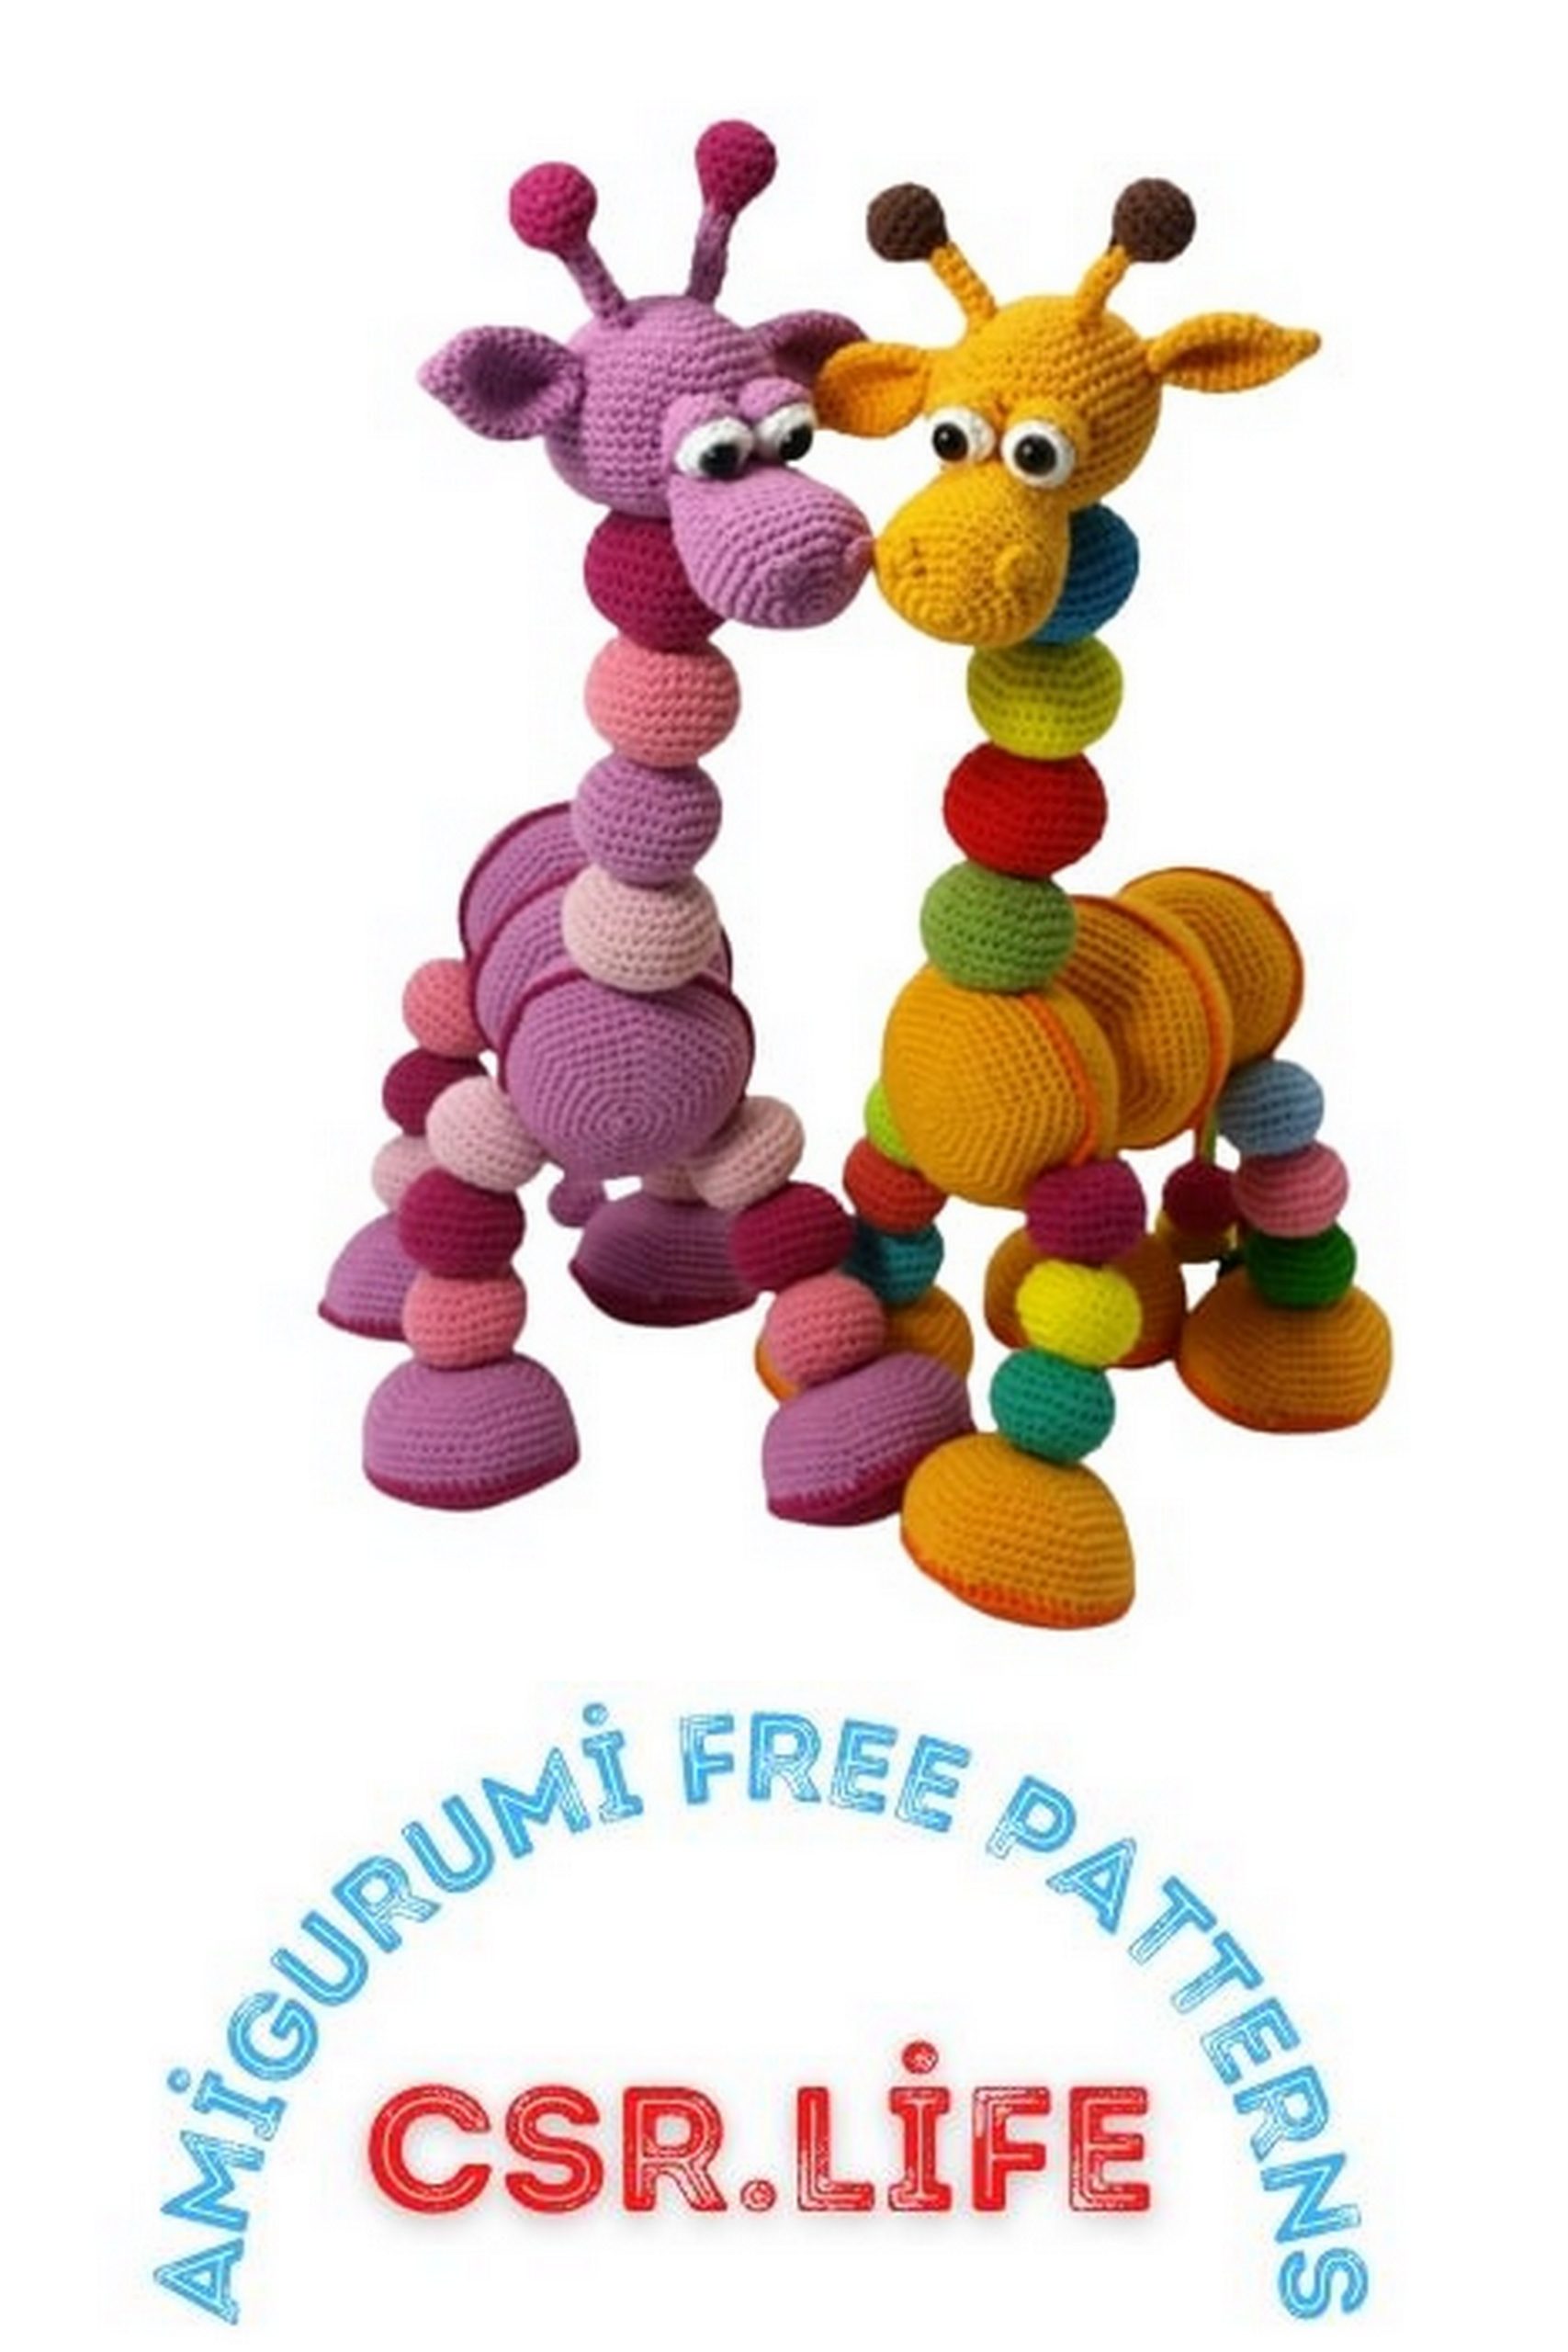
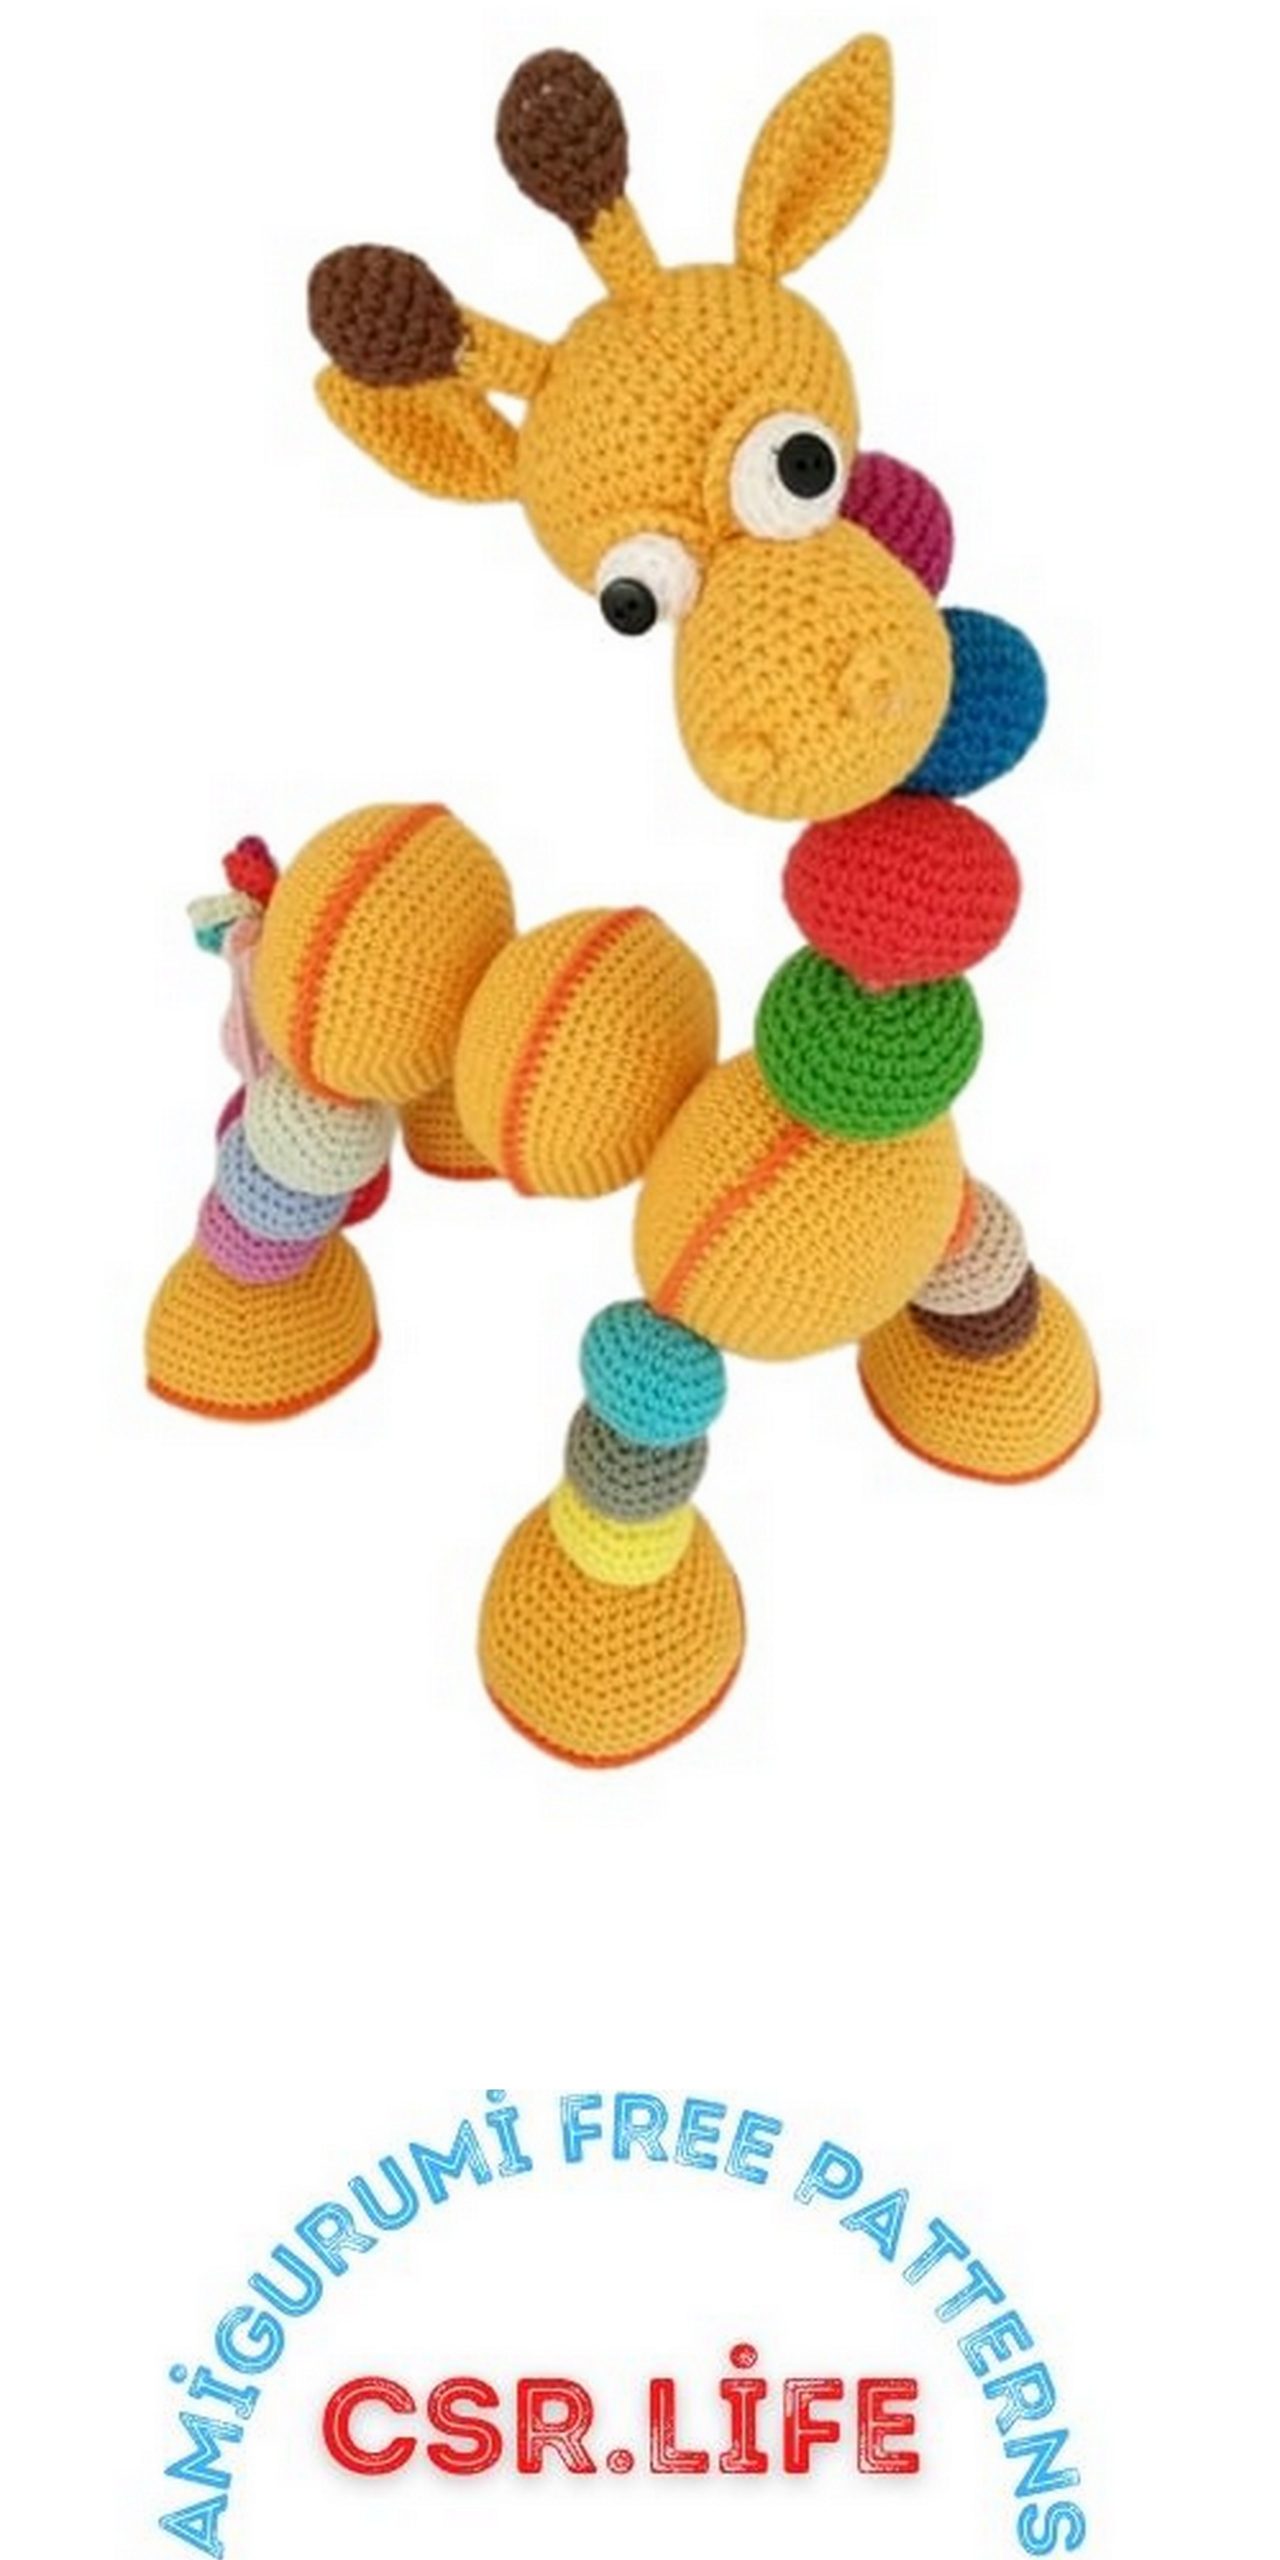
Amigurumi Rainbow Giraffe Free Crochet Pattern
Welcome to our website where you can find the most beautiful and highest quality samples of Amigurumi patterns. All the amigurumi patterns you can’t find are available on our website. Every day we continue to share new amigurumi patterns for you. Stay tuned to reach these amigurumi patterns before anyone else.
Abbreviations:
SC – single crochet
İNC – increase
DEC – decrease
CH – chain
Materials and Tools
You can knit a giraffe from any yarn. Size depends on yarn and used hook.
The materials I used for this giraffe:
– Hook 2 mm
– Alize cotton gold yarn
– filler
– safe eyes with a diameter of 10mm
– Solid copper wire (if you use the same yarn, you will need 3 pieces of 75 cm)
– insulating tape
PATTERN
Head
1.6 sc into magic ring
2. (inc) 6x (12)
3. (1sc, 1 inc) 6x (18)
4. (2sc, 1 inc) 6x (24)
5. (3sc, 1inc) 6x (30)
6. (4sc, 1 inc) 6x (36)
7. (5sc, 1inc) 6x (42)
8. (6sc, 1inc) 6x (48)
9. -14 48sc (6 rows)
15. (6sc, 1dec) 6x (42)
16. (5sc, 1dec) 6x (36)
17. (4sc, 1dec) 6x (30)
18. (3sc, 1dec) 6x (24)
19. (2sc, 1dec) 6x (18)
Take the wire, bend the loop, fix the connection point with electrical tape (see figure below). Put it in the head and stuff it. Next, we knit the last two rows.
20. (1sc, 1dec) 6x (12)
21. (dec) 6x (6)
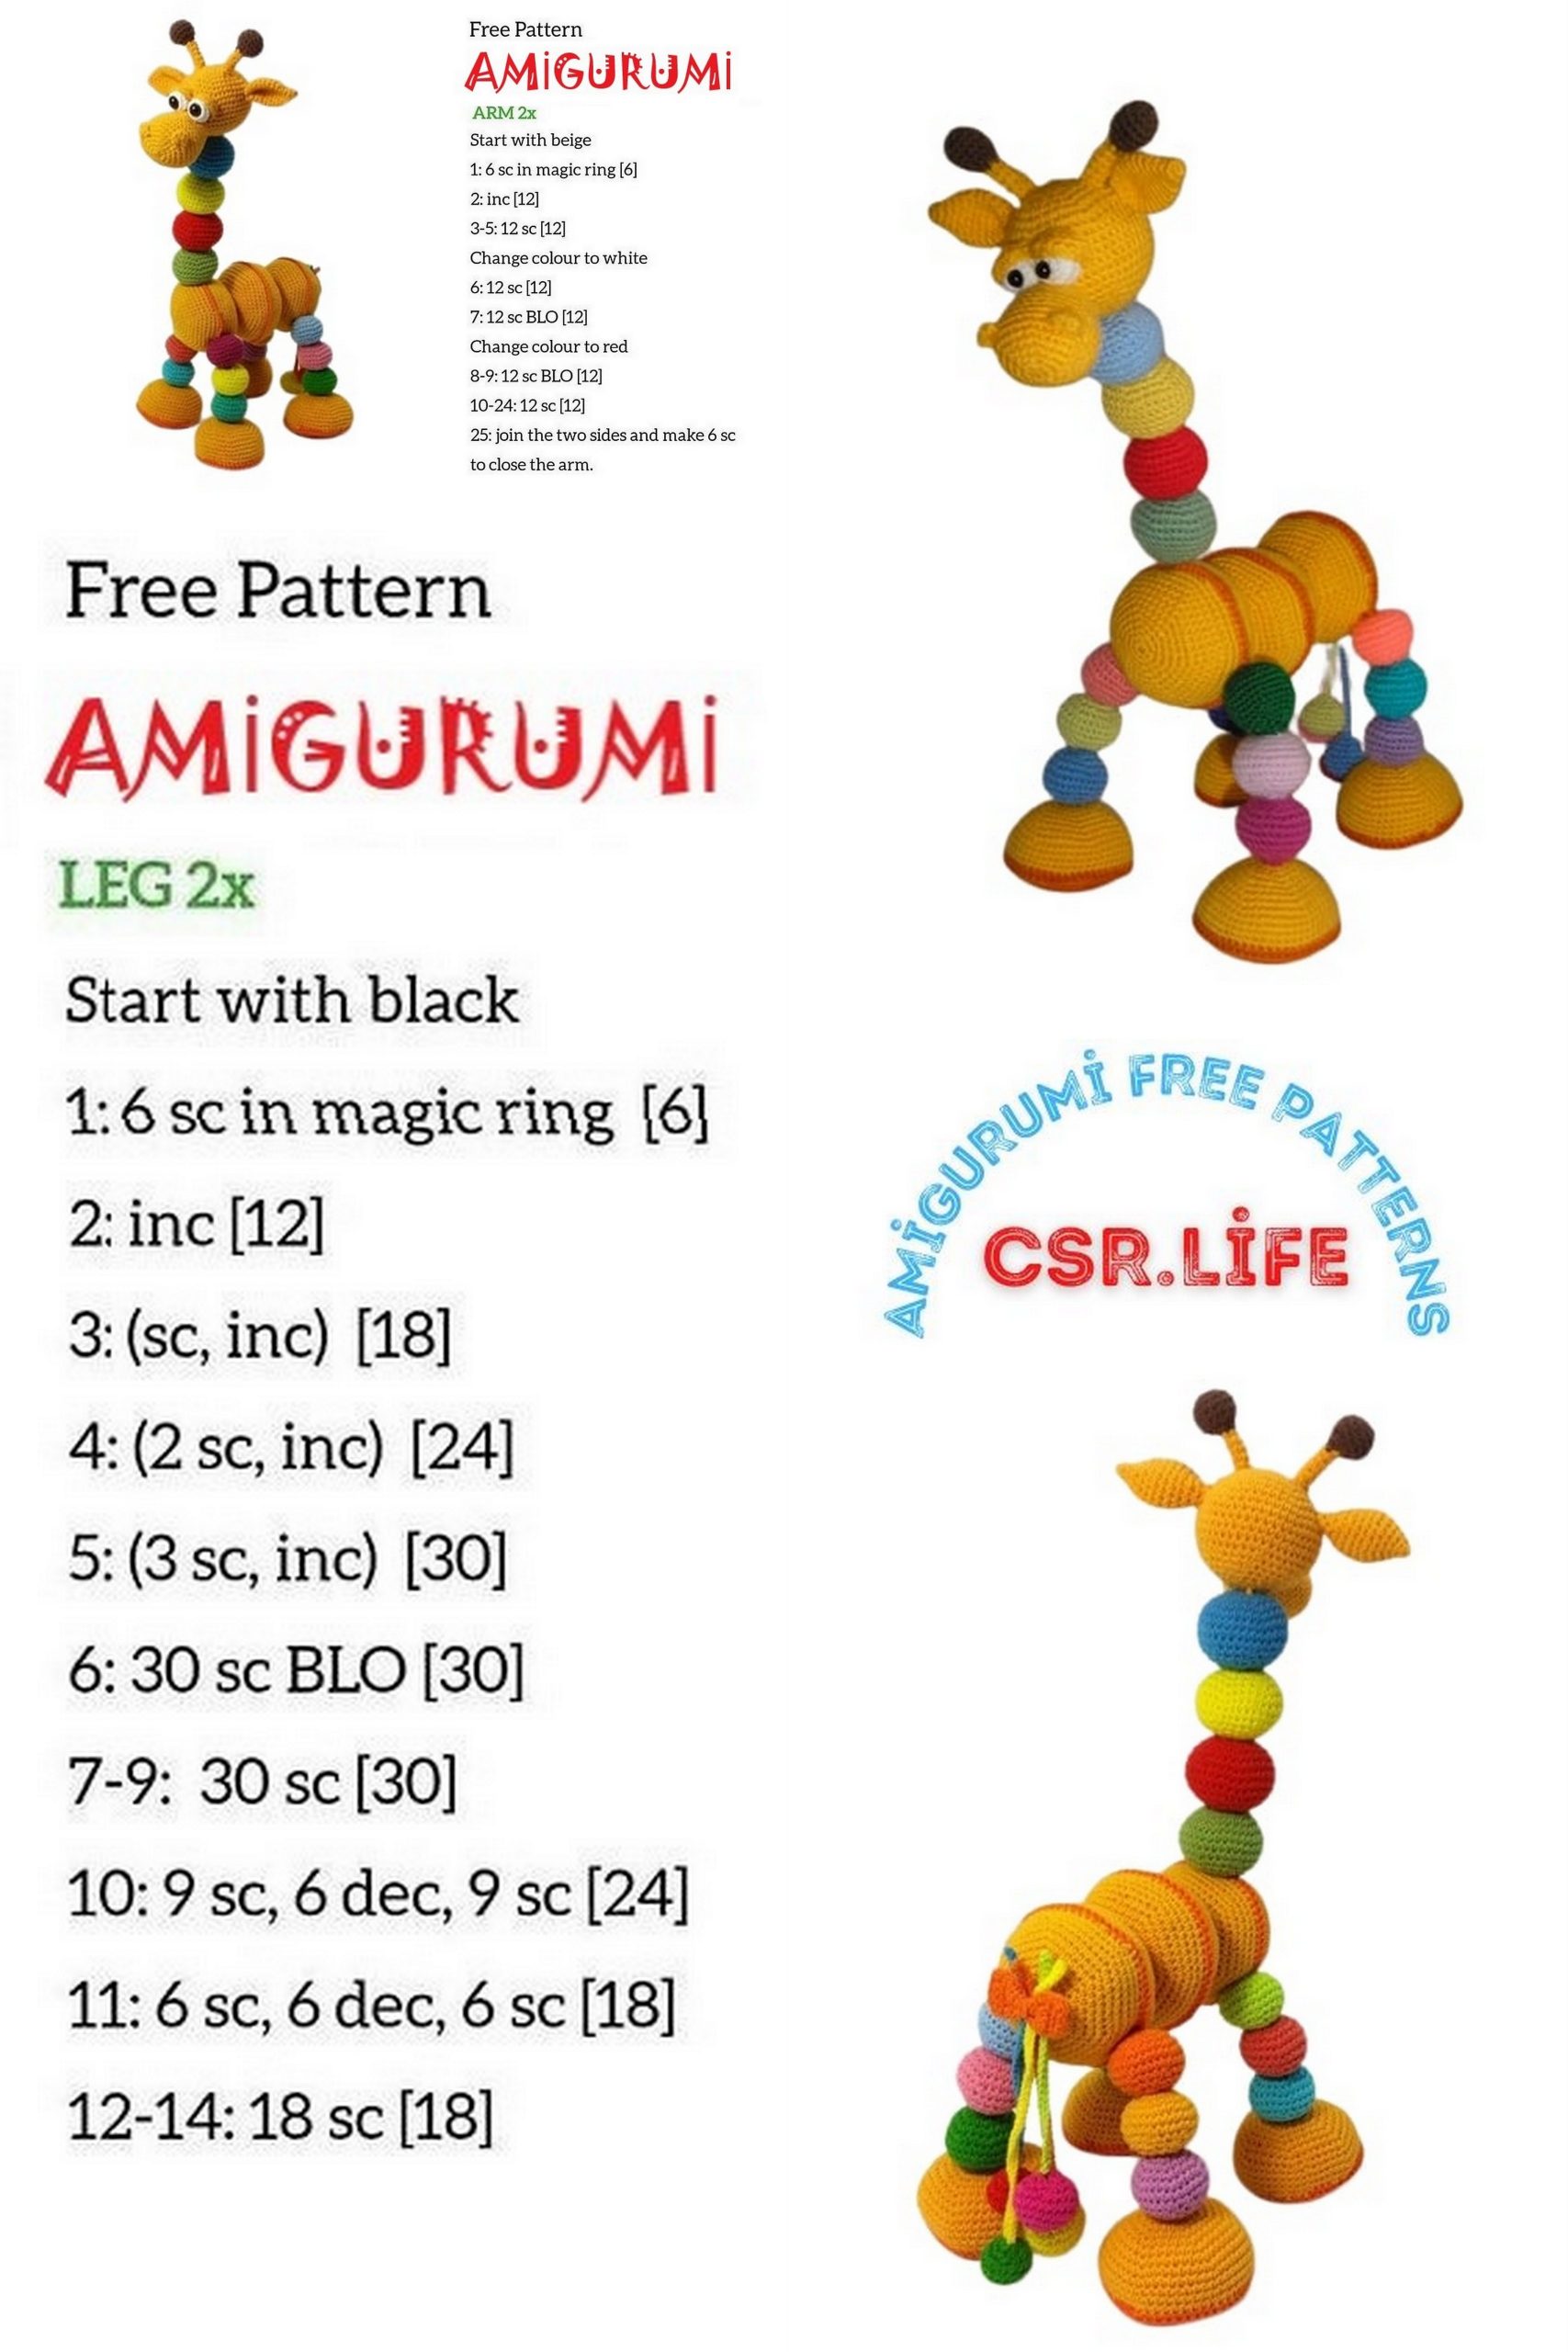
Horns (2x)
1.6 sc into magic ring
2. (inc) 6x (12)
3. (3sc, 1inc) 3x (15)
4.15sc (15)
5.15sc (15)
6. (3sc, 1dec) 3x (12)
7. (dec) 6x (6) change the color
8.8-13. 6sc (6 rows)
To finish. leave an end for sewing to the head.
Ears (2x)
1.6 sc into magic ring
2.6sc (6)
3. (1sc, 1 inc) 3x (9)
4. (2sc, 1 inc) 3x (12)
5. (3sc, 1 inc) 3x (15)
6. (4sc, 1 inc) 3x (18)
7.18sc
8.18sc
9.18sc
10.18sc
11. (4sc, 1dec) 3x (15)
12. (3sc, 1dec) 3x (12)
13.12sc
Finish, leave the end for sewing. Fold ears and flash as shown on the image.
Muzzle
1.6 sc into magic ring
2. (inc) 6x (12)
3. (1sc, 1 inc) 6x (18)
4. (2sc, 1 inc) 6x (24)
5. (3sc, 1inc) 6x (30)
6. (4sc, 1 inc) 6x (36)
7. 36sc
8.336sc
9.36sc
10. (4sc, 1dec) 6x (30)
11.30sc
12.30sc
13. (3sc, 1dec) 6x (24)
14.24sc
15.24sc
16. (2sc, 1dec) 6x (18)
17.18sc
Finish, leave the end for sewing. Sew a muzzle on the head (see photo below)
Nostrils (2x)
İNTO MAGİC RİNG 1sc, 1hdc, 2dc, 1hdc, 1sc.
Eyes (2x)
1.6 sc into magic ring
2. (inc) 6x (12)
3.12sc
4.12sc
5. (dec) 6x (6)
Insert safe eyes after 4 rows, fill a little.
Eyelids (2x)
1.6 sc into magic ring
2. (inc) 6x (12)
3. (1sc, 1 inc) 6x (18)
Fold in half and knit 9 sc for both sides. Sew over the eyes.
Neck (4x)
Balls for the neck you can knit around the wire that comes from the head, or knit separately and then dress them. Leave a ponytail to sew later balls with each other.
1.6 sc into magic ring
2. (inc) 6x (12)
3. (1sc, 1 inc) 6x (18)
4. (2sc, 1 inc) 6x (24)
5. (3sc, 1inc) 6x (30)
6. (4sc, 1 inc) 6x (36)
7. – 9 36sc (3 rows)
10. (4sc, 1dec) 6x (30)
11. (3sc, 1dec) 6x (24)
12. (2sc, 1dec) 6x (18)
13. (1sc, 1dec) 6x (12)
14. (1dec) 6x (6)
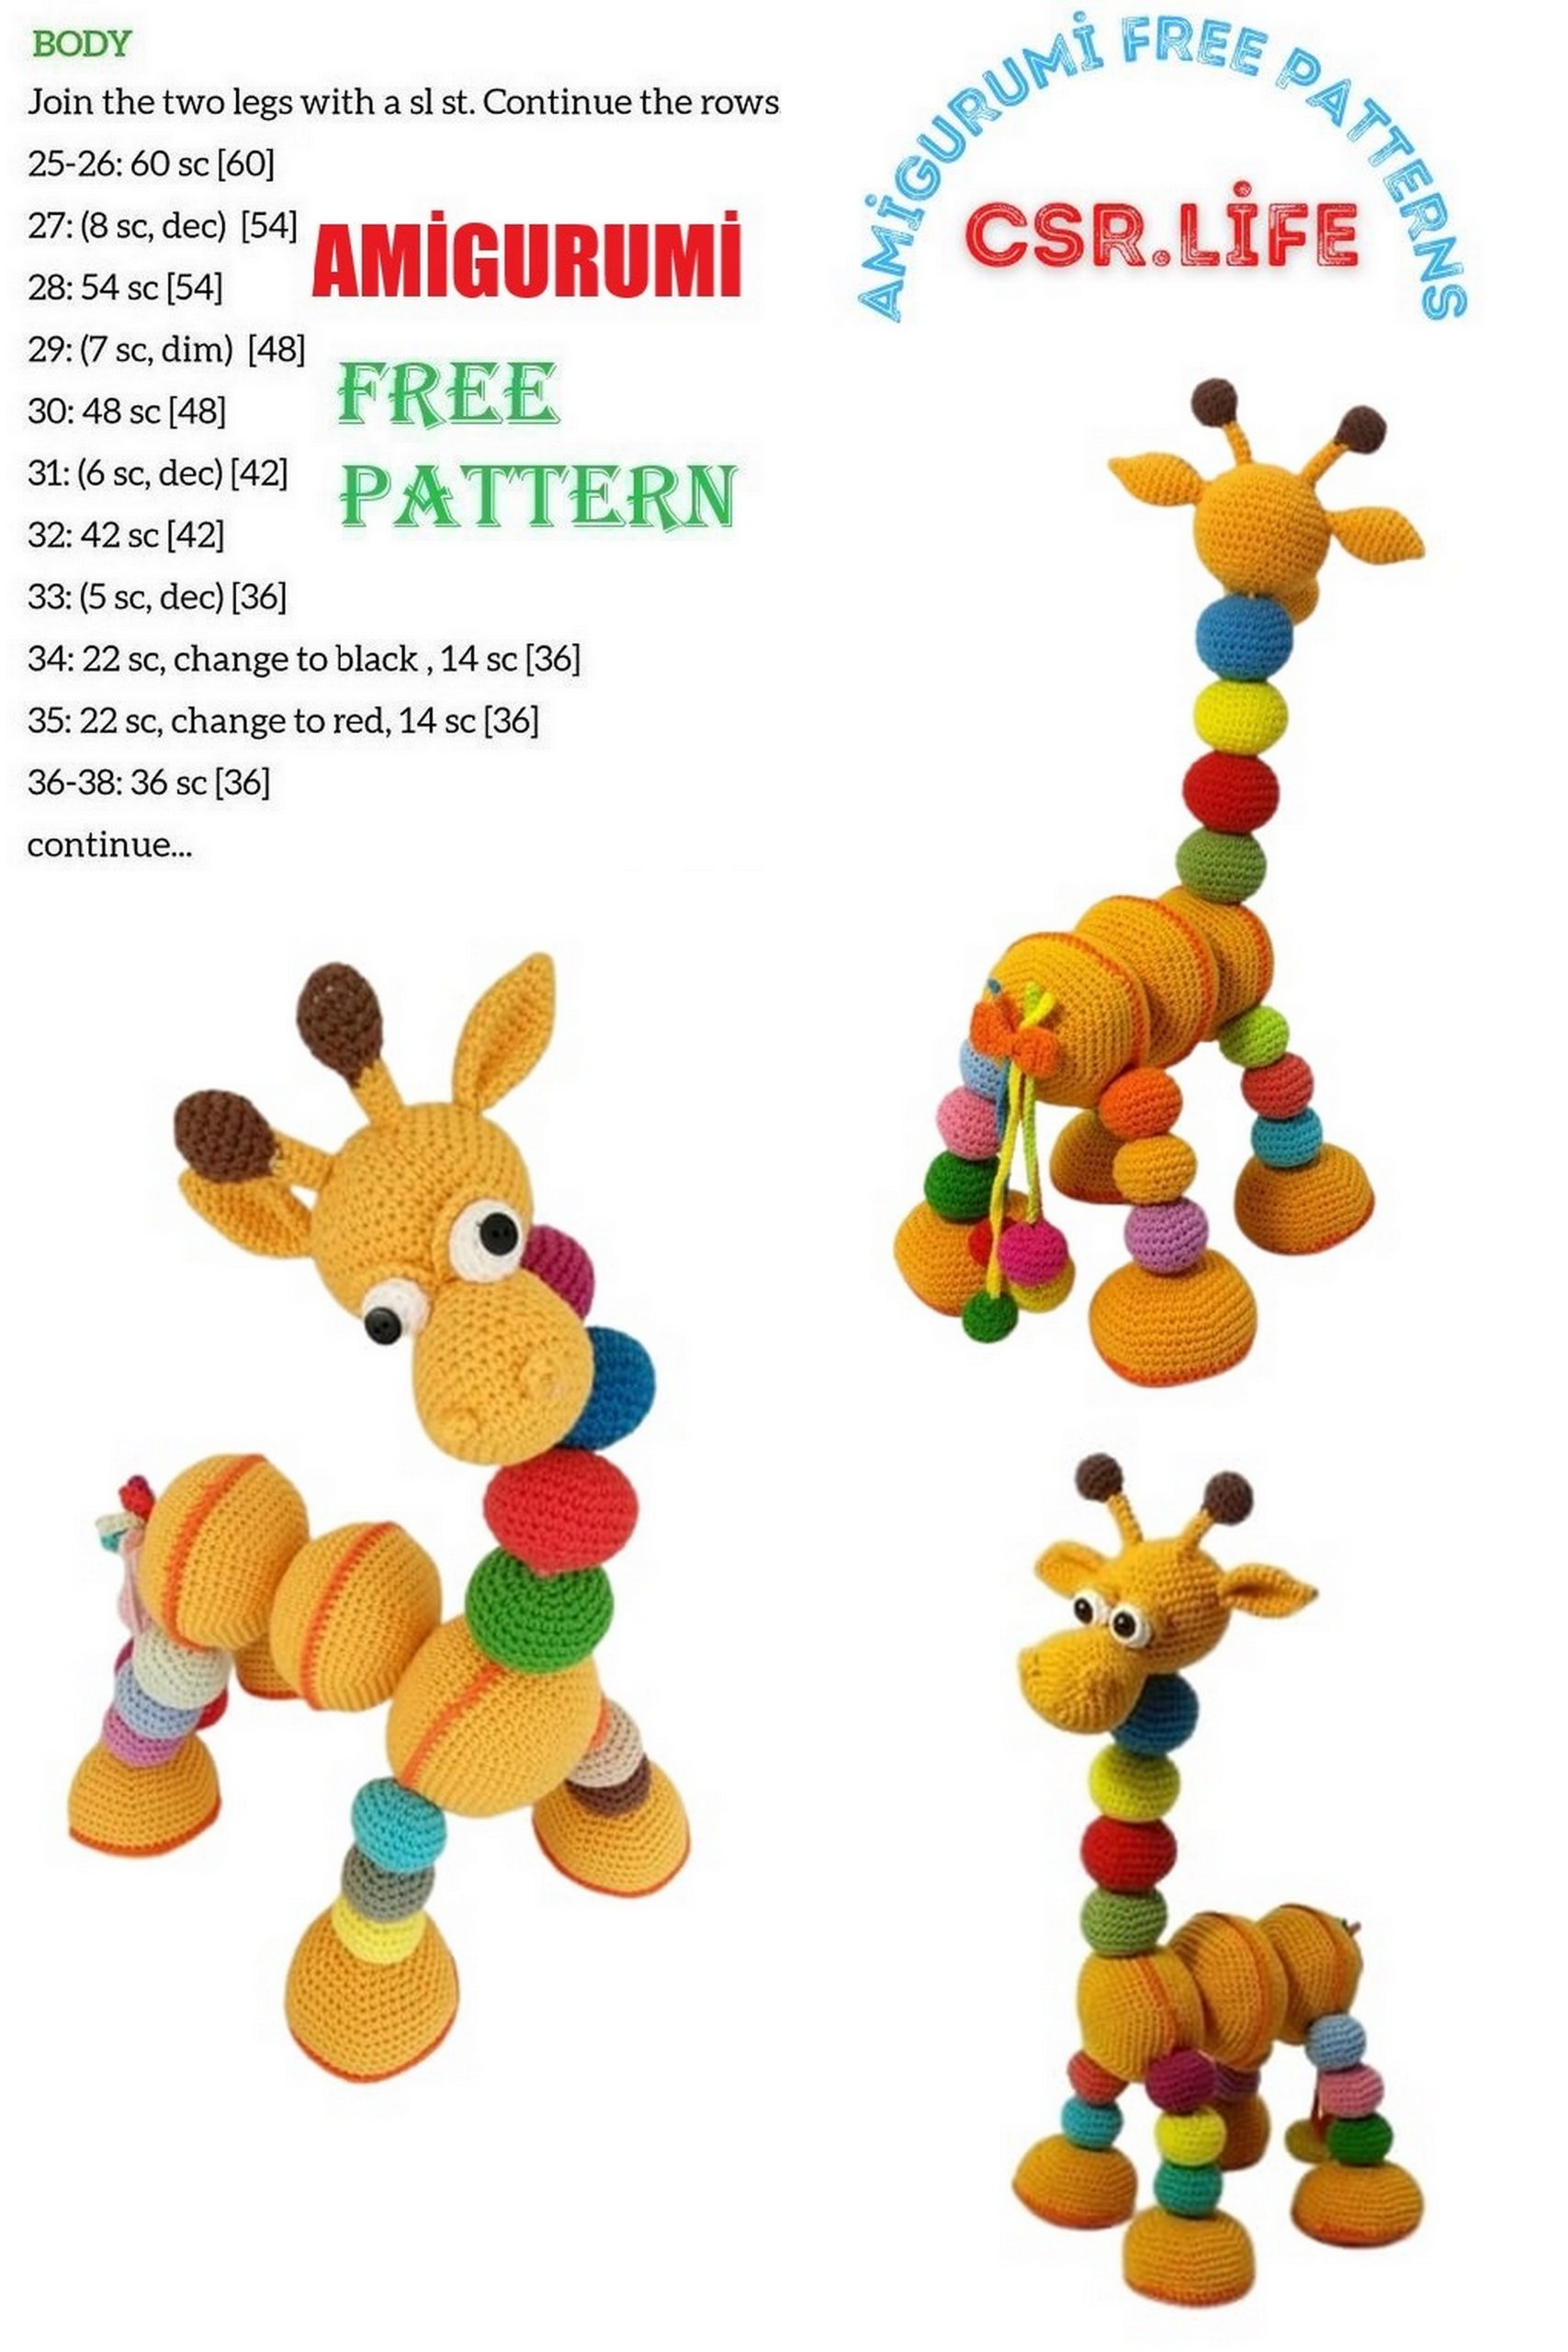
Body (6x)
1.6 sc into magic ring
2. (inc) 6x (12)
3. (1sc, 1 inc) 6x (18)
4. (2sc, 1 inc) 6x (24)
5. (3sc, 1inc) 6x (30)
6. (4sc, 1 inc) 6x (36)
7. (5sc, 1inc) 6x (42)
8. (6sc, 1inc) 6x (48)
9. (7sc, 1inc) 6x (54)
10. (8sc, 1inc) 6x (60)
11. – 13 (3 rows) 60 sc
To finish. Then the details will communicate with each other in a contrasting color.
Leg Bottom (4x)
1.6 sc into magic ring
2. (inc) 6x (12)
3. (1sc, 1 inc) 6x (18)
4. (2sc, 1 inc) 6x (24)
5. (3sc, 1inc) 6x (30)
6. (4sc, 1 inc) 6x (36)
7. (5sc, 1inc) 6x (42)
8. (6sc, 1inc) 6x (48)
9. (7sc, 1inc) 6x (54)
Top of the foot (4x)
We knit as well as a foot to 9 row. Row 10-13 (4 rows) 54sc
To finish.
Feet (12x)
1.6 sc into magic ring
2. (inc) 6x (12)
3. (1sc, 1 inc) 6x (18)
4. (2sc, 1 inc) 6x (24)
5. (3sc, 1inc) 6x (30)
6.30sc
7.30sc
8. (3sc, 1dec) 6x (24)
9. (2sc, 1dec) 6x (18)
10. (1sc, 1dec) 6x (12)
11. (dec) 6x (6)
Put the balls on the wire, then we will connect it to the body.
This is a little trickier. Wire 1 is already attached to the head and neck, wires 2 and 3 will be connected in the process, so that it will be durable frame. Layout of how the frame looks inside a giraffe.
We take the top and bottom of the legs and begin to tie them together with single crochet. When you knit about half, then take wire 2, stretch it through upper part of the foot and bend it as in the picture below. Do not forget to fix insulating tape around the ends and connecting parts.
Stack your feet.
On the upper part of the leg we take three balls. Sew all the balls with each other and with bottom part with several stitches. Now we will attach the body parts. Take two pieces and knit 10 sc together. Insert the wire between both parts, then bend it and bring the end through the SC of the second part. Now knit 20 sc. Take wire 2 (legs)., Make a small loop around wire 1 (squeeze loop with pliers to make it stronger) Knit another 20 sc together. Wire 2 will come out of the body. Fill and knit the last 10 sc. Sew a leg from the third ball to the body. We fix the second leg similarly. Take the next 2 parts of the body and knit them together sc. Sew to the first parts. Wire 3 connect the rear legs. Take the last 2 body parts and connect knitting them together 20 sc. Loop around 1 wire. end from the first isolate the wire, we no longer need it. We knit 20 sc, attach the second leg and again knit 20 sc for both parts. For the tail of the giraffe, I used different lengths of thread and different sizes of balls. Of course, you can do as you like. Knit chains of VP of different lengths.
Balls for the tail (4x)
1.6 sc into magic ring
2. (inc) 6x (12)
3. (1sc, 1 inc) 6x (18)
4. (2sc, 1 inc) 6x (24)
5.24sc
6.24sc
7. (2sc, 1dec) 6x (18)
8. (1sc, 1dec) 6x (12)
9. (dec) 6x (6)
Sew on a tail, decorate with a bow, ribbon or flower.