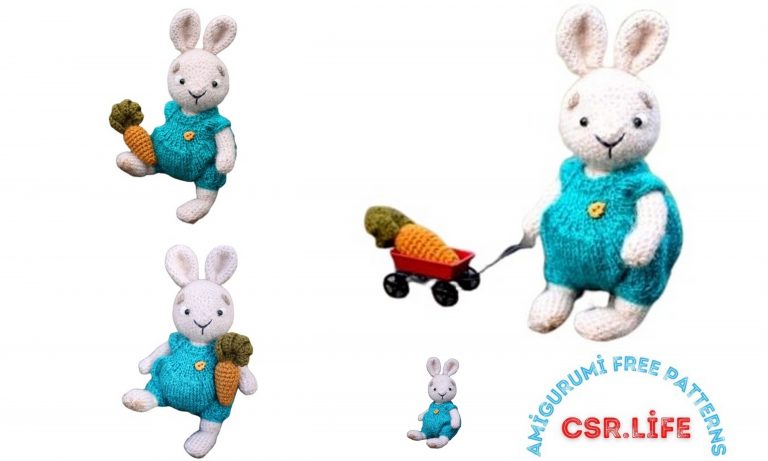
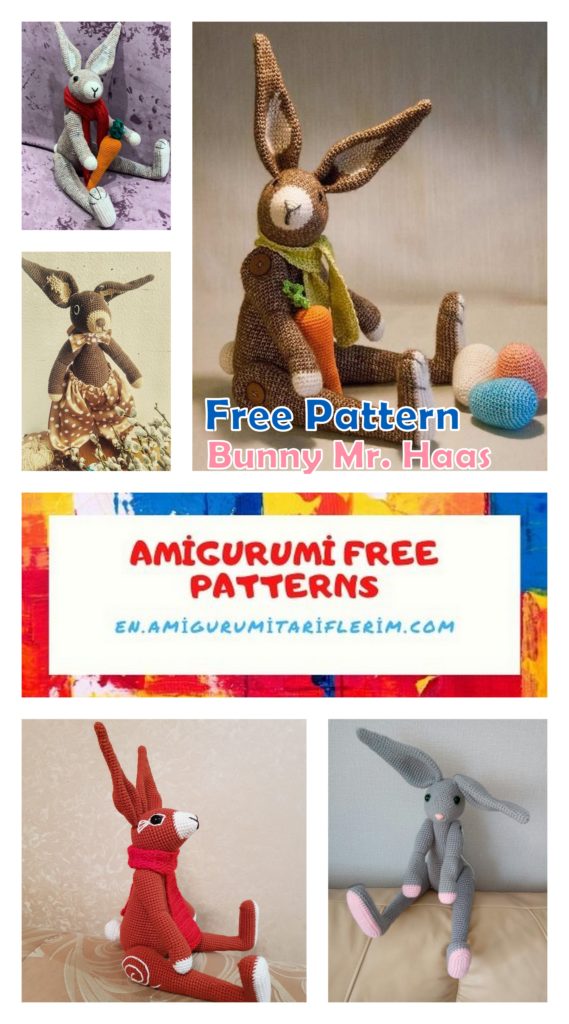
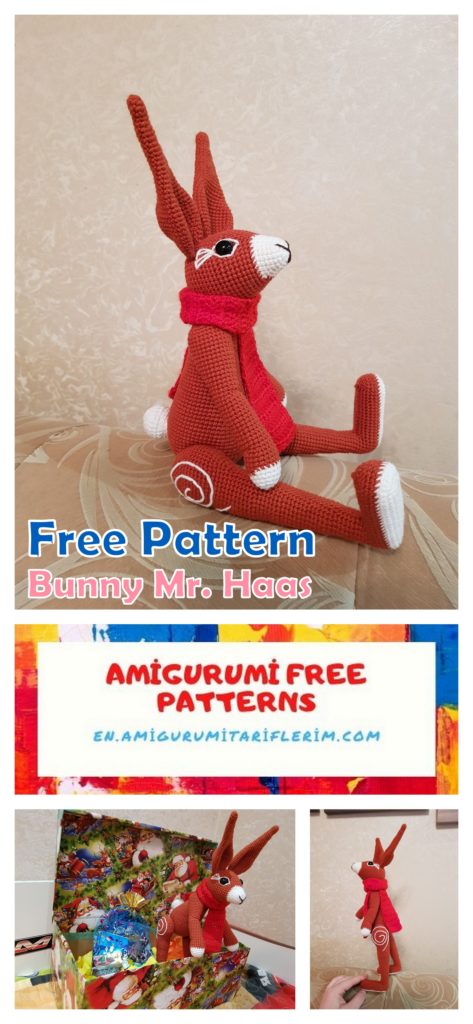
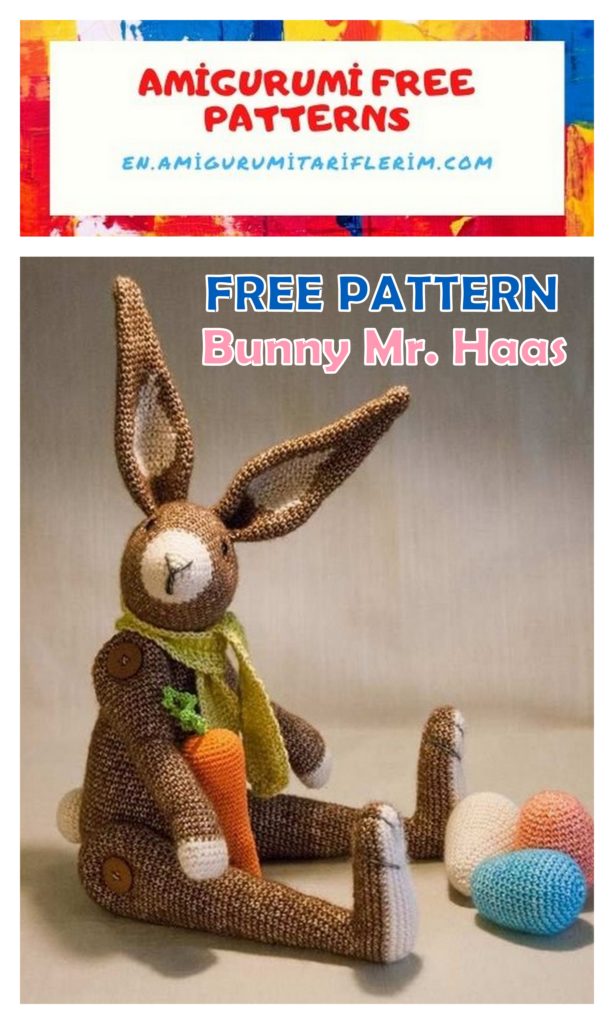
Bunny Mr. Haas Amigurumi Free Crochet Pattern
I am sharing a great amigurumi bunny recipe with you. You can knit this beautiful bunny Mr. haas amigurumi with a free pattern.
Trailer
Materials:
Yarn in two colors (the author used yarn ScheepjesStonewashed):
Color1 = dark shade (3clubs)
Color2 = light shade (1cube)
(Also a little orange and bright green for carrots, and others
colors)
4neats
2 eyes safe 10mm
1 plastic safety hinge 30mm (see picture in template)
Crochet hook: 3mm
Scissors, needle
Mr. Haas has a movable head and movable arms and legs.
All toys created on the basis of this description and which may be
sold, must be accompanied by a mention of the author of the magic ring as the designer.
Self-description or parts thereof may not be sold, modified or published.
into magic ring as its own template.
Abbreviations:
ch-chain
sc-single crochet
sl-st-slip stitch
inc-increase
dec-decrease
Leg (2pieces)
Start with colors2 (light shade) for the outsole.
P1: Link chain of 17ch.
P2: 2scto2-loop from the hook, 14sc, 4scto the last one, go to the other
the side of the chain from ch, then 14sc, 2sc to the last loop (36)
P3: 2inc, 14sc, 4inc, 14sc, 2inc (44)
P4: 2inc, 18sc, 4inc, 18sc, 3inc (54)
P5: 52sc, change the yarn to color1 (dark shade). Ties in this series
less sc so the color change is in the middle of the heel.
R6-9: 54sc (54)
P10: 22sc, dec, 2sc, dec, 2sc, dec, 22sc (51)
P11: 21sc, dec, 1sc, dec, 1sc, dec, 22sc (48)
Р12: 23sc, sl-st, further we insert the hook into the third loop of the base on the right of the hook, and
then in the third base loop on the left of the hook we tie sl-st, so
the way to knit another sl-st, connecting two halves of knitting between
forming a stop.
Next 7sc. Now we turned back in the middle of the heel.
Fill in the filler.
P13: 7sc, 1sc on top of the swestop, 7sc (15)
R14-18: 15sc (15)
Р19: (4sc, inc) х3 (18)
P20-24: 18sc (18)
P25: (5sc, inc) x3 (21)
R26-30: 21sc (21)
Р31: (6sc, inc) х3 (24)
R32-36: 24sc (24)
P37: (7sc, inc) x3 (27)
R38-42: 27sc (27)
P43: inc, 26sc (28)
Fill up with filler.
To knit the next part in this place, you must be right above
the middle of the heel. Otherwise, some number of sc, i.e.
offset to get to this location.
P44: 13sc, inc, 14sc (29)
P45: 14sc, inc, 14sc (30)
P46: 14sc, inc, 15sc (31)
P47: 15sc, inc, 15sc (32)
P48: 15sc, 2inc, 15sc (34)
P49: 16sc, inc, 1sc, inc, 15sc (36)
R50-56: 36sc (36)
P57: (4sc, dec) x6 (30)
R58: 30sc (30)
Fill in the filler.
P59: (3sc, dec) x6 (24)
P60: 24sc (24)
P61: (2sc, dec) x6 (18)
Fill in the next.
P62: (1sc, dec) x6 (12)
Sew up the hole.
Hand (2pieces)
StartColors2 (light shade)
P1: Link chain from 5ch.
P2: 2sc in the second loop of the hook, 2sc, 4sc in the last loop, go to
the other side of the chain from ch, 2sc, 2sc to the last ch (12)
P3: inc, 4sc, 2inc, 4sc, inc (16)
P4: inc, 7sc, inc, 7sc (18)
P5: 18sc (18)
P6: inc, 9sc, inc, 7sc + 2sc to change the color to 1 (dark). (20)
R7-10: 20sc (20)
Fill your arm with filler.
P11: 9sc, dec, 7sc, dec + 1sc for to side (18)
P12: 9sl-st, 9sc (18)
P13: 9sl-st, 9sc (18)
R14-24: 18sc (18)
P25: 9sc, 9 sl-st (18)
P26: 9sc, 9 sl-st (18)
P27-29: 18sc (18) + 4sc in the middle of the last row to get out to the bottom
hands.
Fill in the forearm with filler.
P30: inc, 8sc, inc, 8sc (20)
R31: 20sc (20)
P32: inc, 9sc, inc, 9sc (22)
P33: 22sc (22) + 2sc to return to center.
P34: inc, 10sc, inc, 10sc (24)
R35: 24sc (24)
P36: inc, 11sc, inc, 11sc (26)
R37-42: 26sc (26)
P43: (11sc, dec) x2 (24)
Fill top with filler.
P44: (2sc, dec) x6 (18)
P45: (1sc, dec) x6 (12)
Fill in the hand with a filler.
R46: (dec) x3 (9)
Sew up the hole.
Body
The body will be fully tied with color1 (dark shade) .You will also need a part
safe hinge.
Р1: 6scinto magic ring (6)
P2: 6inc (12)
P3: (1sc, inc) x6 (18)
Р4: (2sc, inc) х6 (24)
P5: (3sc, inc) x6 (30)
P6: (4sc, inc) x6 (36)
P7: (5sc, inc) x6 (42)
P8: (6sc, inc) x6 (48)
P9: (7sc, inc) x6 (54)
P10: (8sc, inc) x6 (60)
R11-18: 60sc (60)
Р19: (18sc, dec) х3 (57)
P20: 57sc (57)
P21: (17sc, dec) x3 (54)
P22: 54sc (54)
Р23: (16sc, dec) х3 (51)
P24: 51sc (51)
Р25: (15sc, dec) х3 (48)
R26: 48sc (48)
Р27: (14sc, dec) х3 (45)
R28: 45sc (45)
Р29: (13sc, dec) х3 (42)
P30: 42sc (42)
Р31: (12sc, dec) х3 (39)
R32: 39sc (39)
P33: (11sc, dec) x3 (36)
R34-35: 36sc (36)
Р36: (10sc, dec) х3 (33)
R37-38: 33sc (33)
R39: (9sc, dec) x3 (30)
R40-45: 30sc (30)
P46: (8sc, dec) x3 (27)
R47: 27sc (27)
P48: (7sc, dec) x3 (24)
R49: 24sc (24)
Filler
P50: (2sc, dec) x6 (18)
P51: (1sc, dec) x6 (12)
Filler
Place a part of the safety joint in the hole with a pin.
so that the pin remains protruding.
Head
Start with color2 (light shade) for the muzzle.
The end will need the rest part of the safe hinge.
Р1: 6chmagic ring (6)
P2: 6inc (12)
P3: (1sc, inc) x6 (18)
P4: 18sc (18)
P5: (5sc, inc) x3 (21)
P6: 21sc (21)
Р7: (6sc, inc) х3 (24)
Р8: (7sc, inc) х3 (27) .Color replacement in the last column shade).
P9: (8sc, inc) x3 (30)
Р10: (9sc, inc) х3 (33)
Р11: (10sc, inc) х3 (36)
P12: (11sc, inc) x3 (39)
Р13: (12sc, inc) х3 (42)
Р14: (13sc, inc) х3 (45)
Р15: (14sc, inc) х3 (48)
R16-24: 48sc (48)
P25: 1ch, 1 loop base skip, 47sc (48)
P26: (6sc, dec) x6 (42)
P27: (5sc, dec) x6 (36)
P28: (4sc, dec) x6 (30)
P29: (3sc, dec) x6 (24)
Place safe eyes between rows 15-16 and between rows 15 sc.
Fill a little head with filler.
P30: 24sc (24)
P31: (2sc, dec) x6 (18)
Lock the catcher: insert the casing pin through the holes 25 in a row.
Inside the head on the plastic washer on the pin tightly screw on hinge.
Fill the head with a filler until the end.
P32: (1sc, dec) x6 (12)
Sew up the hole.
Ears (2pieces)
The studs will be fully knitted with color1 (dark shade).
Р1: 6sc into magic ring (6)
P2: (1sc, inc) x3 (9)
R3-5: 9sc (9)
Р6: (2sc, inc) х3 (12)
R7-9: 12sc (12)
Р10: (3sc, inc) х3 (15)
R11-13: 15sc (15)
Р14: (4sc, inc) х3 (18)
R15-16: 18sc (18)
Р17: (5sc, inc) х3 (21)
R18: 21sc (21)
Р19: (6sc, inc) х3 (24)
P20: 24sc (24)
P21: (7sc, inc) x3 (27)
P22: (8sc, inc) x3 (30)
Р23: (9sc, inc) х3 (33)
Р24: (10sc, inc) х3 (36)
R25-29: 36sc (36)
P30: (10sc, dec) x3 (33)
R31: 33sc (33)
P32: (9sc, dec) x3 (30)
P33: (8sc, dec) x3 (27)
Р34: (7sc, dec) х3 (24)
Р35: (6sc, dec) х3 (21)
Leave a long thread for sewing on.
Embroider the inside of the ear in color 2 (light shade) as you like.
When attaching the ear head, fold it back into the bottom of the boat.
Tail
The tail is fully tied with color 2 (light shade).
Р1: 6sc into magic ring (6)
P2: 6inc (12)
P3: (1sc, inc) x6 (18)
Р4: (2sc, inc) х6 (24)
R5-7: 24sc (24)
P8: (2sc, dec) x6 (18)
P9: 18sc, knit only back wall (18) .This will give you a sewing
edge to be able to sew on the tail to the body.
Assembly
Sew on the ears on both sides of the head as you like.
Hands and buttons to the body.
Determine where the body should be and fix this position when
use a piece of wire. Take a double thread of color1 (dark shade) and
a piece of wire. Pierce the wire through the body and through the
position of the legs.
Insert the needle into the inside of the leg, remove it from the outside.
through the needle. Insert the needle into place, back through
leg through the body in place. Insert the needle into the seat.
from the inside to the outside through the other leg. Take the button and the day through the other leg.
the needle. Insert the needle back into the same place.
body Remove the needle from the first puncture itself.
Now you have to start and end the thread between the first body.
stretch out the sides so that the legs are tightly attached to the
was still in motion. Tie the ends with a triple knot and
hide his body. Remove the wire.
Repeat this procedure for the hands.
Embroider the black thread of the june muzzle of the hare.
Embroider the black thread on the legs.
Fill in the lapels and sew it to his body with a patch on the edge of the vine.
Tie the desired color according to your preference a scarf.
The carco into magic ring is fully tied in orange color.
knitting.
Р1: 6sc into magic ring (6)
P2: (1sc, inc) x3 (9)
R3-6: 9sc (9)
Р7: (2sc, inc) х3 (12)
R8-10: 12sc (12)
Р11: (3sc, inc) х3 (15)
R12-14: 15sc (15)
Р15: (4sc, inc) х3 (18)
R16-18: 18sc (18)
Р19: (5sc, inc) х3 (21)
P20-22: 21sc (21)
Р23: (6sc, inc) х3 (24)
R24-25: 24sc (24)
Р26: (7sc, inc) х3 (27)
R27-28: 27sc (27)
Р29: (8sc, inc) х3 (30)
P30: 30sc (30)
Р31: (9sc, inc) х3 (33)
Р32: (10sc, inc) х3 (36)
R33-37: 36sc (36)
P38: (4sc, dec) x6 (30)
P39: (3sc, dec) x6 (24)
P40: (2sc, dec) x6 (18)
P41: (1sc, dec) x6 (12)
P42: 3dec (9)
Sew up the hole.
Carrot leaves represent a chain of air loops, tied
columns with no sign and arches from air loops, about 10-12 cm long.
Tie an air loop to the correct length, replace it with a circle.
tie the columns with unsanitary strings, periodically making arch from air loops.
it needs to dial 6ch, skip two base loops and knit a third sc.
repeat periodically, varying between arcs the number of intermediate columns
impunity.
Tie a circle.
Fold the circle in half into the open top of the carrot.
the leaves were in a vertical position, wrap them several times
green yarns .Crimp and hide the tails in a carrot.
Eggs
The eggs can be tied from the rest of the yarn of different colors.
dressing.
Р1: 6sc into magic ring (6)
P2: 6inc (12)
P3: (1sc, inc) x6 (18)
Р4: (2sc, inc) х6 (24)
P5: (3sc, inc) x6 (30)
P6: (4sc, inc) x6 (36)
R7-11: 36sc (36)
Р12: (10sc, dec) х3 (33)
R13-14: 33sc (33)
Р15: (9sc, dec) х3 (30)
R16: 30sc (30)
Р17: (8sc, dec) х3 (27)
R18: 27sc (27)
Р19: (7sc, dec) х3 (24)
P20: 24sc (24)
P21: (2sc, dec) x6 (18)
P22: (1sc, dec) x6 (12)
P23: (1sc, dec) x3 (9)
Sew up the hole.
Good luck and congratulations,