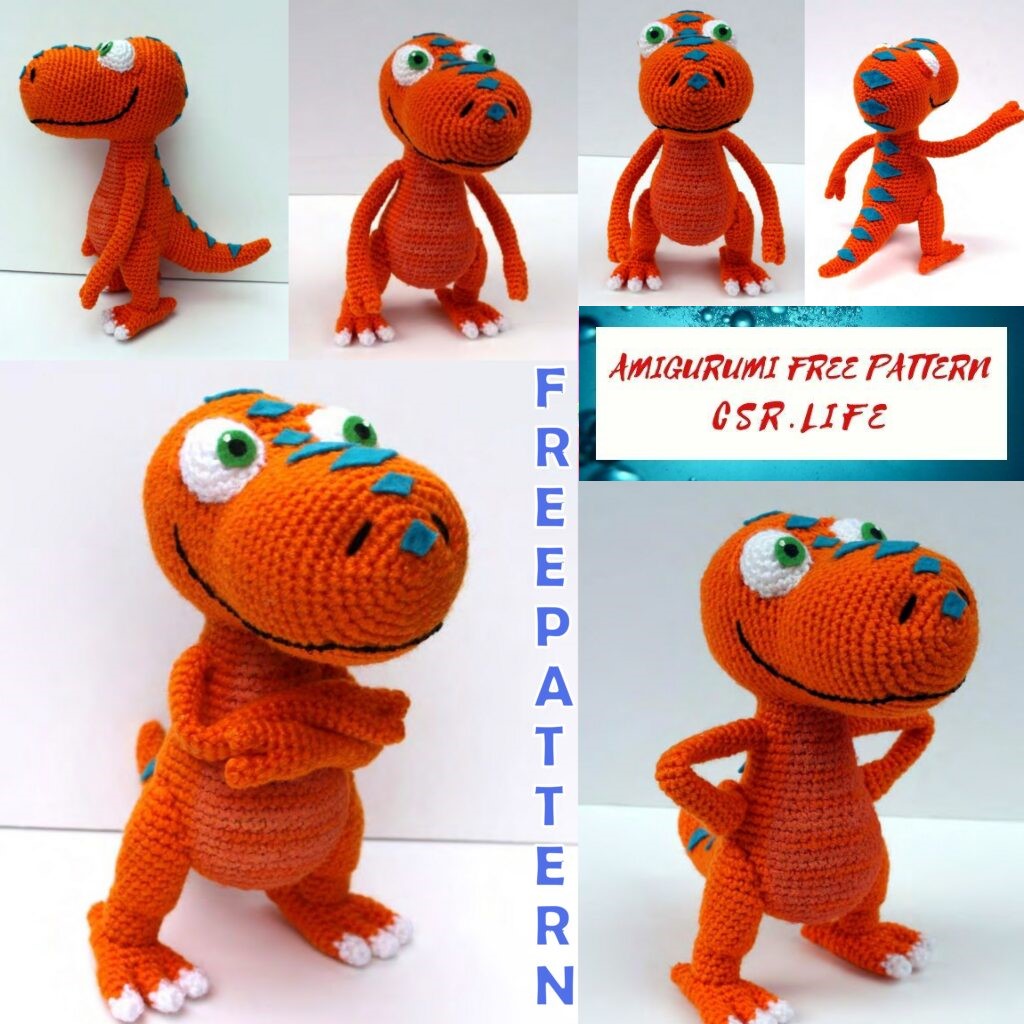
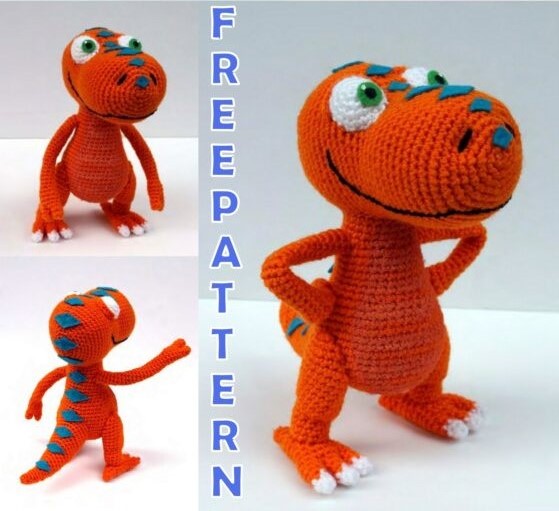
Dinosaur T-Rex Amigurumi Free Pattern
It is very easy to reach amigurumi free patterns, just come to our site. You can visit our content for this amigurumi dinosaur pattern.
Buddy the T-Rex Amigurumi
Pattern
Materials
Worsted-weight yarn in orange, white, and black.
Size G crochet hook (4 mm)
Fiberfill or stuffing
Needle with a large eye
16 gauge aluminum jewelry wire
Black sewing thread and needle.
Fabric or tacky glue.
Blue felt, green felt
White, yellow, orange, and black fabric paint (for pupils and belly. Black felt or permanent marker can also be used and the belly stripes are optional)
Note: My favorite brand of fabric paint is Tulip brand Soft Matte paint. It dries stiff but doesn’t crack and it’s easy to work with.
Abbreviations:
• Sc: single crochet
• dec: decrease (sc 2 tog)
• inc: increase (sc 2 in next st)
• sl st: slip stitch
• FLO: front loop only
Your finished product will measure about 6” long and about 10” tall, depending on yarn
tension and type.
Instructions that need to be repeated will be marked with marked with asterisks like *this*, followed by the number of times repeated. Everything is crocheted in the round unless stated otherwise.
PATTERN


Head
Using ORANGE
R1: Ch 2, 6 sc in second ch from hook.
R2: Inc in each sc around. (12)
R3: *Sc 1, inc 1*, rep 6 times. (18)
R4: *Sc 2, inc 1*, rep 6 times. (24)
R5: *Sc 3, inc 1*, rep 6 times. (30)
R6: Sc 6, inc in next 3 st, sc 12, inc in next 3 st, sc 6. (36)
R7: Sc 6, *inc 1, sc 1*, rep 3 times, sc 12, *inc 1, sc 1*, rep 3 times, sc 6. (42)
R8: *Sc 6, inc 1*, rep 6 times. (48)
R9-17: Sc in each sc around. (48)
R18: *Sc 6, dec 1*, rep 6 times. (42)
R19-20: Sc in each sc around. (42)
R21: Sc 18, *inc 1, sc 1*, rep 6 times, sc 12. (48)
R22: Sc 18, *inc 1, sc 2*, rep 6 times, sc 12. (54)
R23-29: Sc in each sc around. (54)
R30: Sc 52, dec 1. (53)
R31: *Sc 3, dec 1*, rep 3 times, sc 38. (50)
R32: Sc 15, *dec 1, sc 2*, rep 6 times, sc 11. (44)
R33: Sc 2, dec 1, sc 11, *dec 1, sc 1,* rep 6 times, sc 7, dec 1, sc 2. (36)
R34: Sc 4, dec 1, sc 10, dec 1, sc 12, dec 1, sc 4. (33)
R35: Sc 12, dec 1, sc 5, dec 1, sc 10, dec 1. (30)
R36: *Sc 3, dec 1*, rep 6 times. (24)
R37: *Sc 2, dec 1*, rep 6 times. (18)
Stuff firmly.
R38: *Sc 1, dec 1*, rep 6 times. (12)
R39: *Sc 1, dec 1*, rep 6 times. (8)
Dec 2, finish off. Weave in tail.
Body
Using ORANGE
R1: Ch 2, 6 sc in second ch from hook.
R2: Inc in each sc around. (12)
R3: *Sc 1, inc 1*, rep 6 times. (18)
R4: *Sc 2, inc 1*, rep 6 times. (24)
R5: *Sc 3, inc 1*, rep 6 times. (30)
R6: *Sc 4, inc 1*, rep 6 times. (36)
R7: *Sc 5, inc 1*, rep 6 times. (42)
R8-9: Sc in each sc around. (42)
R10: *Sc 6, inc 1*, rep 6 times. (48)
R11-16: Sc in each sc around. (48)
R17: *Sc 6, dec 1*, rep 6 times. (42)
R18: *Sc 5, dec 1,* rep 6 times. (36)
R19: Sc in each sc around. (36)
R20: *Sc 4, dec 1*, rep 6 times. (30)
R21-26: Sc in each sc around. (30)
R27: *Sc 3, dec 1*, rep 6 times. (24)
R28-30: Sc in each sc around. (24)
Sl st. 1. Tie off, leave long tail for sewing.
Stuff body.
Arms
(make 2)
Fingers:
Using ORANGE
R1: Ch 2, 5 sc in second ch from hook.
R2-3: Sc in each sc around. (5)
Tie off. Make 1 more toe, do NOT tie off this toe. Sc 5 stitches onto second toe, connecting the two toes. Sc 5 back onto the first toe. You’ve just finished R4. (10) Cut any extra strings shorter. (see photos)
R5-7: Sc in each sc around. (10)
R8: *Sc 3, dec 1*, rep 2 times. (8)
Stuff. (This section is his hand, the rest of the arm will not be stuffed.)
R9-27: Sc in each sc around. (8) Sl st 1. Tie off, leave long tail for sewing. Do not stuff the rest of the arm, only the “hand” part needs stuffing. Wire will be inserted later.
Legs
(make 2)
Using ORANGE
When you make your slip knot, leave a long tail. After crocheting a few rows, pull this tail out through the bottom of the leg so you can use it to stitch on the foot later.
R1: Ch 2, 6 sc in second ch from hook.
R2: Inc in each sc around. (12)
R3-6: Sc 1 in each sc around. (12)
R7: Dec 1, sc 2, inc in next 4 FLO, sc 2, dec 1. (14)
R8: Sc in each sc around. (14)
R9: Inc 1, sc 12, inc 1. (16)
R10-11: Sc in each sc around. (16)
R12: *Sc 7, inc 1*, rep 2 times. (18)
R13-14: Sc in each sc around. (18)
R15: *Sc 4, dec 1*, rep 3 times. (15)
R16: *Sc 3, dec 1*, rep 3 times. (12)
Stuff the narrow part firmly, stuff the top, wider part less firmly.
R17: *Sc 2, dec 1*, rep 3 times. (9)
R18: *Sc 1, dec 1*, rep 3 times. (6)
Finish off. Leave long tail for sewing.
Feet
(make 2)
Toes
(make 3):
Using WHITE
R1: Ch 2, 5 sc in second ch from hook.
R2: Sc in each sc around. (5)
Change to ORANGE
R3: Sc in each sc around. (5)
R4: Inc 1, sc 4. (6)
R5: Sc in each sc around. (6)
Tie off. Make 2 more toes, do NOT tie off last toe. Sc 3 onto 2nd toe, connecting toe #3 to toe #2, then sc 6 onto toe #1 in each sc around, then sc 3 back onto toe #2, and finally sc 6 around onto toe #1. You should now have a round consisting of 18 stiches: this is R6. Continue onto R7.
R7: *Sc 7, dec 1*, rep 2 times. (16)
R8: *Sc 6, dec 1*, rep 2 times. (14)
R9: Sc in each sc around. (14)
R10: *Sc 5, dec 1*, rep 2 times. (12)
R11-12: Sc in each sc around. (12)
Stuff.
R13: Dec 6. (6)
R14-15: Sc in each sc around. (6)
Finish off, Leave long tail for sewing.
Tail
Using ORANGE
R1: Ch 2, 6 sc in second ch from hook.
R2-3: Sc in each sc around. (6)
R4: *Sc 2, inc 1*, rep 2 times. (8)
R5-6: Sc in each sc around. (8)
R7: *Sc 3, inc 1*, rep 2 times. (10)
R8: Sc 3, inc 1, sc 4, dec 1. (10)
R9: *Sc 4, inc 1*, rep 2 times. (12)
R10: *Sc 5, inc 1*, rep 2 times. (14)
R11: Sc 5, inc 1, sc 6, dec 1. (14)
R12: *Sc 6, inc 1*, rep 2 times. (16)
R13: Sc 6, inc 1, sc 7, dec 1. (16)
R14: *Sc 7,inc 1*, rep 2 times. (18)
R15: Dec 1, sc 4, inc 1, sc 2, inc 1, sc 5, dec 1, sc 2. (18)
R16: *Sc 8, inc 1*, rep 2 times. (20)
R17: *Sc 4, inc 1*, rep 4 times. (24)
R18-19: Sc 10, inc 1, sc 11, dec 1. (24)
R20: Dec 1, sc 7, inc 1,sc 4, inc 1, sc 6, dec 1, sc 1. (24)
R21: *Sc 5, inc 1*, rep 4 times. (28)
R22: Sc 14, inc 1, sc 11, dec 1. (28)
R23: Sc in each sc around. (28) Sl st. 1. Tie off, leave long tail for sewing.
Eyes
(make 2)
Using WHITE
R1: Ch 2, 6 sc in second ch from hook.
R2: Inc in each sc around. (12)
R3: *Sc 1, inc 1*, rep 6 times. (18)
R4: Sc in each sc around. Sl st. 1. Tie off, leave long tail for sewing.
Assemby
Head
Start by attaching the head to the body using the long tail from the body piece.
Make sure both pieces are firmly stuffed, you may need to add more stuffing as you stitch the pieces together. Use safety pins or straight pins to hold the pieces together while you stitch the body to the far end of the head (the side you closed up). Make sure the head is on straight before you tie off. Use the pictures below to guide you.
Tail
Use pins if needed to place the tail towards the bottom of the body. Stitch around the edge of the tail to secure it to the body. Insert any extra stuffing if needed.
Legs
The legs will be stitches on either side of the body. Place the upper half of the leg against the body so the lower half hangs down (make sure the knee indent is in front). Use pins if needed to hold the leg in place on the body while you stitch around the upper edge of the leg to the body and then towards the middle of the leg, securing it to the body.
Feet
Using the long tail on the end of the leg, stitch around the center of the foot to secure it to the leg. You may need to use a couple pins to hold in in place while you stitch.
Arms
If you want your arms to be poseable, you will have to wire them. Measure out about 14” of wire, or as I like to do it, just start with your wire in a bundle and trim it as needed. Take the end of your wire and bend it into a small, narrow loop and twist the end. This will keep your wire from poking out through your stitches. Wrap the end of your wire with a spare piece of yarn to keep the sharp piece of wire from snagging on the inside of your stitches.
Your wire should be long enough to fit inside the arm, go into the body, and poke out thought opposite side of the body to fit inside the other arm. Both arms will be wired with ONE piece of wire.
Trim your wire long enough to be inserted into the body and fit into the other arm (longer is better! You can always trim it shorter!) and insert it where you want your first arm to go. Push the wire into the body and out where you want the other arm to be placed. Measure the wire using your remaining arm and trim the wire to that when you loop the end, it will fit slightly shorter than the arm. Loop and wrap with wire, and fir the arm over the wire. Attach both arms to the body.
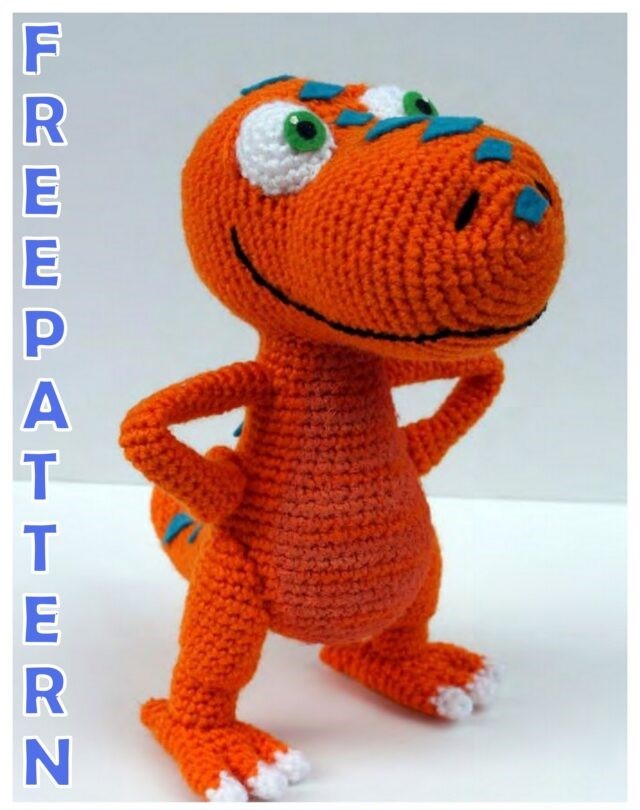
Eyes
So now you should have the body all put together! Next comes attaching the eyes. Stuff the eyes and use pins to secure them to the face while you stitch. They should be placed in the slight indent in the face.
The Diamond Designs
Start by cutting out your diamond shapes out of paper. This will really help make sure that all of the diamonds are just how you want them. Make some smaller diamonds on the face and larger ones on the back. Use straight pins to pin the paper diamonds on your dinosaur and space them out how you like.
The easiest way to cut out your diamonds is to take a diamond and the pin, stick it into your felt, and just trim around your paper shape. To secure your felt diamond, use a good glob of fabric glue or tacky craft glue (if you’re giving him to a child, you may want to stitch it down with sewing thread). Keep the pin in and let it dry. Continue for the rest of your diamonds.
Iris & Pupils
Cut two small circles out of green felt for the irises. You can use either black fabric paint or black felt for the pupils; I find painting them on to be much easier and then the pupil is flat compared to using felt. If you want, paint a little white dot in the iris to make the eyes “shine.” Let the paint dry before gluing onto the eye.
Belly
Using a mixture of orange, white, and a tiny amount of yellow, paint the belly design onto your dinosaur. The outline of the belly should be painted in and then painted with stripes so the actual color of your yarn shows through to create the stripes.
Eyelids
Using your orange yarn and your crochet hook, chain 10, turn, and sl st. 9. Tie off and make one more. Use pins if needed to fit your eyelid across each eye and stitch in place, keeping the piece flush against the orange of the face (so no white shows).
Mouth
Using a long piece of black yarn, insert your needle between two stitches somewhere near the back of the head and thread it out where you want the mouth to start (near below the eye). Loosely bring your yarn around the entire mouth, use a couple straight pins to pin down the curve of his smile, and insert the needle into the head beneath the other eye. Bring your yarn out through the same two stitches you inserted it at. Do not tie anything off yet.
Using black sewing thread, insert your needle anywhere into the head near the mouth (don’t worry about hiding your thread, if you insert your needle between two stitches, when you pull the thread, the knot should slip into the head and be stopped from coming out by the stuffing).
Use your needle to make tiny stitched along your yarn-mouth, securing it to the face and shaping it into a slight smile as you go along.
Once your mouth is stitched and you’ve discretely tied off your thread and weaved in the tail, you need to tie off your black yarn. The two tails should be sticking out towards the back of the head. Just tie the two strands into a tight knot and using your needle, thread the ends back into the head. The knot should disappear into the head.
Nose
To make the nose, take another long piece of black yarn and insert it between two stitches somewhere on the head (I chose underneath the mouth). Stitch two lines where you want the nose to be (see photos) and then thread the yarn back out through the same spot you inserted the yarn. Pull the yarn tightly so that the nose is slightly indented. Tie the two ends in a knot and thread them back into the head.
Congrats! You’ve finished making Buddy the T-Rex!