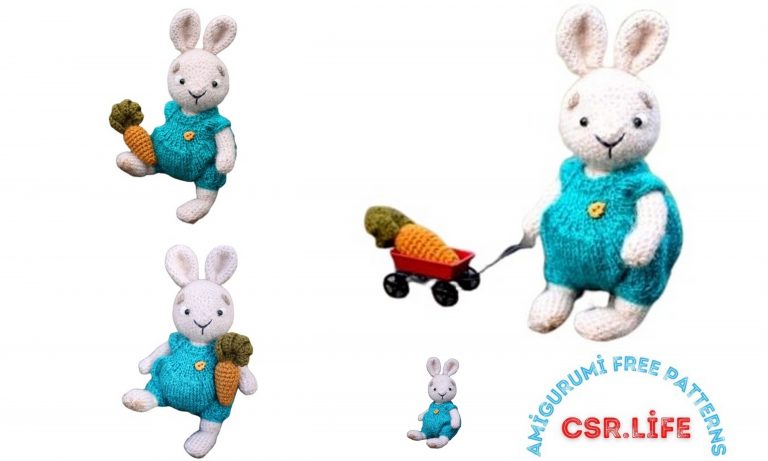
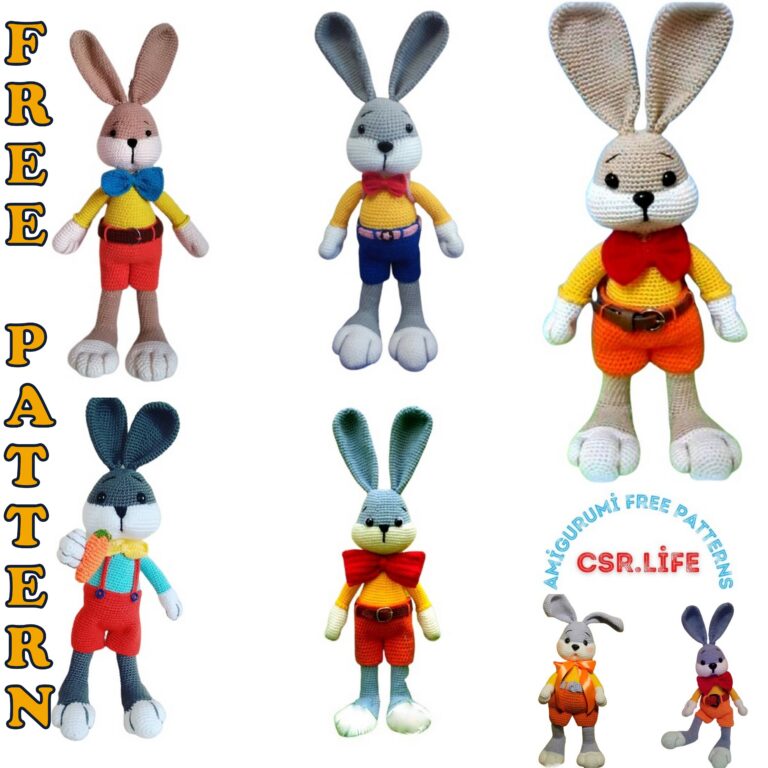
Free Amigurumi Bunny with Backpack Pattern – Easy and Cute Bunny Making
Start making an adorable amigurumi bunny with a backpack using this free pattern. This article provides step-by-step instructions and lists the required materials. A great gift idea for bunny enthusiasts!
Welcome to the world of amigurumi! In this article, we’re offering a fantastic opportunity to start a fun and adorable project: the free pattern for a bunny with a backpack. Amigurumi has become a popular art form for creating small plush animals using crochet or knitting, and this pattern is perfect for both beginners and experienced crafters.
This pattern includes not only a cute bunny but also its backpack. This little detail adds extra charm to your amigurumi and can make for a wonderful gift idea for your kids or loved ones who adore bunnies. This pattern is truly a gem, especially for those who have a soft spot for these fluffy creatures.
In this article, we’ll provide step-by-step guidance and instructions to help you complete your project. We’ll also share the necessary materials and some tips and tricks to make your amigurumi crafting experience enjoyable.
Get your crochet hook ready and dive into the world of amigurumi!
FOR THE RABBIT:
Yarn: YarnArt Velour (color 840)
Hook: No. 3
Eyes (diameter 8 mm)
Nose (diameter 1.3 cm)
Polyester fiberfill
Strong thread for sewing parts
Scissors
Marker
FOR THE BODY:
Yarn: YarnArt Jeans (colors 01, 35, 53, 59)
Hook: No. 1.5
Long tapestry needle
3 buttons
Scissors
Marker
FOR THE SLIPPERS:
Yarn: YarnArt Jeans (color 59)
Hook: No. 1.5
Long tapestry needle
2 buttons
Scissors
Marker
Materials:
FOR THE HAT:
Yarn: YarnArt Jeans (colors 01, 42, 53, 59)
Hook: No. 1.5
Long tapestry needle
3 buttons
Scissors
Marker
FOR THE SLIPPERS:
Yarn: YarnArt Jeans (colors 53, 59)
Hook: No. 1.5
Long tapestry needle
2 buttons
Scissors
Marker
Abbreviations:
ch – chain
sl st – slip stitch
sc – single crochet
hdc – half-double crochet
dc – double crochet
tr – treble crochet
inc – increase (2 sc in one stitch)
dec – decrease (single crochet two stitches together)
BLO – back loop only
FLO – front loop only
PATTERN
Using:
YarnArt Velour color 840
Hook No. 3
Left Leg
Row 1: 2 ch, in the second from the hook st, 6 sc (6)
Row 2: 6 inc (12)
Row 3: (sc, inc) * 6 (18)
Row 4: (2 sc, inc) * 6 (24)
Rows 5-6: 24 sc (24)
Row 7: 7 sc, 2 dec, 3 sts worked together, 2 dec, 6 sc (18)
Row 8: 18 sc (18)
Row 9: (sc, dec) * 6 (12)
Rows 10-11: 12 sc (12)
Row 12: 6 hdc, 6 sc (12)
Row 13: 6 hdc, 6 sc (12)
Rows 14-16: 12 sc (12)
Fasten off.
Right Leg
Row 1: 2 ch, in the second from the hook st, 6 sc (6)
Row 2: 6 inc (12)
Row 3: (sc, inc) * 6 (18)
Row 4: (2 sc, inc) * 6 (24)
Rows 5-6: 24 sc (24)
Row 7: 7 sc, 2 dec, 3 sts worked together, 2 dec, 6 sc (18)
Row 8: 18 sc (18)
Row 9: (sc, dec) * 6 (12)
Rows 10-11: 12 sc (12)
Row 12: 6 sc, 6 hdc (12)
Row 13: 6 sc, 6 hdc (12)
Rows 14-16: 12 sc (12)
Fasten off.
Left Foot
Row 1: 2 ch, in the second from the hook st, 6 sc (6)
Row 2: 6 inc (12)
Row 3: 12 sc (12)
Row 4: (sc, inc) * 6 (18)
Rows 5-7: 18 sc (18)
Row 8: (BLO, dec) * 6 (12)
Rows 9-11: 6 sc, 6 hdc (12)
Rows 12-15: 12 sc (12)
Row 16: 6 dec (6)
Row 17: 6 sc (6)
Lightly stuff 2/3 of the arms. Fasten off.
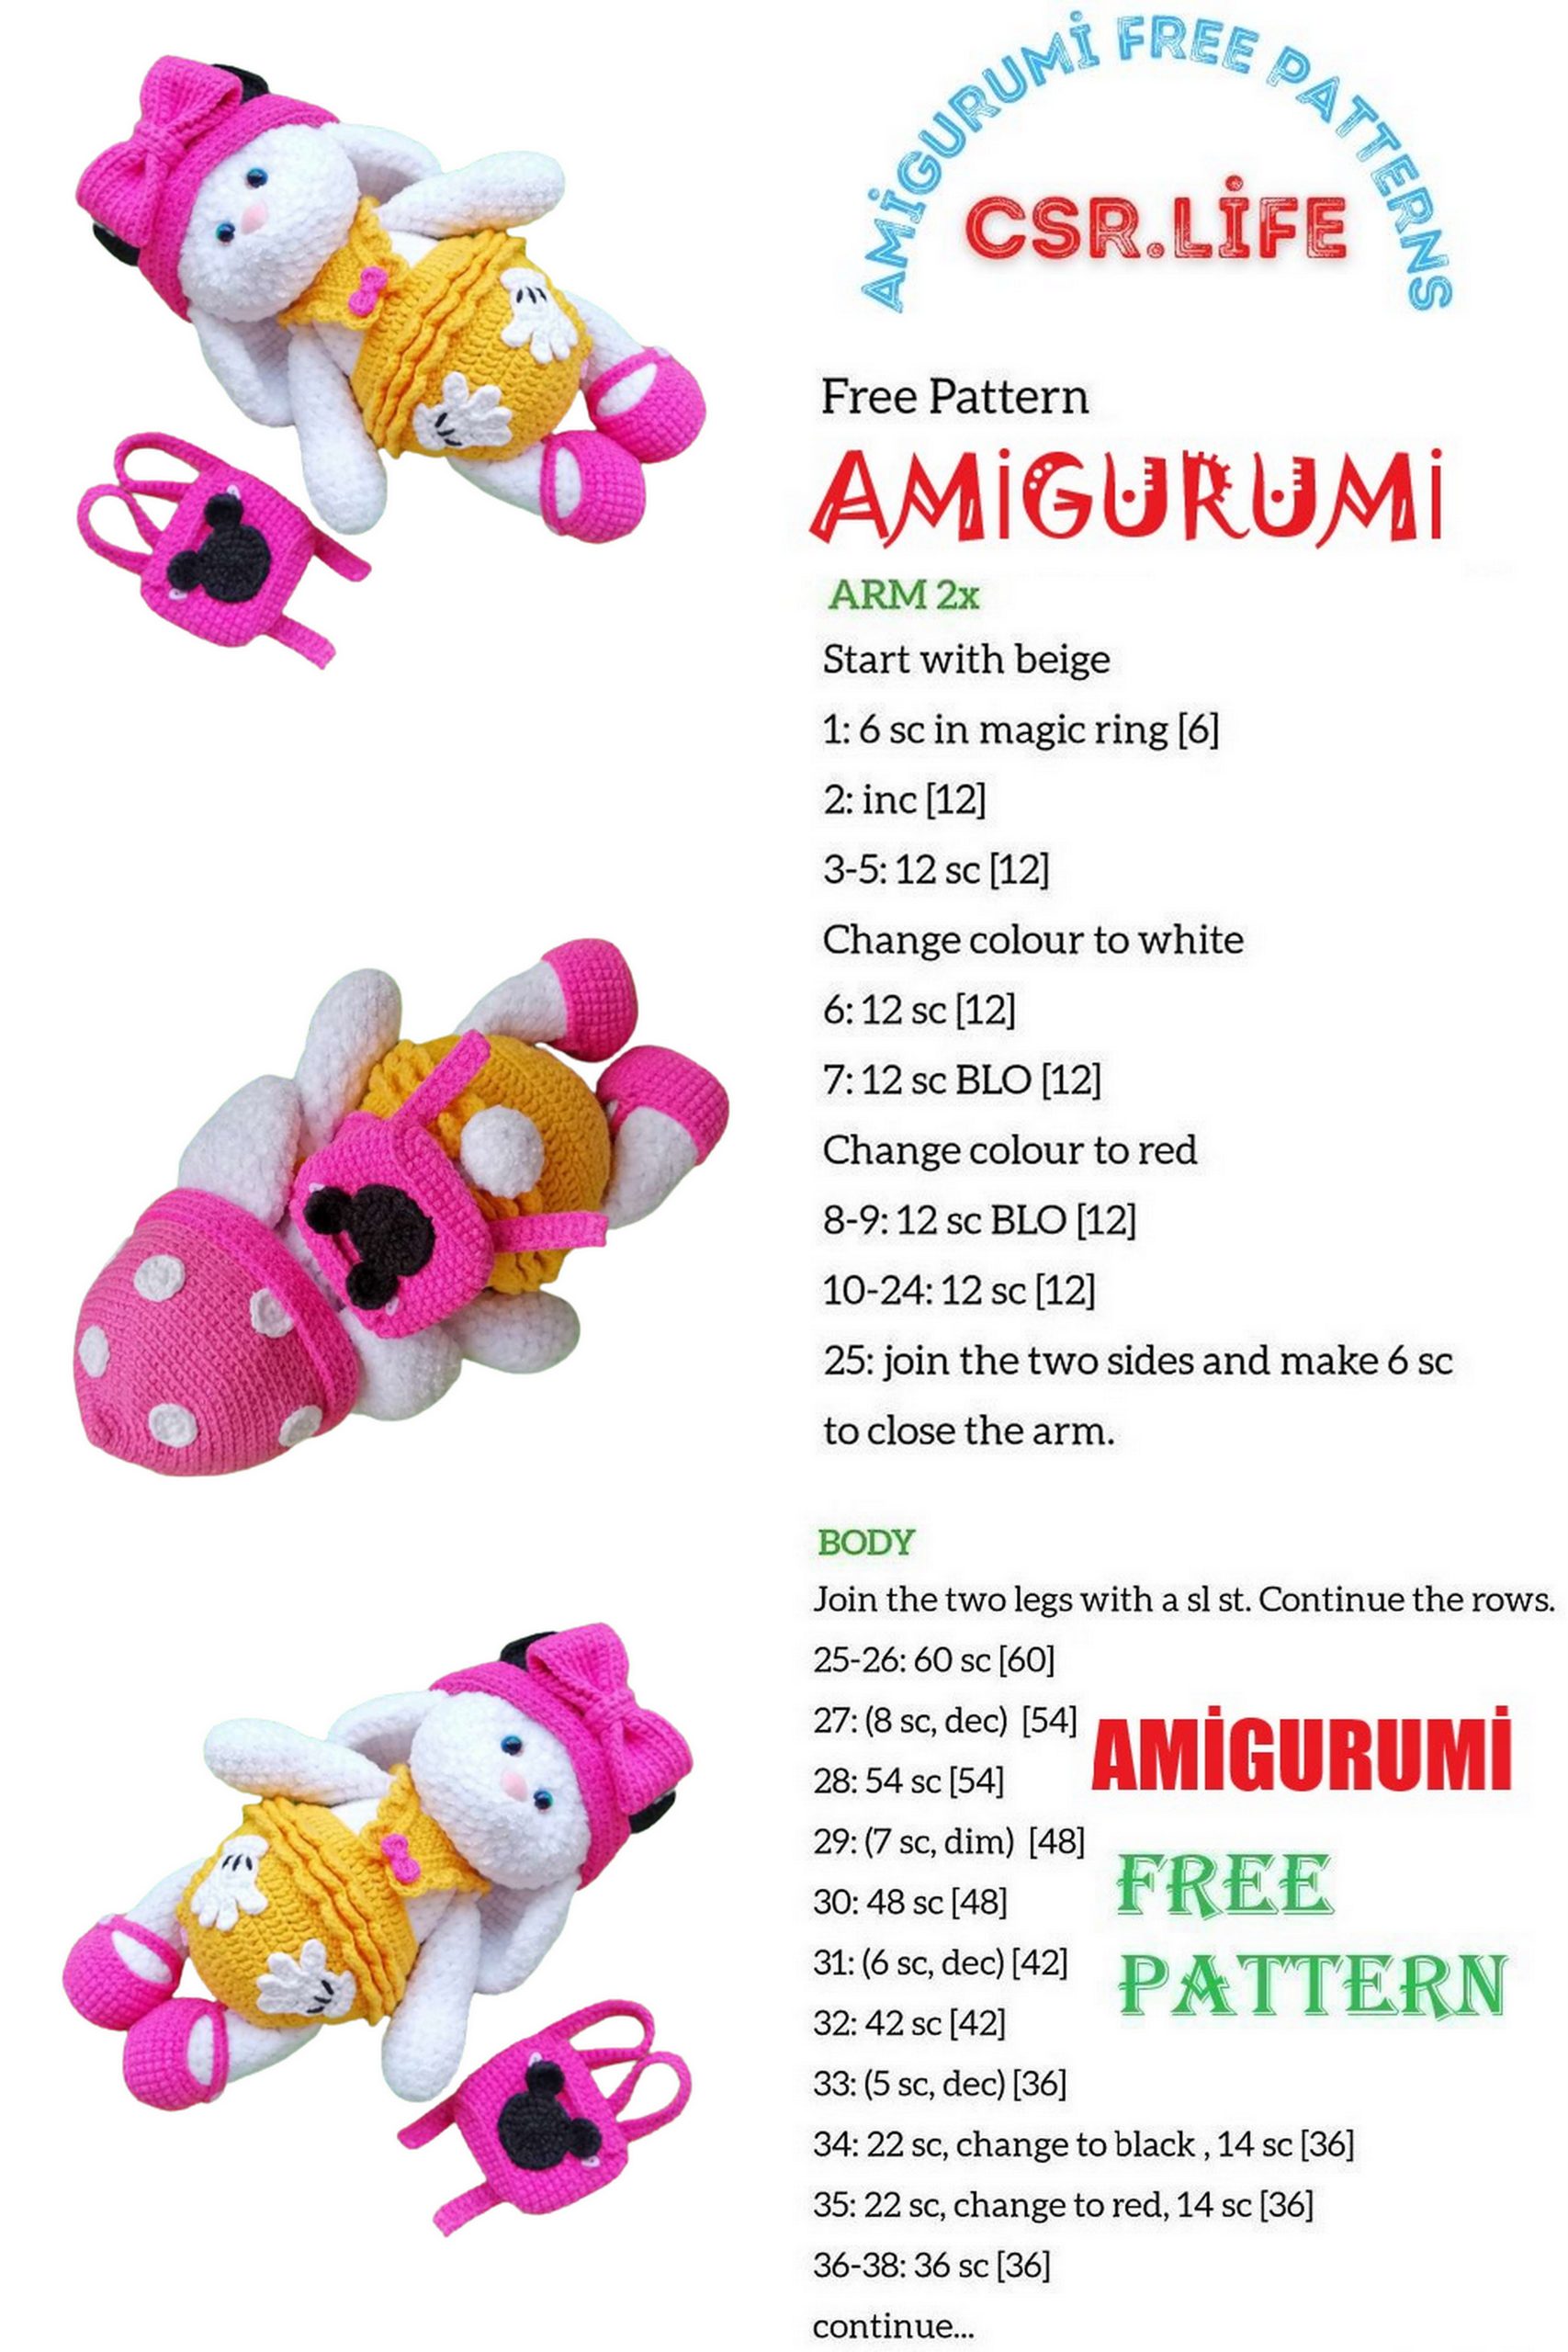
Arms (2 pieces)
Tail
Row 1: 2 ch, in the second from the hook st, 6 sc (6)
Row 2: 6 inc (12)
Rows 3-4: 12 sc (12)
Row 5: 6 dec (6)
Row 6: 6 sc (6)
Fasten off.
Body
Row 1: 2 ch, in the second from the hook st, 6 sc (6)
Row 2: 6 inc (12)
Row 3: (sc, inc) * 6 (18)
Row 4: (2 sc, inc) * 6 (24)
Row 5: (3 sc, inc) * 6 (30)
Row 6: (4 sc, inc) * 6 (36)
Row 7: (5 sc, inc) * 6 (42)
Row 8: 42 sc (42)
Row 9: Attach the left leg – 5 sc, 16 sc, attach the right leg – 5 sc, 16 sc (42)
Row 10: (6 sc, inc) * 6 (48)
Row 11: 48 sc (48)
Mark the center of the toy’s bottom, and attach the tail in this spot; you can also simply sew it.
Row 12: 48 sc (48)
Row 13: (6 sc, dec) * 6 (42)
Row 14: 42 sc (42)
Row 15: (5 sc, dec) * 6 (36)
Row 16: 36 sc (36)
Row 17: (4 sc, dec) * 6 (30)
Rows 18-20: 30 sc (30)
Row 21: (3 sc, dec) * 6 (24)
Rows 22-23: 24 sc (24)
Row 24: (2 sc, dec) * 6 (18)
Stuff the body slightly.
Fasten off.
Head:
Row 1: 5 ch, in the second from the hook st, 3 sc, 3 sc in one st, 3 sc, 3 sc in one st (12)
Row 2: 3 sc, 3 inc, 3 sc, 3 inc (18)
Rows 3-4: 18 sc (18)
Row 5: 3 inc, hdc, inc, hdc, inc, inc, hdc inc, 3 sc, inc, inc, hdc, inc, hdc (27)
Row 6: 6 inc, hdc, inc, hdc, inc, hdc inc, inc, hdc inc, hdc, inc, sc, inc, hdc, inc, hdc, inc, hdc inc, hdc, inc, sc, inc, hdc, inc, hdc (42)
Row 7: 18 sc, 7 hdc, 4 sc, 7 hdc, 6 sc (42)
Row 8: 42 sc (42)
Row 9: 2 hdc, inc hdc, 6 hdc, inc hdc, 2 hdc, 3 sc, 4 hdc, inc hdc, hdc, inc, 10 sc, inc, hdc, inc hdc, 4 hdc, 3 sc (48)
Rows 10-16: 48 sc (48)
You can attach the eyes and nose now. Sew the eyes in row 5, with 6 sc stitches between the eyes. Place the nose in the middle just above row 1.
Row 17: (6 sc, dec)*6 (42)
Row 18: (5 sc, dec)*6 (36)
Row 19: (4 sc, dec)*6 (30)
Row 20: (3 sc, dec)*6 (24)
Row 21: (2 sc, dec)*6 (18)
Row 22: (sc, dec)*6 (12)
Row 23: 6 dec (6)
Fasten off.
To watch the video on “How to Create Facial Features,” click on the green icon.
Ears:
Row 1: ch, in the second from the hook st, 6 sc (6)
Row 2: 6 inc (12)
Row 3: (sc, inc)*6 (18)
Row 4: 18 sc (18)
Row 5: (2 sc, inc)*6 (24)
Row 6: 24 sc (24)
Row 7: (3 sc, inc)*6 (30)
Rows 8-10: 30 sc (30)
Row 11: (3 sc, dec)*6 (24)
Rows 12-13: 24 sc (24)
Row 14: (2 sc, dec)*6 (18)
Rows 15-16: 18 sc (18)
To watch the video on “How to Attach Ears,” click on the green icon.
To watch the video on “How to Attach the Head,” click on the green icon.
To watch the video on “How to Attach Arms,” click on the green icon.
Clothing:
Crochet in turned rows.
Row 1: 70 ch (70)
Row 2: sc in the 6th st from the hook (creating a buttonhole loop), 2 ch, 64 ss (64)
Body:
Row 3: 2 ch, turn your work, starting from the second ch from the hook, crochet 64 ss (64)
Row 4: Crochet the entire row in the front loops of the chain made from the air loops. (Starting from the second ch from the hook, 5 ss in one loop, then ss in the next loop)*16. 2 ch, turn your work, and crochet the entire row in the back loops of the chain made from the air loops. (7 ss, inc ss)*8 (72)
To watch the video on “How to Crochet a Skirt,” click on the green icon.
To watch the video on “How to Continue Crocheting After the Skirt,” click on the green icon.
Row 5: Crochet the entire row in the front loops of the chain made from the air loops. (Starting from the second ch from the hook, 5 ss in one loop, then ss in the next loop)*18. 2 ch, turn your work, and crochet the entire row in the back loops of the chain made from the air loops. (72 ss) (72)
Row 6: Crochet the entire row in the front loops of the chain made from the air loops. (Starting from the second ch from the hook, 5 ss in one loop, then ss in the next loop)*18. 2 ch, turn your work, and crochet the entire row in the back loops of the chain made from the air loops. (72 ss) (72)
Row 7: 2 ch, turn your work, inc ss in the second ch from the hook, 70 ss, inc (74)
Next, continue in the round. In the next row, connect the two edges with a slip stitch.
Row 8: 2 ch, crochet in the third ch from the hook, 74 ss, sl st (74)
Create markers: Mark 12 stitches for the legs, 25 for the front, and the remaining for the back. Use markers. Close off the crochet.
To watch the video on “How to Continue Crocheting the Body,” click on the green icon.
The section marked with lavender markers is crocheted together from right to left (looking at the front side, as shown in the video). Crochet in turned rows.
Row 9: 26 sc (26)
Rows 10-11: ch, turn your work, starting from the second ch from the hook, 4 sc, 4 hdc, 10 ss, 4 hdc, 4 sc (26)
Row 12: ch, turn your work, starting from the second ch from the hook, 3 sc, 2 dec, 3 hdc, 6 ss, 3 hdc, 2 dec, 3 sc (22)
Row 13: ch, turn your work, starting from the second ch from the hook, 2 sc, 2 dec, 2 hdc, 6 ss, 2 hdc, 2 dec, 2 sc (18)
Rows 14-16: 2 ch, turn your work, starting from the third ch from the hook, 18 ss (18)
Fasten off.
Crochet the section marked with yellow markers, 25 stitches from right to left (looking at the front side). Crochet in turned rows.
Row 17: 25 sc (25)
Rows 18-19: ch, turn your work, starting from the second ch from the hook, 4 sc, 4 hdc, 9 ss, 4 hdc, 4 sc (25)
Row 20: ch, turn your work, starting from the second ch from the hook, 3 sc, 2 dec, 3 hdc, 5 ss, 3 hdc, 2 dec, 3 sc (21)
Row 21: ch, turn your work, starting from the second ch from the hook, 2 sc, 2 dec, 2 hdc, 5 ss, 2 hdc, 2 dec, 2 sc (17)
Rows 22-23: 2 ch, turn your work, starting from the second ch from the hook, 17 ss (17)
Fasten off.
Button Loops:
To watch the video on “How to Crochet Button Loops on the Body,” click on the green icon.
Row 1: Chain 33 (33)
Row 2: Starting from the third chain from the hook, crochet 5 ss in one loop, ss in the next loop. Repeat this pattern 8 times (8 button loops).
Row 3: Chain, turn your work, crochet 30 sc in the second chain from the hook (30).
Fasten off.
Count 30 stitches from the edge (where there are no button loops).
Straps for the Body (2 pieces):
Row 1: In the 30th stitch from the edge (working in turned rows), crochet 6 sc (6).
Rows 2-9: Chain, turn your work, crochet 6 sc in the second chain from the hook (6).
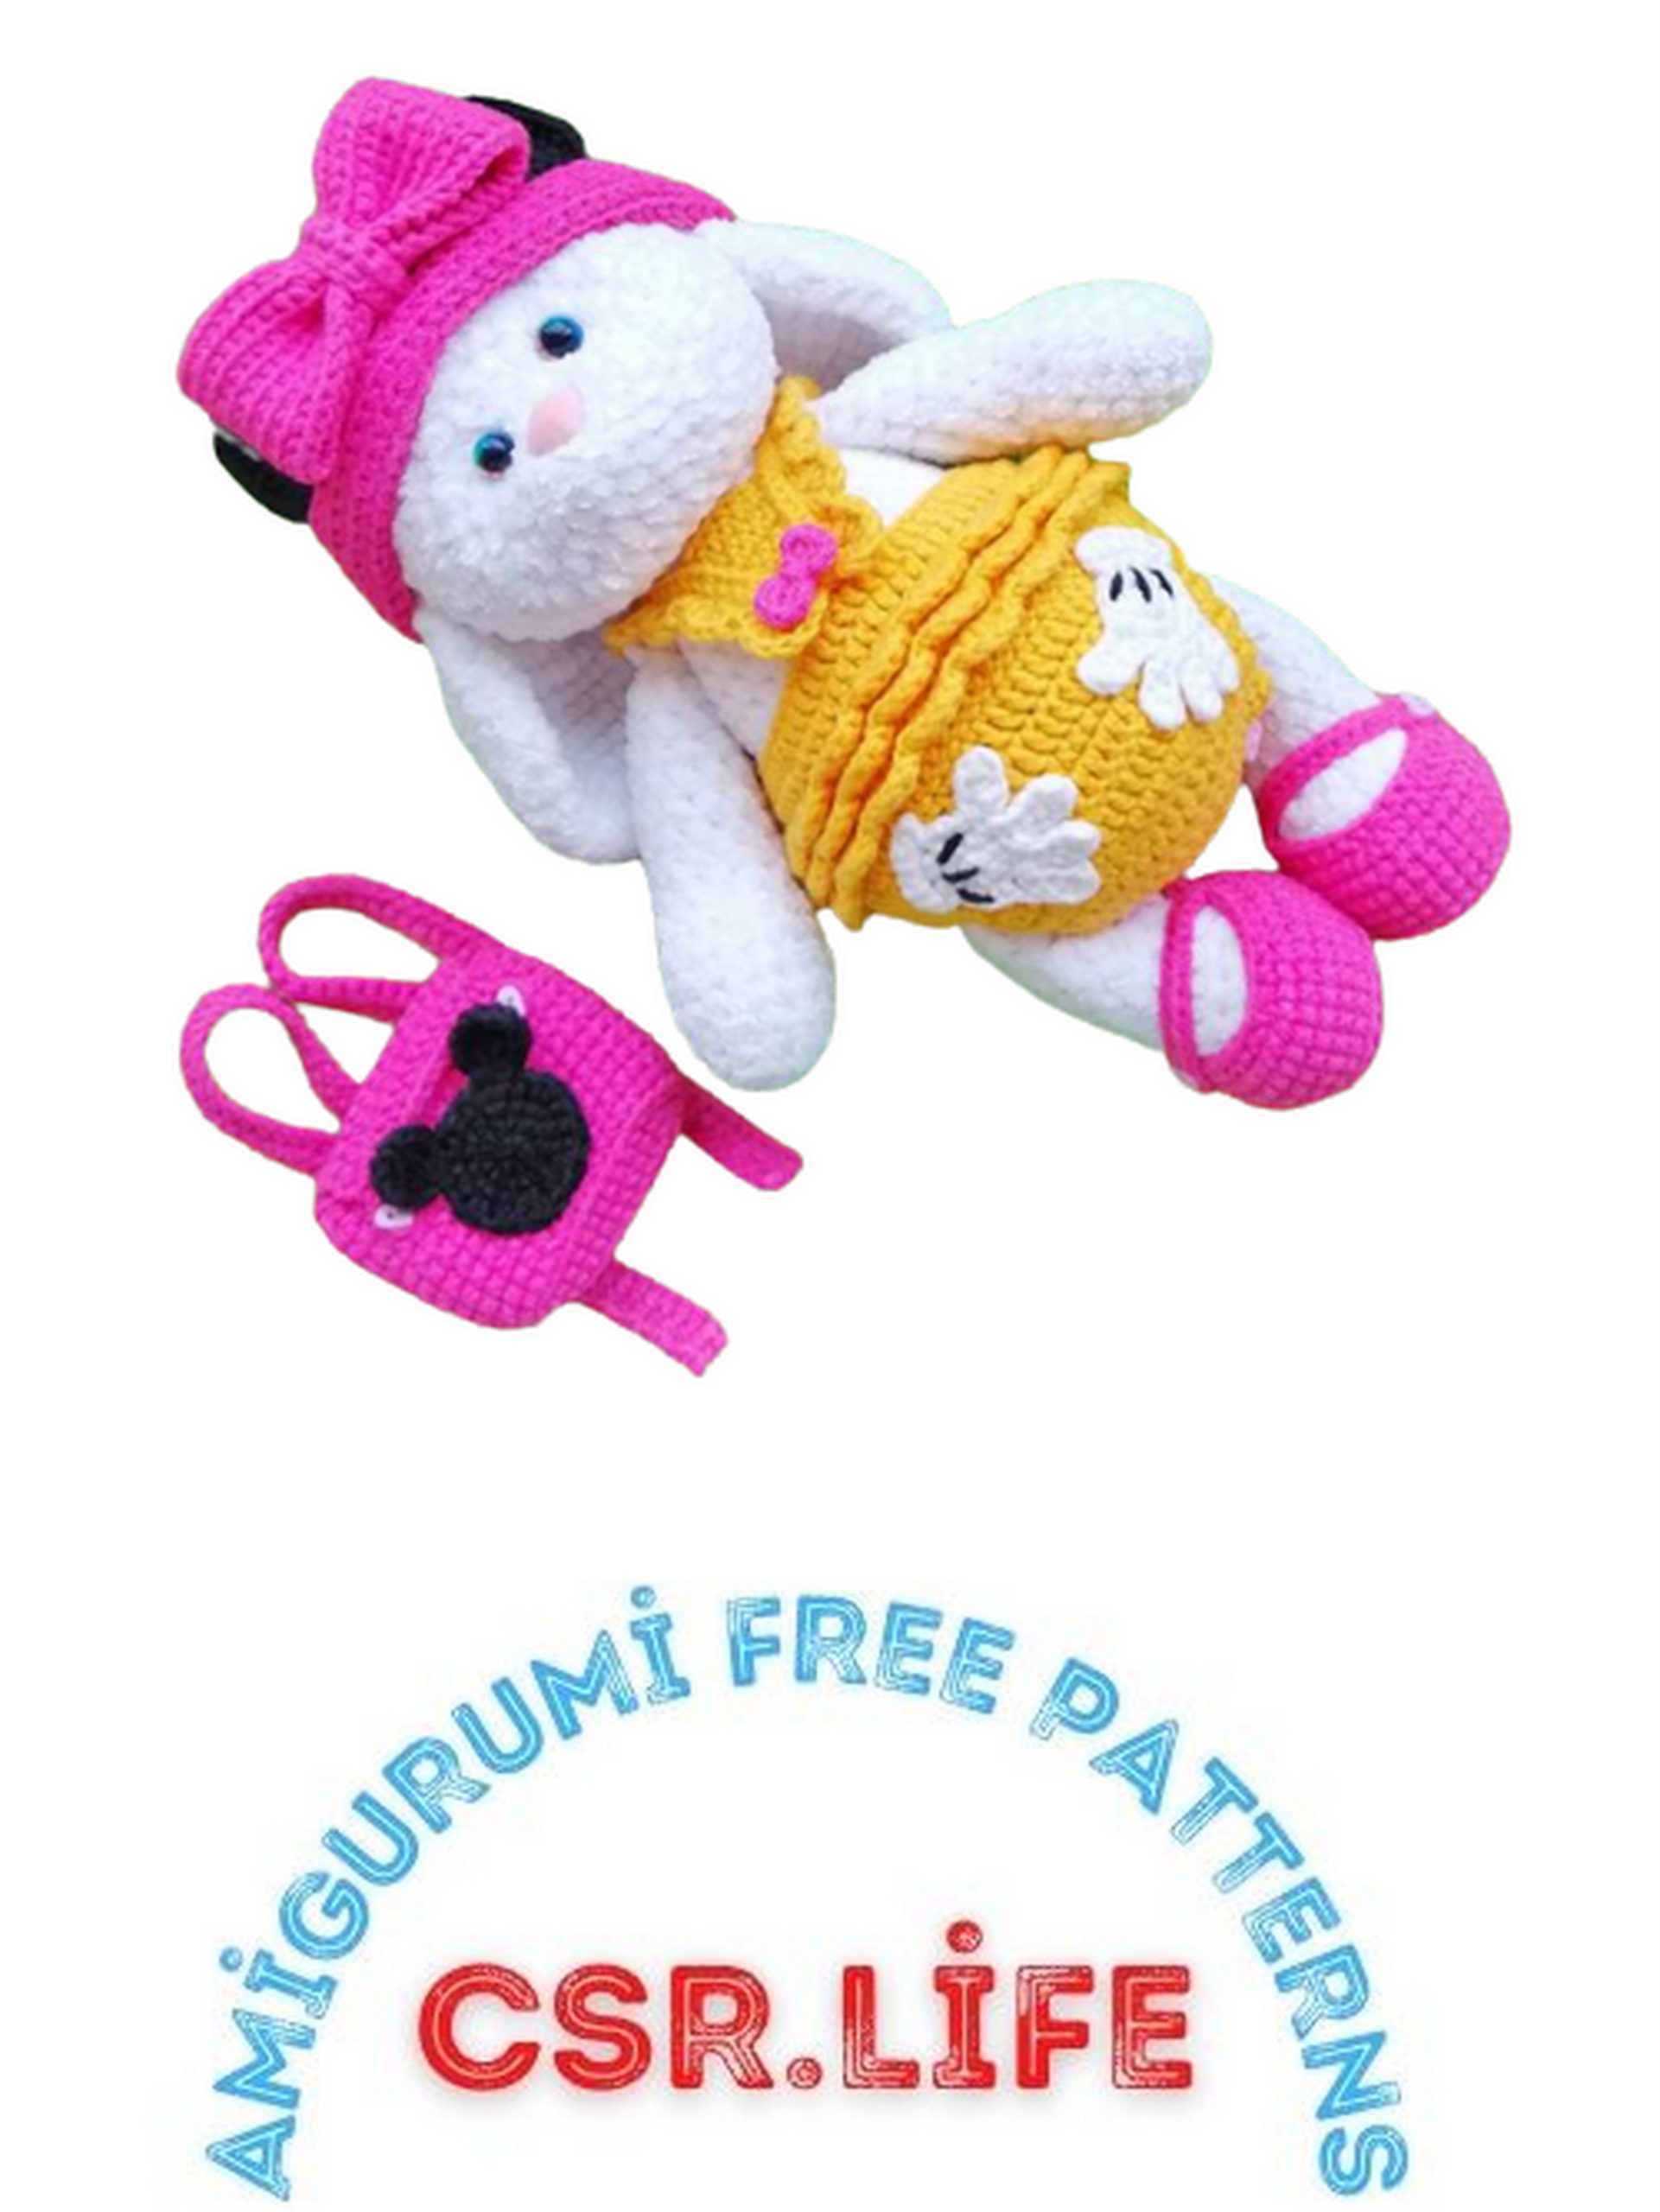
Sew the straps on the front, angling them as shown in the photo. Attach a button opposite each button loop.
Bow:
Chain 4, leaving a long tail.
In the very first chain, crochet a ss.
Crochet another ss in the same chain.
Chain 3.
Crochet a ss in the first chain.
Chain 3.
Crochet a ss in the first chain.
Chain 3.
Crochet 2 ss in the first chain.
Cut the yarn (leave a long tail), pull it through the loop. Wrap the middle of the bow with the tails, each in different directions, and tie a knot. Attach the bow to the body and hide the ends. Sew the straps at the back.
Right Glove:
Row 1: Magic ring (6)
Row 2: 6 inc (12)
Row 3: 5 ch (photo 1), in the second chain from the hook, 2 hdc (photo 2), 2 sc, ss (photo 3), 5 ch (photo 4), in the second chain from the hook, 2 hdc, 2 sc, ss (photo 5).
Gloves:
5 ch, in the second chain from the hook, 2 hdc, 2 sc, ss (photo 6), 5 ch, in the second chain from the hook, hdc, dec hdc, sc, ss (photo 7), 2 sc, inc, 2 sc, 5 ch, in the second chain from the hook, 2 hdc, 2 sc, ss (photo 8).
To watch the video on “How to Crochet the 4th Finger (photo 7),” click on the green icon.
Right Glove (Continued):
Turn your work, in the second chain from the hook, crochet sc, inc, sc, 3 sc in one loop (photo 9).
Left Glove:
Crochet the left glove similarly to the right glove but with slight modifications.
Row 1: Magic ring (6)
Row 2: 6 inc (12)
Row 3: sc, 4 ch, in the second chain from the hook, hdc, inc hdc, sc, ss, 5 ch, in the second chain from the hook, 2 hdc, 2 sc, ss, 5 ch, in the second chain from the hook, 2 hdc, 2 sc, ss, 5 ch, in the second chain from the hook, 2 hdc, 2 sc, 2 sc, inc, 2 sc, ch, turn your work, in the second chain from the hook, sc, inc, sc, ss.
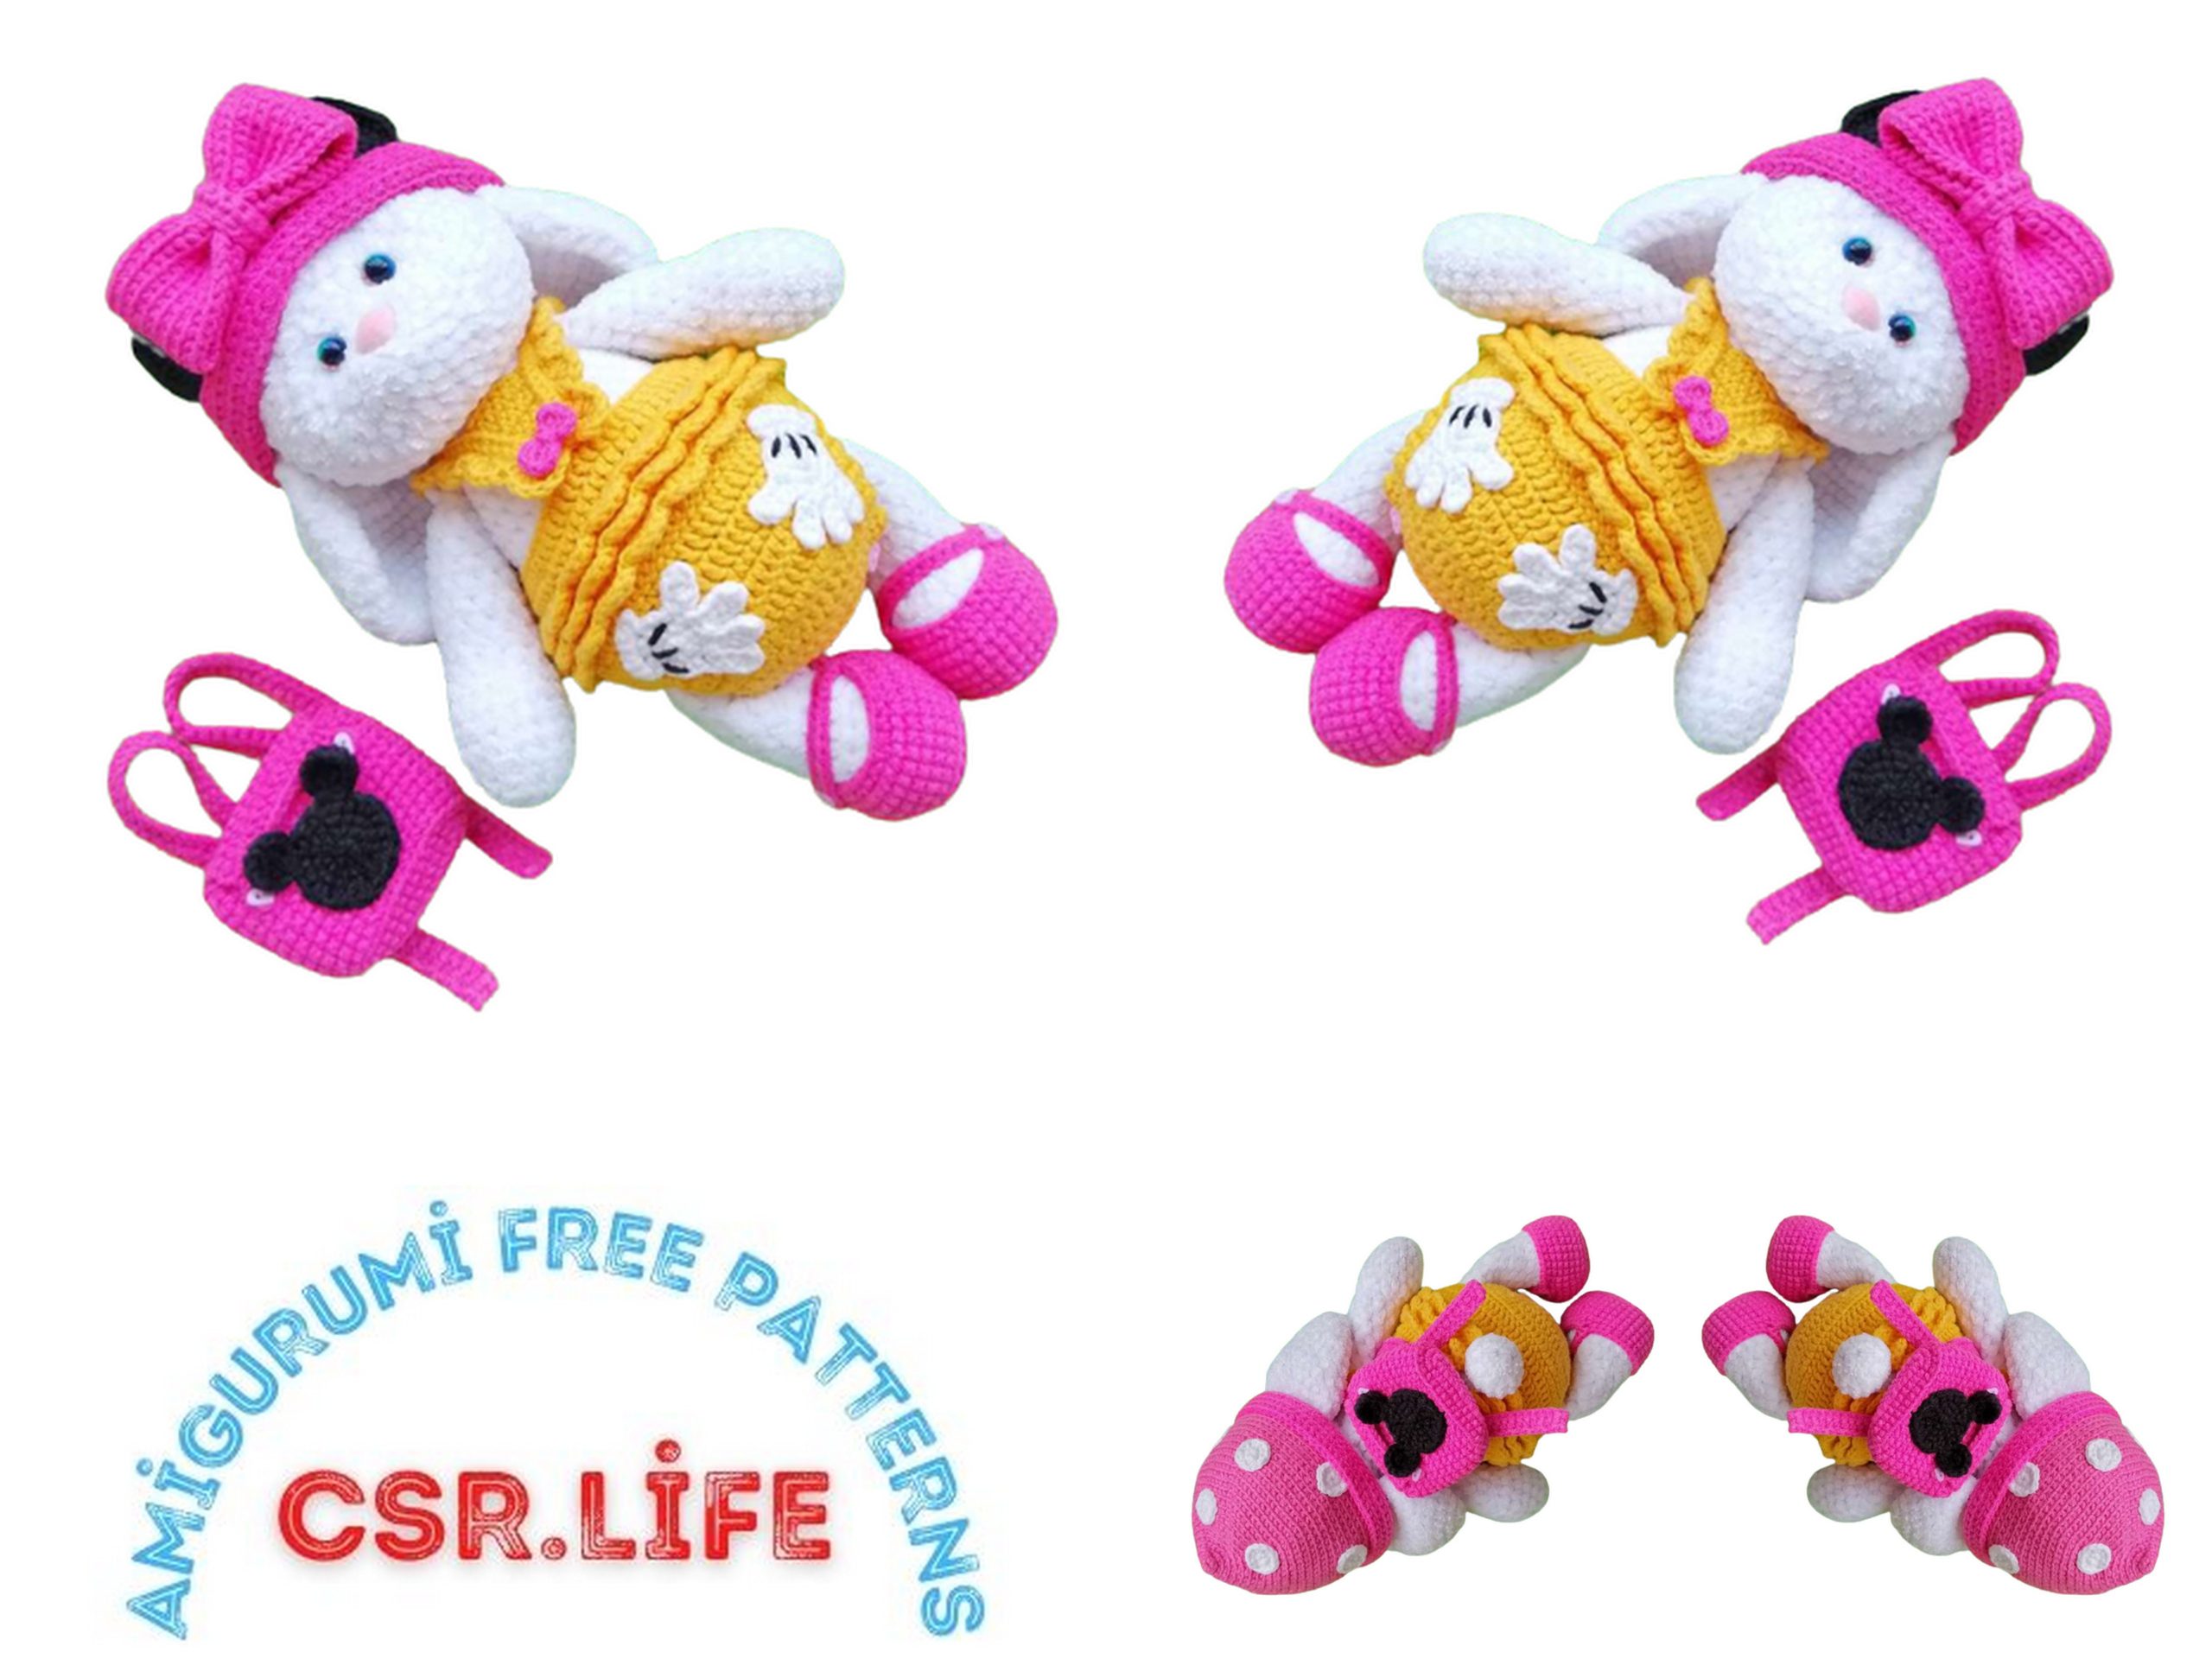
Backpack:
Row 1: Magic ring (6)
Row 2: 6 inc (12)
Row 3: (sc, inc)*6 (18)
Row 4: (2 sc, inc)*6 (24)
Row 5: (3 sc, inc)*6 (30)
Row 6: (4 sc, inc)*6 (36)
Row 7: (5 sc, inc)*6 (42)
Row 8: (6 sc, inc)*6 (48)
Row 9: (7 sc, inc)*6 (54)
Row 10: (8 sc, inc)*6 (60)
Row 11: (9 sc, inc)*6 (66)
Row 12: (10 sc, inc)*6 (72)
Row 13: (11 sc, inc)*6 (78)
Rows 14-24: 78 sc (78)
Row 25: (11 sc, dec)*6 (72)
Row 26: (10 sc, dec)*6 (66)
Row 27: 66 sc (66)
Fasten off.
You can make the backpack flap with the same or a different color. Crochet in the opposite direction, starting with the crown facing up, and continue in the back loop of the chain made from the air loops.
To watch the video on “How to Start the Backpack Flap,” click on the green icon.
Row 28: (10 sc, inc)*6 (72)
Row 29: 72 sc (72)
Row 30: (11 sc, inc)*6 (78)
Row 31: 78 sc (78)
Bow for Backpack:
Crochet the bow for the backpack in rounds, working in the back loop of the chain made from the air loops.
Row 1: Chain 50, join with a ss to form a ring (50)
Bow (Continued):
Rows 2-9: 50 sc (50)
Fasten off. Cinch the bow.
To watch the video on “How to Cinch a Bow,” click on the green icon.
Bow Tie for the Bow:
Row 1: Chain 14, in the second chain from the hook, crochet 13 sc (13)
Row 2: Chain, turn your work, in the second chain from the hook, crochet 13 sc (13)
Sew the tie to the back of the bow.
Ears (2 pieces):
Row 1: Magic ring (6)
Row 2: 6 inc (12)
Row 3: (sc, inc)*6 (18)
Row 4: (2 sc, inc)*6 (24)
Row 5: (3 sc, inc)*6 (30)
Row 6: (4 sc, inc)*6 (36)
Row 7: (5 sc, inc)*6 (42)
Sew the ears to the hat.
Peas:
Row 1: Magic ring (6)
Row 2: 6 inc (12)
Close and sew on freely. I have 8 peas on the hat.
To watch the video on “How to Crochet and Attach Peas,” click on the green icon.
Left Boot:
Row 1: 6 ch (6)
Row 2: Starting from the second chain from the hook, crochet 4 sc, 3 sc in one loop, 4 sc, 3 sc in one loop (14)
Row 3: 4 sc, 3 inc, 4 sc, 3 inc (20)
Row 4: 4 sc, (sc, inc)*3, 4 sc, (sc, inc)*3 (26)
Row 5: Crochet through the back loop of the chain made from the air loops, 26 sc (26)
Rows 6-15: 26 sc (26)
Row 16: 9 sc, (sc, dec)*3, 9 sc, (sc, dec)*3 (30)
Row 17: 12 sc (12)
Row 18: Chain, turn your work, in the second chain from the hook, crochet 13 sc (13)
Row 19: Chain, turn your work, in the second chain from the hook, crochet 13 sc (13)
Attach buttons.
Right Boot:
Row 1: 27 ch (27)
Row 2: In the 8th chain from the hook, crochet 27 sc.