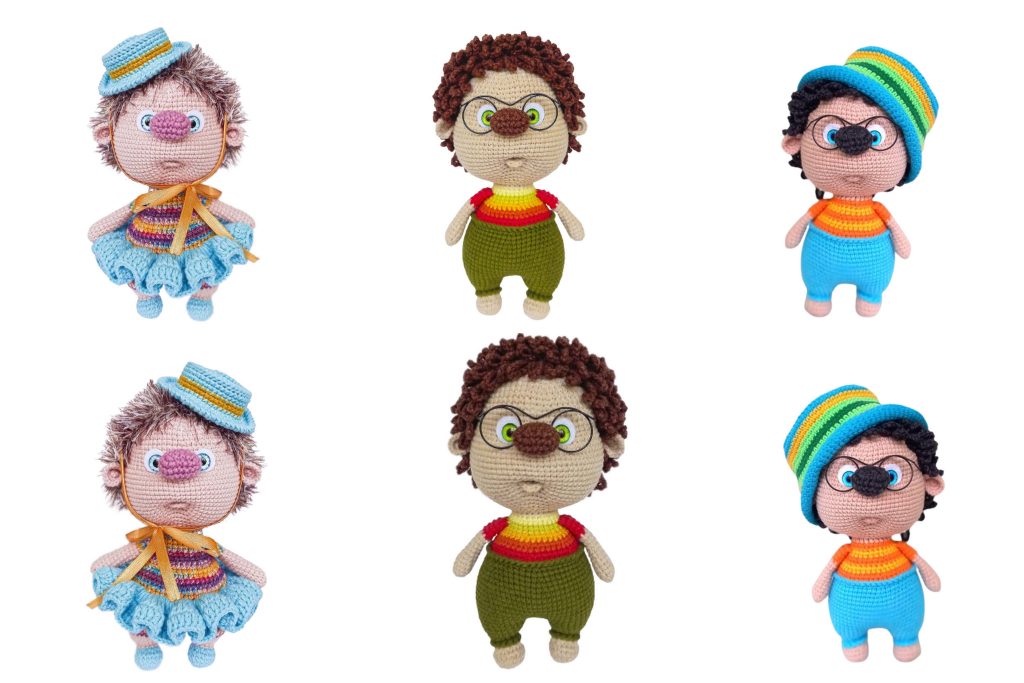
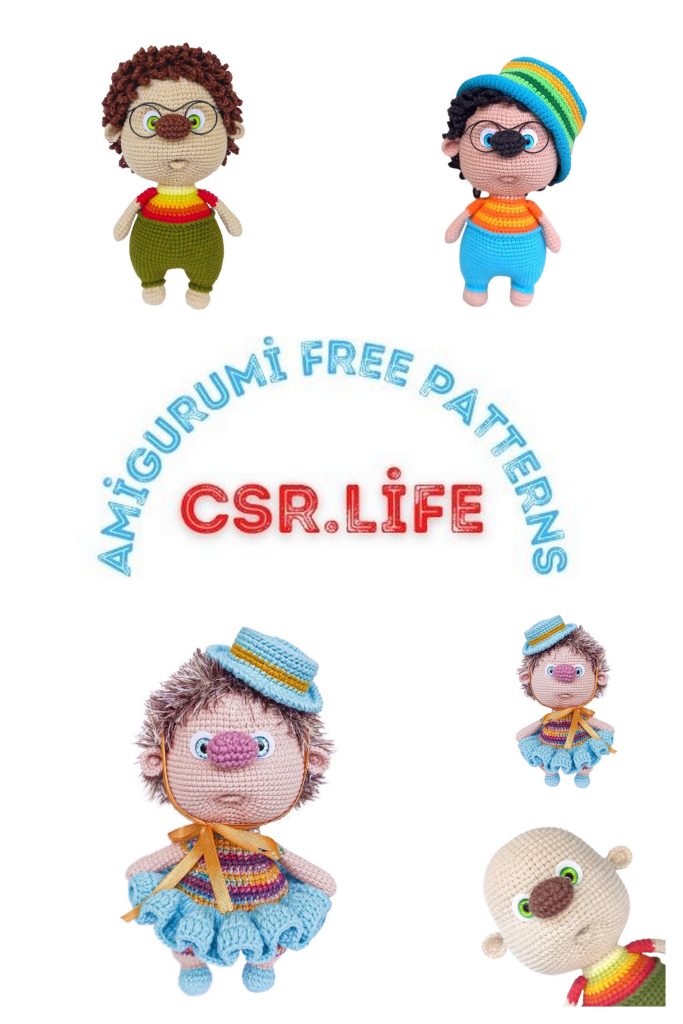
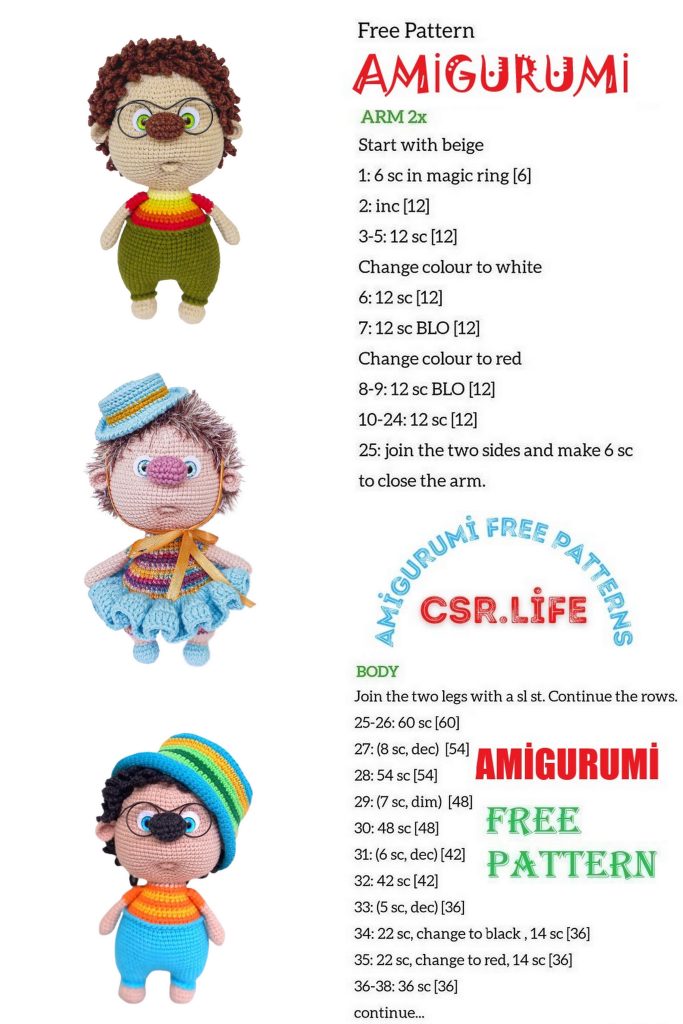
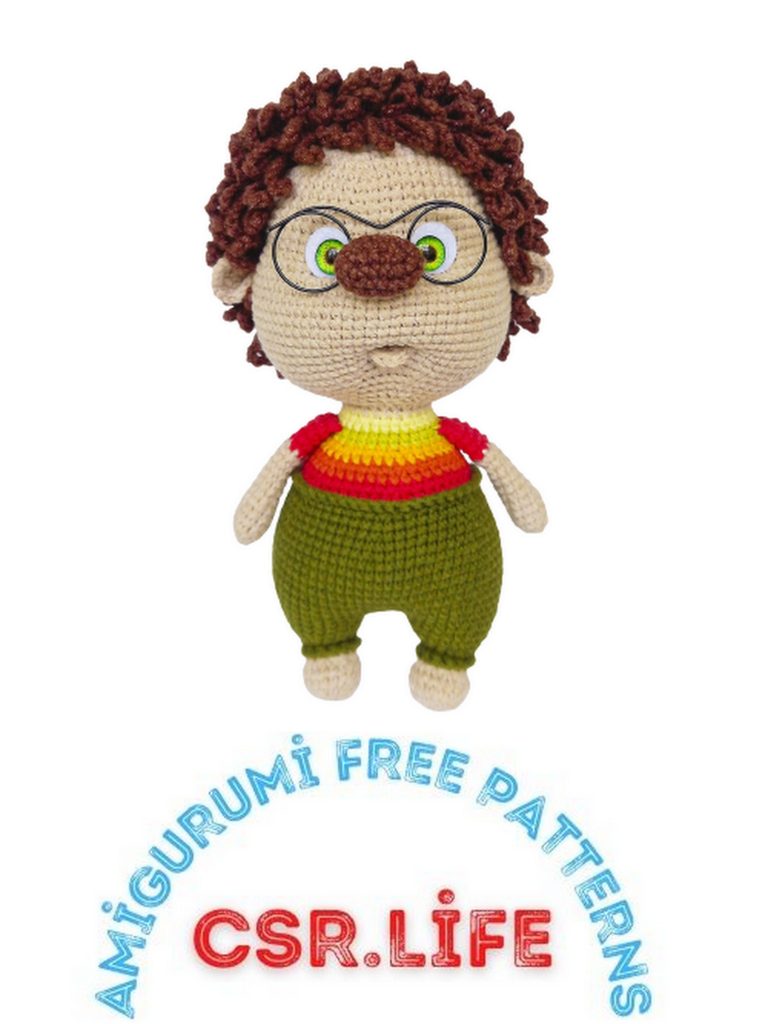
Free Amigurumi Cute Hedgehogs Pattern – Crochet Adorable Hedgehog Toys
Are you ready to create cute toys with a free amigurumi hedgehogs pattern? Learn how to crochet adorable hedgehog toys step by step in this guide, complete with a free pattern. Enjoy the satisfaction of crafting your handmade toys.
The world of amigurumi is one of the most enjoyable ways to create cute and unique toys. In this guide, we’ll teach you how to make adorable hedgehog amigurumis. What’s more, we’re sharing this fantastic pattern with you for free. So, grab your needle and yarn, and let’s start crafting your very own adorable hedgehog toys!
This master class contains a complete description of the toy crocheting process, intermediate photos of details.
The toy is crocheted from the bottom up, in “half-crosses,” in a spiral (unless otherwise specified). The upper paws and nose are crocheted, the head and ears are sewn on. Needles are crocheted separately, as a “wig.” The wig is sewn on. Clothing is non-removable and crocheted directly on the toy.
When using the specified materials, the height of the finished toy is approximately 20 cm.
Mark the beginning of each row with a contrasting thread thinner than the one you use to crochet the toy.
This description does not contain instructional lessons and is intended for those who already have basic crochet skills.
This description is my author’s development and is absolutely FREE.
You are free to use the toys created from this description as you see fit.
When publishing photos of finished work, I would appreciate it if you mention me as the author of the description.
Materials and tools needed:
A crochet hook suitable for your yarn.
YarnArt JEANS yarn in your choice of colors. I used No. 87 as the main color and No. 70 for the nose and needles.
Stuffing.
Safety eyes with a 10 mm attachment or sew-on or adhesive eyes (beads or half-beads – your choice).
White felt circles with a diameter of 15 mm for the eyes.
Needle for sewing details, scissors, pins, marking thread. Strong thread for tightening.
I used Yarnart Jeans for pants No. 82; for the shirt: 29, 11, 90, 35.
As an additional accessory, you can take ready-made glasses 57-60 mm wide.
Abbreviations:
MR – magic ring
sc – single crochet
hdc – half double crochet
ch – chain
sl st – slip stitch
(…) *X – repeat X times the instructions in parentheses
The number after the equal sign (=) indicates the final stitch count for the row.
PATTERN

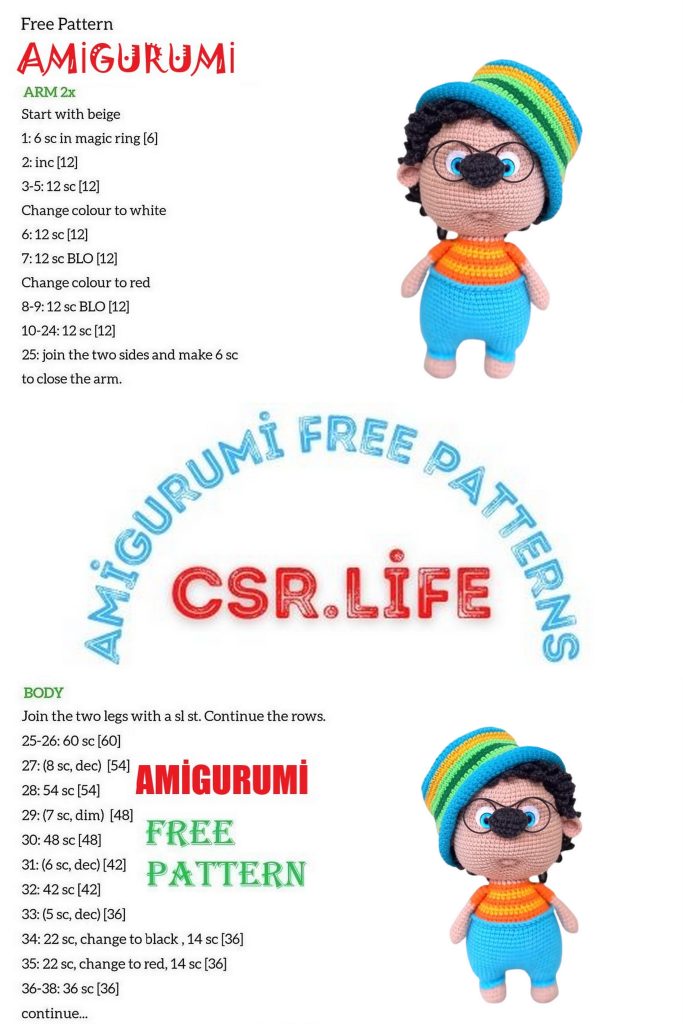
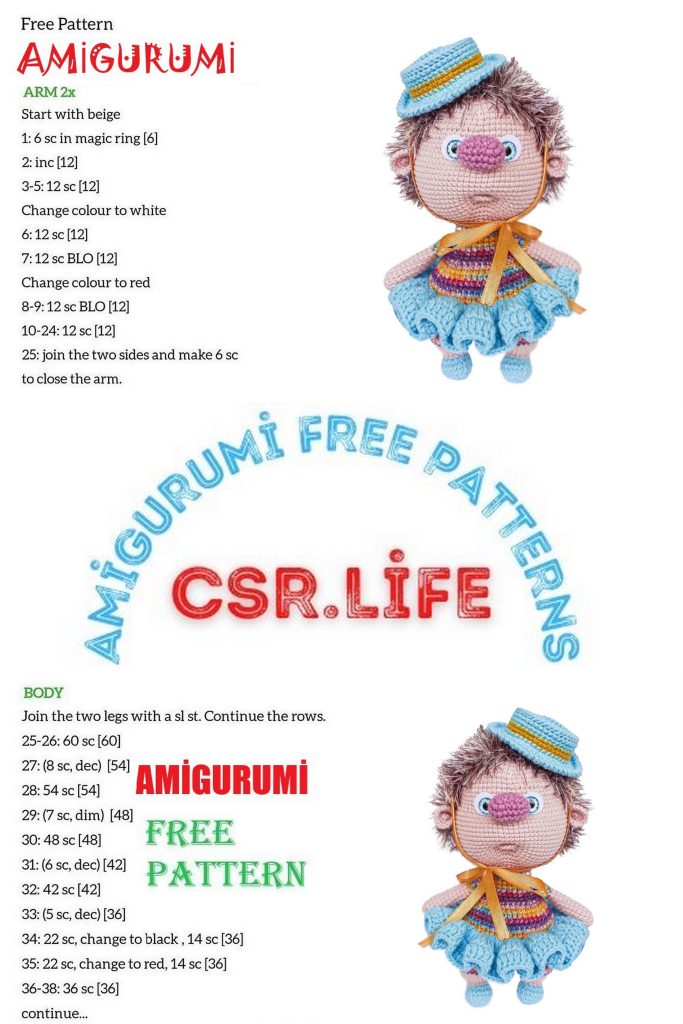
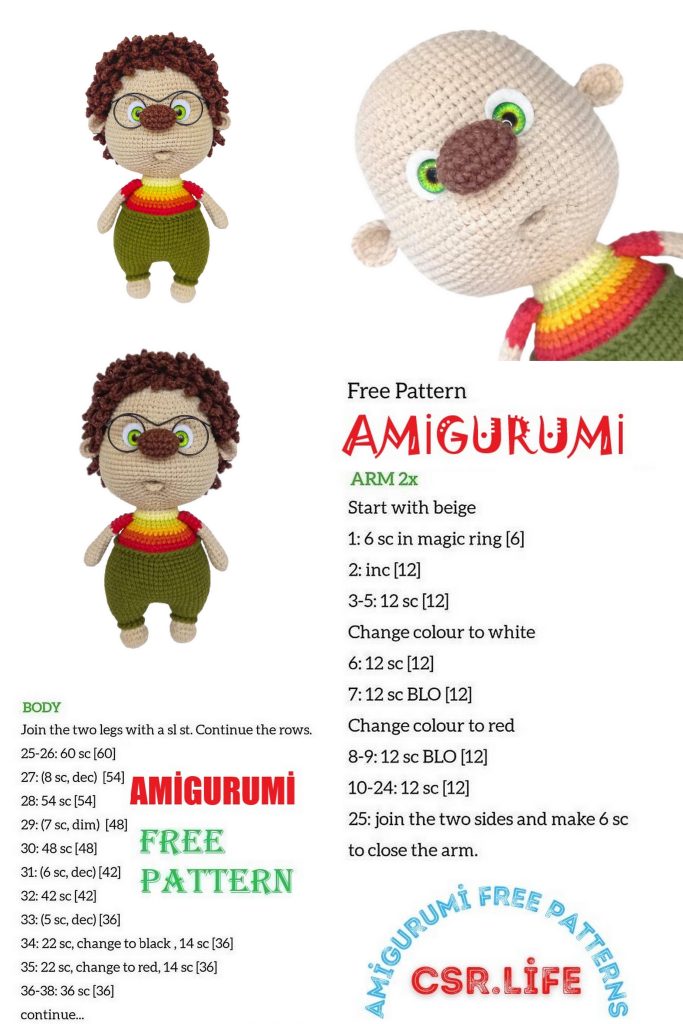
Upper Paws
Row 1: 5 sc in MR (magic ring).
Row 2: 5 inc (increase) = 10.
Rows 3-12: 10 sc each.
In row 13, change the yarn color for the sleeves.
Rows 13-16: 10 sc each.
Only stuff the lower part of the paw. Fold it in half and crochet 5 sc through both sides. Secure the thread and cut it.
The paws will be crocheted on.
Nose
Start with a chain of 5, and in the second chain from the hook, crochet:
Row 1: 1 inc, 2 sc, 4 sc in 1 stitch, 2 sc, 1 inc = 12.
Row 2: 2 inc, 2 sc, 4 inc, 2 sc, 2 inc = 20.
Rows 3-4: 20 sc each.
Row 5: 10 dec (decrease).
Secure the thread and cut it.
The nose will be crocheted on.
Head
Row 1: 6 sc in MR.
Row 2: 6 inc = 12.
Row 3: (1 sc, inc) * 6 = 18.
Row 4: (2 sc, inc) * 6 = 24.
Row 5: (3 sc, inc) * 6 = 30.
Row 6: (4 sc, inc) * 6 = 36.
Row 7: (5 sc, inc) * 6 = 42.
Row 8: (6 sc, inc) * 6 = 48.
Row 9: (7 sc, inc) * 6 = 54.
Row 10: (8 sc, inc) * 6 = 60.
Rows 11-12: 60 sc each.
Row 13: (9 sc, inc) * 6 = 66.
Rows 14-18: 66 sc each.
In the next row, we will create cheeks and crochet the nose.
Row 19: 19 sc, (1 sc, inc) * 6, 5 sc with 5 stitches from the nose, (inc, 1 sc) * 6, 18 sc = 78.
Row 20: 37 sc, 5 sc in the remaining nose stitches, 36 sc = 78.
Lightly stuff the nose.
Rows 21-30: 78 sc each.
If you are using safety eyes, install them at this stage. For instructions on how to do this, see the addendum after the main text. In this master class, I will use adhesive eyes.
Row 31: (11 sc, dec) * 6 = 72.
Row 32: (7 sc, dec) * 8 = 64.
Row 33: (6 sc, dec) * 8 = 56.
Row 34: (5 sc, dec) * 8 = 48.
Row 35: (4 sc, dec) * 8 = 40.
Row 36: (3 sc, dec) * 8 = 32.
Row 37: (2 sc, dec) * 8 = 24.
Stuff the head tightly but not excessively.
Keep in mind that there will be tightening. Secure the thread and hide it inside.
Lower Paws
Row 1: 6 sc in MR.
Row 2: 6 inc = 12.
Row 3: (1 sc, inc) * 6 = 18.
Rows 4-5: 18 sc each.
Row 6: 3 sc, 6 dec, 3 sc = 12.
Change the yarn color for the pants.
Row 7: 12 sc.
The next row is crocheted in the back loops only.
Row 8: 12 sc.
Row 9: (1 sc, inc) * 6 = 18.
Row 10: 18 sc.
Row 11: (2 sc, inc) * 6 = 24.
Row 12: 24 sc.
On the first leg, crochet an additional 6 sc, secure the thread, and cut it. Count back 12 sc, place a marker. This is the point where you will attach the second leg.
On the second leg, crochet an additional 6 sc, but do not cut the thread.
(Note: The translation might not perfectly match the original format due to differences in grammar and formatting between languages.)
Body
Stuff the body tightly during the crochet process.
Crochet a chain of 3 ch, connect the second leg to the first one in the previously marked loop.
Row 1: 24 sc around the first leg, 3 sc in the chain of ch, 24 sc around the second leg, 3 sc in the chain of ch.
Total number of stitches in the row = 54.
Place a marker thread.
Row 2: (8 sc, inc)*6 = 60.
Row 3: 60 sc.
Row 4: (9 sc, inc)*6 = 66.
Rows 5-11: 66 sc.
Row 12: (9 sc, dec)*6 = 60.
Row 13: 60 sc.
Row 14: (8 sc, dec)*6 = 54.
Row 15: 54 sc.
Row 16: (7 sc, dec)*6 = 48.
Starting from row 17, we will crochet the shirt. Stripes alternate every 2 rows.
Row 17: 48 sc in the back loops = 48.
Row 18: (6 sc, dec)*6 = 42.
Change color.
Row 19: 42 sc.
Change color.
Row 20: (5 sc, dec)*6 = 36.
Change color.
Row 21: 36 sc.
Row 22: (4 sc, dec)*6 = 30.
Change color.
Row 23: 30 sc.
In row 24, we will crochet the upper paws. Stuff the main part of the body quite tightly but not completely. Leave about 1 cm to make it convenient when attaching the paws, and to prevent the filler from getting between the stitches.
Determine the attachment points strictly on the sides: 5 sc together with the paws, and 10 sc between them.
Considering my displacement, it turned out like this:
Row 24: 6 sc, 5 sc together with the paw, 10 sc, 5 sc together with the paw, 4 sc = 30.
Change color.
Row 25: 30 sc.
Row 26: (3 sc, dec)*6 = 24.
Change the yarn color to match the body.
Row 27: 24 sc.
If necessary, crochet a few more stitches (for me, it was 1 sc and sl st in the next loop), and secure the thread at the back in the center of the back. Leave about 50 cm for sewing the head. Remove the marker thread. Stuff the part tightly.
At this stage, we will crochet the pants without increases.
Crochet 8 rows of stitches around the remaining loops on the outside of the legs while holding the toy with the legs towards you.
For the upper part of the pants, crochet around the remaining loops of the 17th row from the outside while holding the toy with the legs away from you.
Sew the head. When sewing, don’t forget to stuff the neck. For convenience, you can secure the head to the body with a knitting needle.
Shaping
Shape the details independently, whether you are using glass or adhesive eyes. As an example, the diagram for shaping the bear’s face is provided.
Create the mouth and eye sockets using shaping. Mark 6 points on the face with pins.
Determine the center of the face. You can do this by attaching a thread, knitting needle, or needle downwards from the center of the nose. Place marks between rows 29 and 30.
Place 2-3 stitches between the pins.
Insert the needle into point 1, leaving about 25-30 cm of thread, and bring it out at point 2. Then, go to point 3 and bring it out at point 6.
Adjust the thread so that it is under the eye and the felt circle, pull it tight, and tie two knots. Without cutting the thread, insert it into point 6, bring it out at point 5, then go to point 4 and bring it out at point 1. Pull tight and tie a couple of knots. Hide the threads inside the head. You can carefully apply some clear universal glue to the last knot and the points where the thread is inserted and pulled out.
Follow the same principle to create shaping for adhesive eyes.
Ears
Row 1: 6 sc in a magic ring.
Row 2: 6 inc = 12.
Row 3: (1 sc, inc)*6 = 18.
Secure the thread, leaving about 45-50 cm for sewing, and cut it.
Attaching the Ears
Fold the ears in half, make 1-2 stitches at the base, and attach them behind the 21st row (from the top of the head). Crochet 42 sc between the ears (count from the 21st row). To attach the pieces symmetrically, orient yourself on the center of the nose. Secure the thread, hiding it inside the head.
Lower Lip
Leave a thread tail of about 30 cm, make 6 sc in a magic ring, pull tight. Leave a thread tail of about 40-45 cm, cut the thread. The resulting piece should be roughly semicircular in shape. Fit the piece and attach it about 2-3 rows below the shaping of the mouth. Secure the middle of the lip slightly below the edges. When sewing, the thread tension should be moderate, not too tight. Do not pull too hard. Pull the middle thread through the back of the head (in a magic ring) and back through any neighboring stitch. You can repeat this step. Make the stitch tight but not too tight. Hide the thread inside the head with a few loop stitches. Use the second thread tail to secure both ends of the lip. Make stitches upward and backward. Bring it to the nose attachment point (between rows 18 and 19). Thanks to the shaping, these stitches will not be noticeable.
Attaching the Eyes
First, glue the eyes to the felt circles, and then attach them to the face. Use clear universal glue, such as “Moment Crystal.”
Hairpiece
Option 1 (using YarnArt JEANS)
Crochet the entire hairpiece through the back loops of the stitches.
Row 1: 6 sc in a magic ring.
Row 2: 6 inc = 12.
Row 3: (1 sc, inc)*6 = 18.
Row 4: (2 sc, inc)*6 = 24.
Row 5: (3 sc, inc)*6 = 30.
Row 6: (4 sc, inc)*6 = 36.
Row 7: (5 sc, inc)*6 = 42.
Row 8: (6 sc, inc)*6 = 48.
Row 9: (7 sc, inc)*6 = 54.
Row 10: (8 sc, inc)*6 = 60.
11-12 Rows: 60 sc.
Fit the resulting “cap” onto the toy. It should reach the ears. If needed, you can crochet (or not crochet) the required number of additional rows. Do not cut the thread; continue. Turn the hairpiece with the inner side facing you. We will crochet “needles” in the opposite direction. Form the “needles” from chains. Attach the chains to the remaining loops on the outside with slip stitches. You can make the length of each “needle” as desired, anywhere from 10 to 15 chains. In my case, it’s 12 chains. If you plan to put a hat on the hedgehog later, make the chains shorter.
Start by making 12 chains and secure the “needle” in the next slip stitch loop. For the next “needle,” make a slip stitch in the next loop, then make another chain of 12 and secure it in the next slip stitch loop. Continue crocheting until you reach the center. To make the top of the head look neater, you can make the last few “needles” 2-3 loops shorter.
Option 2 (using YarnArt SAMBA)
Crochet the entire hairpiece in “checkmarks.”
Row 1: 6 sc in a magic ring.
Row 2: 6 inc = 12.
Row 3: (1 sc, inc)*6 = 18.
Row 4: (2 sc, inc)*6 = 24.
Row 5: (3 sc, inc)*6 = 30.
Row 6: (4 sc, inc)*6 = 36.
Row 7: (5 sc, inc)*6 = 42.
Row 8: (6 sc, inc)*6 = 48.
Afterward, crochet without increases. Fit the hairpiece as you go, determining the forehead height according to your preference. The hairpiece should reach the ears. If your tension matches mine, you will have another 6 rows. If this is too much or not enough, adjust the number of rows as needed.
9-14 Rows: 48 sc.
Put the hairpiece on the toy’s head, secure it with pins, and sew it on. Your hedgehog is ready!
Addendum 1
Adding Safety Eyes
Install the safety eyes between rows 17 and 18, leaving 6-8 single crochets between the installation points. Center the eyes relative to the nose.
Take felt circles. Carefully fold them in half to make small notches, slightly shifting them from the center to the edge.
Rotate the circles and make perpendicular notches (resulting in a cross pattern).
Insert the safety eyes through the notches and secure them in the fabric.
Later, after making the shaping, you can securely fix the felt with glue.
Addendum 2
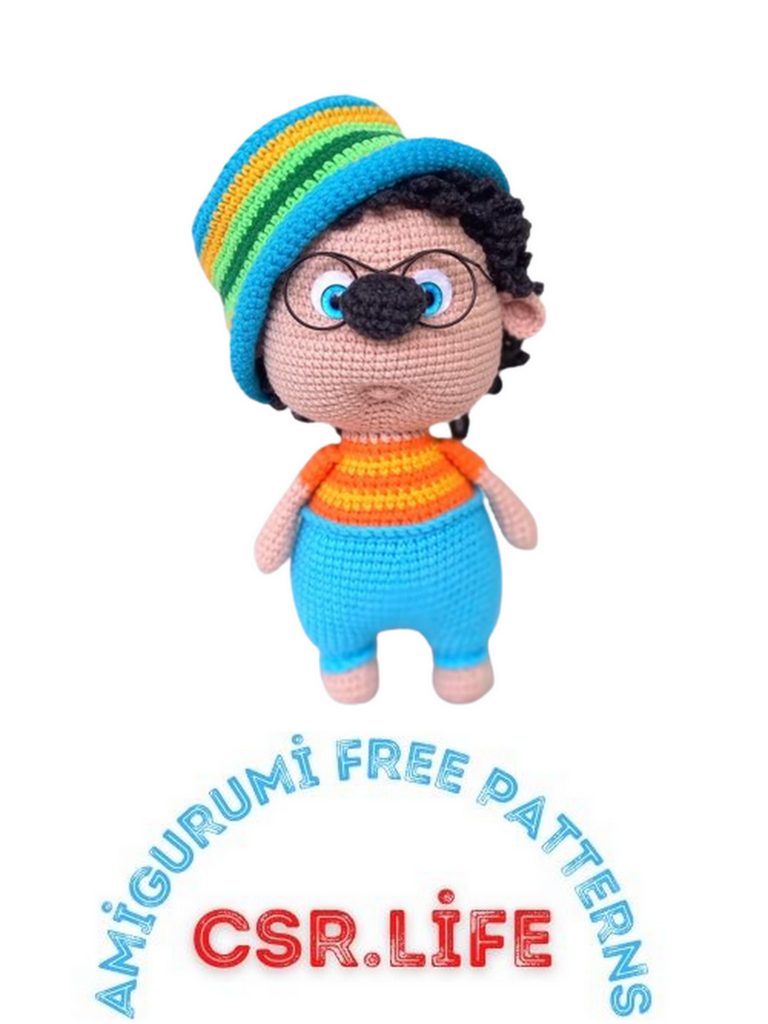
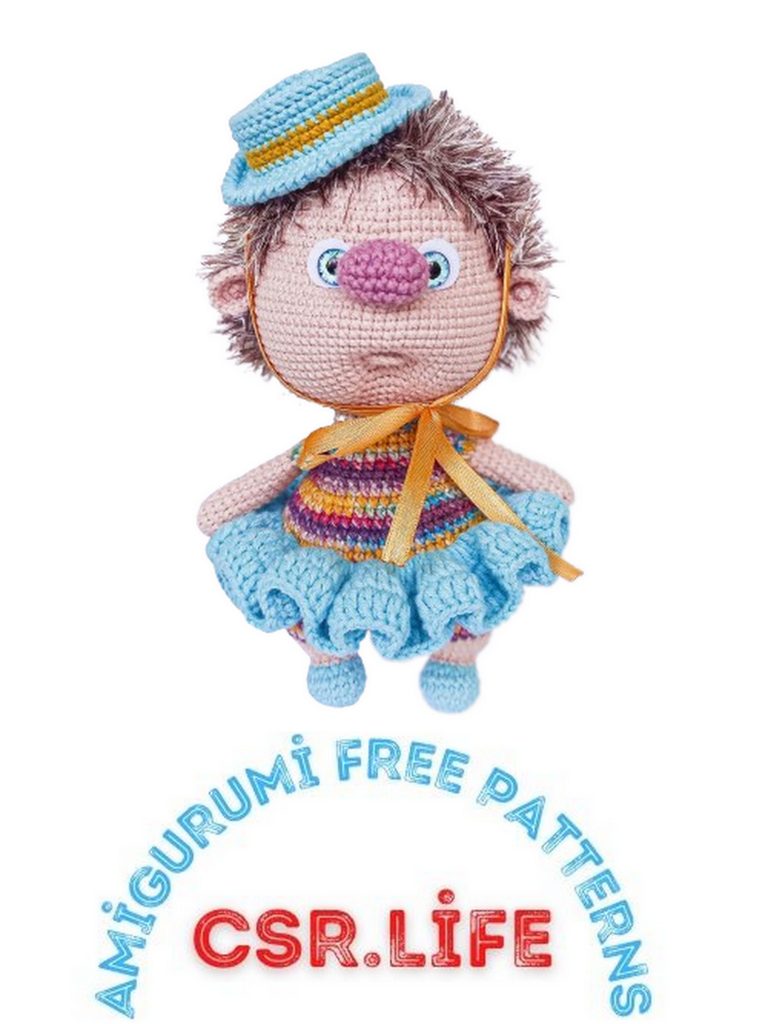
Vasilisa
For Vasilisa, I used YarnArt JEANS yarn. For the body, use No. 83, for the nose 65, for the shoes, skirt, and hat 81, and for the hat stripe 84. Bodysuit: YarnArt Jeans Splash No. 943.
The hairpiece is made from YarnArt SAMBA No. 99.
Change the color for the shoes in the 7th row. Crochet the 8th row in the usual way through both loops.
Change the color of the legs to the body color when connecting the legs, starting from the chain of chains.
In the 13th row of the body, crochet through the back loops of the half-double crochets.
Skirt
Crochet the skirt by inserting the hook into the remaining loops of the half-double crochets in the 13th row of the body, with single crochets:
Row 1: 2 sc in each half-double crochet = 120.
Row 2: 2 sc in each half-double crochet = 240.
Row 3: 240 sc.
Hat
Row 1: 6 sc in a magic ring.
Row 2: 6 inc = 12.
Row 3: (inc, 1 sc)*6 = 18.
Row 4: (2 sc, inc)*6 = 24.
Row 5: (inc, 3 sc)*6 = 30.
Row 6: (2 sc, inc, 2 sc)*6 = 36.
Row 7: (4 sc, inc, 1 sc)*6 = 42.
Row 8: 42 sc through the back loops (or use single crochet stitches without increases).
9-10 Rows: 42 sc.
Change the color.
11-12 Rows: 42 sc.
Change the color.
13th Row: 42 sc.
The next row (14th row) is crocheted through the front loops:
14th Row: (6 sc, inc)*6 = 48.
Continue in the usual way:
15th Row: (inc, 7 sc)*6 = 54.
16th Row: (2 sc, inc, 6 sc)*6 = 60.
17th Row: 60 crab stitch loops.
You can secure the hat on the head with ribbons, decorative (including crocheted) cords, elastic, etc. You can decorate it with flowers, beads, crochet around the edges, or sew lace to the brim.
I sincerely hope you enjoyed both the process and the result!