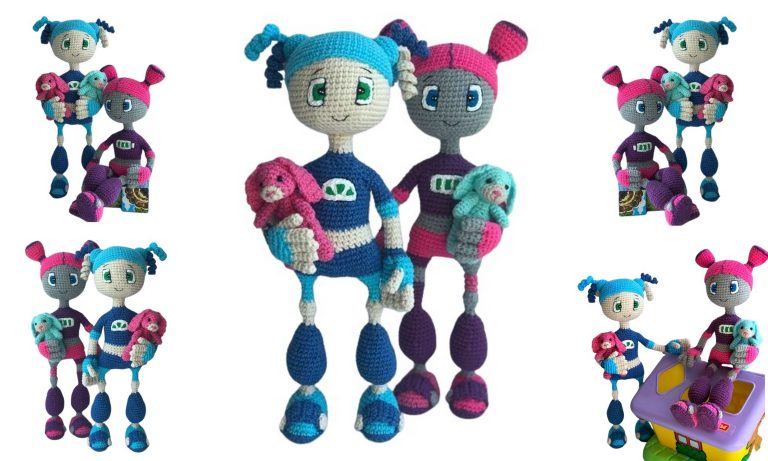
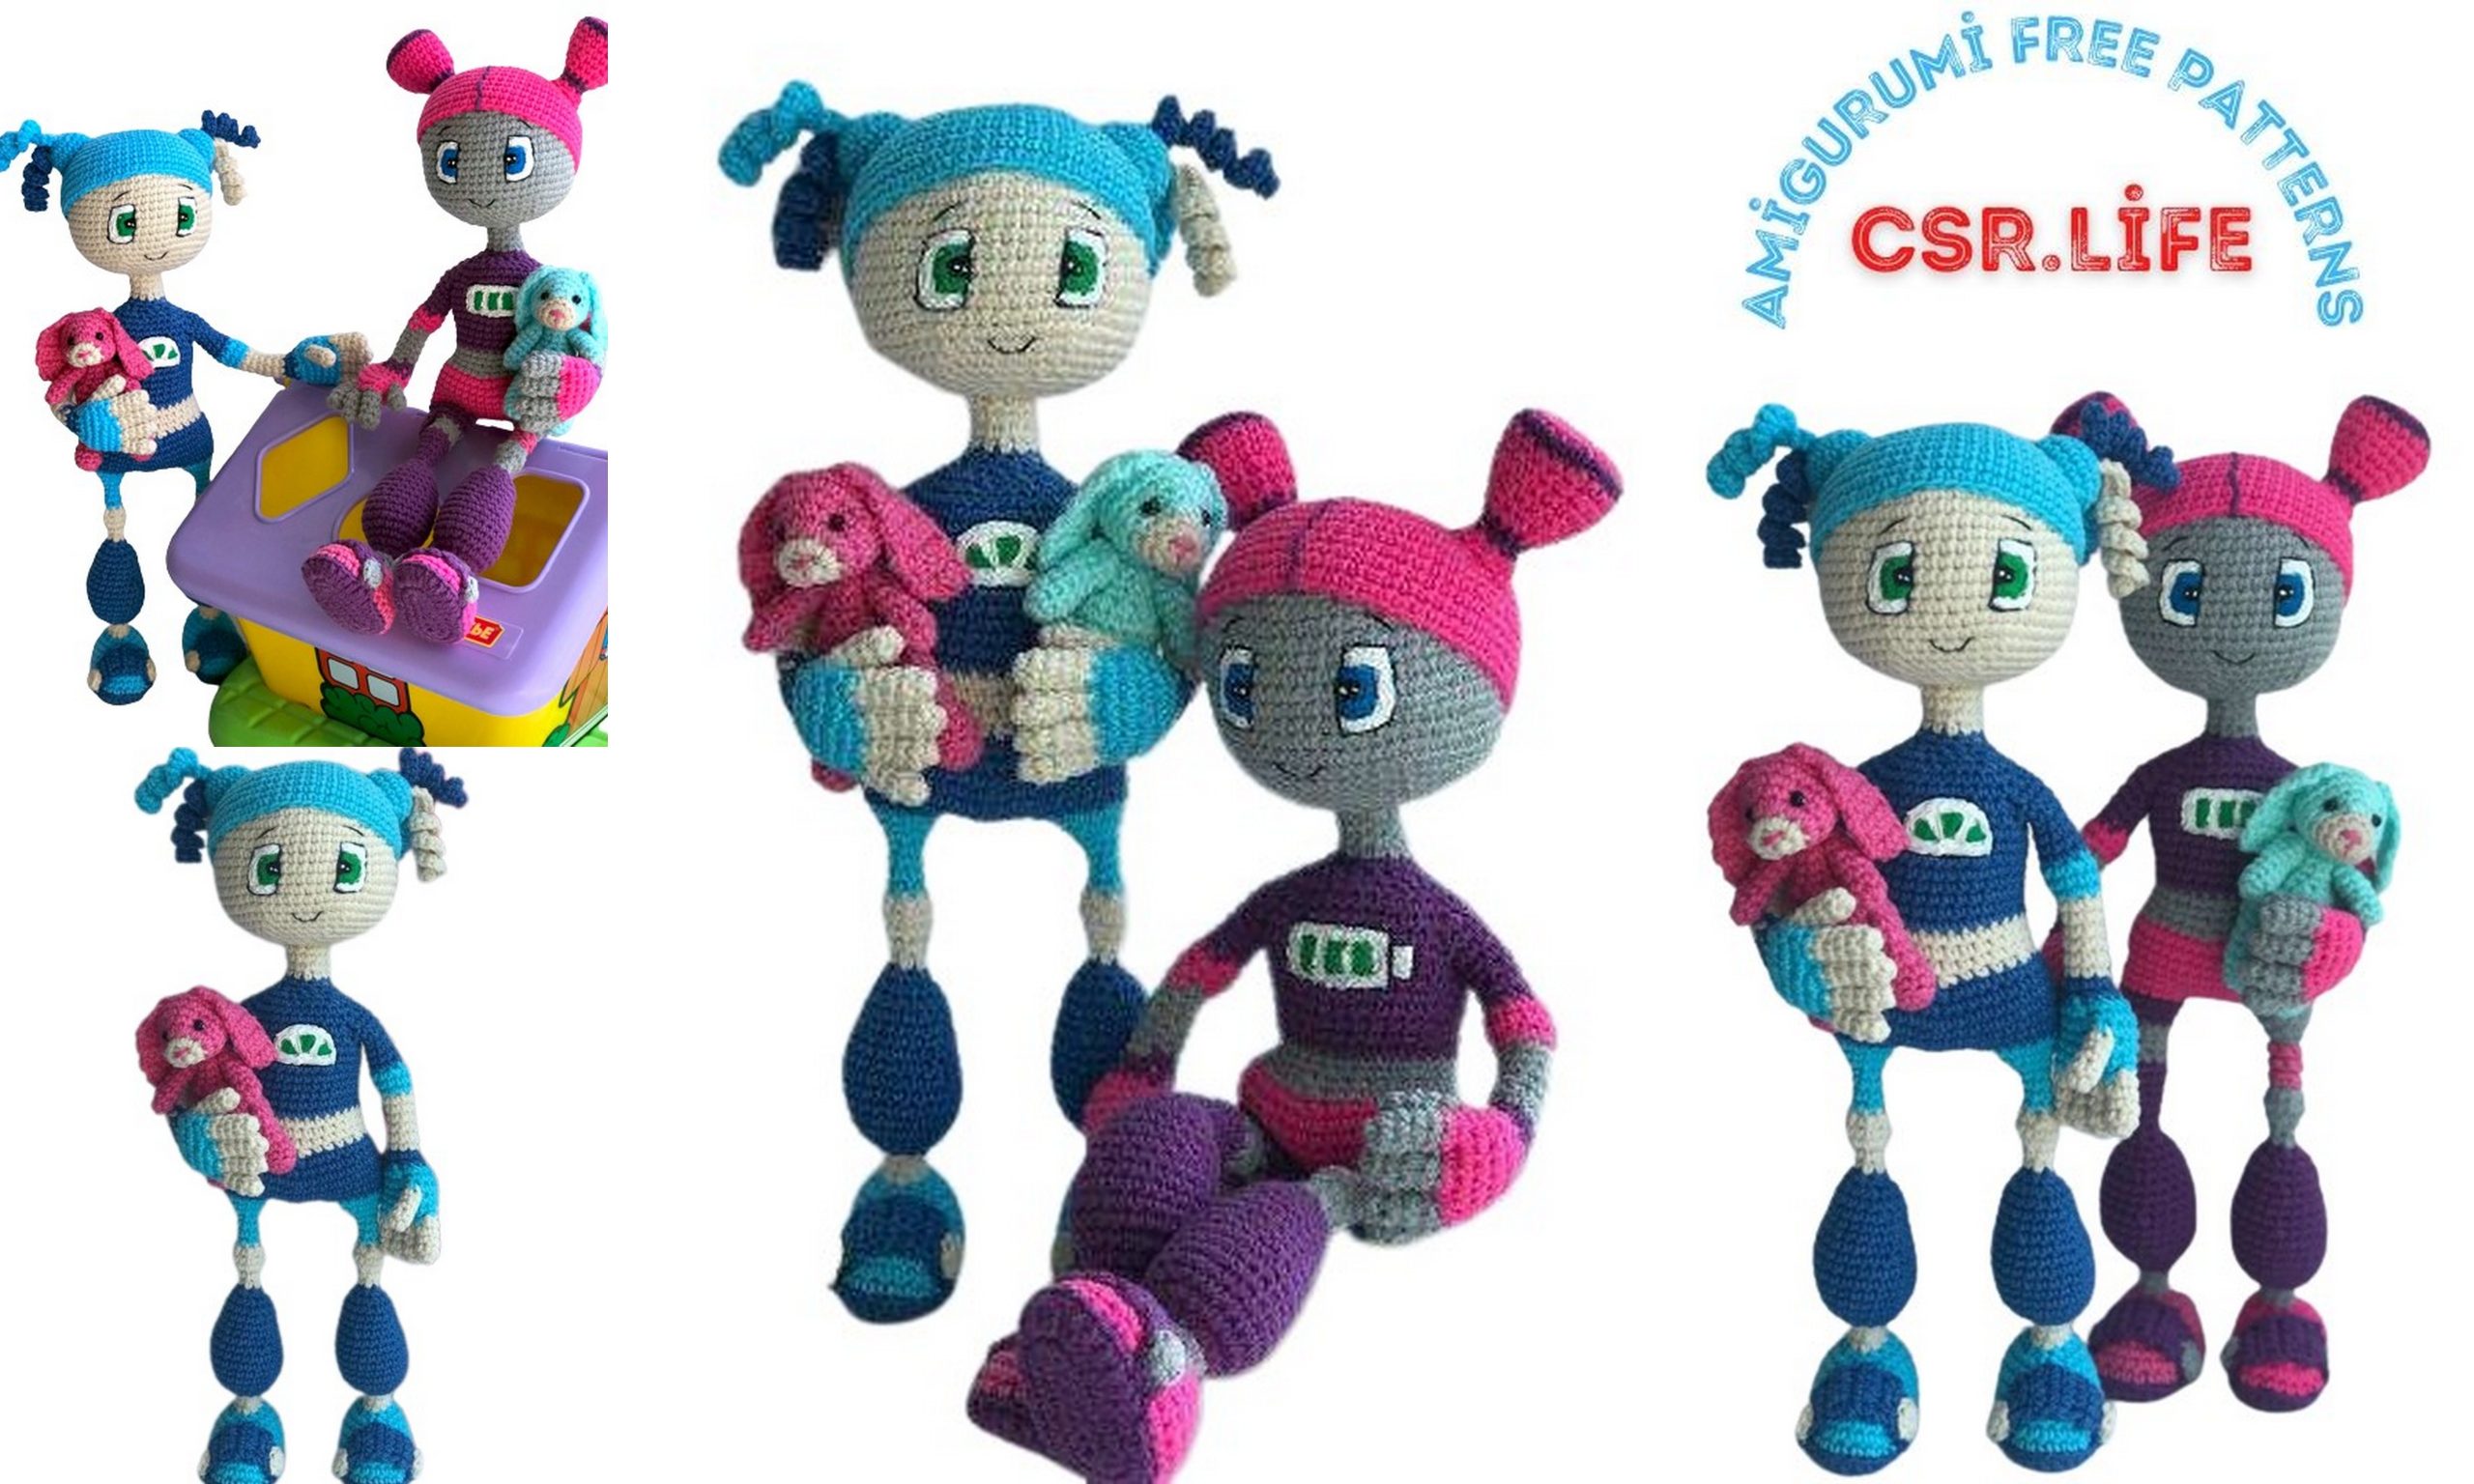
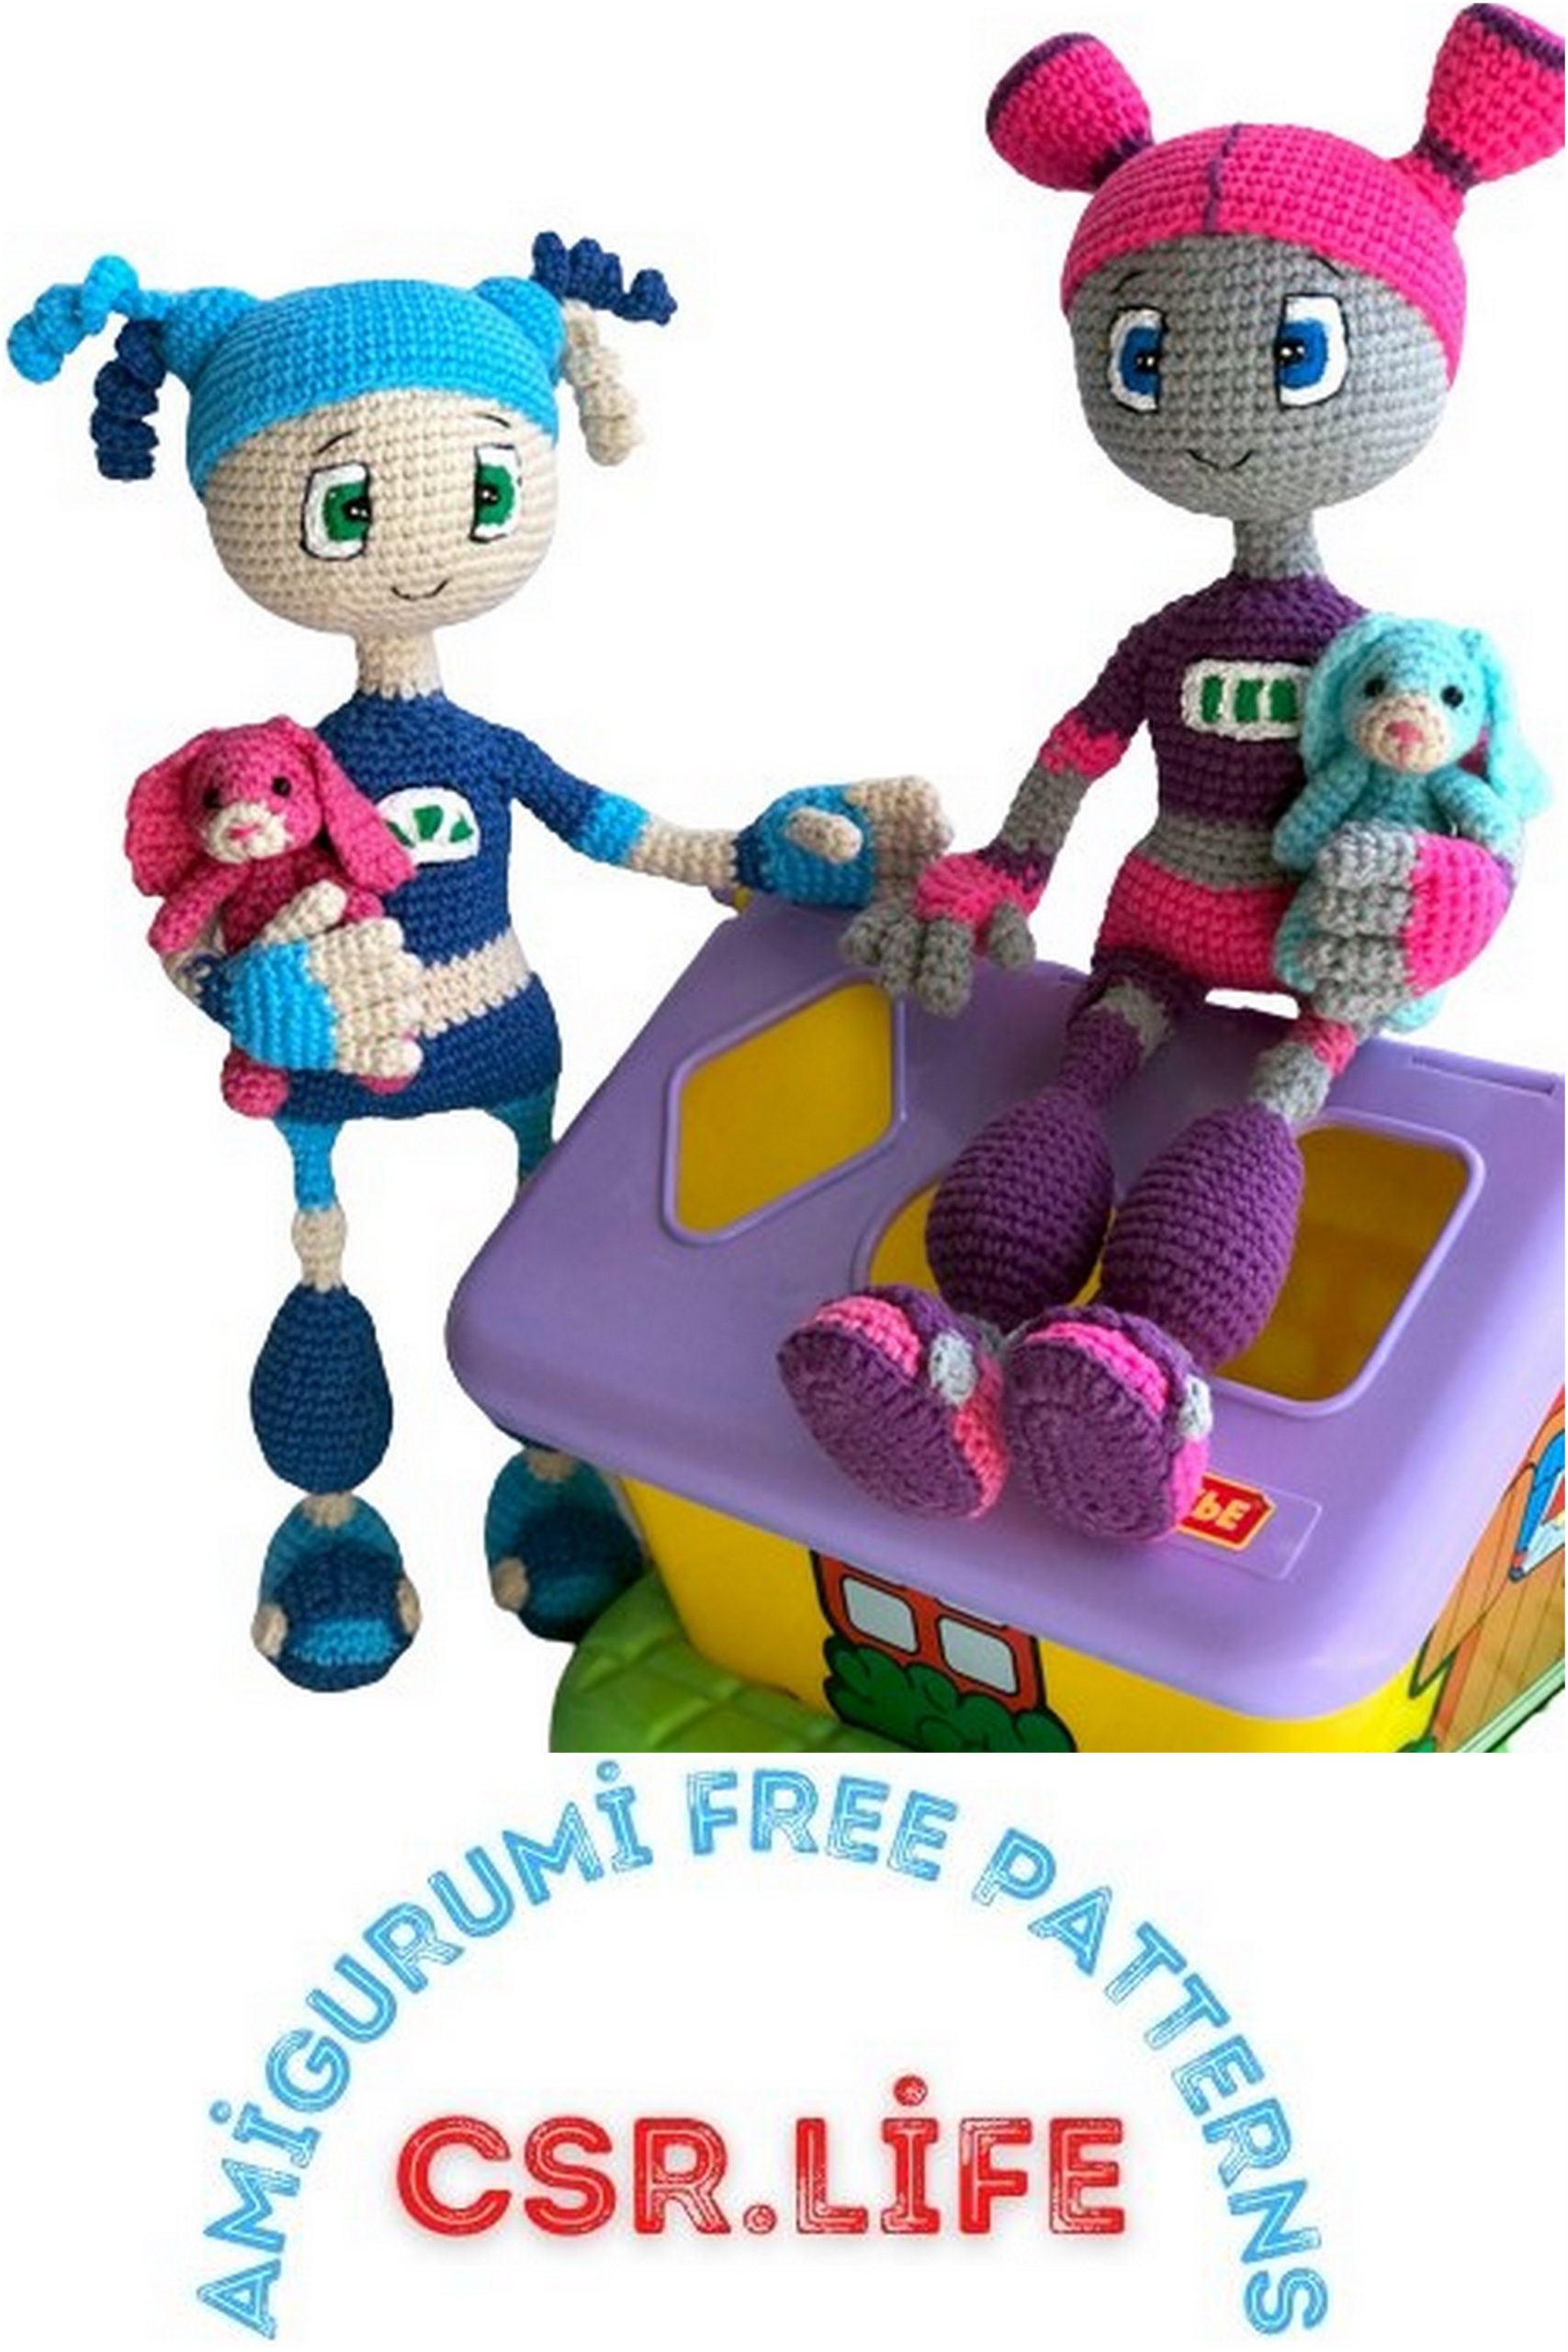
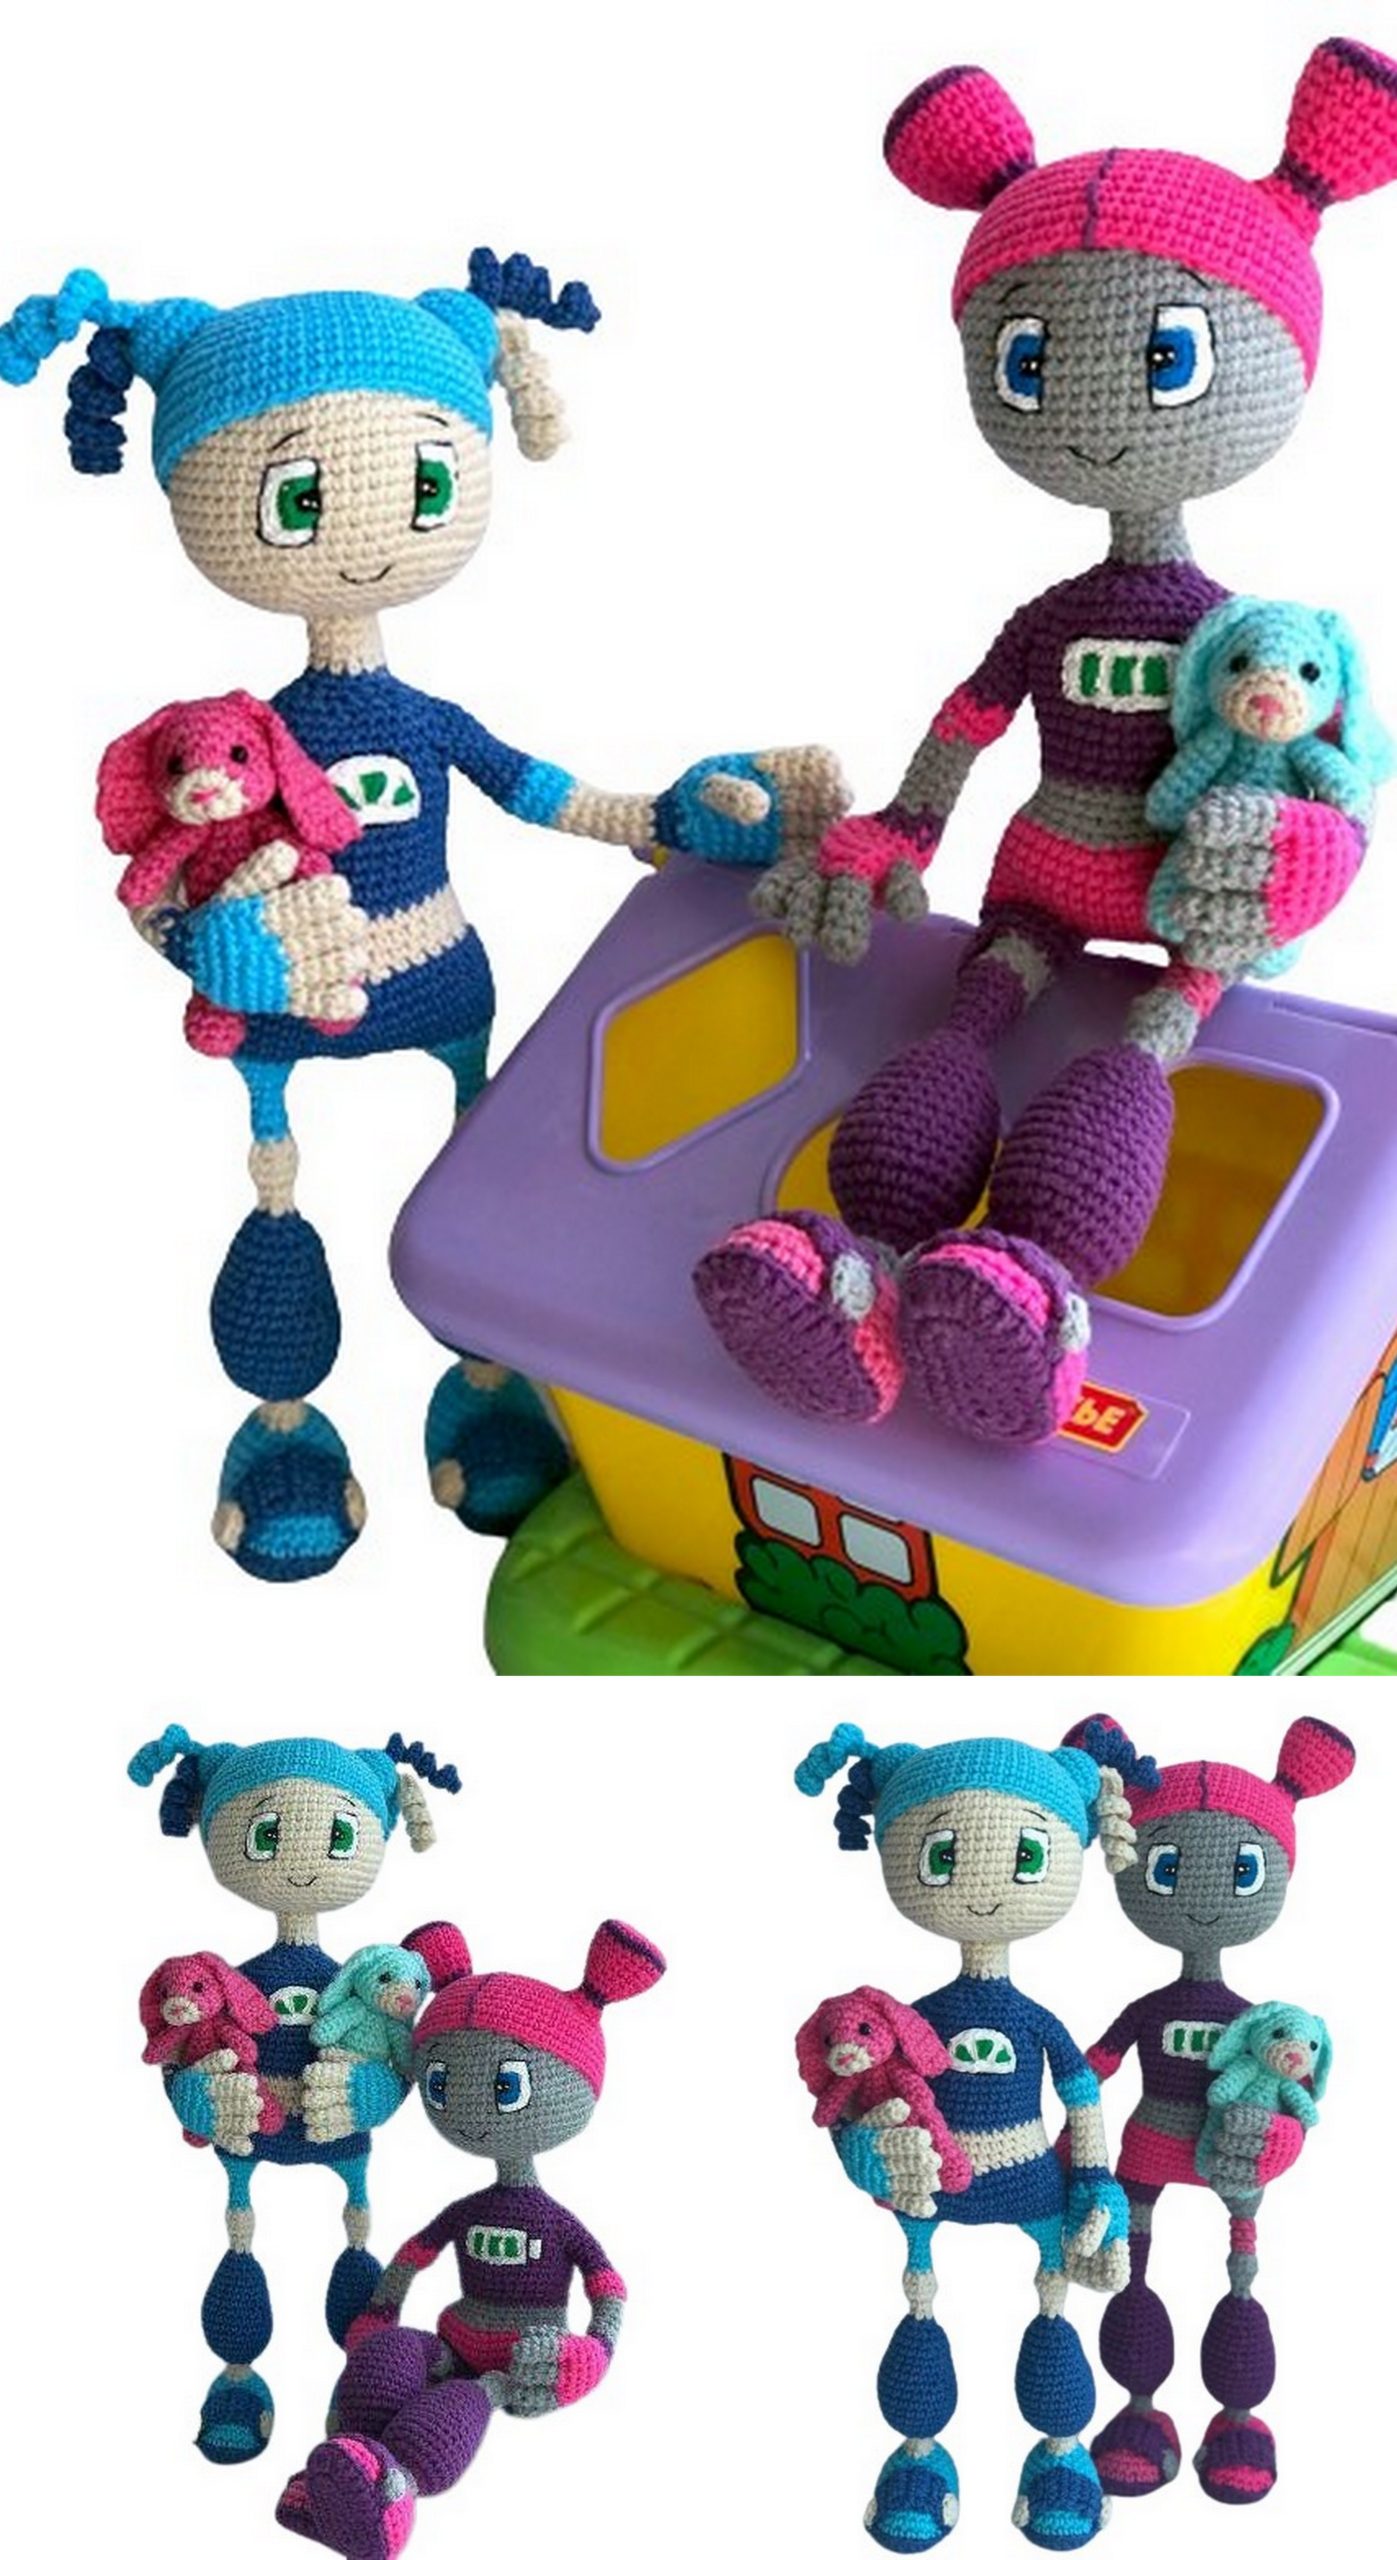
Free Amigurumi Robot Girls Pattern: Craft Your Own Adorable Creations
Explore the whimsical world of amigurumi with our “Amigurumi Robot Girls Free Pattern“! If you’re a fan of crafting and enjoy creating charming, handmade dolls, you’re in for a treat. This article is your gateway to a delightful adventure in crocheting your very own amigurumi robot girls. Whether you’re a seasoned crochet artist or a beginner looking for a creative project, these free patterns and instructions will inspire you to bring these adorable robotic characters to life.
Discover the joy of crafting with our free “Amigurumi Robot Girls Pattern.” Crochet your own cute and unique robot dolls with step-by-step instructions and patterns. Perfect for all skill levels, from beginners to experienced crocheters. Start your creative journey today!
Materials
The toys are crocheted from Jeans yarn, 1.5 crochet hook, 3 colors are used for the robot and 2 colors for the bunny. The consumption is small, approximately 1\3-1\4 of a skein of each color.
You can take any combination, for me it’s beige, light blue, dark blue.
For the bunny pink and beige
I also took 2.5 mm wire for the frame, white, black, green floss threads, regular acrylic paint for painting, you can use fabric paints, you will need white, black, green colors, threads for sewing parts, filler, 2 black beads for hare’s eye, size 3 mm.
Abbreviations:
Inc – increase
Dec-decrease
Ch-chain
Runway – air lift loop
Dc – double crochet
Hdc – half double crochet
(2 sc,inc )*6 – repeat the combination in brackets 6 times
PATTERN
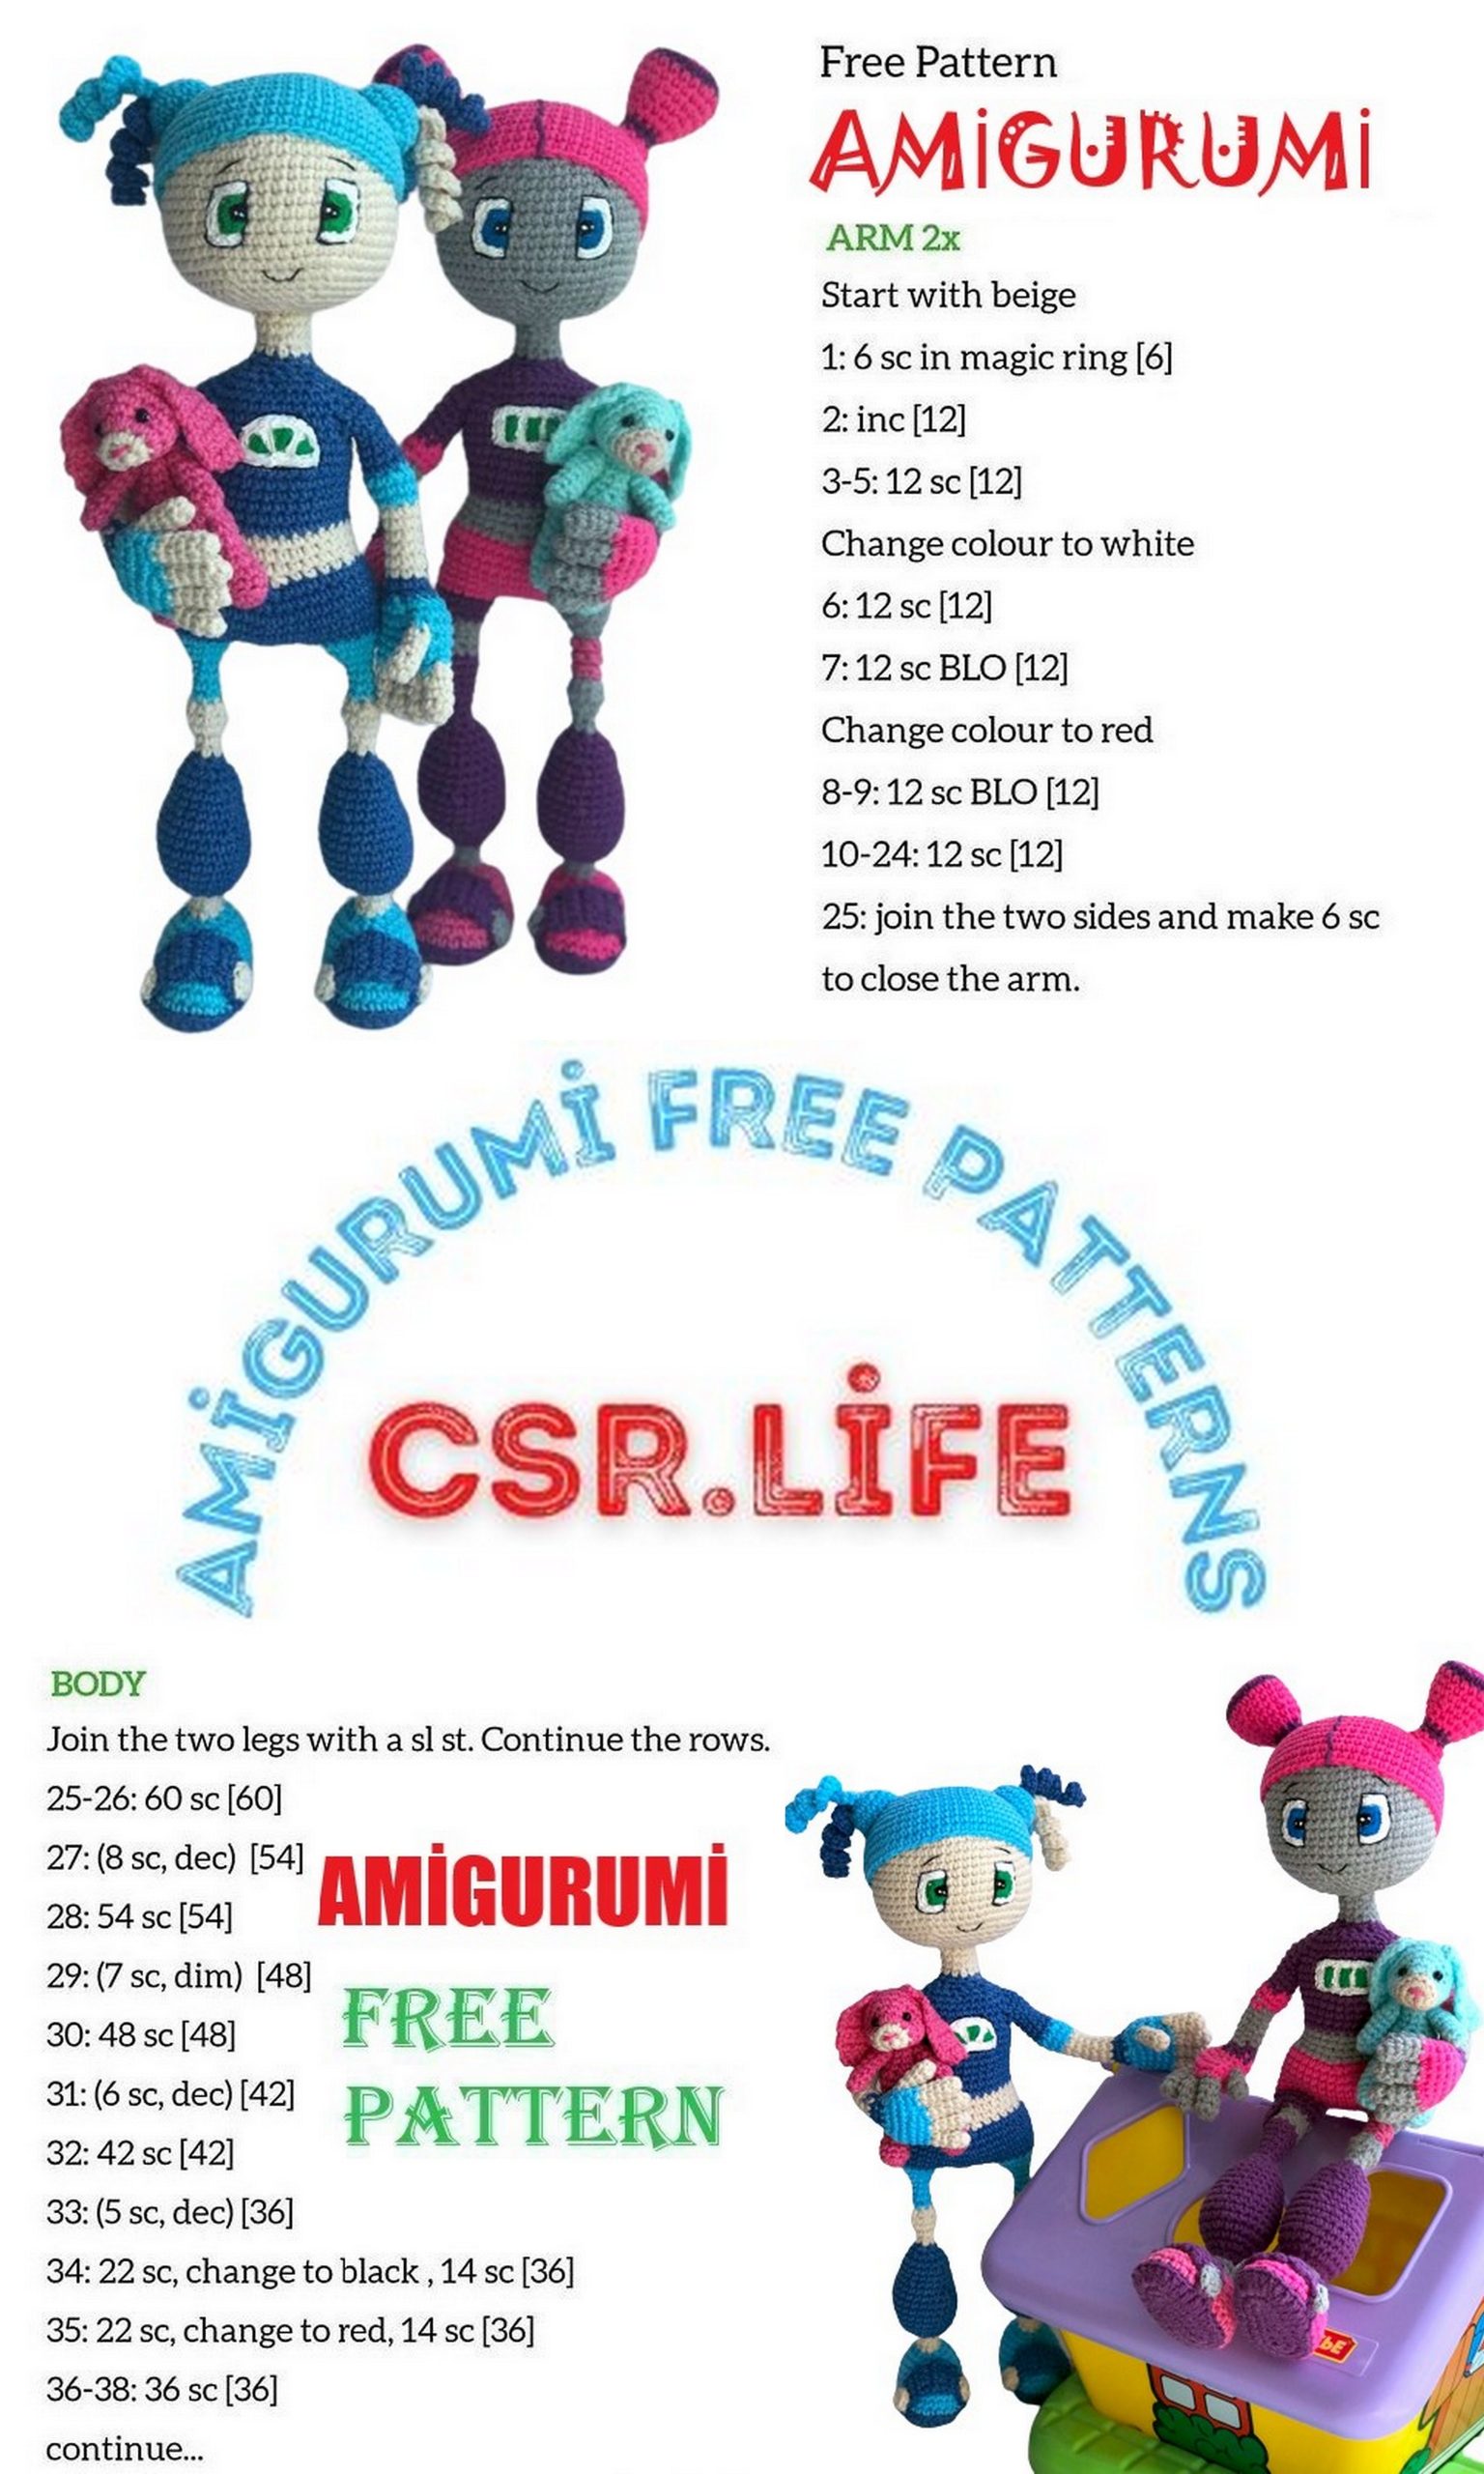
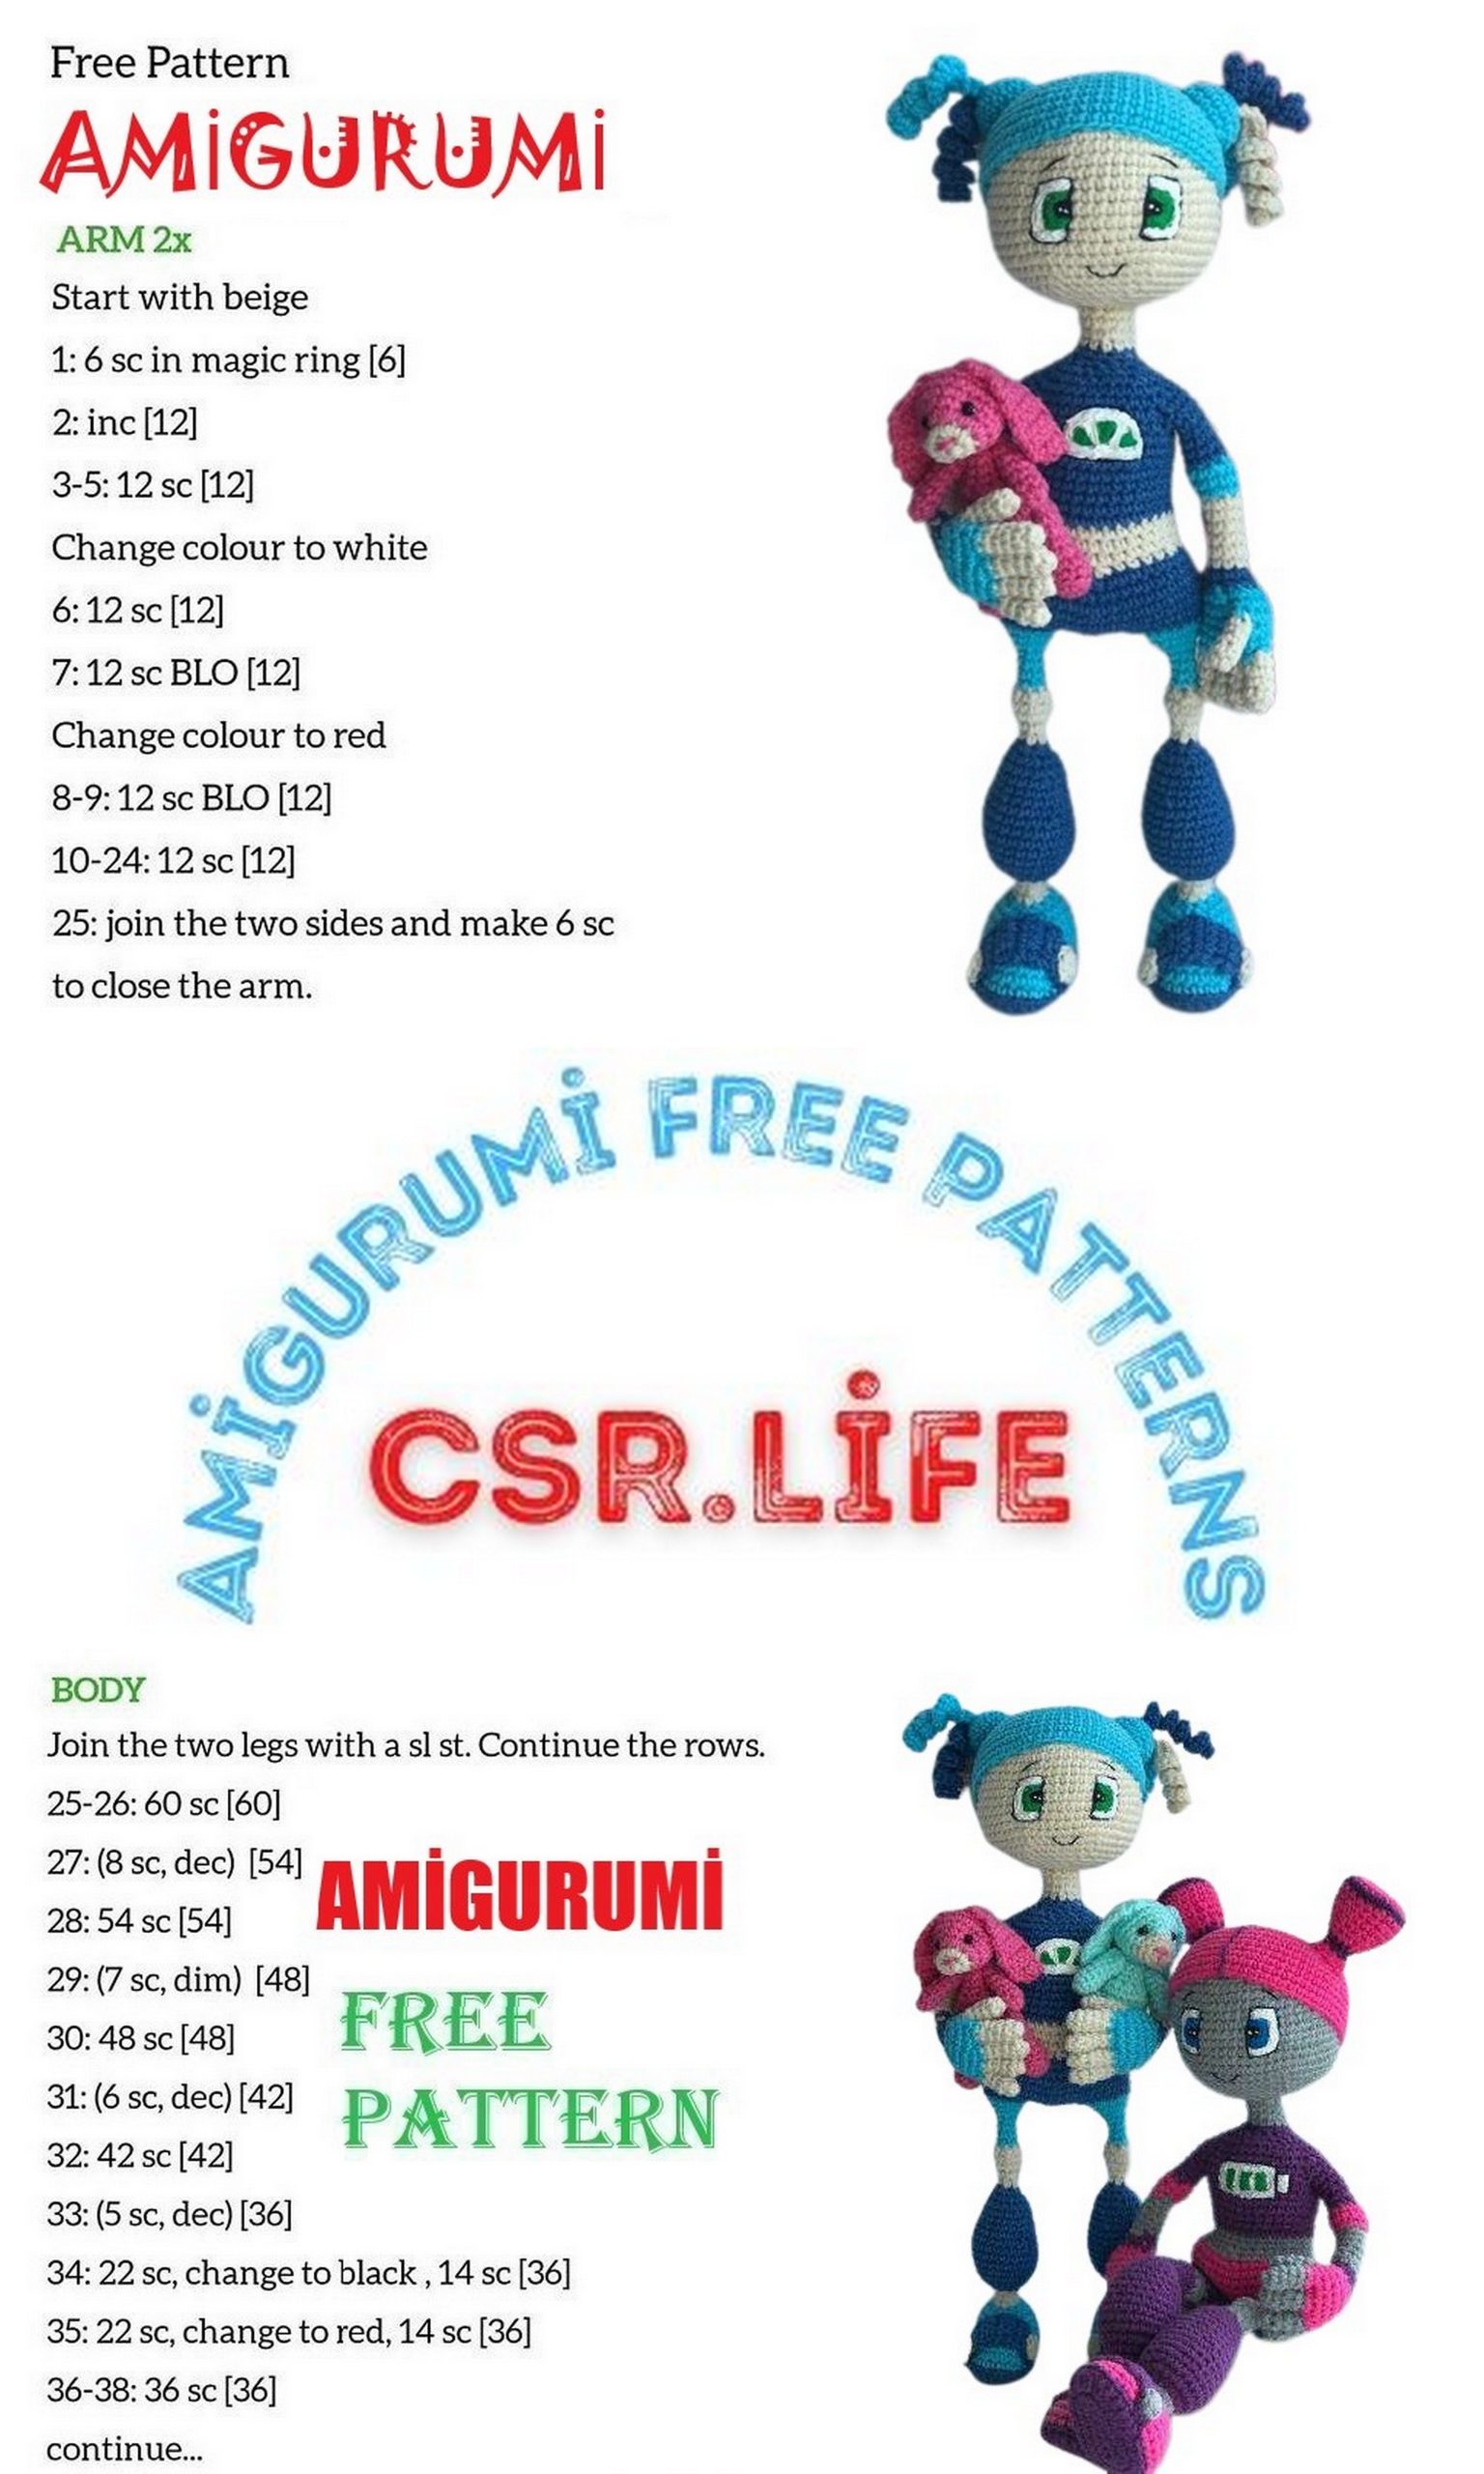
We start knitting the toy from the hands, as they are tied into the body.
Hands, fingers
We knit 10 fingers in beige
1st row: 5 sc into magic ring
2-5 row: 5 sc
Row 6: Gather your fingers into a hand, take 1 finger, attach a blue thread to it and connect it to the second finger, knit 3 sc along the second finger
Attach the third finger, knit 3 sc on it
Attach the 4th finger and knit 5 sc along it
Next we knit 2 sc on the third finger, 2 sc on the second finger, 3 sc on the first finger, put a marker
7th row: 20 sc
Row 8: knit a finger, knit 12 sc, knit 3 sc, grabbing finger loops, 5 sc (20)
Row 9: 12 sc, 2 sc across remaining finger stitches, 5 sc (19)
The right hand is knitted in the same way as the left, differing only in rows 8 and 9
Right hand
Row 8: 17 sc, 3 sc with finger loops (20)
Row 9: 17 sc, 2 sc with remaining finger stitches
Next we knit both hands in the same way.
Row 10: dec, 17 sc (18)
At that stage we put the frame in our hand
You can twist the arm frame like in my photo from a single piece, length 30-35 cm, or cut small pieces for each finger and connect everything together into a hand and arm. Wrap the frame with adhesive tape. Place in knitted piece.
Row 11: (1 sc, dec)*6 (12)
Row 12: change color to blue (2 sc, dec)*3 (9)
Row 13: 9 sc
Row 14: change color to beige 9 sc
15-19 row: 9 sc
Row 20: change color to blue (2 sc,inc)*3 (12)
Row 21: 12 sc
Row 22: (2 sc, dec)*3 (9)
Row 23: change color to blue 9 sc
24-26 row: 9 sc
Row 27: (2 sc,inc)*3 (12)
Row 28: 12 sc
Knitting legs
Foot blue color
1st row: cast on a chain of 7 ch, knit from the second loop inc, 4 sc, 4 sc in the last stitch, 4 sc,inc (16) place a marker
Row 2: 2 inc, 4 sc, 4 inc, 4 sc, 2 inc (24)
3rd row: 2 sc, inc, 3 sc, 2 hdc, 2 dc, 4 inc hdc, 2 dc, 2 hdc, 3 sc, inc, 2 sc (30)
4th row: change color to blue, knit behind the back wall of a 30 sc loop
5 – 6 row: 30sc
7th row: 10 sc, 5 dec, 10 sc (25)
Cut out an insole from cardboard or plastic and place it inside the part
Row 8: 12 sc, dec, 11 sc (24)
Row 9: 10 sc, 2 dec, 10 sc (22)
Row 10: 9 sc, 2 dec, 9 sc (20)
We put a frame in the foot – a piece of wire 30 – 35 cm, make a small loop at one end, bend it to the size of the foot, wrap it with adhesive tape
Filling in the detail.
11th row: 10 dec (10)
Row 12: change color to beige 10 sc
13-14 row: 10 sc
Row 15: change color to blue 10 inc (20)
Row 16: (4 sc,inc)*4 (24)
17 – 21 row: 24 sc
Row 22: (10 sc,dec)*2 (22)
Row 23: 22 sc
Row 24: 5 sc, dec, 8 sc, dec, 5 sc (20)
Row 25: 20 sc
Row 26: (dec,8 sc)*2 (18)
Row 27: 18 sc
Row 28: (1 sc,dec)*6 (12)
Row 29: 6 dec (6)
Row 30: change color to beige 6 sc
Row 31: 6 sc
Row 32: 6 inc (12)
Row 33: 12 sc
Row 34: 6 dec (6)
Row 35: change color to blue 6 sc
Row 36-38: 6 sc
Row 39: 6 inc (12)
Row 40: 12 sc
Row 41: (1 sc,inc)*6 (18)
Row 42: 18 sc
To connect the legs we will knit a small piece
Blue color
1st row: cast on a chain of 7 ch, knit 6 sc from the second loop, unfold the knitting, knit a runway
2nd row: 6 sc
Take one leg and attach the part as shown in the photo – the part should be in the middle of the inside of the leg
Sew the piece to 2 leg loops
We take the second leg and sew the part to the inside in the same way
Row 43: Attach the blue thread to the back, knit 16 sc along the leg, 6 sc on the blue part, 16 sc on the second leg, 6 sc on the blue part. (44)
Marker on the back
Row 44: (20 sc, dec)*2 (42)
Row 45-47: 42 sc
Row 48: (19 sc,dec)*2 (40)
Row 49: (18 sc, dec)*2 (38)
Row 50: change color to beige 1 sc, (4 sc,dec)*6 , 1 sc (32)
Row 51: 32 sc
Row 52-53: 32 sc
Row 54: change color to blue 32 sc
Row 55-57: 32 sc
Row 58: (7 sc, inc)*4 (36)
Rows 59-61: 36 sc
Row 62: we knit the arms (the arms should be on the sides of the body, slightly in front, if you cannot place them where needed according to the description, then knit additional loops at your discretion and place the arms where needed) 8 sc, 6 sc knit together with arm loops, 13 sc, 6 sc with arm loops, 5 sc (36)
Row 63: 8 sc, 6 sc with arm loops, 13 sc, 6 sc with arm loops, 5 sc (36)
Row 64: 7 sc, dec, 3 sc, dec, 12 sc, dec, 3 sc, dec, 3 sc (32)
(combination dec, 3 sc, dec- must fall on hands)
Row 65: 9 sc, dec, 16 sc, dec, 3 sc (30)
Row 66: (3 sc,dec)*6 (24)
Row 67: (2 sc, dec)*6 (18)
Row 68: (1 sc,dec)*6 (12)
Row 69: 12 sc
Row 70: change color to beige 12 sc
71-73 row: 12 sc

Head
1st row: 6 sc into magic ring
2nd row: 6 inc (12)
3rd row: 12 inc (24)
4 row: (3 sc, inc)*6 (30)
5 row: (4 sc, inc)*6 (36)
Row 6: (5 sc, inc)*6 (42)
Row 7: (6 sc,inc)*6 (48)
Row 8: (7 sc, inc)*6 (54)
9 – 19 row: 54 sc
Row 20: (7 sc,dec)*6 (48)
Row 21: (6 sc,dec)*6 (42)
Row 22: (5 sc, dec)*6 (36)
Row 23: (4 sc, dec)*6 (30)
Row 24: (3 sc, dec)* 6 (24)
fill
Row 25: (2 sc, dec)*6 (18)
Row 26: (1 sc,dec)*6 (12)
Wig blue color
1st row: 6 sc into magic ring
2nd row: 6 inc (12)
3rd row: 12 inc (24)
4 row: (3 sc, inc)*6 (30)
5 row: (4 sc, inc)*6 (36)
Row 6: (5 sc, inc)*6 (42)
Row 7: (6 sc,inc)*6 (48)
Row 8: (7 sc, inc)*6 (54)
Row 9: (17 sc,inc)*3 (58)
10-15 row: 58 sc
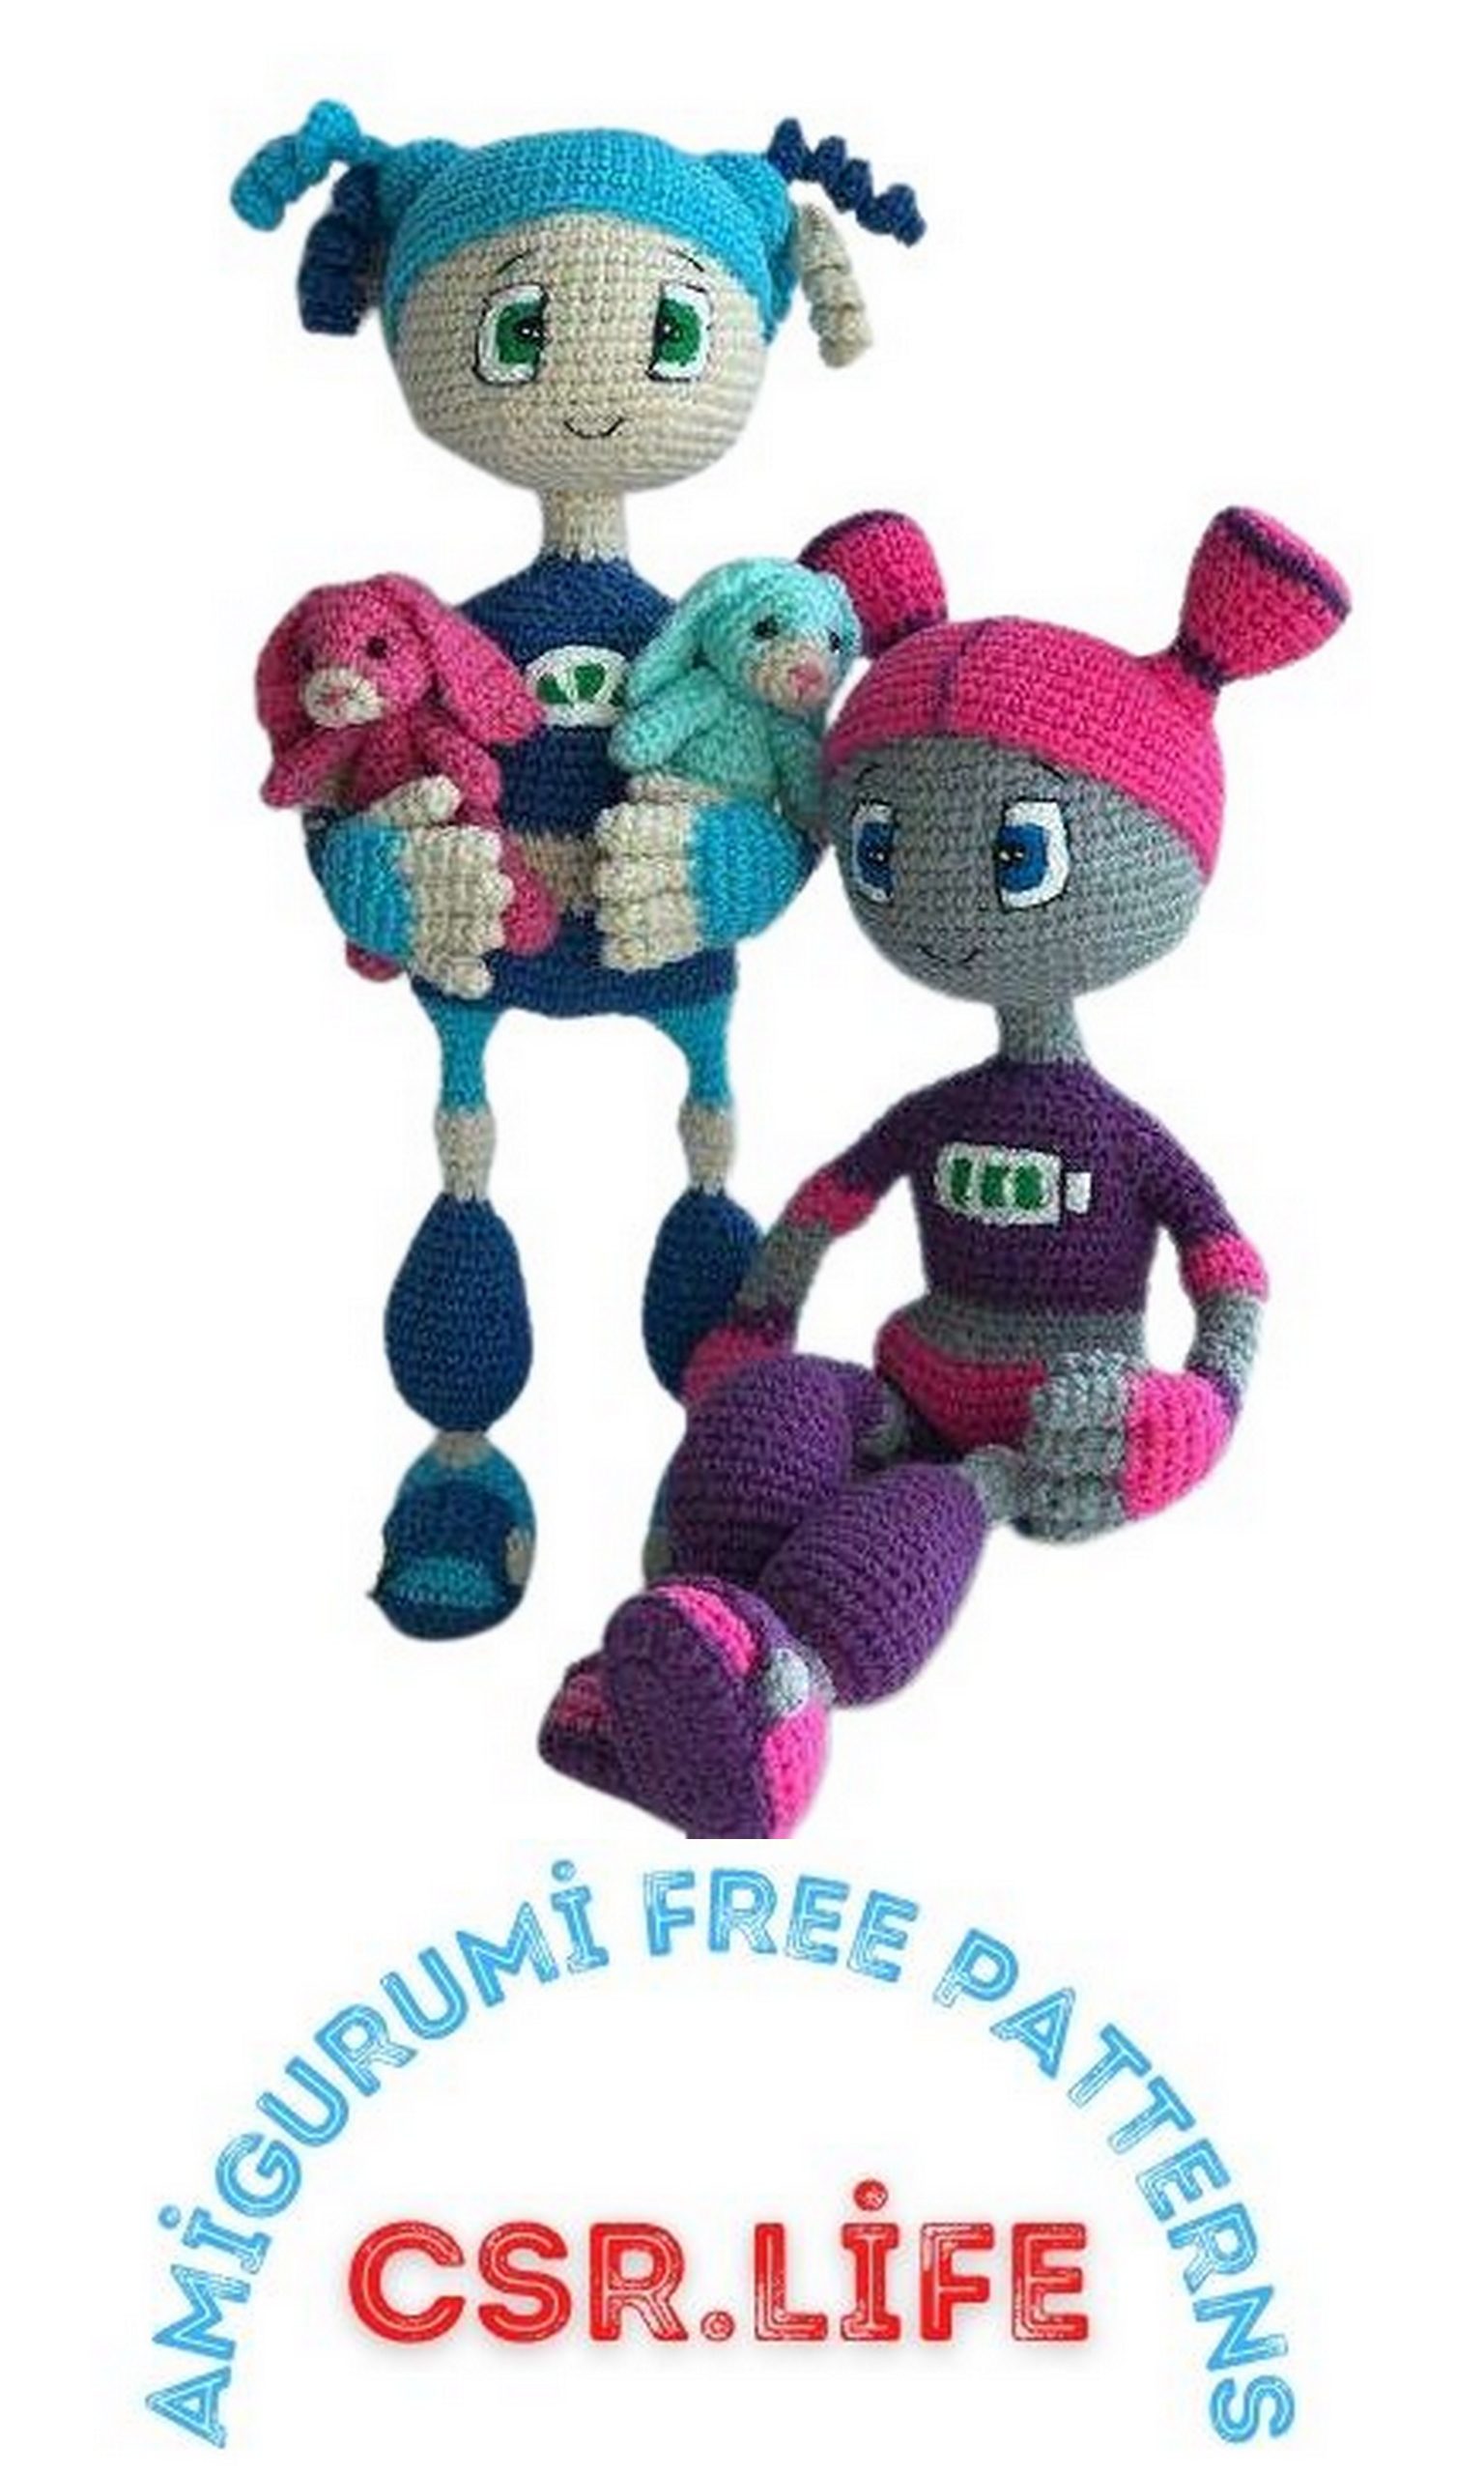
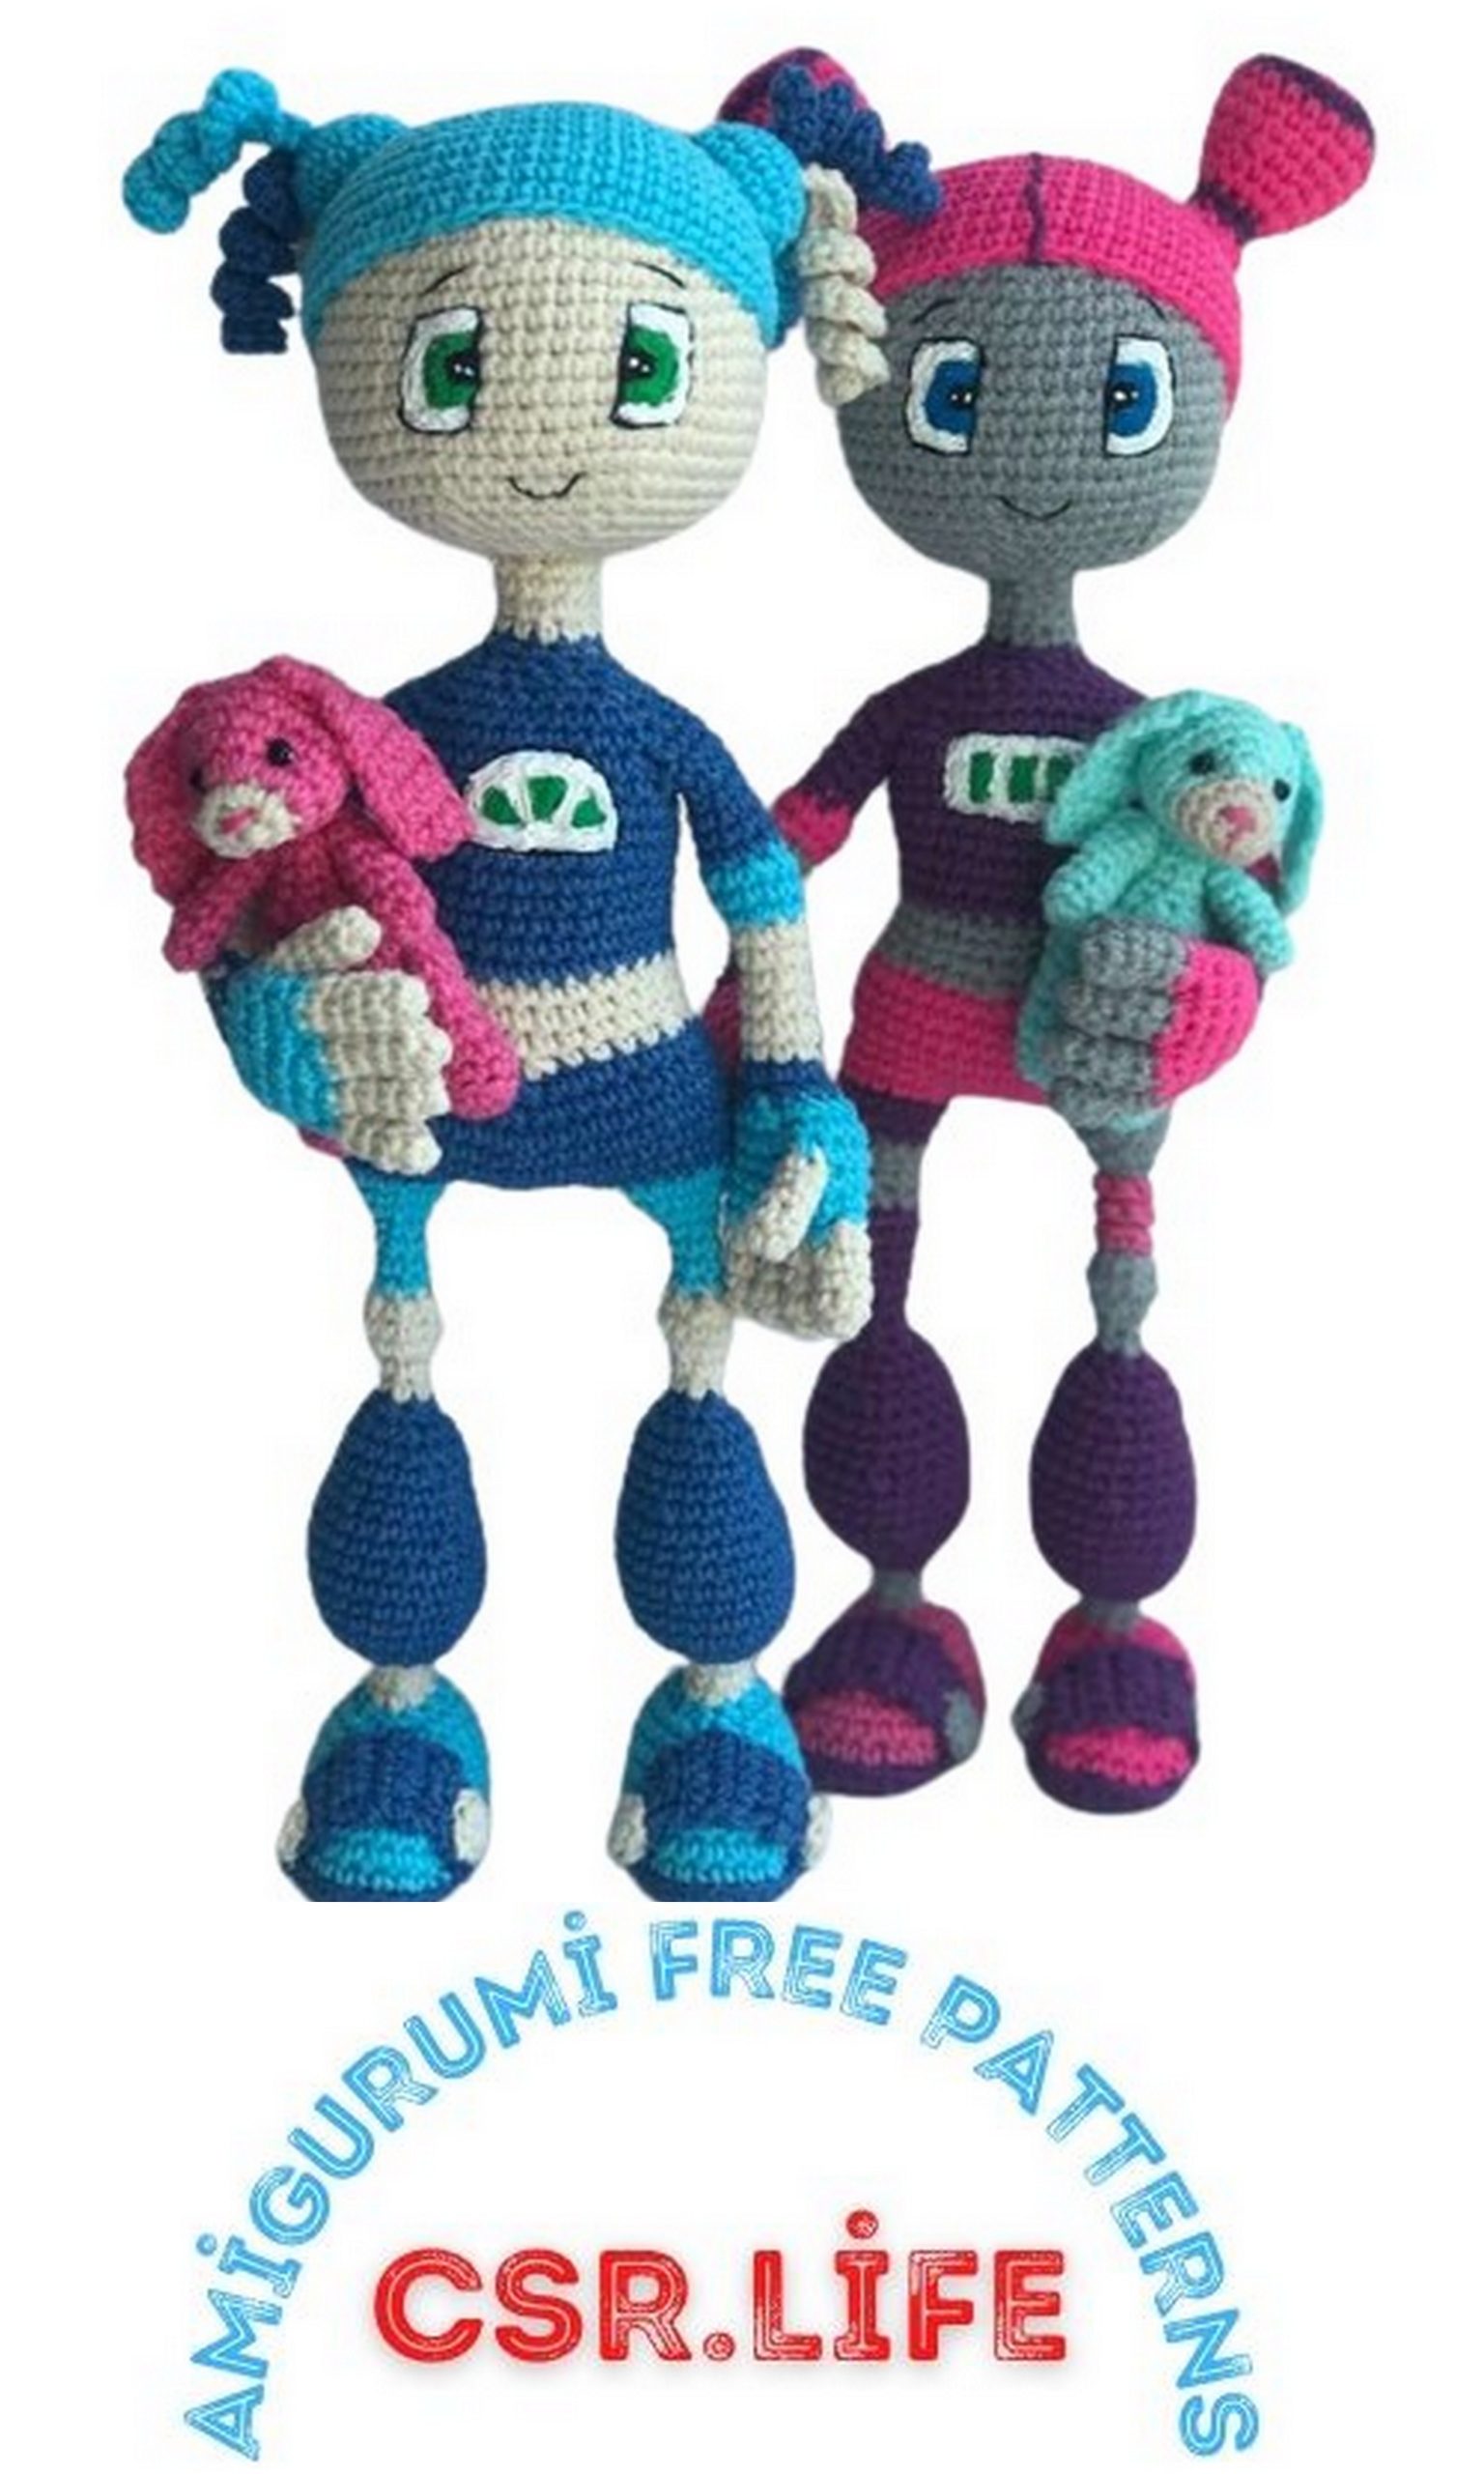
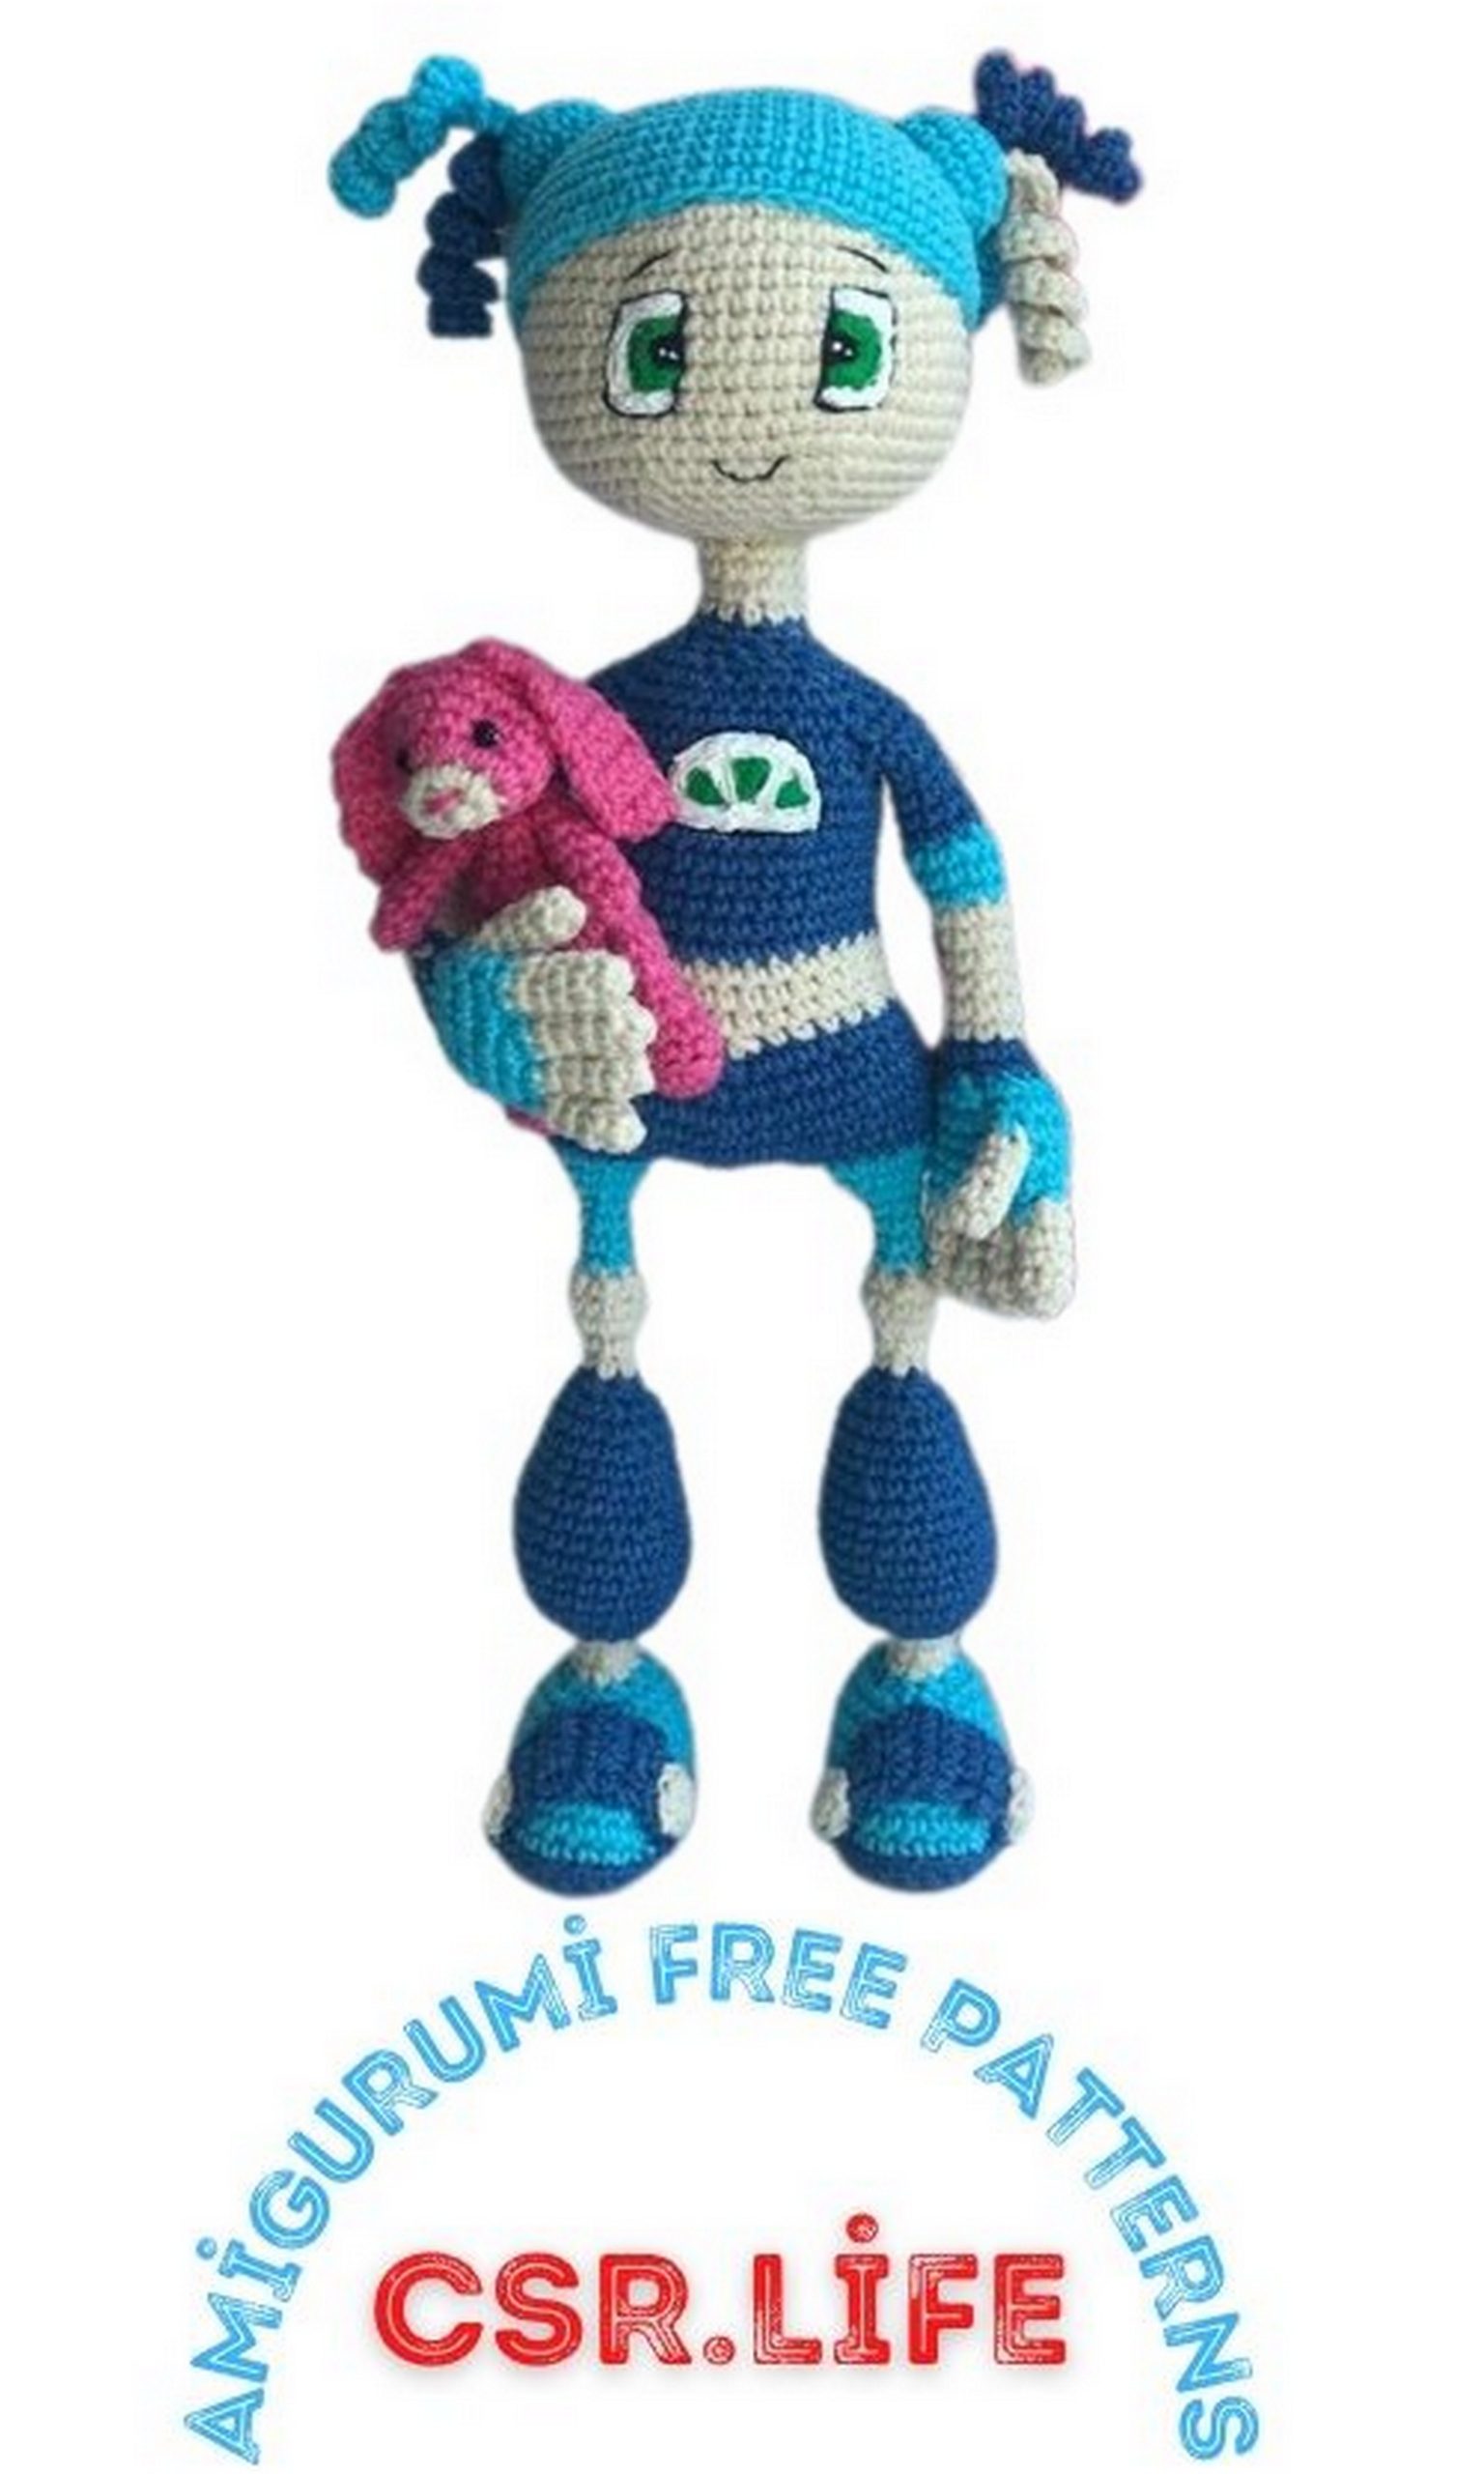
Place the wig on your head as shown in the photo
Sew the wig to your head.
The base for the ponytails is blue
1st row: 6 sc into magic ring
2nd row: 6 inc (12)
3rd row: (1 sc,inc)*6 (18)
4-5 row: 18 sc
Ponytails – cast on a chain of 21 air loops and knit from the second loop 3 sc in each loop. Knit 3 pieces of different colors for each tail.
Attach the tails to the center of the main part
Boot overlay 2 parts
Blue color . We knit the part in turning rows, in the naal of each row
(starting from the second row of the runway)
1st row: 3 ch, knit 2 sc from the second loop
Row 2: 2 sc
3rd row: 2 inc (4)
4-9 row: 4 sc
Row 10: 2 dec (2)
11-12 row: 2 sc
Button 4 parts
Beige color 6 sc into magic ring
Assembly and design
Sew the linings onto the boots as shown in the photo
Sew buttons on the sides
Face
We outline the eyes – pupils
Next, draw the iris around the pupil
Draw the outline of the entire eye
Take black threads and embroider the pupil
Take a green thread and embroider the iris
Using white thread we embroider the rest of the eye
Sew on the ponytails
Draw a battery indicator on the chest
We embroider with white threads along the contour
Embroider with green threads
Embroider with white threads
Take acrylic paint
Using a toothpick, carefully paint the pupil
For each paint we take a new toothpick
Painting the iris and battery divisions
Paint the whites white
Making highlights on the pupil
We paint over the battery and wait for it to dry or dry it with a hairdryer.
After the paint has dried, use black thread to embroider along the outline.
Embroider the face with black threads
and eye contour
The toy is ready, we knit a bunny
For this toy you will need some fine yarn – denim or
new 2 colors – main, white. 2 black beads, pink threads
floss, filler, hook 1.5
Head
White color
1st row: 6 sc into magic ring
2nd row: 6 inc (12)
Row 3: change color to pink 2 sc, 6 inc, 4 sc (18)
4th row: 18sc
5 row: 6 sc, (1 sc,inc)*3, 6 sc (21)
Rows 6-8: 21 sc
Row 9: (1 sc,dec)*7 (14)
10 row: 7 dec (7)
Row 11: 4 dec, close
Body
Pink color
1st row: 6 sc into magic ring
2nd row: 6 inc (12)
3rd row: (1 sc, inc)*6 (18)
4th row: 18sc
5-7 row: 18 sc
8 row: 6 dec, 6 sc (12)
9-11 row: 12 sc
Legs
2 parts pink color
1st row: 6 sc into magic ring
2nd row: (1 sc, inc)*3 (9)
3rd row: knit loops 9 sc behind the back wall
4 row: 9 sc
5 row: 2 dec, 5 sc (7)
6-8 row: 7 sc
Fill
Row 9: 4 dec
Upper paws
1st row: 6 sc into magic ring
2-7 row: 6 sc
8 row: 3 dec
Ears
We knit in turning rows, at the beginning of each row (from the second) we knit
air lifting loop
1st row: cast on 3 ch, knit 2 sc from the second loop
Row 2: 2 sc
3rd row: 2 inc (4)
4 – 10 row: 4 sc
11th row: 2 dec (2)
Assembly
We make a tightening – insert the needle in the center from the bottom in the 3rd row, bring it out to the right, hook the loop, take it to the starting place
Now we take it to the left, hook the loop and take the needle down, pull it up.
Sew on the eyes
Embroider the nose, sew on the ears
Sew the head to the body
Sew on the paws
The toy is ready