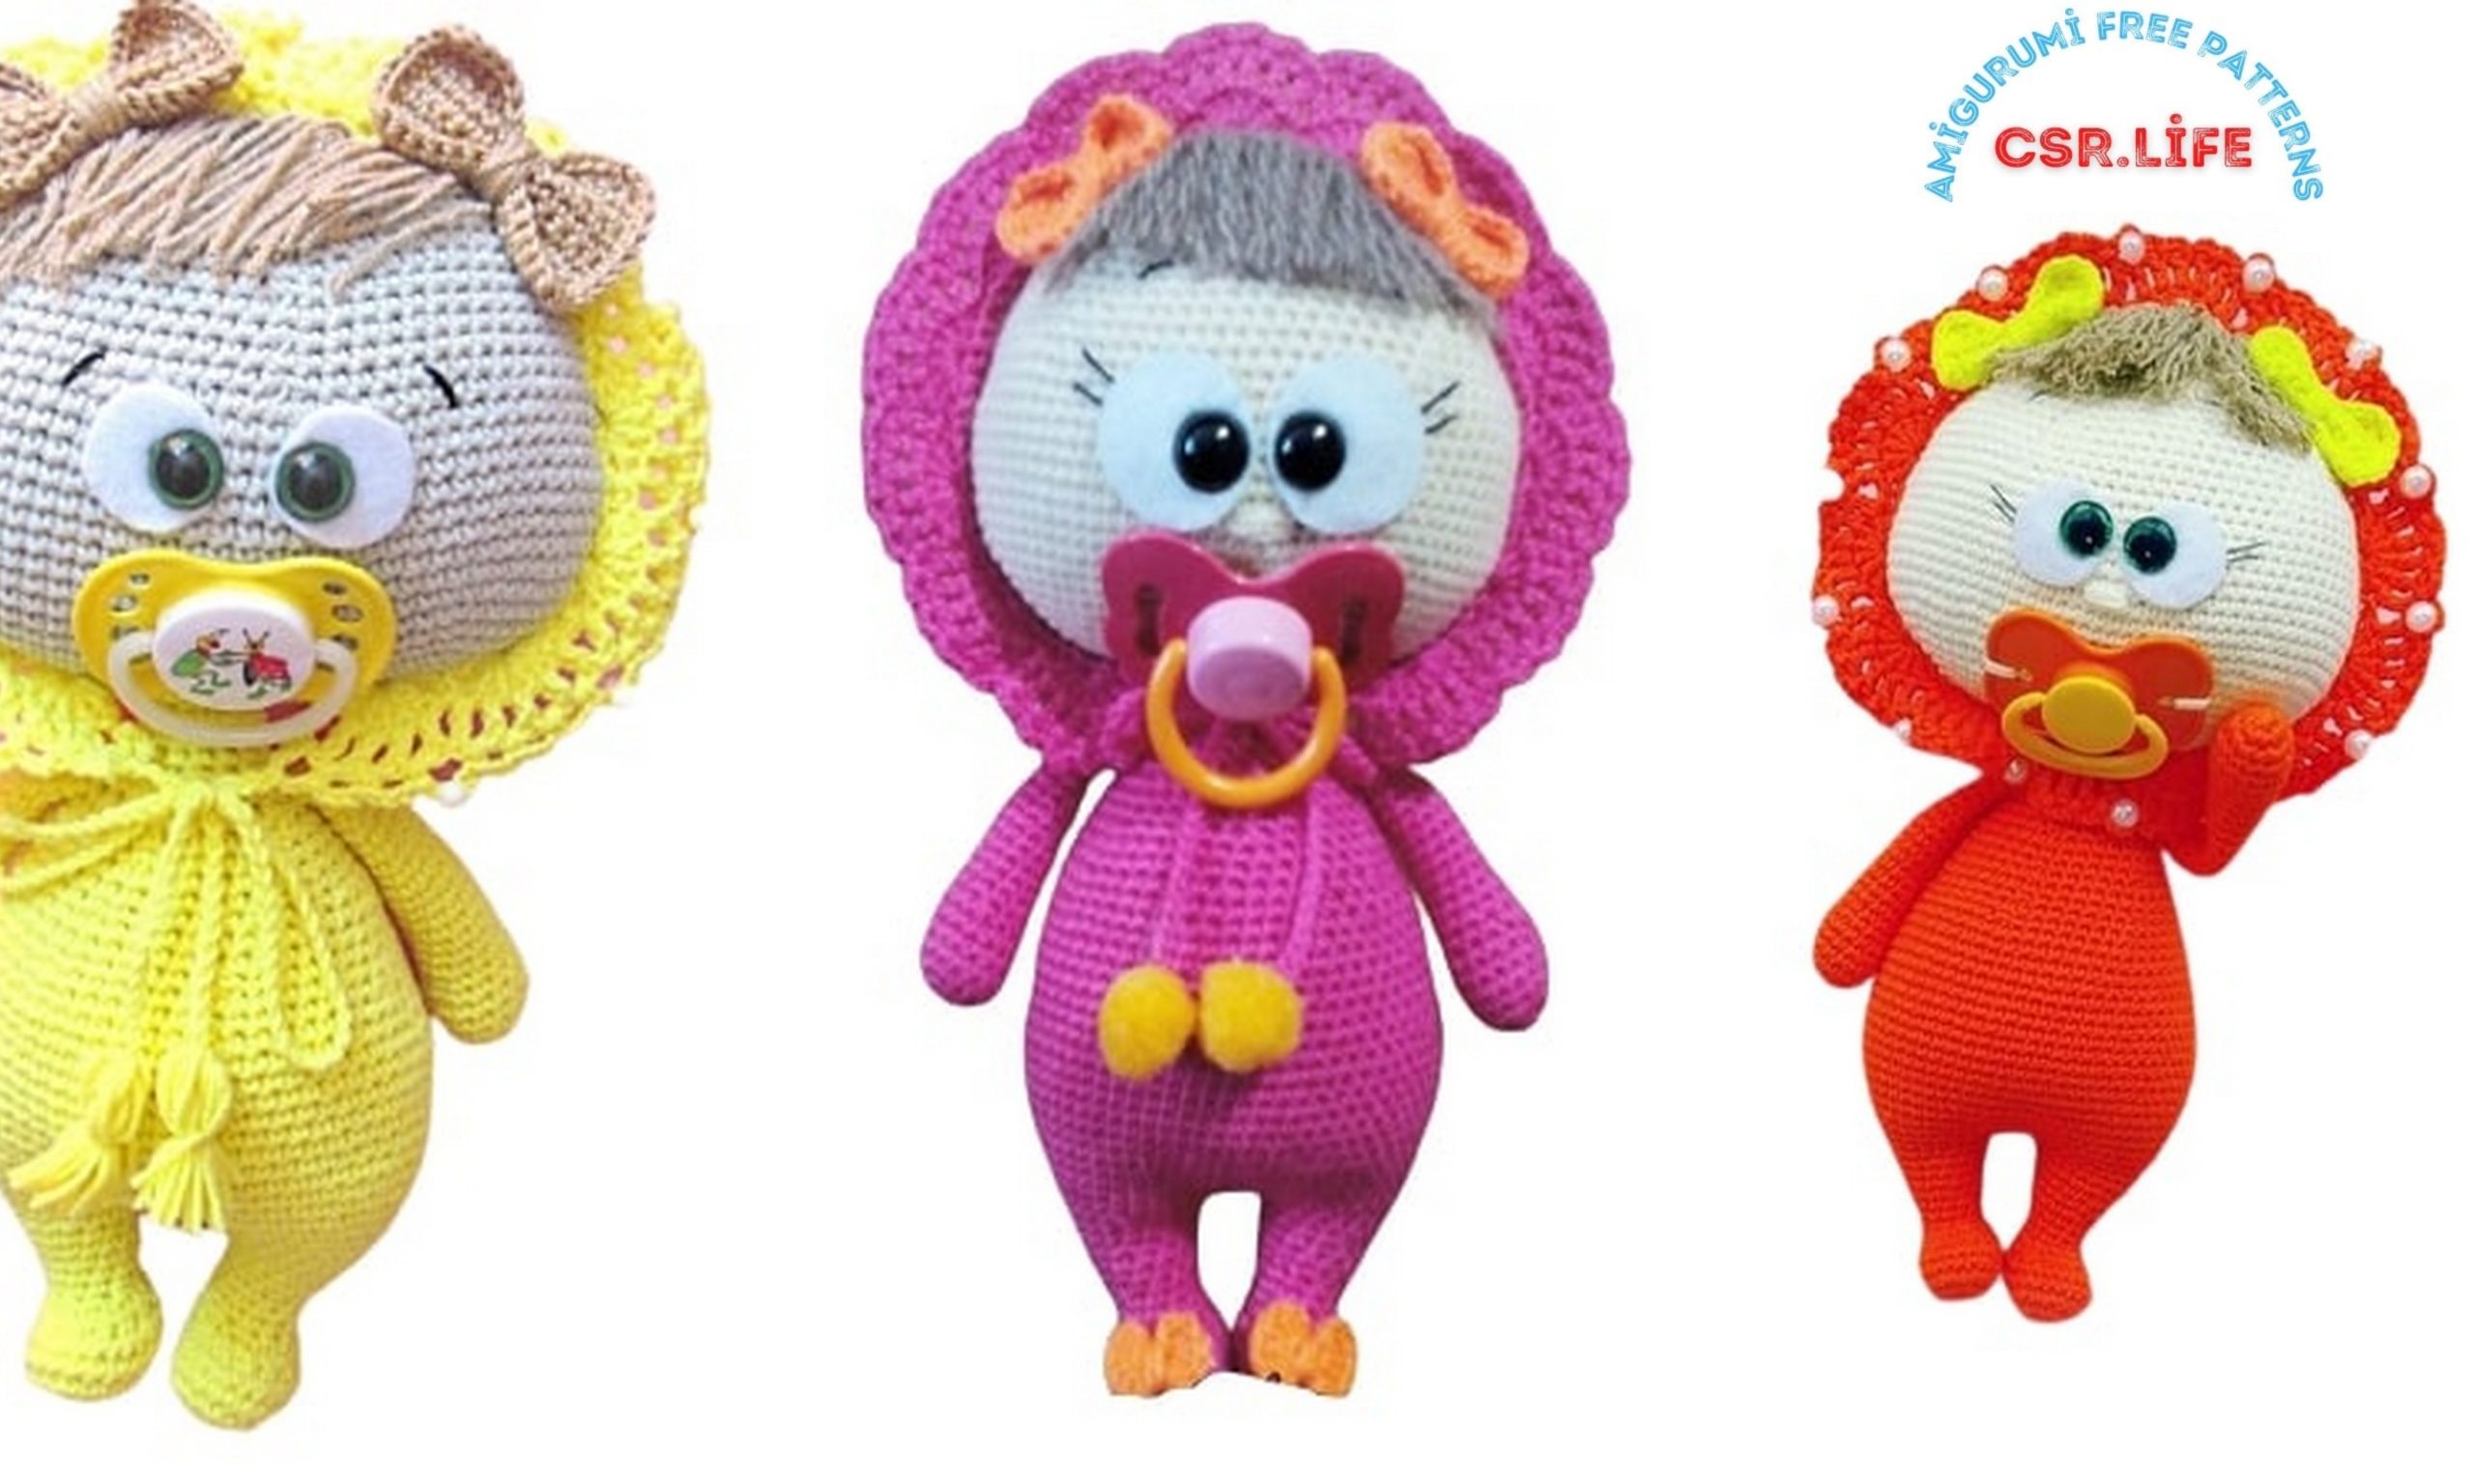
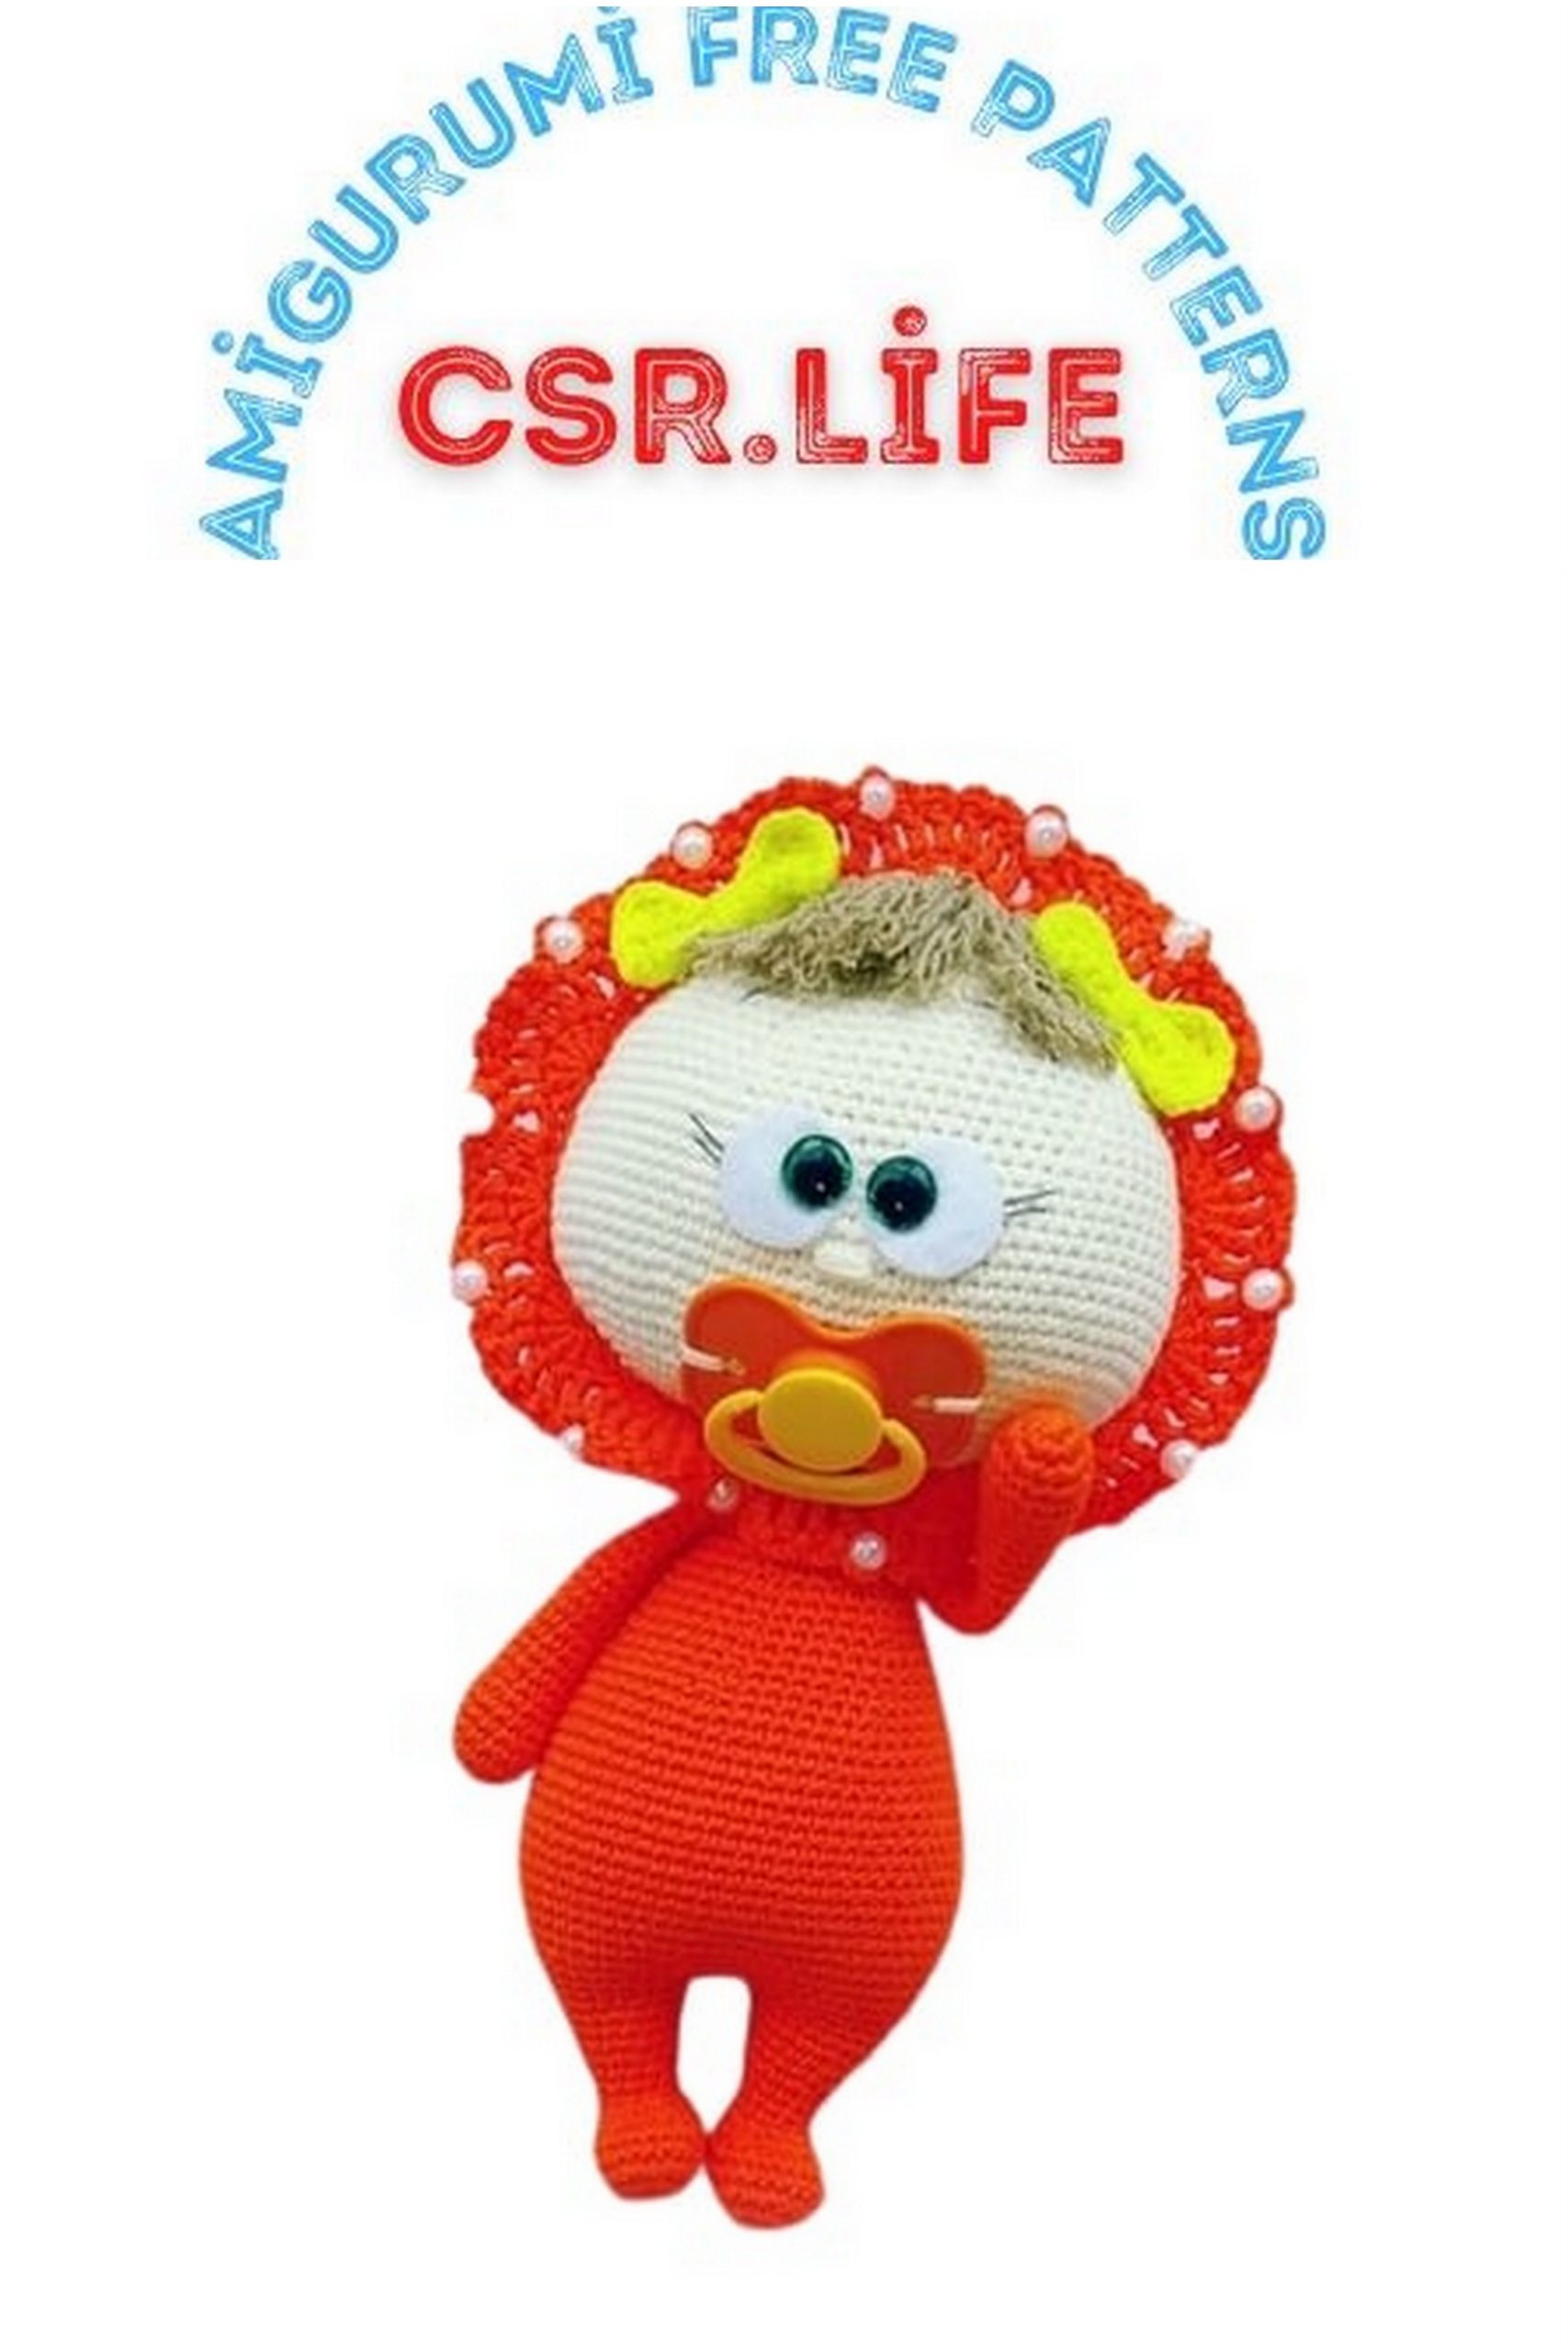
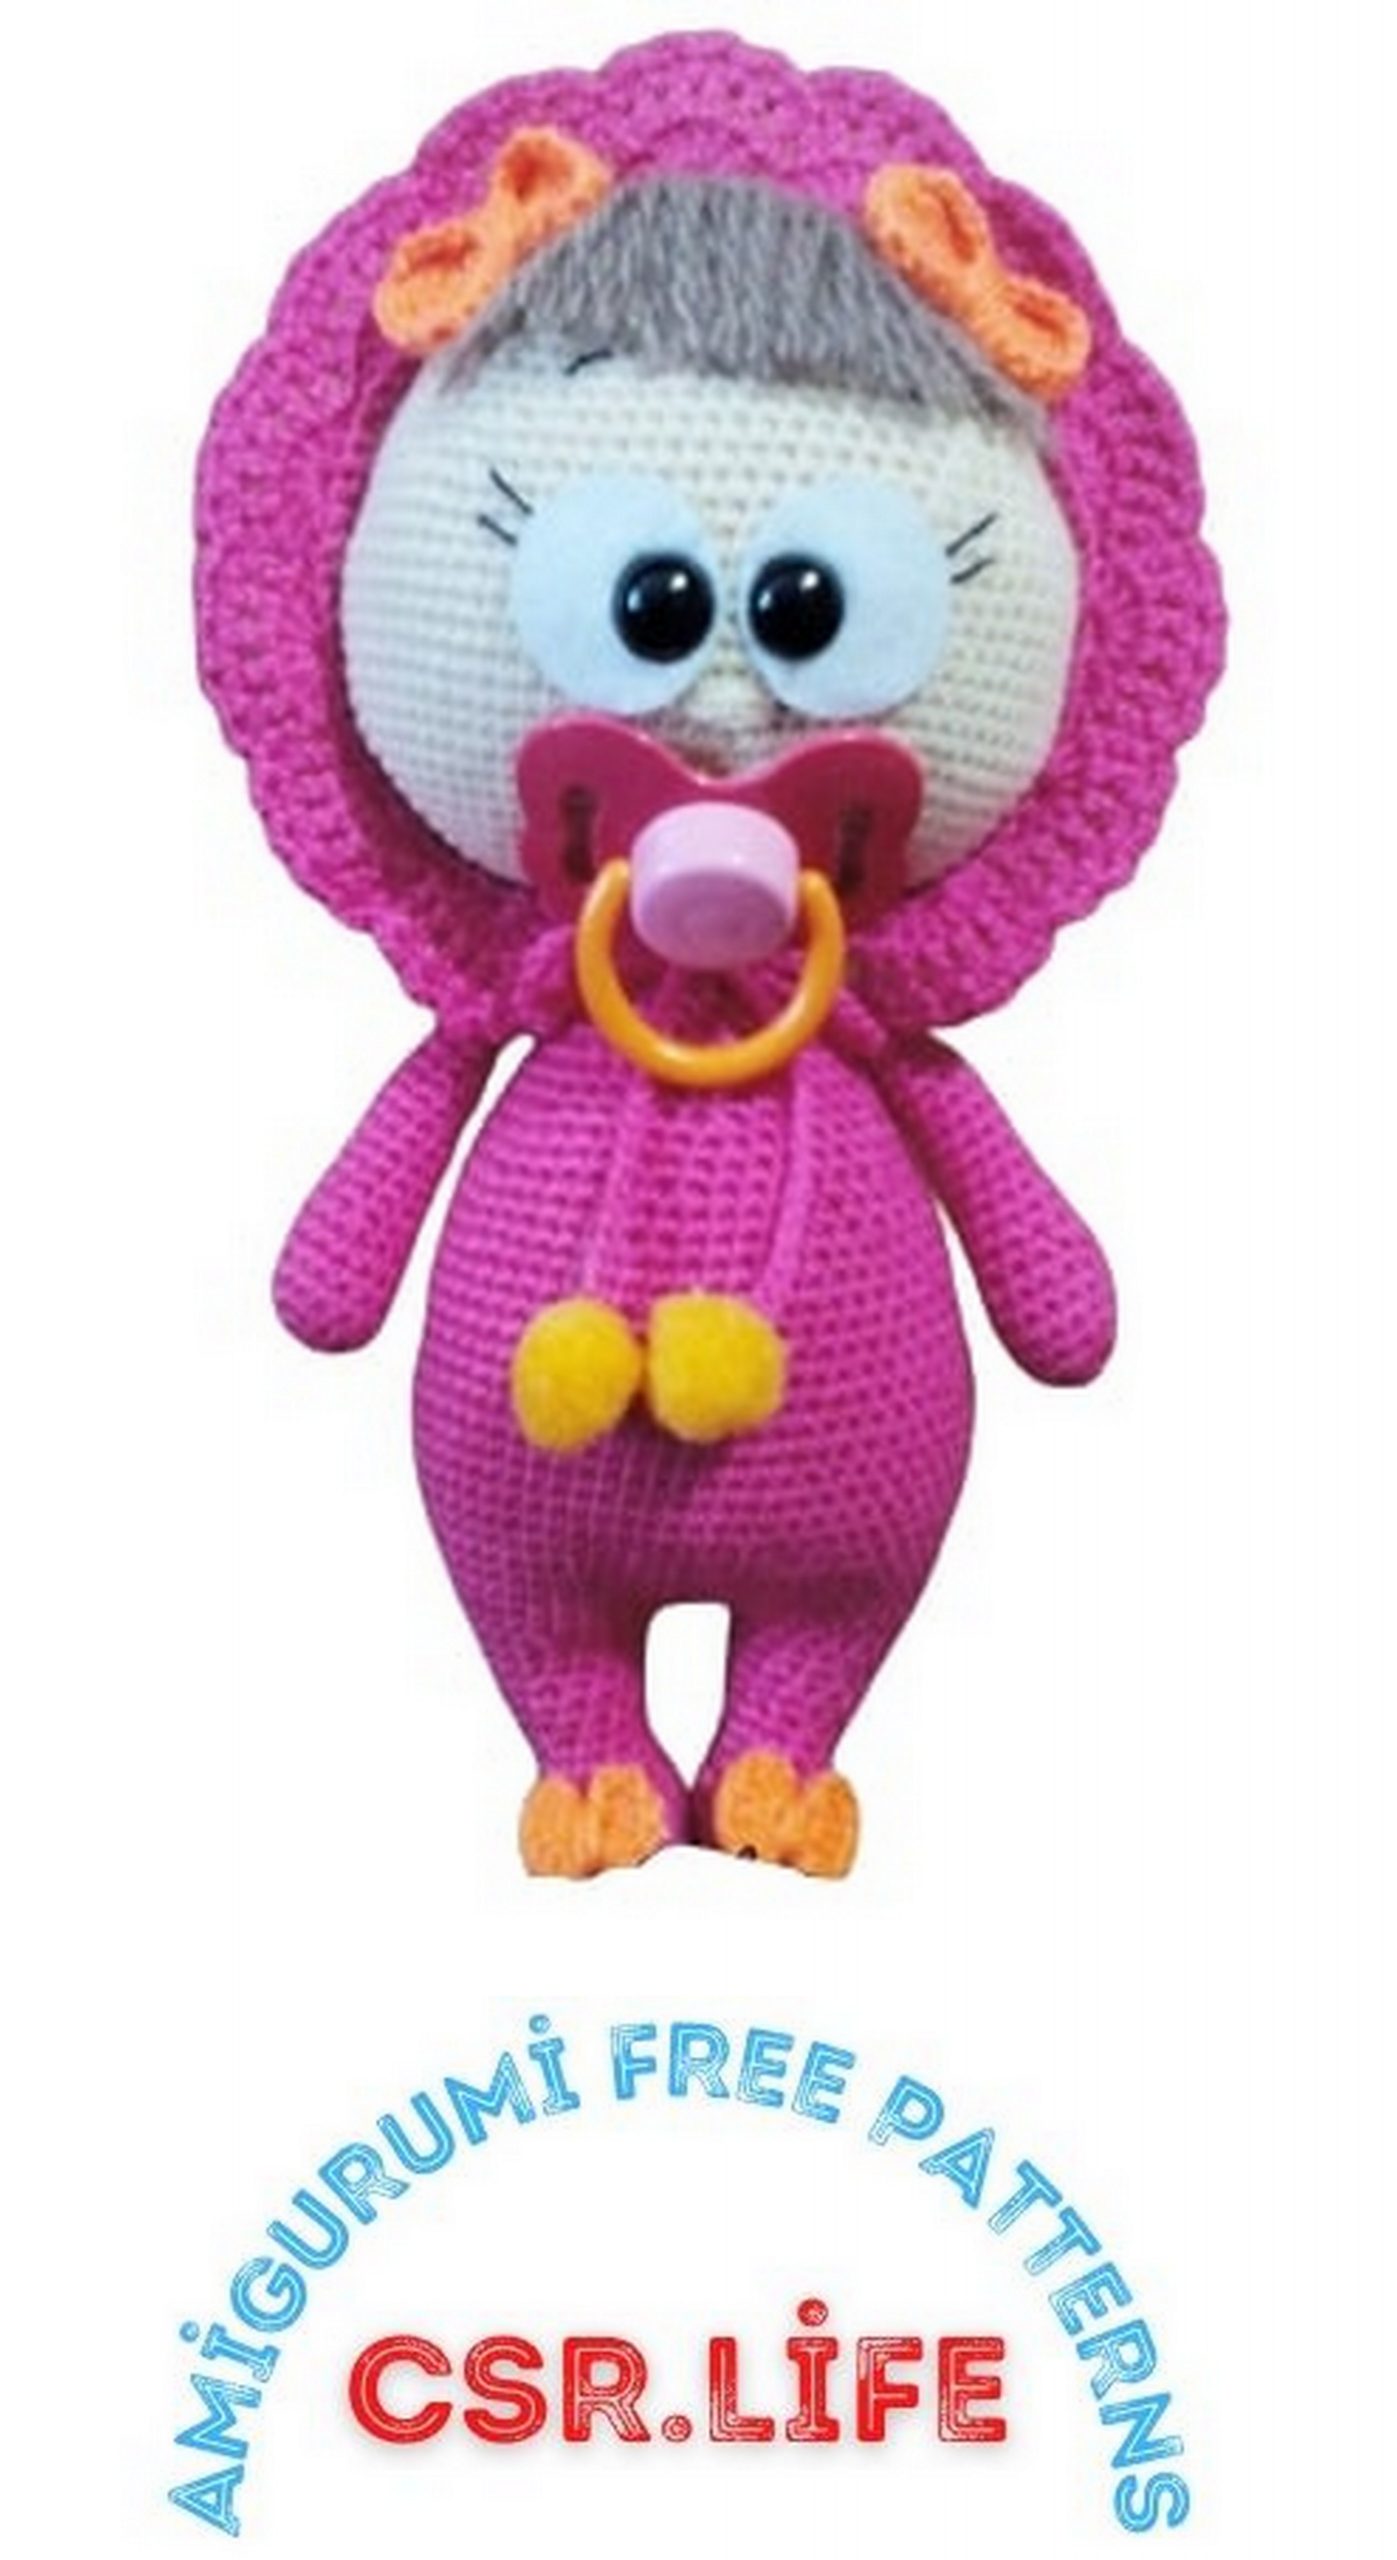
Pacifier Doll Amigurumi Free Pattern
We continue to share amigurumi free patterns with the highest quality images with you. In this sharing, we brought together the amigurumi pacifier doll pattern.
Abbreviations:
sc – single crochet
st – stitch
ch – chain stitch
Dec – sc next 2 stitches together
inc – sc in indicated stitch 2 times
rnd(s) – sl stround(s)
hdc – half double crochet
sl-st -slip stitch
Necessary materials
1. Two skeins of the main color
(semi-cotton Jeans from Yarn Art, 50 g \ 160 m)
2. One skein for a head of a different color (the same Jeans)
3. Remains of yarn of any color for bows (I also have Jeans)
4. Remains of yarn for hair (also Jeans)
5. A little black thread (you can iris, I have Anna, you can use ordinary sewing threads in several folds)
6. A pair of eyes 12 mm on a secure mount (you can use half beads)
7. Instant glue (I take gel. It glues better, lasts longer, and
for the same price as glue)
8. Pacifier (it is better to take a nipple that is rounded inward to
probably stuck) or a decorative nipple, hang it around the neck.
9. Gypsy needle
10. Long sushi stick (or wire)
11. A little bit of felt (fleece or other thick fabric for the eyes)
12. Five rubles (circle for the peephole)
13. Hook 2.5
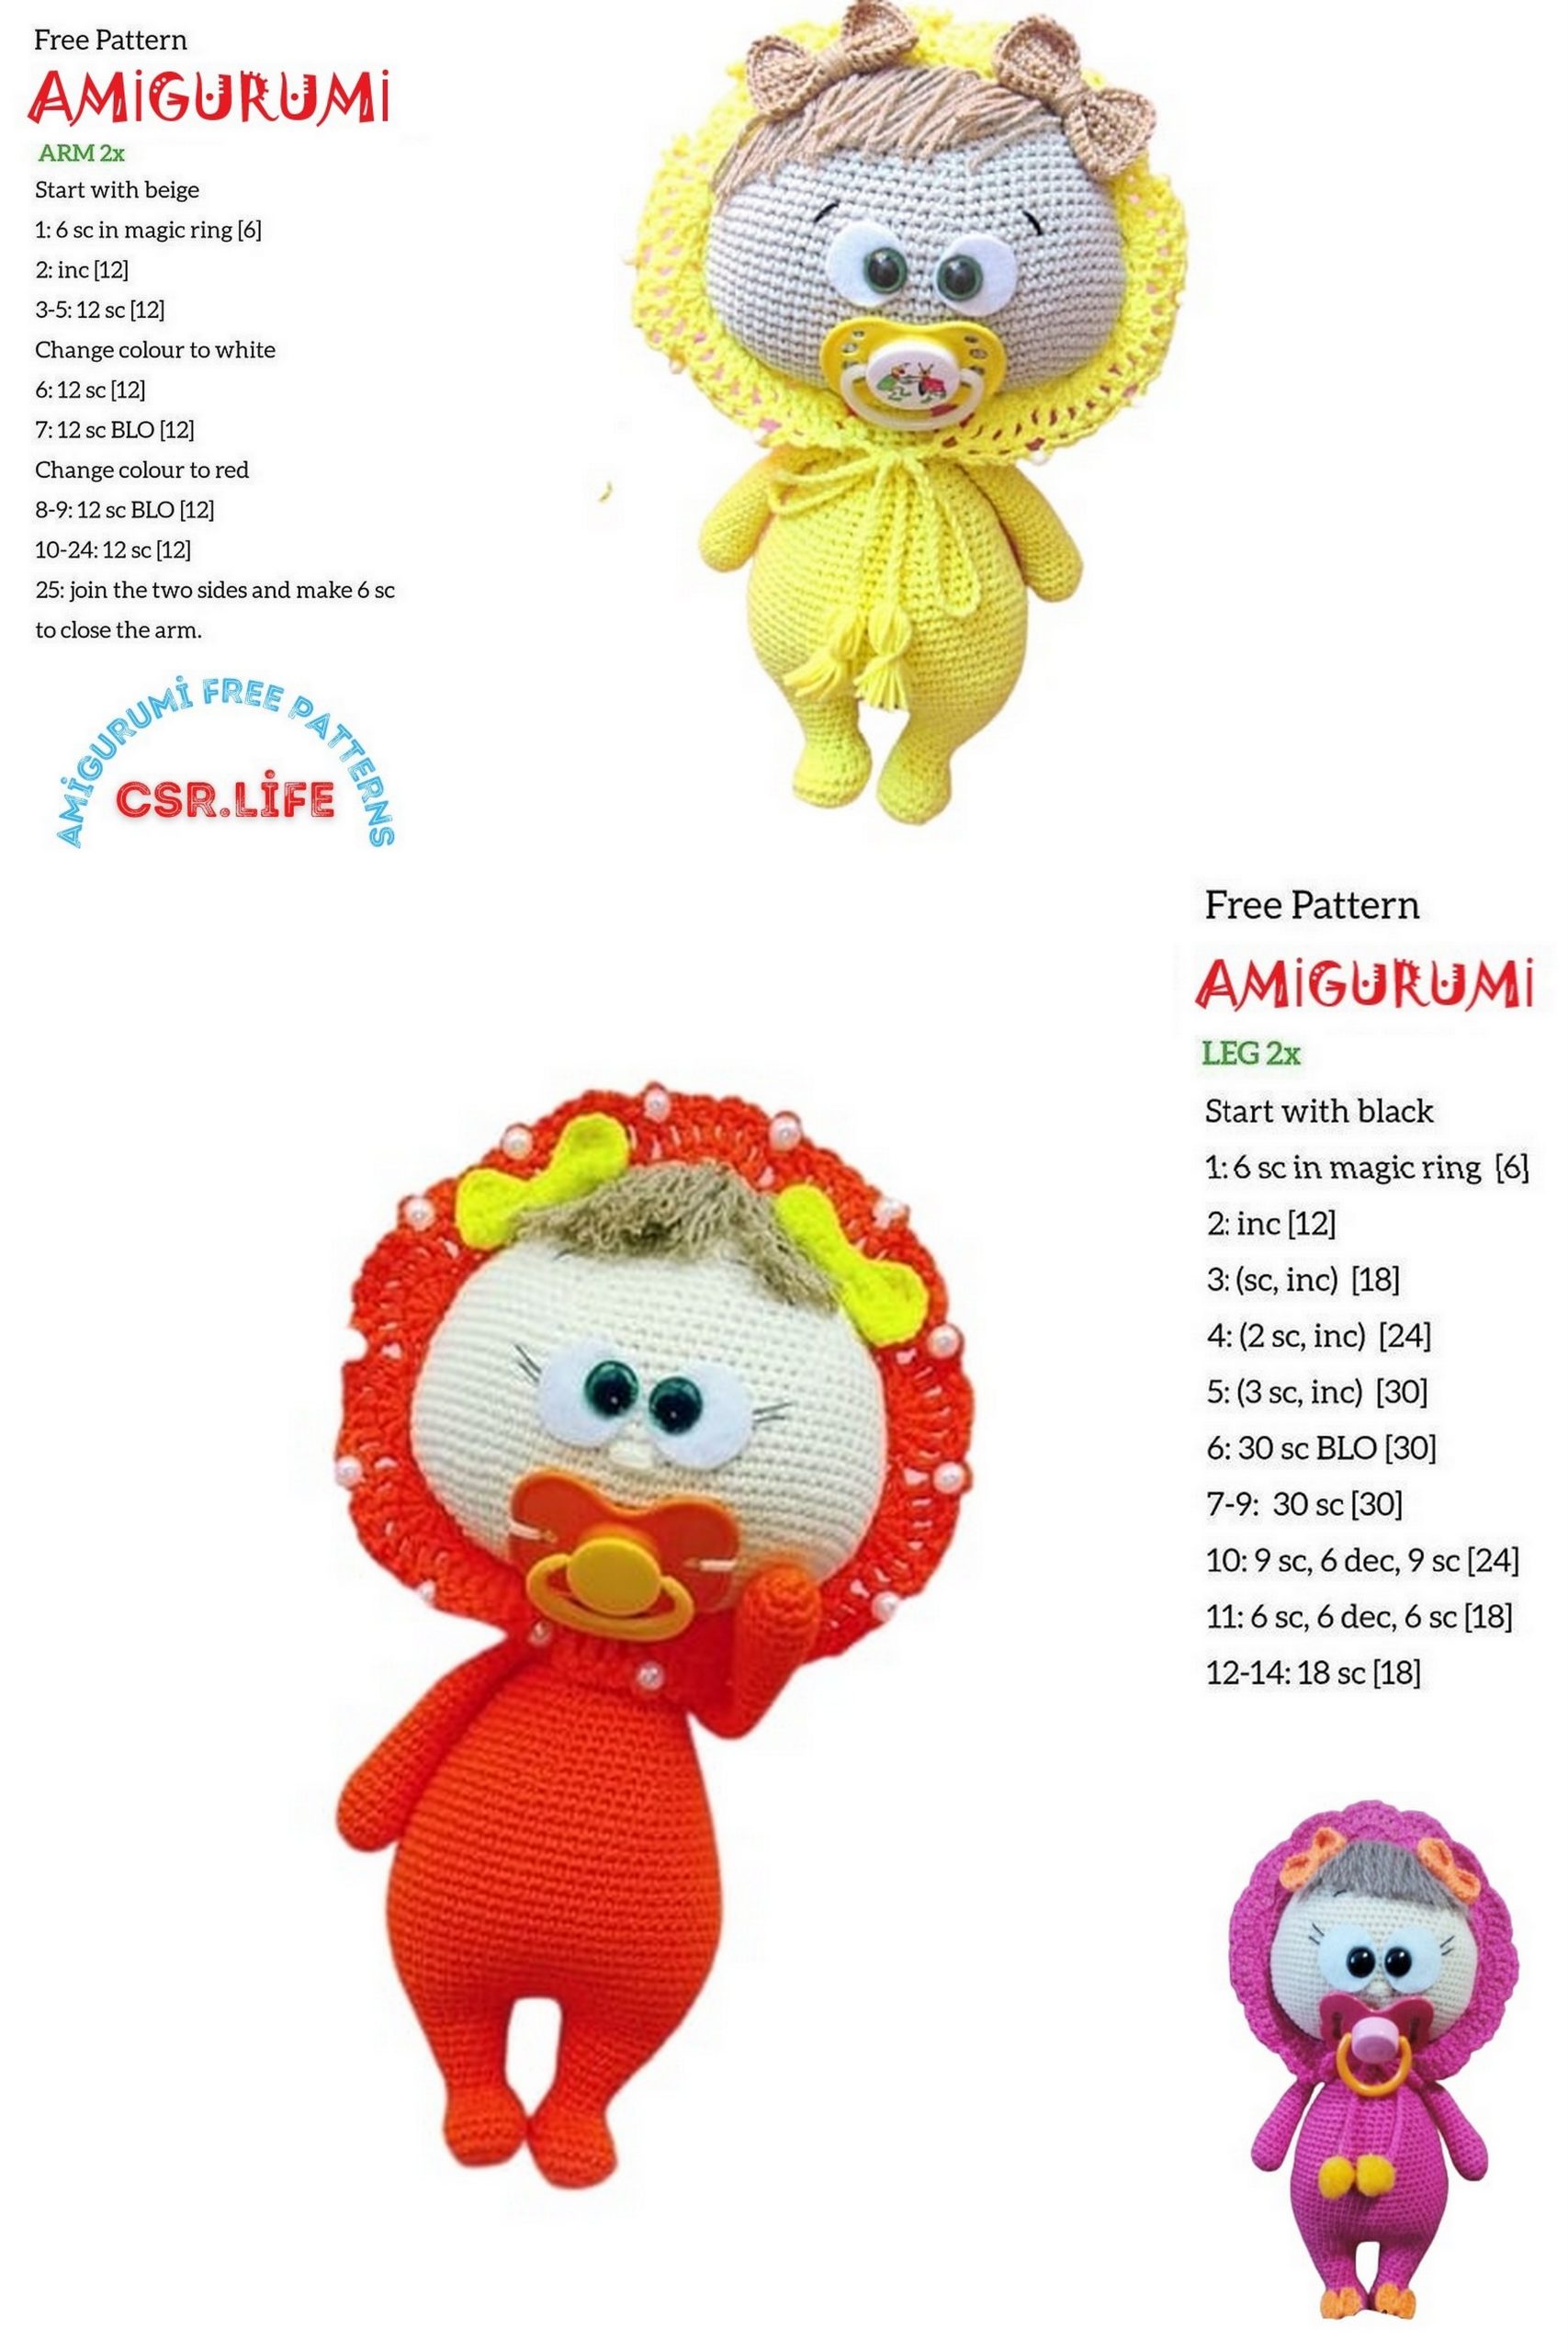
Handles (2 pcs.)
We knit in the main color.
1.6 sc into magic ring = 6
2.6 inc = 12
3. (3 sc, inc) * 3 = 15
4-6. 15 sc = 15
7. (3 sc, dec) * 3 = 12
8-16. 12 sc = 12
17. (dec, 4 sc) * 2 = 10
18-20. 10 sc = 10
21. Dec, 8 sc = 9
22.9 sc = 9
23. We fill the handle a little. It’s just the bottom for me. We fold to do in half and tie the halves with four sc. Secure the thread and cut, leaving a long end to be sewn on.
Legs (2 pcs.)
We start with the foot.
6 ch.
1. In the second loop from the hook 3 sc, 3 sc in the chain, 3 sc in the last loop, 3 sc in the chain – 12
2.inc x 3, 3 sc, inc x 3, 3 sc – 18
3. (sc, inc) x 3, 3 sc (sc, inc) x 3, 3 sc – 24
4-5. 24
6.10 sc, 7 dec – 17
7.sc, dec, 2sc, dec, sc, 4 dec, 1 sc – 11
8.11
9.3 sc, inc, 7 sc – 12
10.12
11. (2 sc, inc) x 4 – 16
12-13. sixteen
14. (3 sc, inc) x 4 – 20
For the right leg, knit 12 sc so that the last sc is in the middle of the leg on the side. Leave a long thread.
I use it as a marker on my body.
Leave the left leg as it is, we will form the body from it.
Fill the bottom of the legs a little.
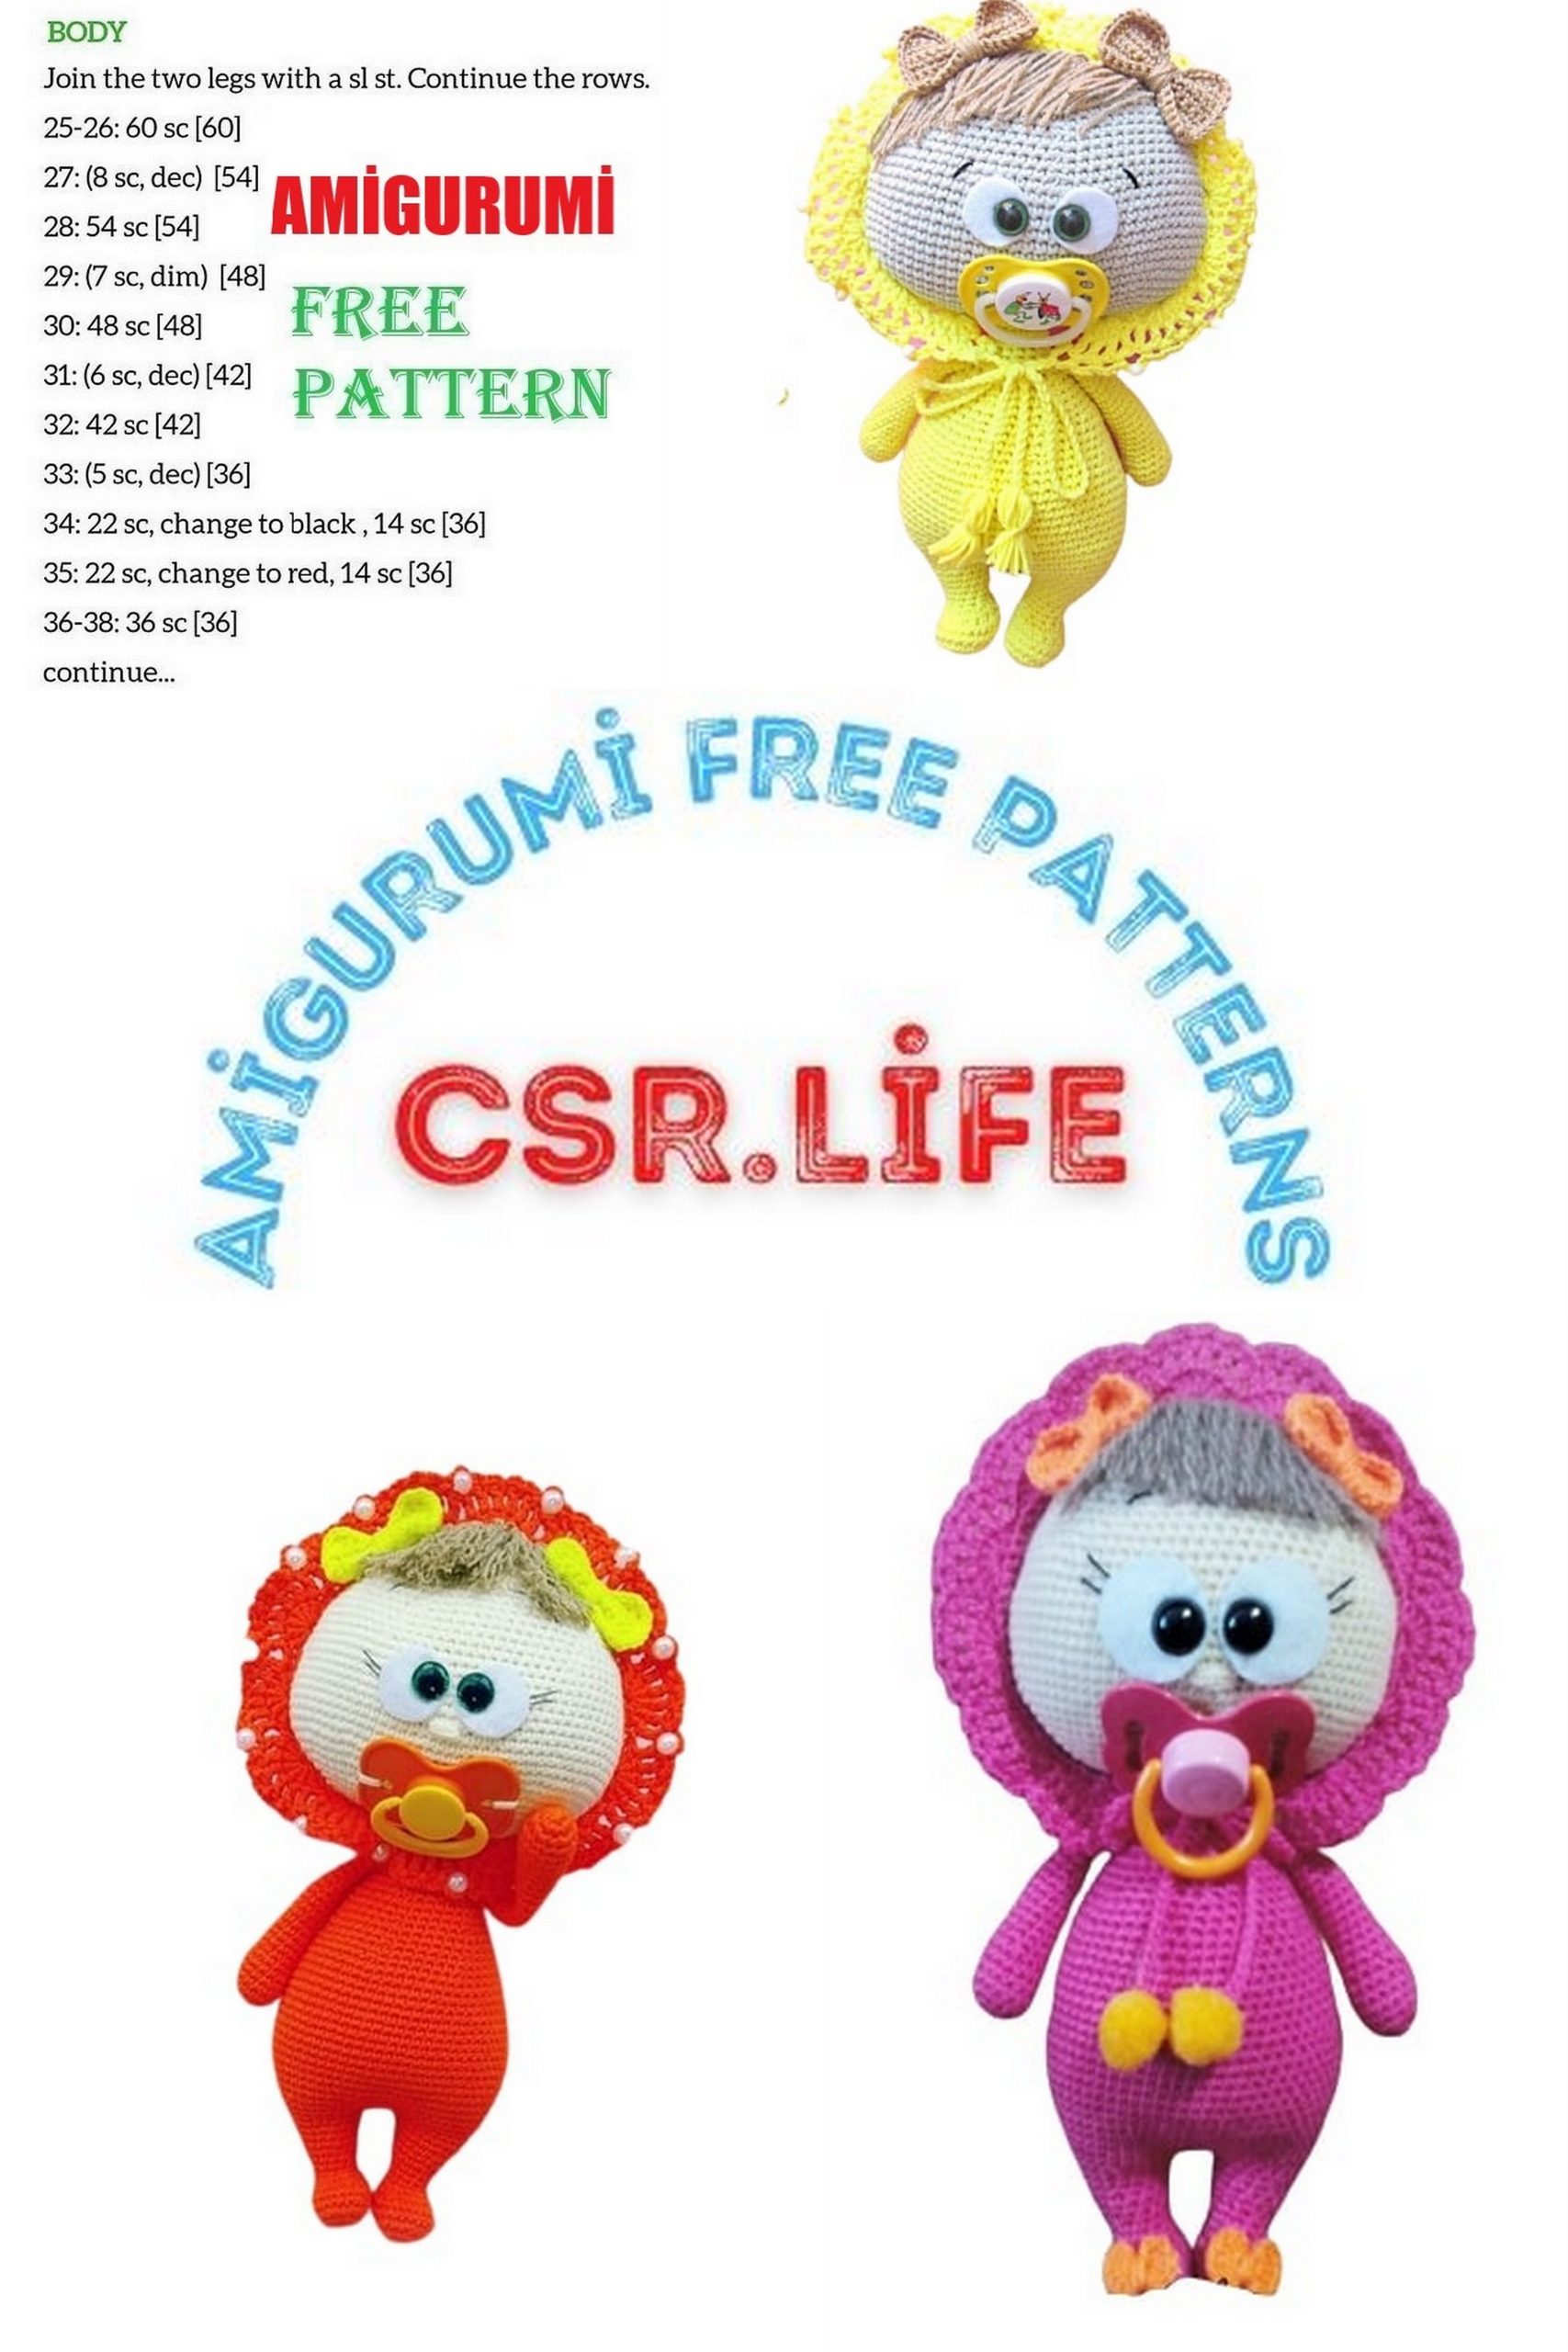
Body.
We form the body from the legs.
Let me remind you that the row on the left leg begins almost from the middle of the leg in front.
A little need to adjust it to the scheme. To do this, knit another 8 sc.
Now the row starts almost in the middle of the leg at the back.
Knit 17 sc. Fold the leg, we stopped exactly on the side. Place your right leg next to it. Look, we should tie the legs evenly in the middle of the sides of the legs.
Crochet 3 ch and join sc left leg with right leg into the last column of right leg.
We have 21 loops (17 on the left leg, 3 ch and 1 sc when the legs were connected). Work the remaining 19 sc over the leg. Then tie 3 sc along the ch chain and 3 sc along the left leg to close the row.
Thus, we connected the legs and began to shape the body.
It turned out a total of 46 sc. Be sure to mark the beginning of the row.
I do this with the thread that remains long from the right leg.
Tip: knit this thread in several columns when you move to the right leg, and then pull it so that there is no hole in this transition.
Now we knit the body in a circle.
1. 46 sc (remember that we will now chain the three sc on the other side).
2. (4sc, inc) * 9 = 54 (and tie another stitch to close the row).
Should be 55 sc, as they say in all descriptions. But purely mathematically, this cannot be so. It turns out only 54 sc and one more just remains. And nowhere do they write that it just needs to be tied, so as not to go astray from the whole scheme, because to redo everything, adjust the rest of the rows, you need to recount everything.
3.55 sc = 55
4. (10 sc, inc) * 5 = 60
5.60 sc = 60
6. (9 sc, inc) * 6 = 66
7-11. 66 sc = 66
12.10 sc, dec, 32 sc, dec, 20 sc = 64
13.64 sc = 64
14.10 sc, dec, 31 sc, dec, 19 sc = 62
15.62 sc = 62
16.10 sc, dec, 30 sc, dec, 18 sc = 60
17.60 sc = 60 (decreases are from the sides of the lali).
18.10 sc, dec, 29 sc, dec, 17 sc = 58
19.10 sc, dec, 28 sc, dec, 16 sc = 56
20.10 sc, dec, 27 sc, dec, 15 sc = 54
21. (7sc, dec) * 6 = 48
22.48 sc = 48
23. (6 sc, dec) * 6 = 42
24-25. 42 sc = 42
26. (5 sc, dec) * 6 = 36
27-28. 36 sc = 36
29. (4 sc, dec) * 6 = 30
30.30 sc = 30
31 (3 sc, dec) * 6 = 24
32.24 sc = 24 (in this row knit the handles of those who want to knit them, I will sew on.
Do not rush, see that the handles are tied exactly on the sides).
33. (sc, dec) * 8 = 16
34-35. sixteen
Knit as many stitches so that the last one is in the back. in the middle, and leave a long thread, which then sew the head to body.
Head.
So, first, let’s prepare the eyes. Two felt circles. Make punctures in about those places. the “white” eye is slightly lowered downward. Insert eyes.
Next is the head itself.
18 ch
1.3 sc in 2nd loop, 15 sc, 3in1, 15sc = 36
2.3 inc, 15sc, 3inc, 15sc = 42
3. (sc, inc) * 3, 16sc, inc, (sc, inc) * 2, 15sc = 48
4. (2sc, inc) * 3, 17sc, inc, (2sc, inc) * 2, 15sc = 54
5. (3sc, inc) * 3, 18sc, inc, (3sc, inc) * 2, 15sc = 60
6. (4sc, inc) * 3, 19sc, inc, (4sc, inc) * 2, 15sc = 66
7. (5sc, inc) * 3, 20sc, inc, (5sc, inc) * 2, 15sc = 72
8. (6sc, inc) * 3, 21sc, inc, (6sc, inc) * 2, 15sc = 78
9. (7sc, inc) * 3, 22sc, inc, (7sc, inc) * 2, 15sc = 84
10. (8sc, inc) * 3, 23sc, inc, (8sc, inc) * 2, 15sc = 90
11-16. 90 sc = 90
17.35 sc, 1 ch, skip 1 sc, 3 sc, 1 ch, skip 1 sc, 50 sc = 90
… Make sure your eyes are centered. If my they are shifted in a column, then decrease or incline as much as you need.
18.35 sc, 1 sc chain, 3 sc, 1 sc chain, 50 sc = 90
19-20. 90 sc = 90
21.12 sc, dec, (16sc, dec) * 4, 4sc = 85
22.85 sc = 85
23.11 sc, dec, (15sc, dec) * 4, 4sc = 80
24.80 sc = 80
25.10 sc, dec, (14sc, dec) * 4, 4sc = 75
26.75 sc = 75
27.9 sc, dec, (13sc, dec) * 4, 4sc = 70
28.8 sc, dec, (12sc, dec) * 4, 4sc = 65
29.65 sc = 65
30.7 sc, dec, (11sc, dec) * 4, 4sc = 60
31. (8 sc, dec) * 6 = 54
32.54 sc = 54
33. (7 sc, dec) * 6 = 48
34. (6 sc, dec) * 6 = 42
35.42 sc = 42
36. (5 sc, dec) * 6 (36)
37. (4 sc, dec) * 6 (30)
Insert eyes and fill your head.
38. (3sc, dec) * 6 (24)
39. (2sc, dec) (18)
40.9 dec
Pull the remaining hole with a needle, hide the thread and cut.
When the head is ready, glue on some felt so that it does not bulged.
Cap and bows.
1.3sc into 2nd loop, 6sc, 3in1, 6sc = 18
2.3inc, 6sc, 3inc, 6sc = 24
3. (sc. Inc) * 3, 7sc, inc, (sc, inc) * 2, 6sc = 30
4. (2sc. Inc) * 3, 8sc, inc, (2sc, inc) * 2, 6sc = 36
5. (3sc. Inc) * 3, 9sc, inc, (3sc, inc) * 2, 6sc = 42
6. (4sc. Inc) * 3, 10sc, inc, (4sc, inc) * 2, 6sc = 48
7. (5sc. Inc) * 3, 11sc, inc, (5sc, inc) * 2, 6sc = 54
8. (6sc. Inc) * 3, 12sc, inc, (6sc, inc) * 2, 6sc = 60
9. (7sc. Inc) * 3, 13sc, inc, (7sc, inc) * 2, 6sc = 66
10. (8sc. Inc) * 3, 14sc, inc, (8sc, inc) * 2, 6sc = 72
11. (9sc. Inc) * 3, 15sc, inc, (9sc, inc) * 2, 6sc = 78
12. (10sc. Inc) * 3, 16sc, inc, (10sc, inc) * 2, 6sc = 84
13. (11sc. Inc) * 3, 17bn, inc, (11sc, inc) * 2, 6sc = 90
14. (12sc. Inc) * 3, 18sc, inc, (12sc, inc) * 2, 6sc = 96
15-25. 96 sc = 96
26.95 sc, ch, skip the last sc in the row and start a new one. (if you can’t get a hole exactly in the middle along my columns, adjust for yourself, subtract or add the required amount)
27.95 sc, 1 sc chain = 96
28.96 sc = 96
29. (14 sc, dec) * 6 = 90
30. Next, according to the description, there is a row of 90 ch, but try on your cap. I have it very large for the head, so I made another number of reductions, otherwise if you leave it like this and sew it on, it will not be beautiful, the cap will not fit the head, but will hang. Therefore, if this is the same for you, knit another row decrease: (13 sc, dec) x 6 = 84. The base is ready.
Next, unfold the cap with the inside towards you and tie back with 6 sc connecting posts.
Now, starting from the 7th sc, according to the pattern, for the back half loop, knit the lace part. At the end, as at the beginning, you should leave 6 sc. The first row of lace ends with a connecting post (as the row begins).
Try to keep the distance the same at the beginning and end of the row.
If you want more ruff, then make the distance between the posts not in two, but in one loop, I do not advise you to do it less often, it will be bad, the cap will tighten.
In my opinion, it will be optimal exactly as mine is: not a lot and not a little. Fasten the thread and leave a long one, with it we will sew the cap to the head.
The cap is ready!
We will immediately knit a couple of bows. According to the diagram, link them. I have it rectangle 10 ch x 6 rows + sc strapping around the perimeter. Leave a long thread, bring it out with the needle in the middle of the bow. Fold the bow towards the center nicely. The remaining thread in a few circular motions drag the middle., fasten the thread at the back and do not cut it off, tomorrow we will sew a bow to the head with it.
The bow is ready! Link the second one.
Assembly.
1. Sew the handles to the torso.
2. Now let’s make out the face. Sew the nose with a few stitches. Embroider the eyebrows and eyelashes with black thread. If you have a glue nipple, do not embroider your mouth. If you use a decorative pacifier like I did this time, embroider the baby’s mouth.
3. We put on a cap. Find the middle at the bottom of the head. Put on the cap by threading the needle through the hole. Change the needle to a sushi stick. Gently thread it into your head while screwing it in. It can go hard at first. Try to make it straight, in the middle of the entire head. Screw it up to the top. cap Pull well. Now bring the thread from the cap to the base with a needle.
Sew on the cap.
4. Making hairs. With another color, cut the same strings of the desired length. Don’t forget that they fold in half. Crochet the threads between the posts and make a couple of knots. Next, without missing the columns, we make the rest of the hair. Make as many hairs as you like. I only do bangs, then cut a little.
Sew bows on the sides.
5. Sew on the head. The sushi stick can be long.
Two options:
– leave this, lower the long bottom into the leg, or just cut the tip. My wand fit perfectly. Do not rush to shove her, at first it is difficult. Gently screw the stick into the filler. Sew on the head with a long thread from the torso, starting at the neck. Tap the toy a little in the neck area.
6. Brushes. First, from the cap on both sides, tie chains of 50 ch.
Leave long strands at the ends. Fold 5 strands into a tassel. Fold them in half. Pass a long thread from the chain into the ring, and put a short thread in the middle, tie it and tie the tassel to the chain.
Tie the tassels into a bow.
7. Glue or hang the pacifier.