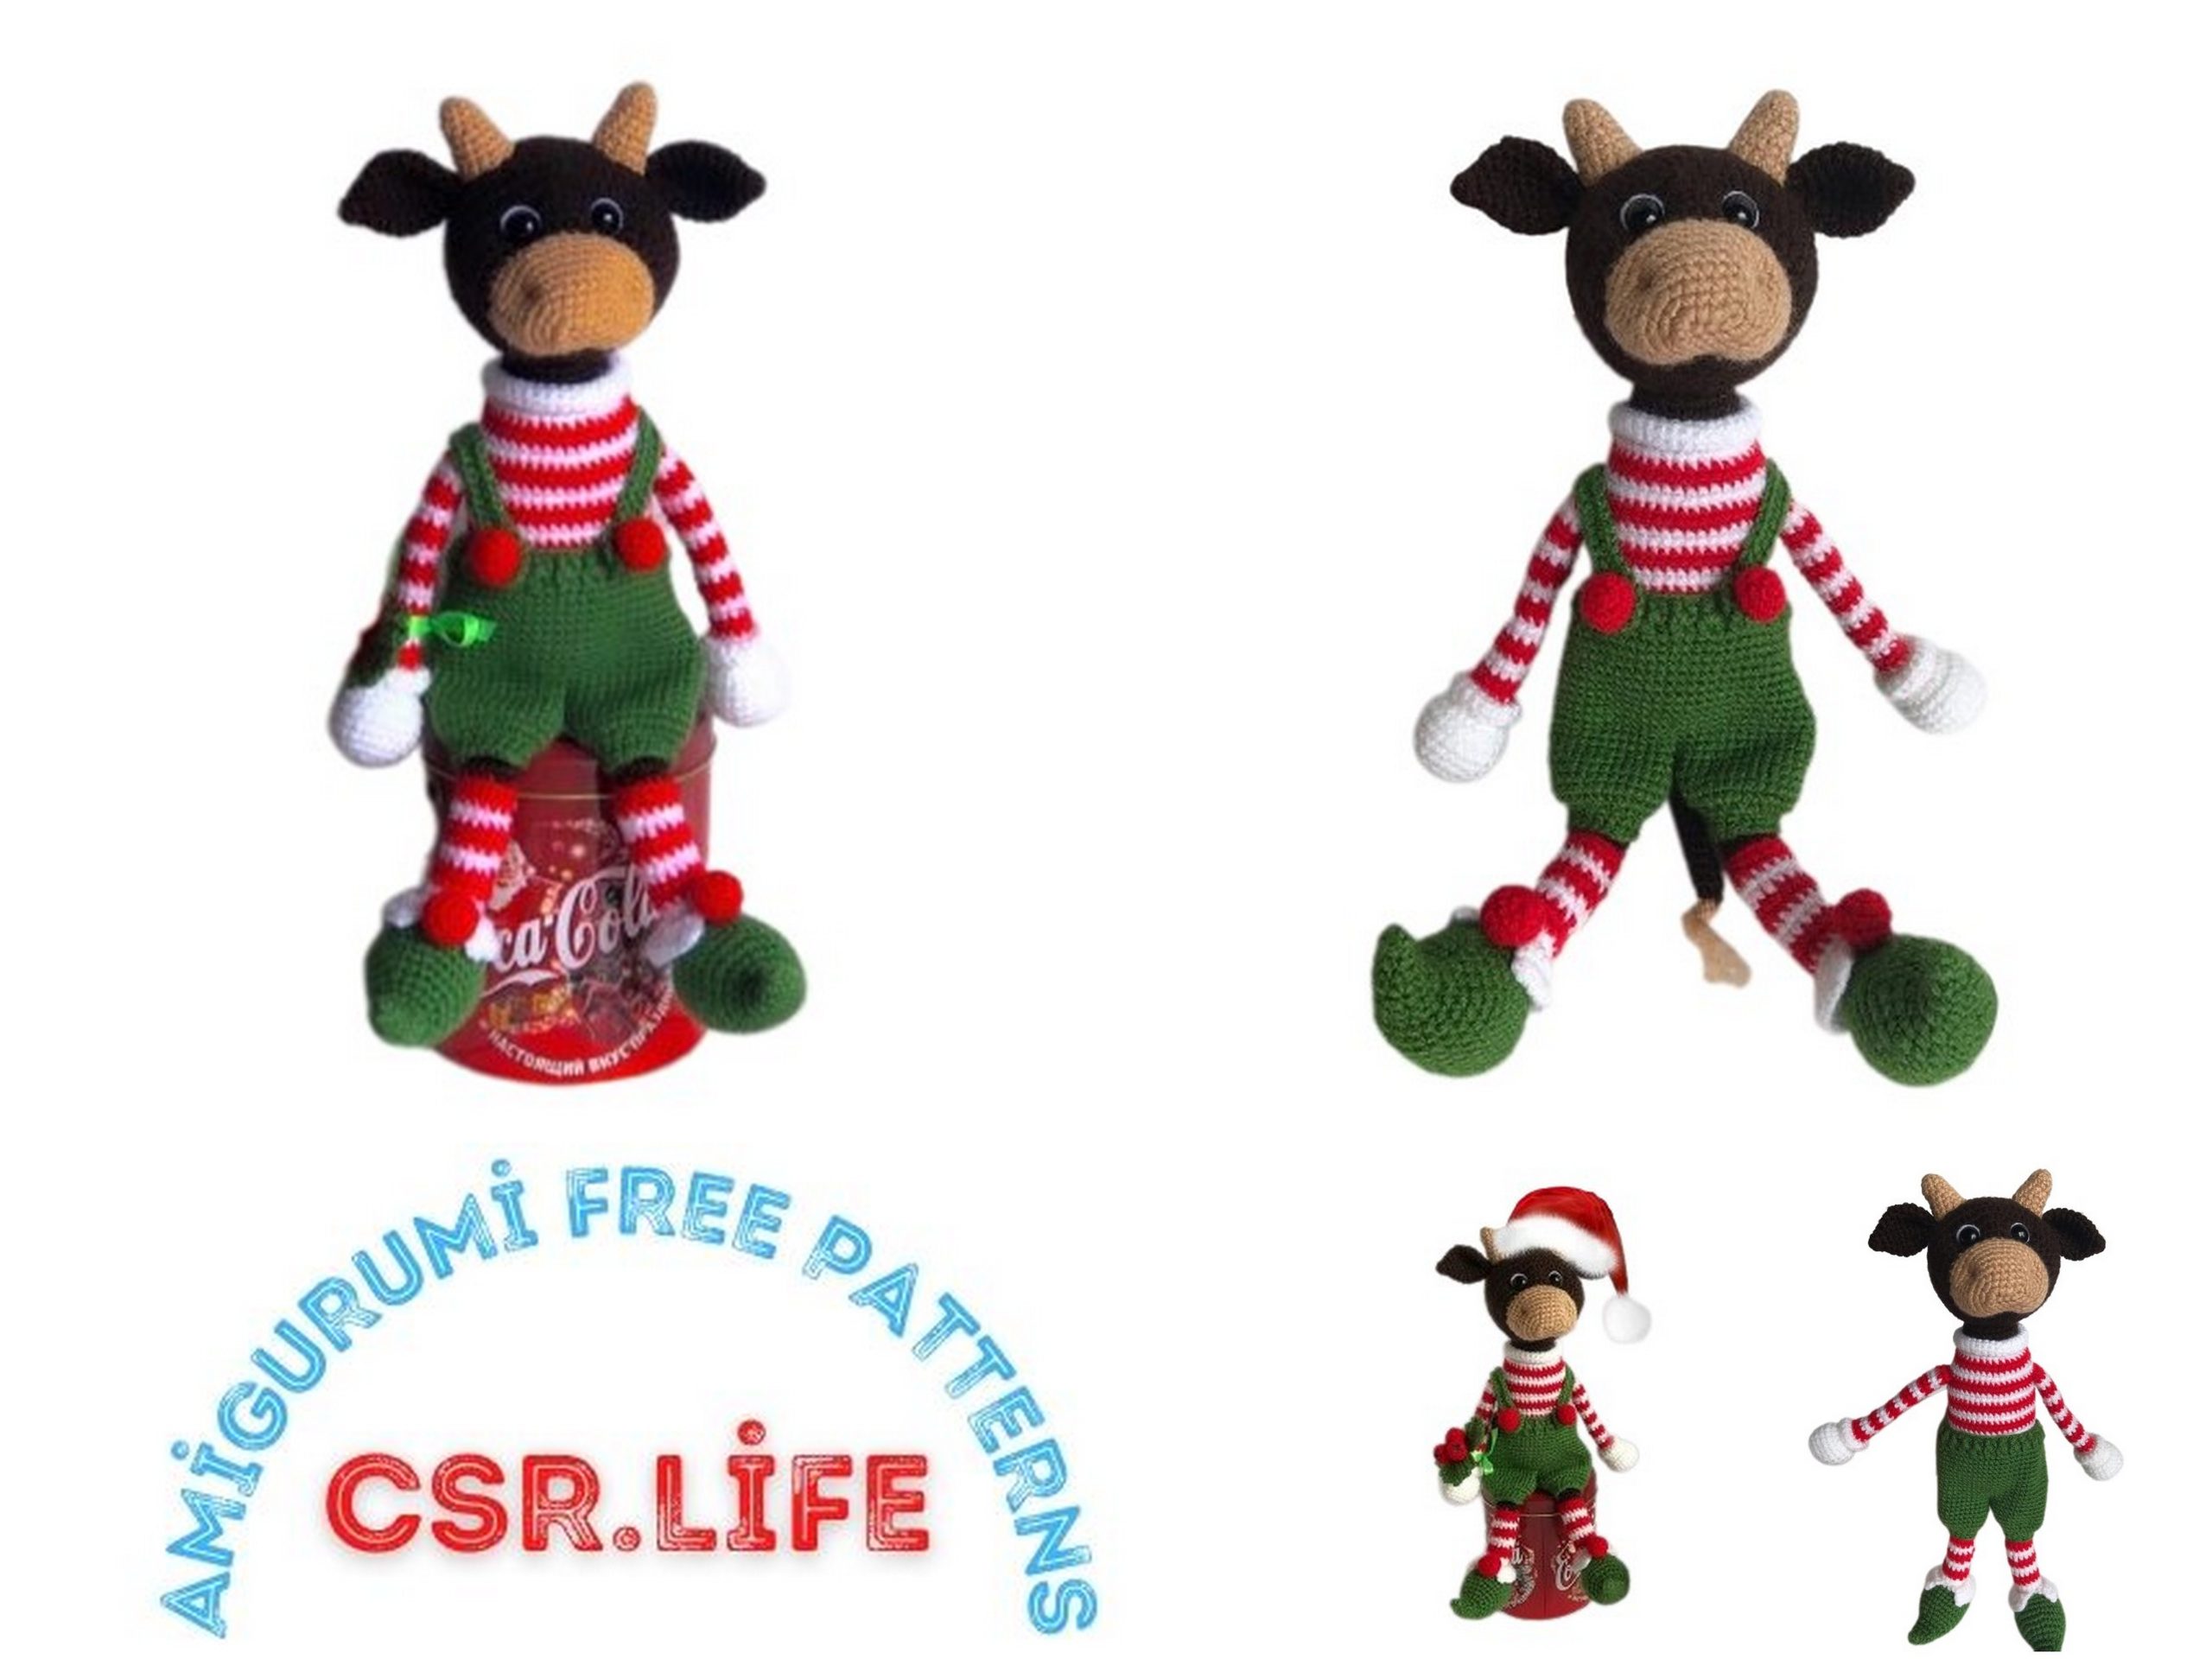
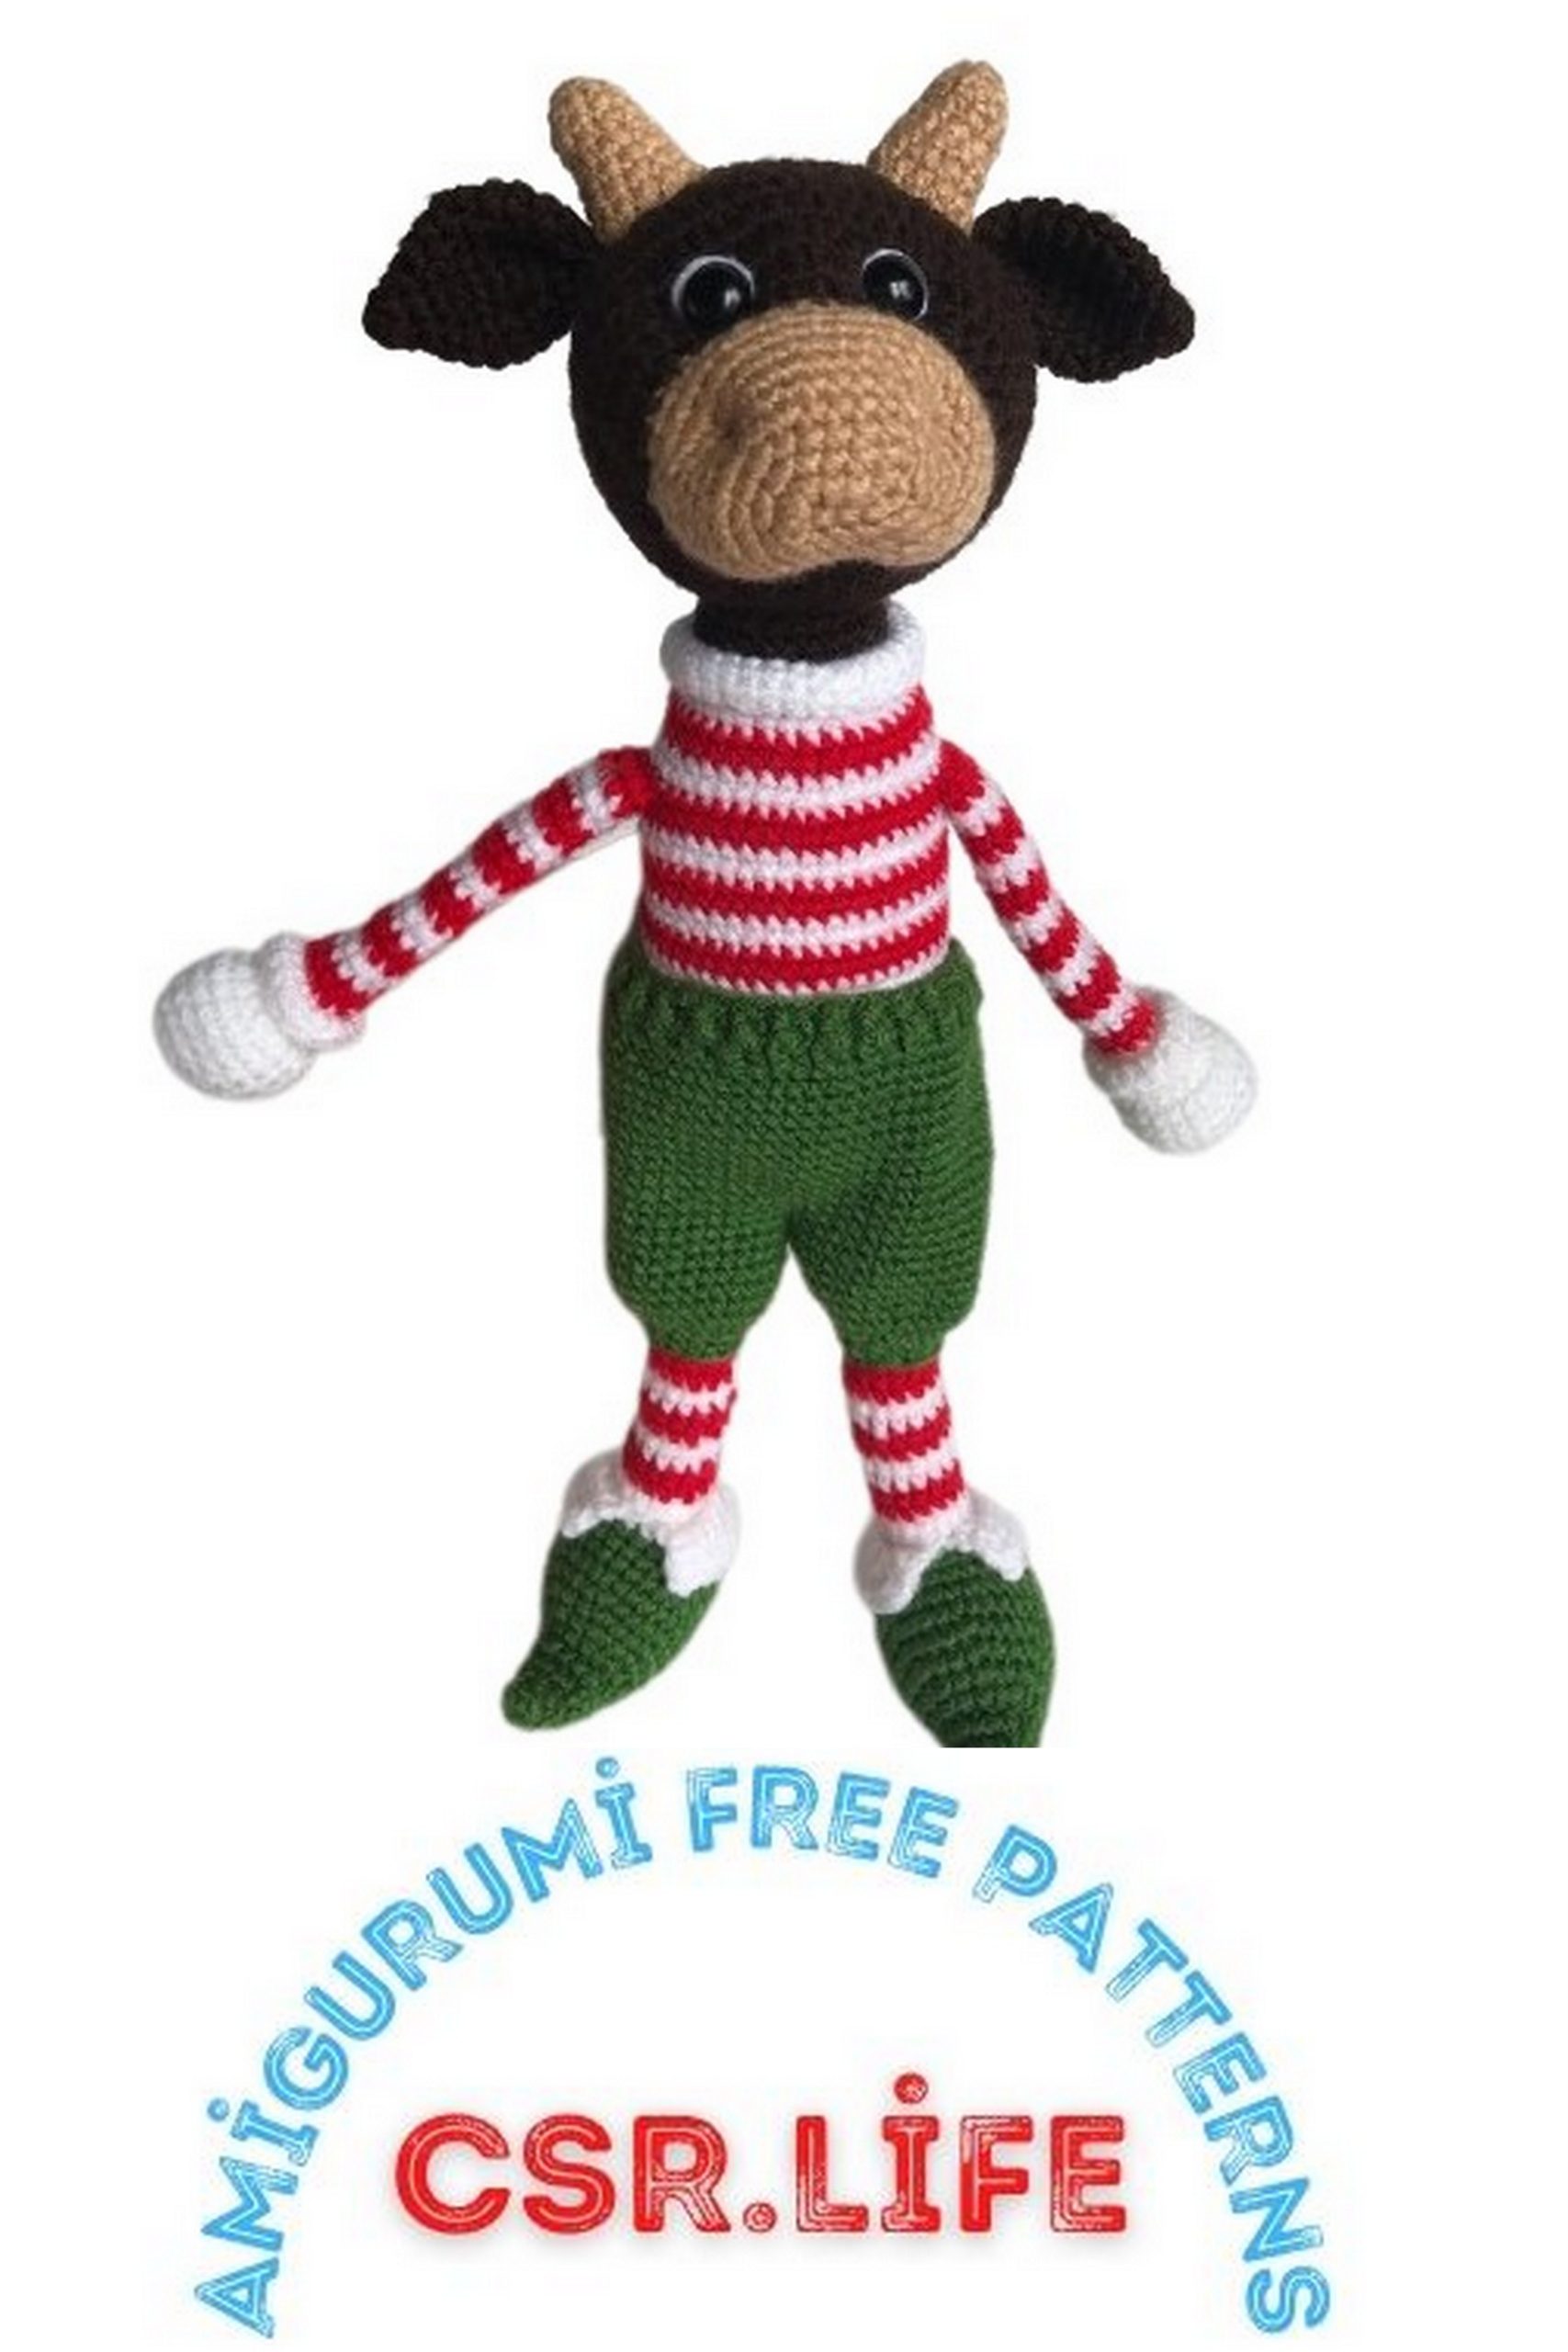
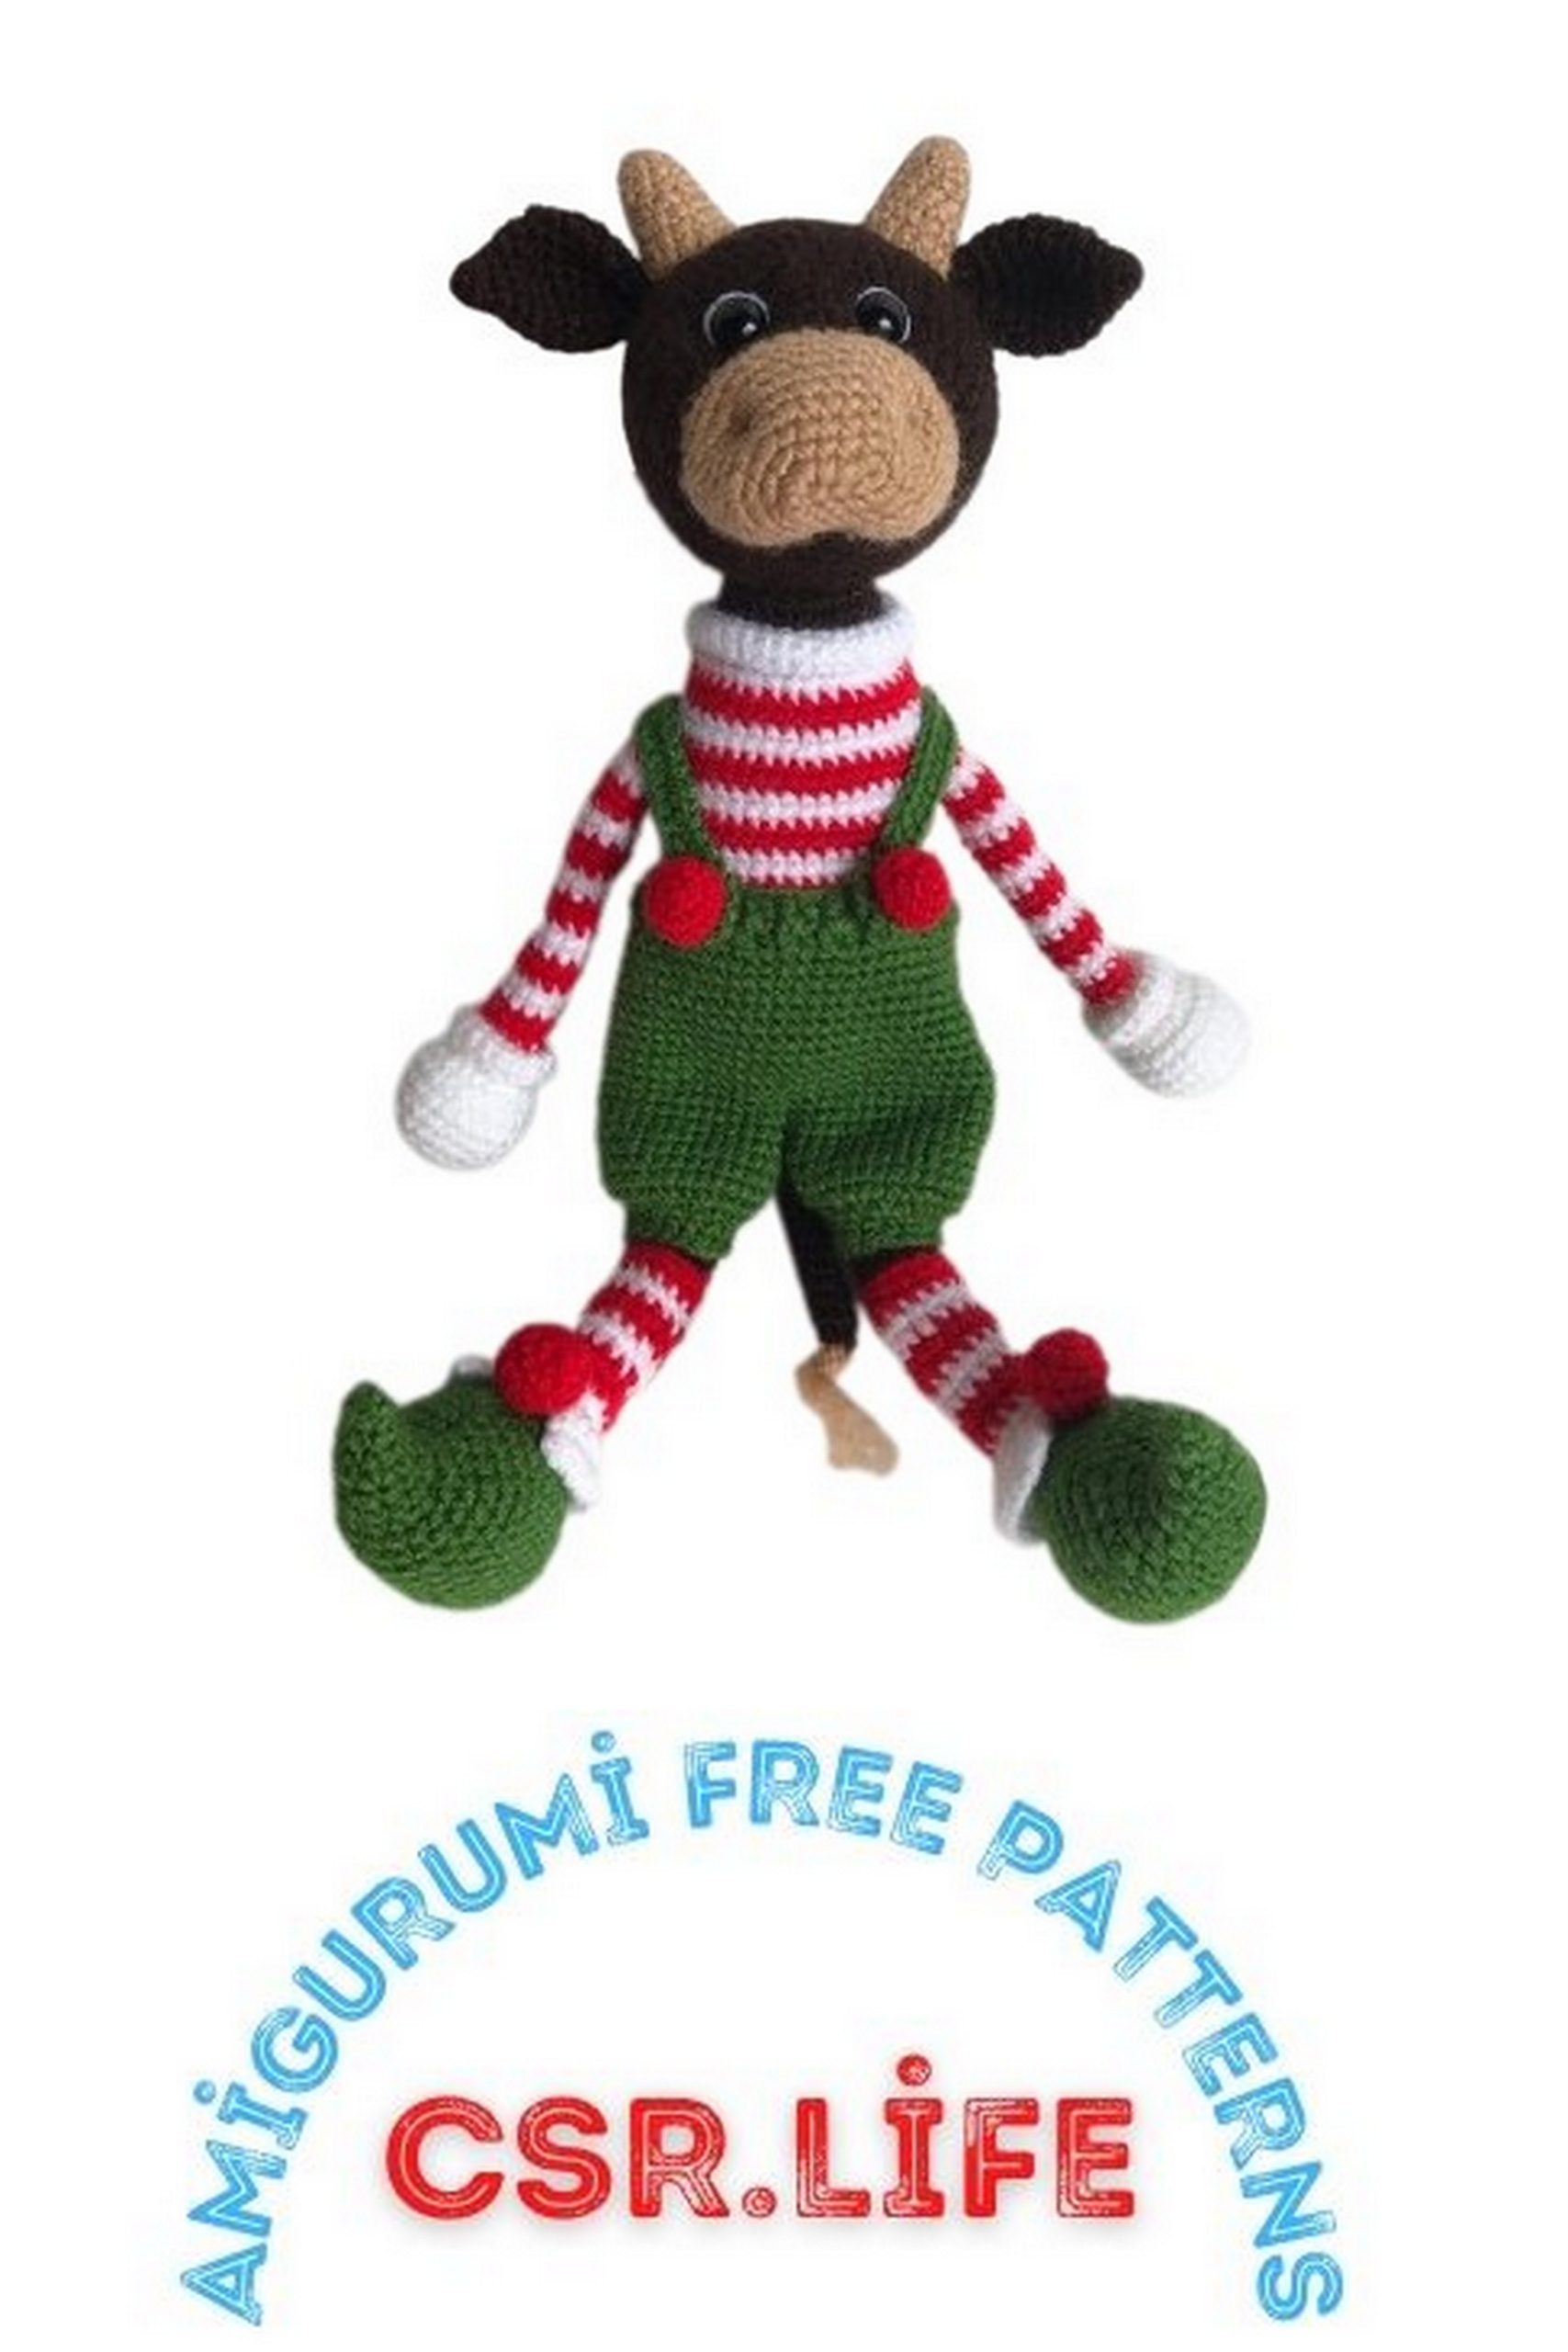
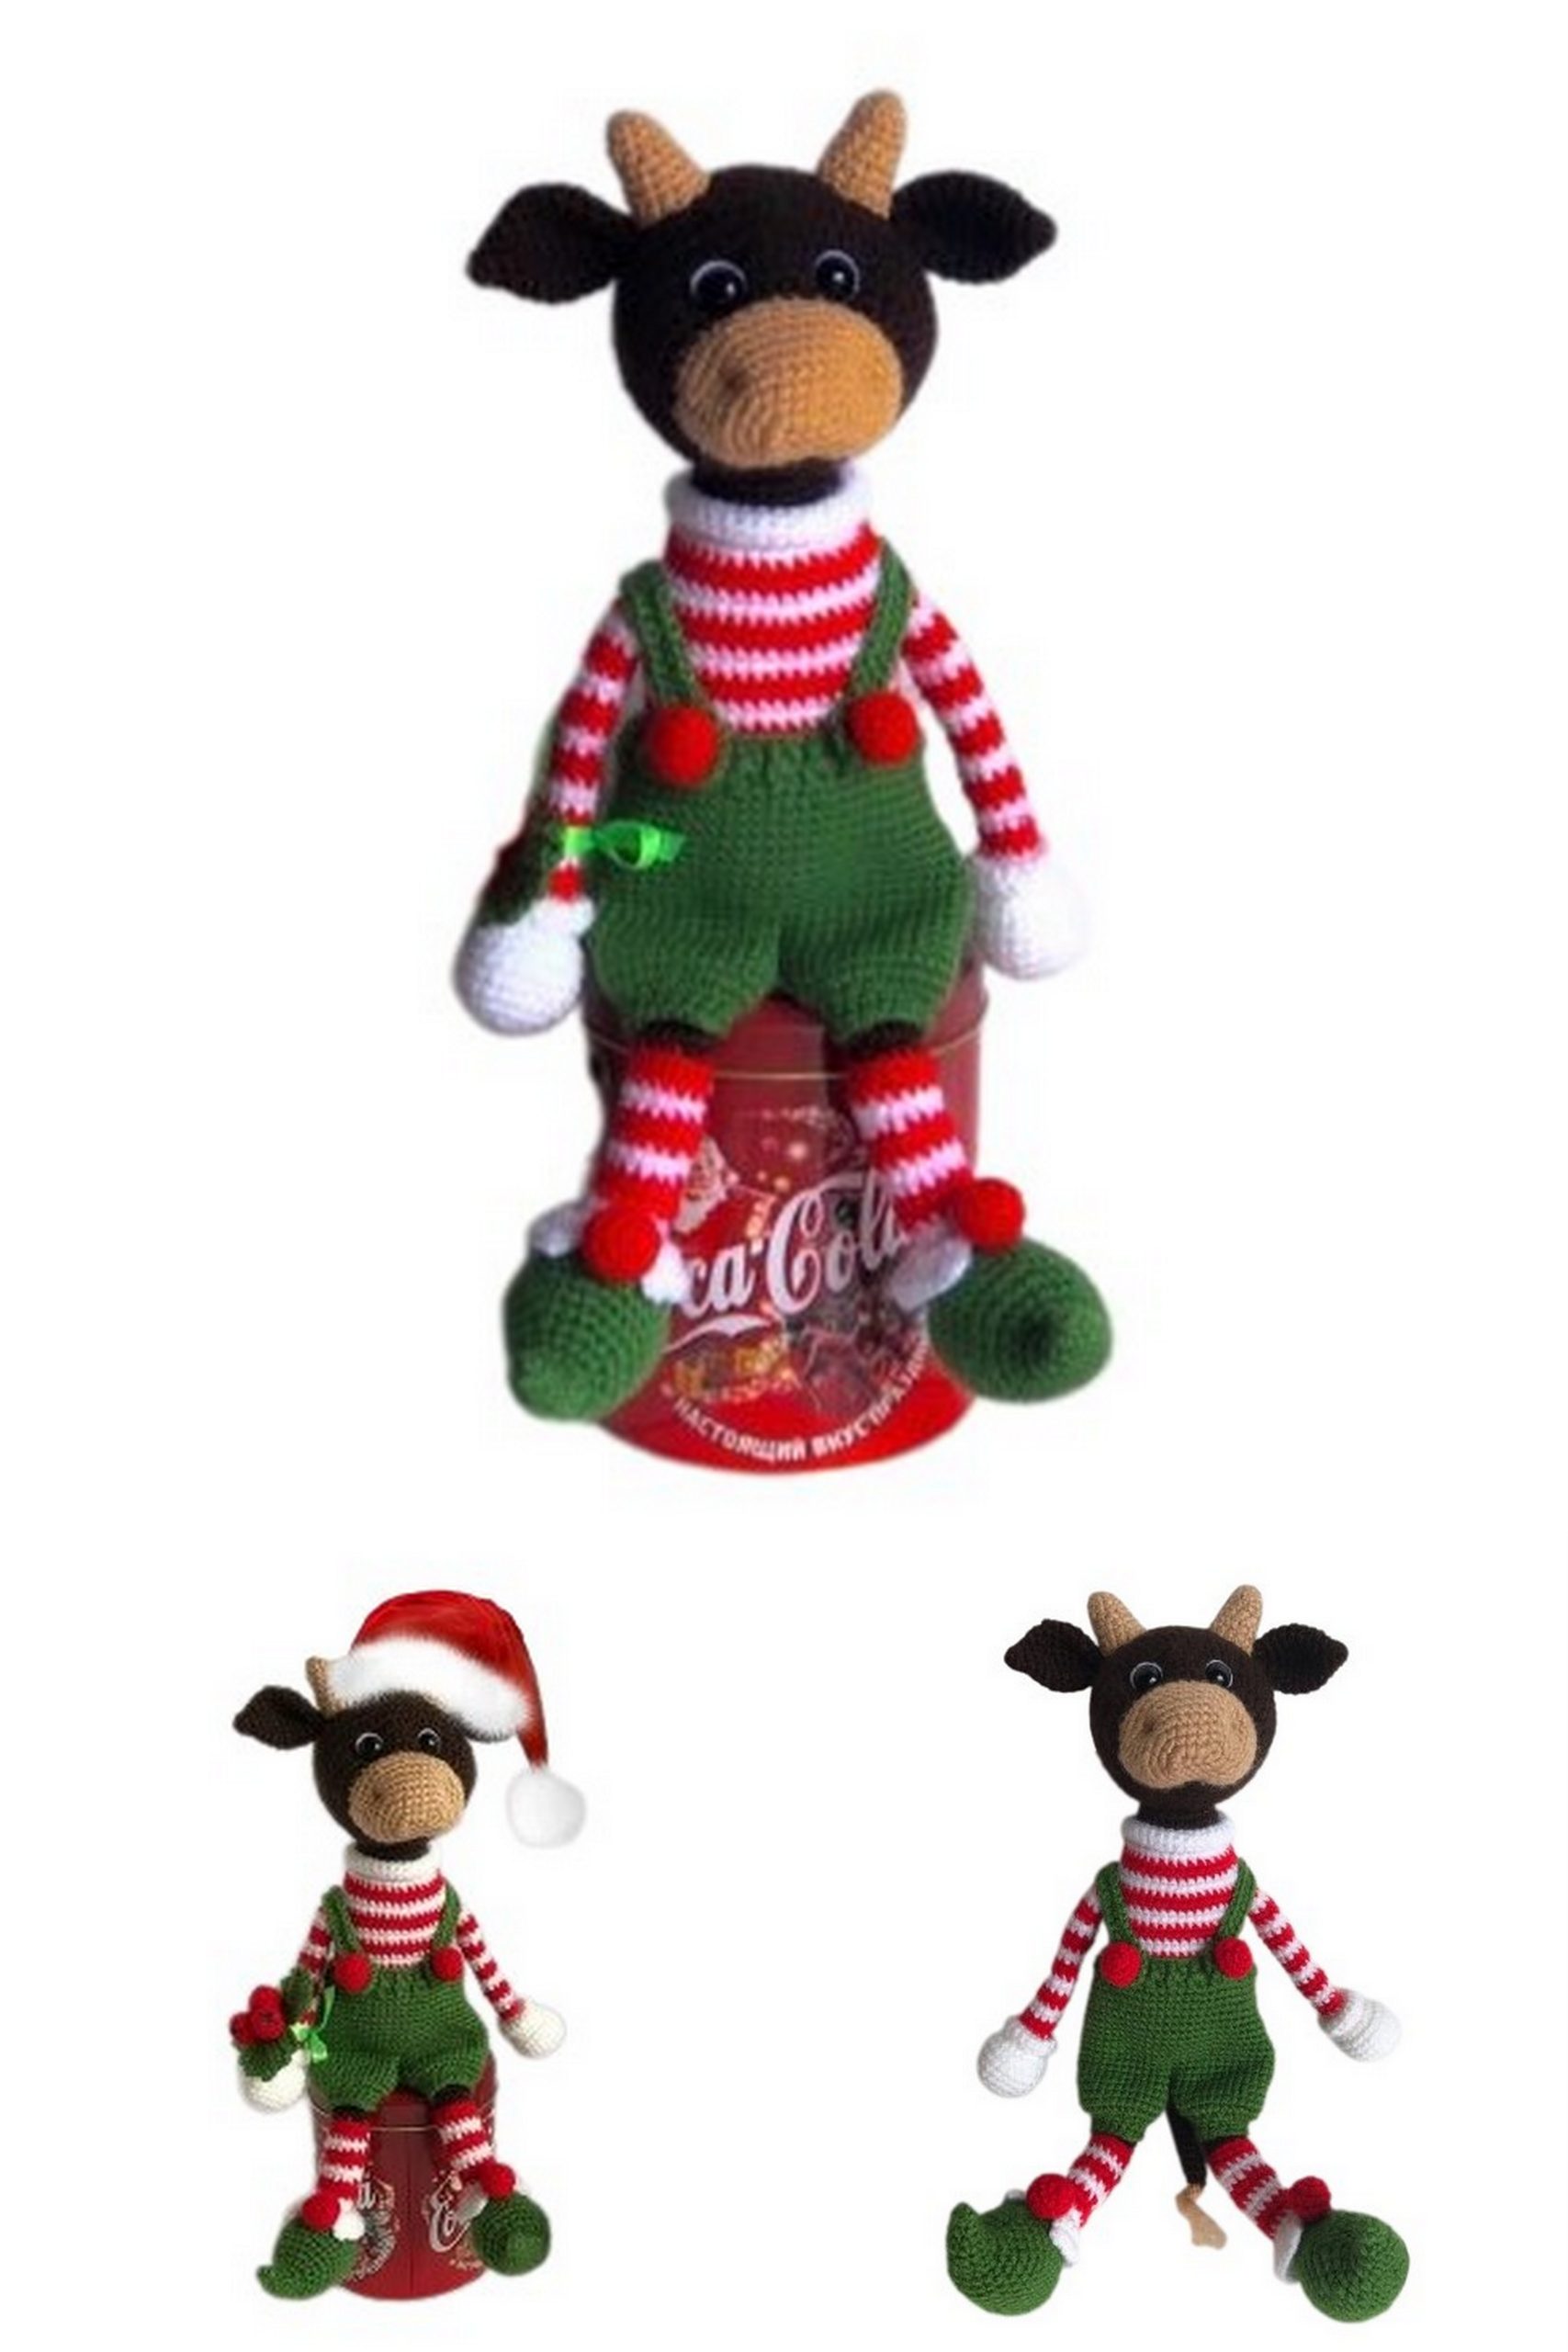
Free Elf Bull Amigurumi Pattern: Crafting an Adorable Handmade Elf Bull
If you’re in search of the enchanting Elf Bull amigurumi free pattern, you’ve come to the right place! This charming handmade toy is ready to captivate knitting enthusiasts and craft aficionados alike. We’re here to share the Elf Bull Amigurumi pattern with you. Get ready to explore this fun and creative project and follow our step-by-step instructions to craft your very own elf bull.
The Elf Bull Amigurumi free crochet pattern is a perfect choice for anyone interested in this delightful handmade toy project, offered to you for free. Follow these special instructions step by step to create your own elf bull. Knit your Elf Bull and create your own magical world.
This MC is intended for personal use only.
Sale, distribution, publication of the description on other resources and in
print media is prohibited.
When publishing the work, please mention me as the author!
Feel free to use the finished toy as you see fit.
The size of the toy is 31 cm.
Note:
This master class uses the “half-cross stitch” knitting technique. If
you are using a different method, you will need to adjust the marker’s
position accordingly.
The toy is frameless; the head is attached with splint fastening (you can also use
button fastening or simply sew it on). The legs, arms, and tail are crocheted
in. The horns and ears are sewn on.
If it is not specified, any increase/decrease is made using single crochets.
The master class does not contain teaching materials.
Difficulty level – intermediate.
Materials Needed:
YarnArt Elite yarn in the following colors: 217 (dark brown), 805 (sand), 41
(red), 248 (green), 150 (white).
Crochet hook #2.
Needle with a wide eye for sewing details.
Hollowfiber filling.
Safety eyes with a 10mm attachment.
Small piece of white felt for the eyes.
Splint 25mm, 2 discs for splint with a diameter of 25mm, 2 washers with a diameter
of about 10mm.
Small piece of green satin ribbon for tying the bouquet (about 15 cm).
The size of the toy depends on the knitting density and the thickness of the yarn used.
When using the specified materials, the bull’s height is approximately 31 cm.
Abbreviations:
MC – amigurumi ring
Ch – chain stitch
Sl st – slip stitch
Sc – single crochet
Hdc – half double crochet
Dc – double crochet
Trc – treble crochet
PATTERN
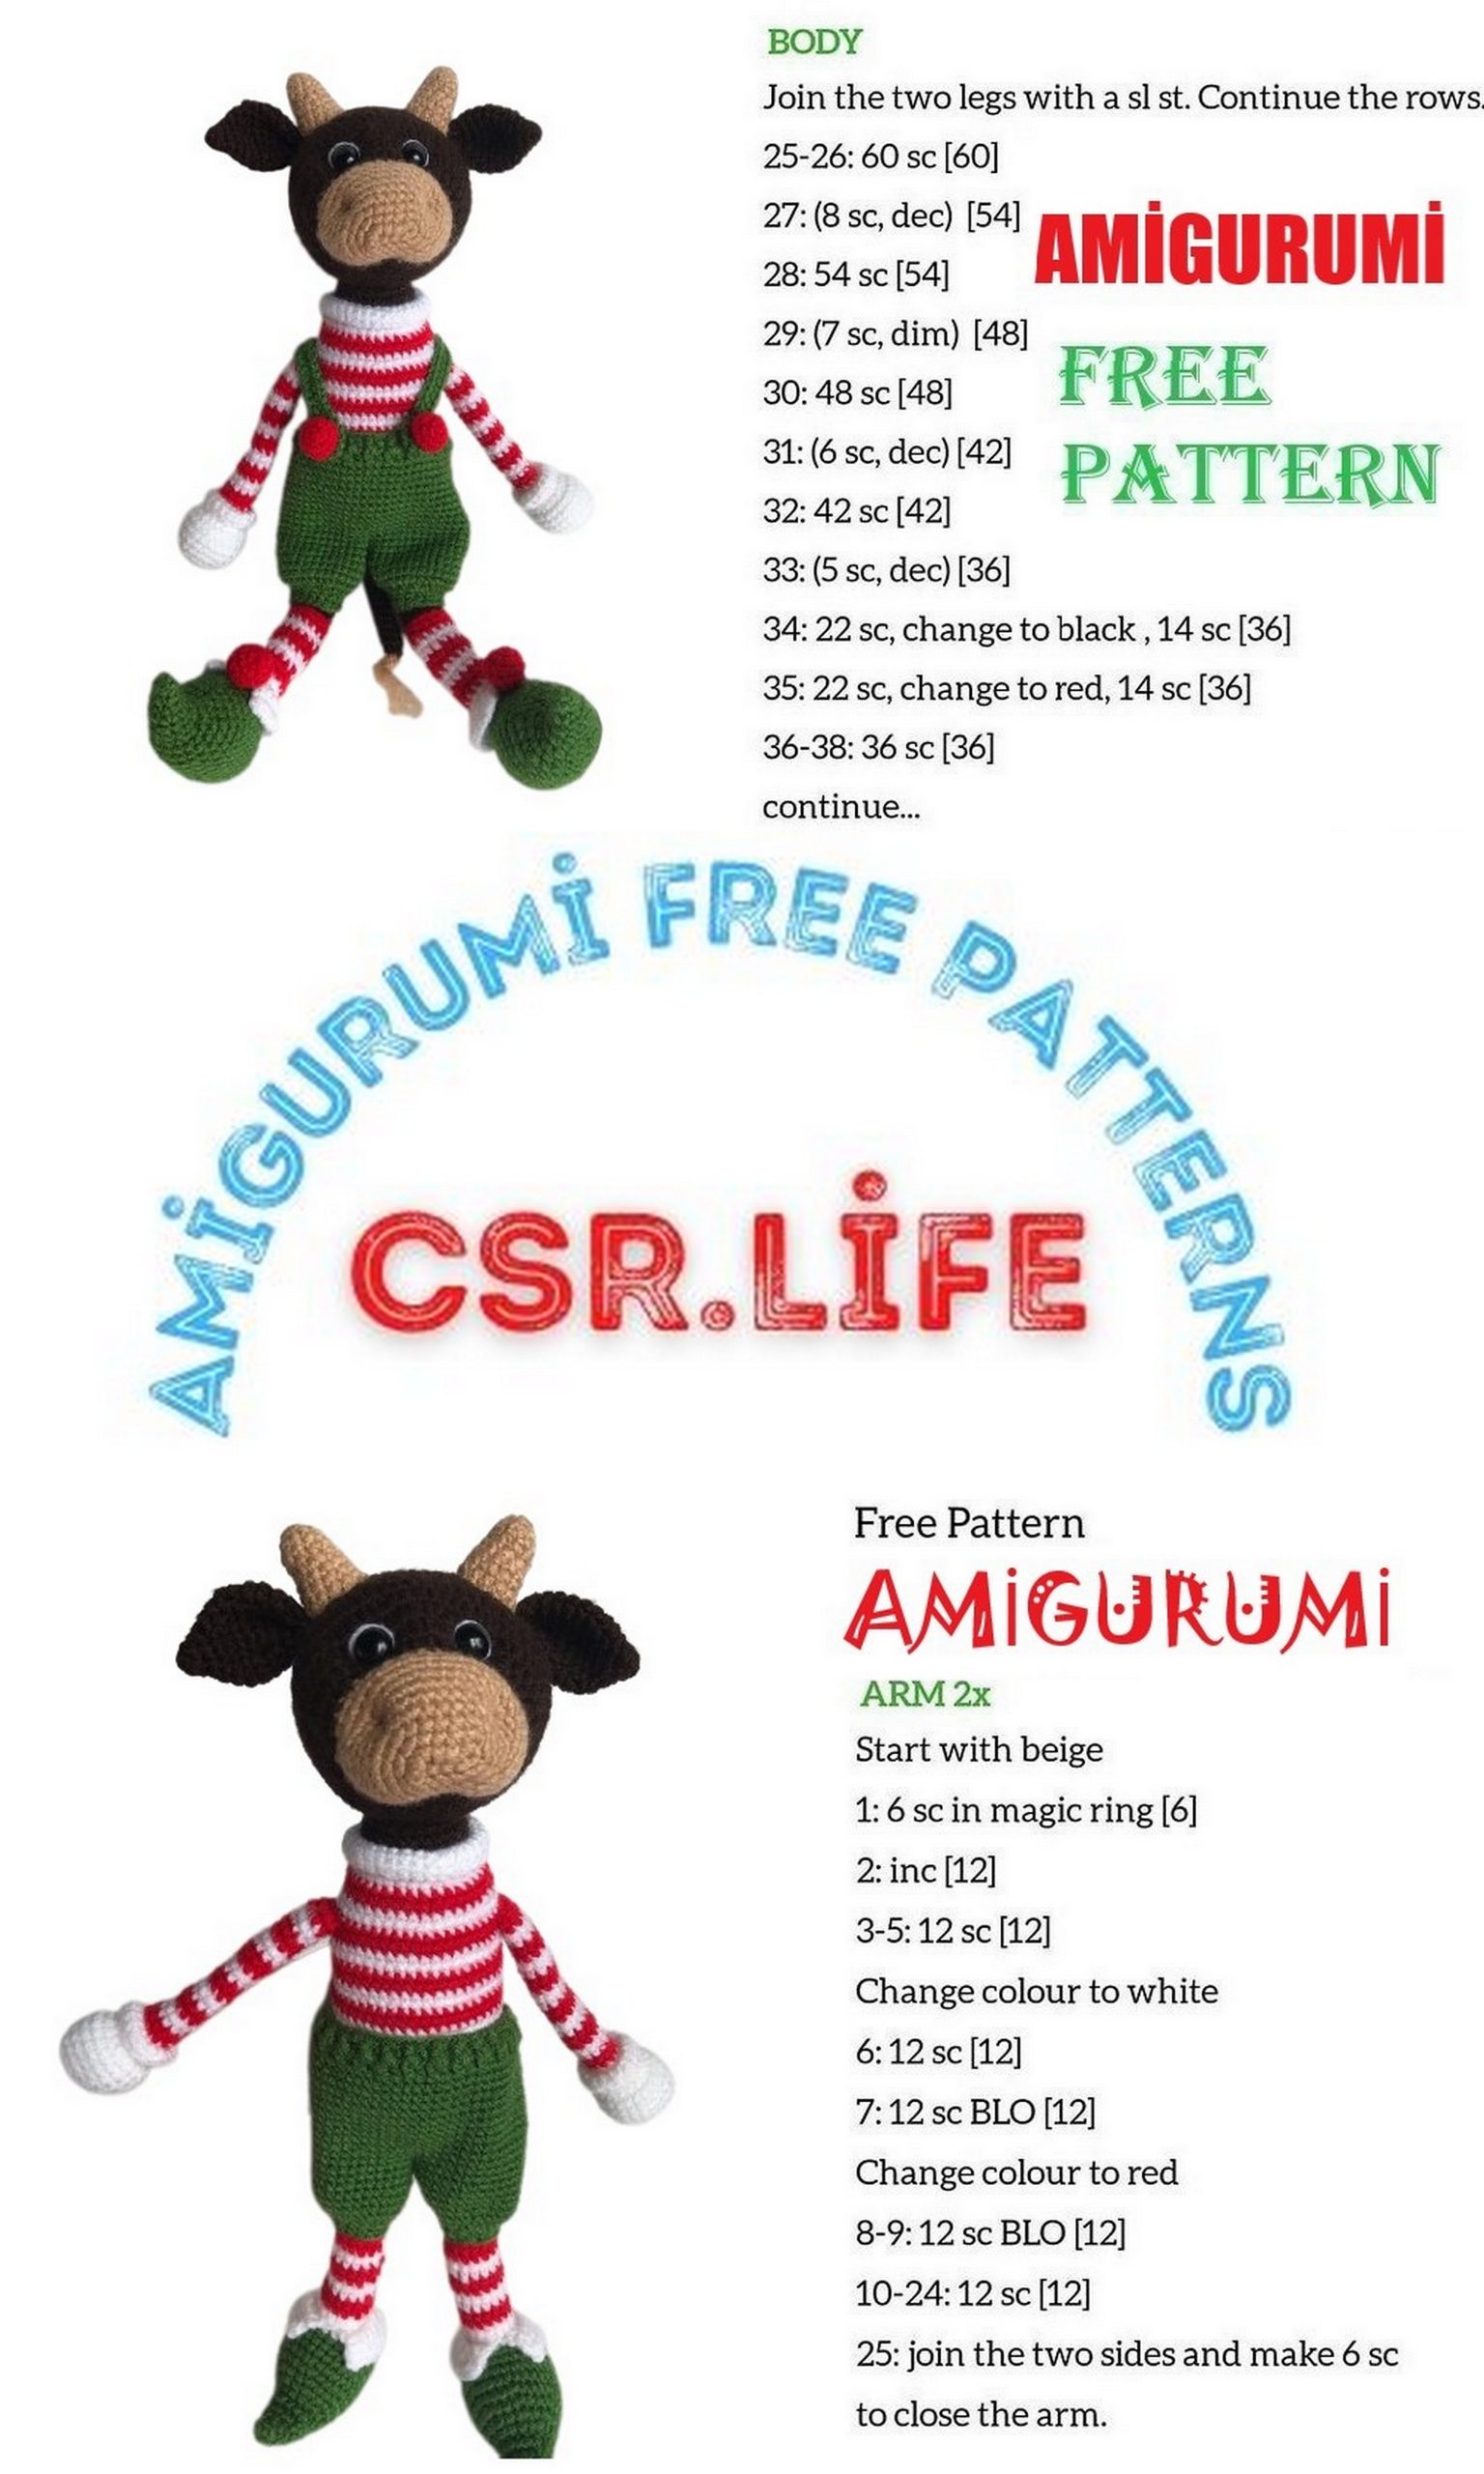
Legs-Boots (2 pieces).
The boots are crocheted in green yarn spirally without lifting loops. Stuff as you go. The marker is placed on the side of the boot. The boot should bend up, so make sure that the slip stitches are stacked on top of each other, right in the middle. There are 10 single crochets in rows 11-13 to create the sole.
1 row: 3 sc in MC (3)
2 row: 3 inc (6)
3 row: 3 sl st, 3 sc (6)
4 row: (sc, inc) * 3 (9)
5 row: 4 sl st, 5 sc (9)
6 row: inc, (2 sc, inc) * 2, 2 sc (12)
7 row: 6 sl st, 6 sc (12)
8 row: (3 sc, inc) * 3 (15)
9 row: 7 sl st, 8 sc (15)
10 row: sc, inc, (4 sc, inc) * 2, 3 sc (18)
11 row: (sc, inc) * 4, 10 sc (22)
12 row: (2 sc, inc) * 4, 10 sc (26)
13 row: (3 sc, inc) * 4, 10 sc (30)
14—17 row: 30 sc (30)
18 row: 7 sc, 7 ch, skip 7 stitches, starting from the eighth, 16 sc (30)
19 row: 7 sc, 7 sc in a chain behind the back loop, 16 sc (30)
20 row: sc, dec, (3 sc, dec) * 5, 2 sc (24)
21 row: (2 sc, dec) * 6 (18)
22 row: (sc, dec) * 6 (12)
23 row: 6 dec (6)
Pull the loop, secure the thread, cut it, and hide the end.
Cuff of the Boot.
Attach white yarn to the middle of the first row in front of the leg to the hole on the boot. Crochet with turning rows and a lifting loop.
1 row: 14 sc (14)
2 row: turn, ch, (2 sc, inc) * 4, 2 sc (18)
3 row: turn, ch, (3 sc, inc) * 4, 2 sc (22)
4 row: turn, ch, (4 sc, inc) * 4, 2 sc (26)
Secure the thread, cut it, and hide the end.
Arms (2 pieces).
First, crochet the arms with white yarn spirally without lifting loops. Stuff only the hand.
1 row: 6 sc in MC (6)
2 row: 6 inc (12)
3 row: (sc, inc) * 6 (18)
4 row: inc, (2 sc, inc) * 5, 2 sc (24)
5-8 row: 24 sc (24)
9 row: (2 sc, dec) * 6 (18)
10 row: (sc, dec) * 6 (12)
11 row: 12 sl st (12)
12 row: 12 sc (12)
Next, crochet the sleeve alternating between red and white yarn.
13-14 row: 12 sc with red yarn (12)
15-16 row: 12 sc with white yarn (12)
17-18 row: 12 sc with red yarn (12)
19-20 row: 12 sc with white yarn (12)
21-22 row: 12 sc with red yarn (12)
23-24 row: 12 sc with white yarn (12)
25-26 row: 12 sc with red yarn (12)
27-28 row: 12 sc with white yarn (12)
Finish with a slip stitch, secure the thread, cut it, and hide the end.
Gloves (1 piece).
Attach white yarn to the 10th row at the unworked half-loops to the bottom of the sleeve. Crochet spirally without lifting loops.
1 row: (sc, inc) * 6 (18)
2-3 row: 18 sc (18)
4 row: (4 sc, dec) * 3 (15)
Finish with a slip stitch, secure the thread, cut it, and hide the end.
Tail (1 piece).
Crochet with brown yarn spirally without lifting loops. Leave a 10-12 cm thread at the beginning for attaching the tassel.
1 row: 6 sc in MC (6)
2-26 row: 6 sc (6)
27 row: Fold the tail in half and crochet 3 sc (3)
Secure the thread, cut it, and hide the end.
Make a tassel from sand-colored yarn, attach it to the tip of the tail, and fluff it up.
Muzzle + Head.
Crochet the muzzle with sand-colored yarn spirally without lifting loops. Stuff as you go.
1 row: Chain 6
2 row: From the second chain from the hook, crochet 4 sc, 3 sc in one loop, 3 sc, inc (12)
3 row: inc, 3 sc, 3 inc, 3 sc, 2 inc (18)
4 row: sc, inc, 3 sc, (sc, inc) * 3, 3 sc, (sc, inc) * 2 (24)
5 row: inc, 5 sc, (inc, 2 sc) * 3, 3 sc, (inc, 2 sc) * 2 (30)
6 row: 3 sc, inc, 3 sc, (3 sc, inc) * 3, 3 sc, (3 sc, inc) * 2 (36)
7-10 row: 36 sc (36)
11 row: (4 sc, dec) * 6 (30)
Finish with a slip stitch, secure the thread, cut it, and hide the end.
Switch to brown yarn, attach it to the bottom of the muzzle in the middle. The marker will be placed in the middle of the head from the bottom.
12 row: at the back loops (2 sc, inc sc) * 2, 2 sc, (hdc, inc hdc) * 7, hdc, (2 sc, inc sc) * 2, sc (41)
13 row: 2 sc, inc sc, 6 sc, inc sc, 6 hdc, inc hdc, 2 hdc, inc hdc, 3 hdc, inc hdc, 6 hdc, inc hdc, 6 sc, inc sc, 3 sc (48)
14 row: 7 sc, inc sc, 4 sc, 3 hdc, inc hdc, (7 hdc, inc hdc) * 2, 4 hdc, 3 sc, inc sc, 7 sc, inc sc (54)
15 row: 3 sc, inc sc, 8 sc, inc sc, (8 hdc, inc hdc) * 3, 8 sc, inc sc, 5 sc (60)
16 row: 15 sc, 30 hdc, 15 sc (60)
17-26 row: 60 sc (60)
27 row: (8 sc, dec) * 6 (54)
In the 13th row, insert the eyes with felt. There are 5 stitches between the eyes. Between the 21st and 22nd rows, insert the cotter pin with the disc and washer from below in the middle.
28 row: 3 sc, dec, (7 sc, dec) * 5, 4 sc (48)
29 row: (6 sc, dec) * 6 (42)
30 row: 2 sc, dec, (5 sc, dec) * 5, 3 sc (36)
31 row: (4 sc, dec) * 6 (30)
32 row: sc, dec, (3 sc, dec) * 5, 2 sc (24)
33 row: (2 sc, dec) * 6 (18)
34 row: (sc, dec) * 6 (12)
35 row: 6 dec (6)
Stuff the head tightly.
Draw the thread from the bottom of the head, secure it, cut it, and hide the end.
Next, make the muzzle adjustment as shown in the photo.
At the end of the shaping, bring the thread out from the bottom, secure it, cut it, and hide the end.
Horns (2 pieces).
Crochet with sand-colored yarn in a spiral without chain stitches.
1st row: 6 single crochet in the magic ring (6).
2nd row: (single crochet, increase)*3 (9).
3rd-4th row: 9 single crochet (9).
5th row: increase, (2 single crochet, increase)*2, 2 single crochet (12).
6th row: 12 single crochet (12).
7th row: (3 single crochet, increase)*3 (15).
8th row: 15 single crochet (15).
Finish with a slip stitch, secure the thread, leave it for sewing.

Ears (2 pieces).
Crochet with brown yarn in a spiral without chain stitches.
1st row: 4 single crochet in the magic ring (4).
2nd row: (single crochet, increase)*2 (6).
3rd row: (single crochet, increase)*3 (9).
4th row: increase, (2 single crochet, increase)*2, 2 single crochet (12).
5th row: (3 single crochet, increase)*3 (15).
6th row: single crochet, increase, (4 single crochet, increase)*2, 3 single crochet (18).
7th-10th row: 18 single crochet (18).
11th row: (single crochet, decrease)*6 (12).
12th row: Fold the ear in half and crochet together 6 single crochet (6).
Secure the thread, leave it for sewing, fold it in half again, and sew it together.
Sew on the horns and ears.
Body (1 piece).
1st row: 6 single crochet in the magic ring (6).
2nd row: 6 increases (12).
3rd row: (single crochet, increase)*6 (18).
4th row: increase, (2 single crochet, increase)*5, 2 single crochet (24).
5th-8th row: 24 single crochet (24).
Finish with a slip stitch, secure the thread. Adjust the neck width according to the diameter of the joint disk.
Insert the joint disk into the neck, followed by the washer. Insert the joint pin into the amigurumi ring on the neck, the same one that was used in the head. Bend the ends of the joint pin with round-nose pliers or a joint pin setter so that they are secured by the washer. Make sure to secure the joint tightly to prevent the head from wobbling.
Next, alternate between crocheting the body with white and red yarn, and use brown yarn for the lower part of the body. The marker will pass along the side, down from the rear corner of the arm.
Join the white yarn.
9th row: (3 single crochet, increase)*6 (30).
10th row: behind the front loop only, single crochet, (4 single crochet, increase)*5, 3 single crochet (36).
11th row: red yarn 36 single crochet (36).
12th row: (11 single crochet, increase)*3 (39).
13th row: white yarn 5 single crochet, increase, (12 single crochet, increase)*2, 7 single crochet (42).
14th row: (13 single crochet, increase)*3 (45).
Attach the arms by folding them in half so that the yarn color change is under the arm.
15th row: red yarn 16 single crochet along the body, 6 single crochet along the arm and body together, 17 single crochet along the body, 6 single crochet along the arm and body together (45).
16th row: 6 single crochet, increase, (14 single crochet, increase)*2, 8 single crochet (48).
17th-18th row: white yarn 48 single crochet (48).
19th-20th row: red yarn 48 single crochet (48).
21st-22nd row: white yarn 48 single crochet (48).
23rd-24th row: red yarn 48 single crochet (48).
25th-26th row: white yarn 48 single crochet (48).
27th-28th row: red yarn 48 single crochet (48).
Next, crochet with brown yarn.
29th row: behind the back loop only, 48 single crochet (48).
30th row: 48 single crochet (48).
Attach the tail.
31st row: 8 single crochet along the body, 3 single crochet along the tail and body together, 37 single crochet along the body (48).
32nd-35th row: 48 single crochet (48).
36th row: (6 single crochet, decrease)*6 (42).
37th row: 2 single crochet, decrease, (5 single crochet, decrease)*5, 3 single crochet (36).
“Attach the legs. Fold the legs in half. Perform decreases only on the body, not on the legs. To do this, insert the hook into the folded leg, then insert the hook under the front halves of the loops on the body, pick up the thread, and pull it through the front half-loops and through the leg, finish the stitch in the usual way.
38th row: on the body (4 single crochet, decrease)*3, single crochet, on the leg and on the body 3 single crochet, decrease, 3 single crochet, on the other leg and on the body single crochet, decrease, 4 single crochet, decrease (30).
39th row: single crochet, decrease, (3 single crochet, decrease)*5, 2 single crochet (24).
40th row: (2 single crochet, decrease)*6 (18).
41st row: (single crochet, decrease)*6 (12).
42nd row: 6 decreases (6).
Stuff tightly.
Pull the ring tight, secure the thread, cut it, and hide the thread end.”
Collar.
Crochet with white yarn into the front loops of the 9th row in a spiral without chain stitches.
1st row: into the front loops, 30 single crochet (30).
2nd row: 30 single crochet (30).
3rd row: (4 single crochet, increase)*6 (36).
4th-5th rows: 36 single crochet (36).
Finish with a slip stitch, secure the thread, cut it, and hide the thread end.
Pants.
Crochet with green yarn. Start with a circular row for the waistband with a chain stitch, then crochet the pants in a spiral. Align the marker.
1st row: Chain 50 and join to form a ring (50).
2nd row: 2 chain stitches, 50 single crochet around the chain, slip stitch to join (50).
3rd row: 2 chain stitches, (front loop single crochet, back loop single crochet)*25, slip stitch to join (50).
Continue crocheting in a spiral.
4th row: (4 single crochet, increase)*2, single crochet, 3 chain stitches, skip 3 stitches (create an opening for the tail), starting from the 4th stitch, single crochet, (4 single crochet, increase)*7 (60).
5th row: 13 single crochet, 3 single crochet around the chain, 44 single crochet (60).
6th-15th rows: 60 single crochet (60).
Let’s crochet the left leg.
16th row: 15 single crochet, 2 chain stitches, skip 30 stitches, starting from the 31st stitch, crochet 15 single crochet (32).
17th row: 15 single crochet, 2 single crochet around the chain, 15 single crochet (32).
18th-23rd rows: 32 single crochet (32).
Finish with a slip stitch, secure the thread, and cut it.
Attach green yarn to the first chain stitch of the left leg.
Next, we will crochet the right leg.
17th-23rd rows: 32 single crochet (32).
Do not cut the yarn; instead, put the pants on the amigurumi by threading the tail through the opening and continue crocheting the pants.
24th row: 16 decrease stitches (16).
25th-26th rows: 16 single crochet (16).
Finish with a slip stitch, secure the thread, cut it, and hide the thread end.
Attach the green yarn to the left leg from the inside and finish the leg the same way as the right one, crocheting rows from the 24th to the 26th.
Straps (2 pieces).
Crochet the straps with green yarn.
At the beginning, leave a 10 cm tail for securing the loop.
1st row: Chain 41.
Count 7 stitches from the beginning of the chain, and in the 7th stitch, secure the tail that you left at the beginning to create a loop.
2nd row: Starting from the second stitch from the hook, single crochet 33 stitches along the chain, crochet 10 single crochet stitches around the loop, and then single crochet 33 stitches along the other side of the chain (76).
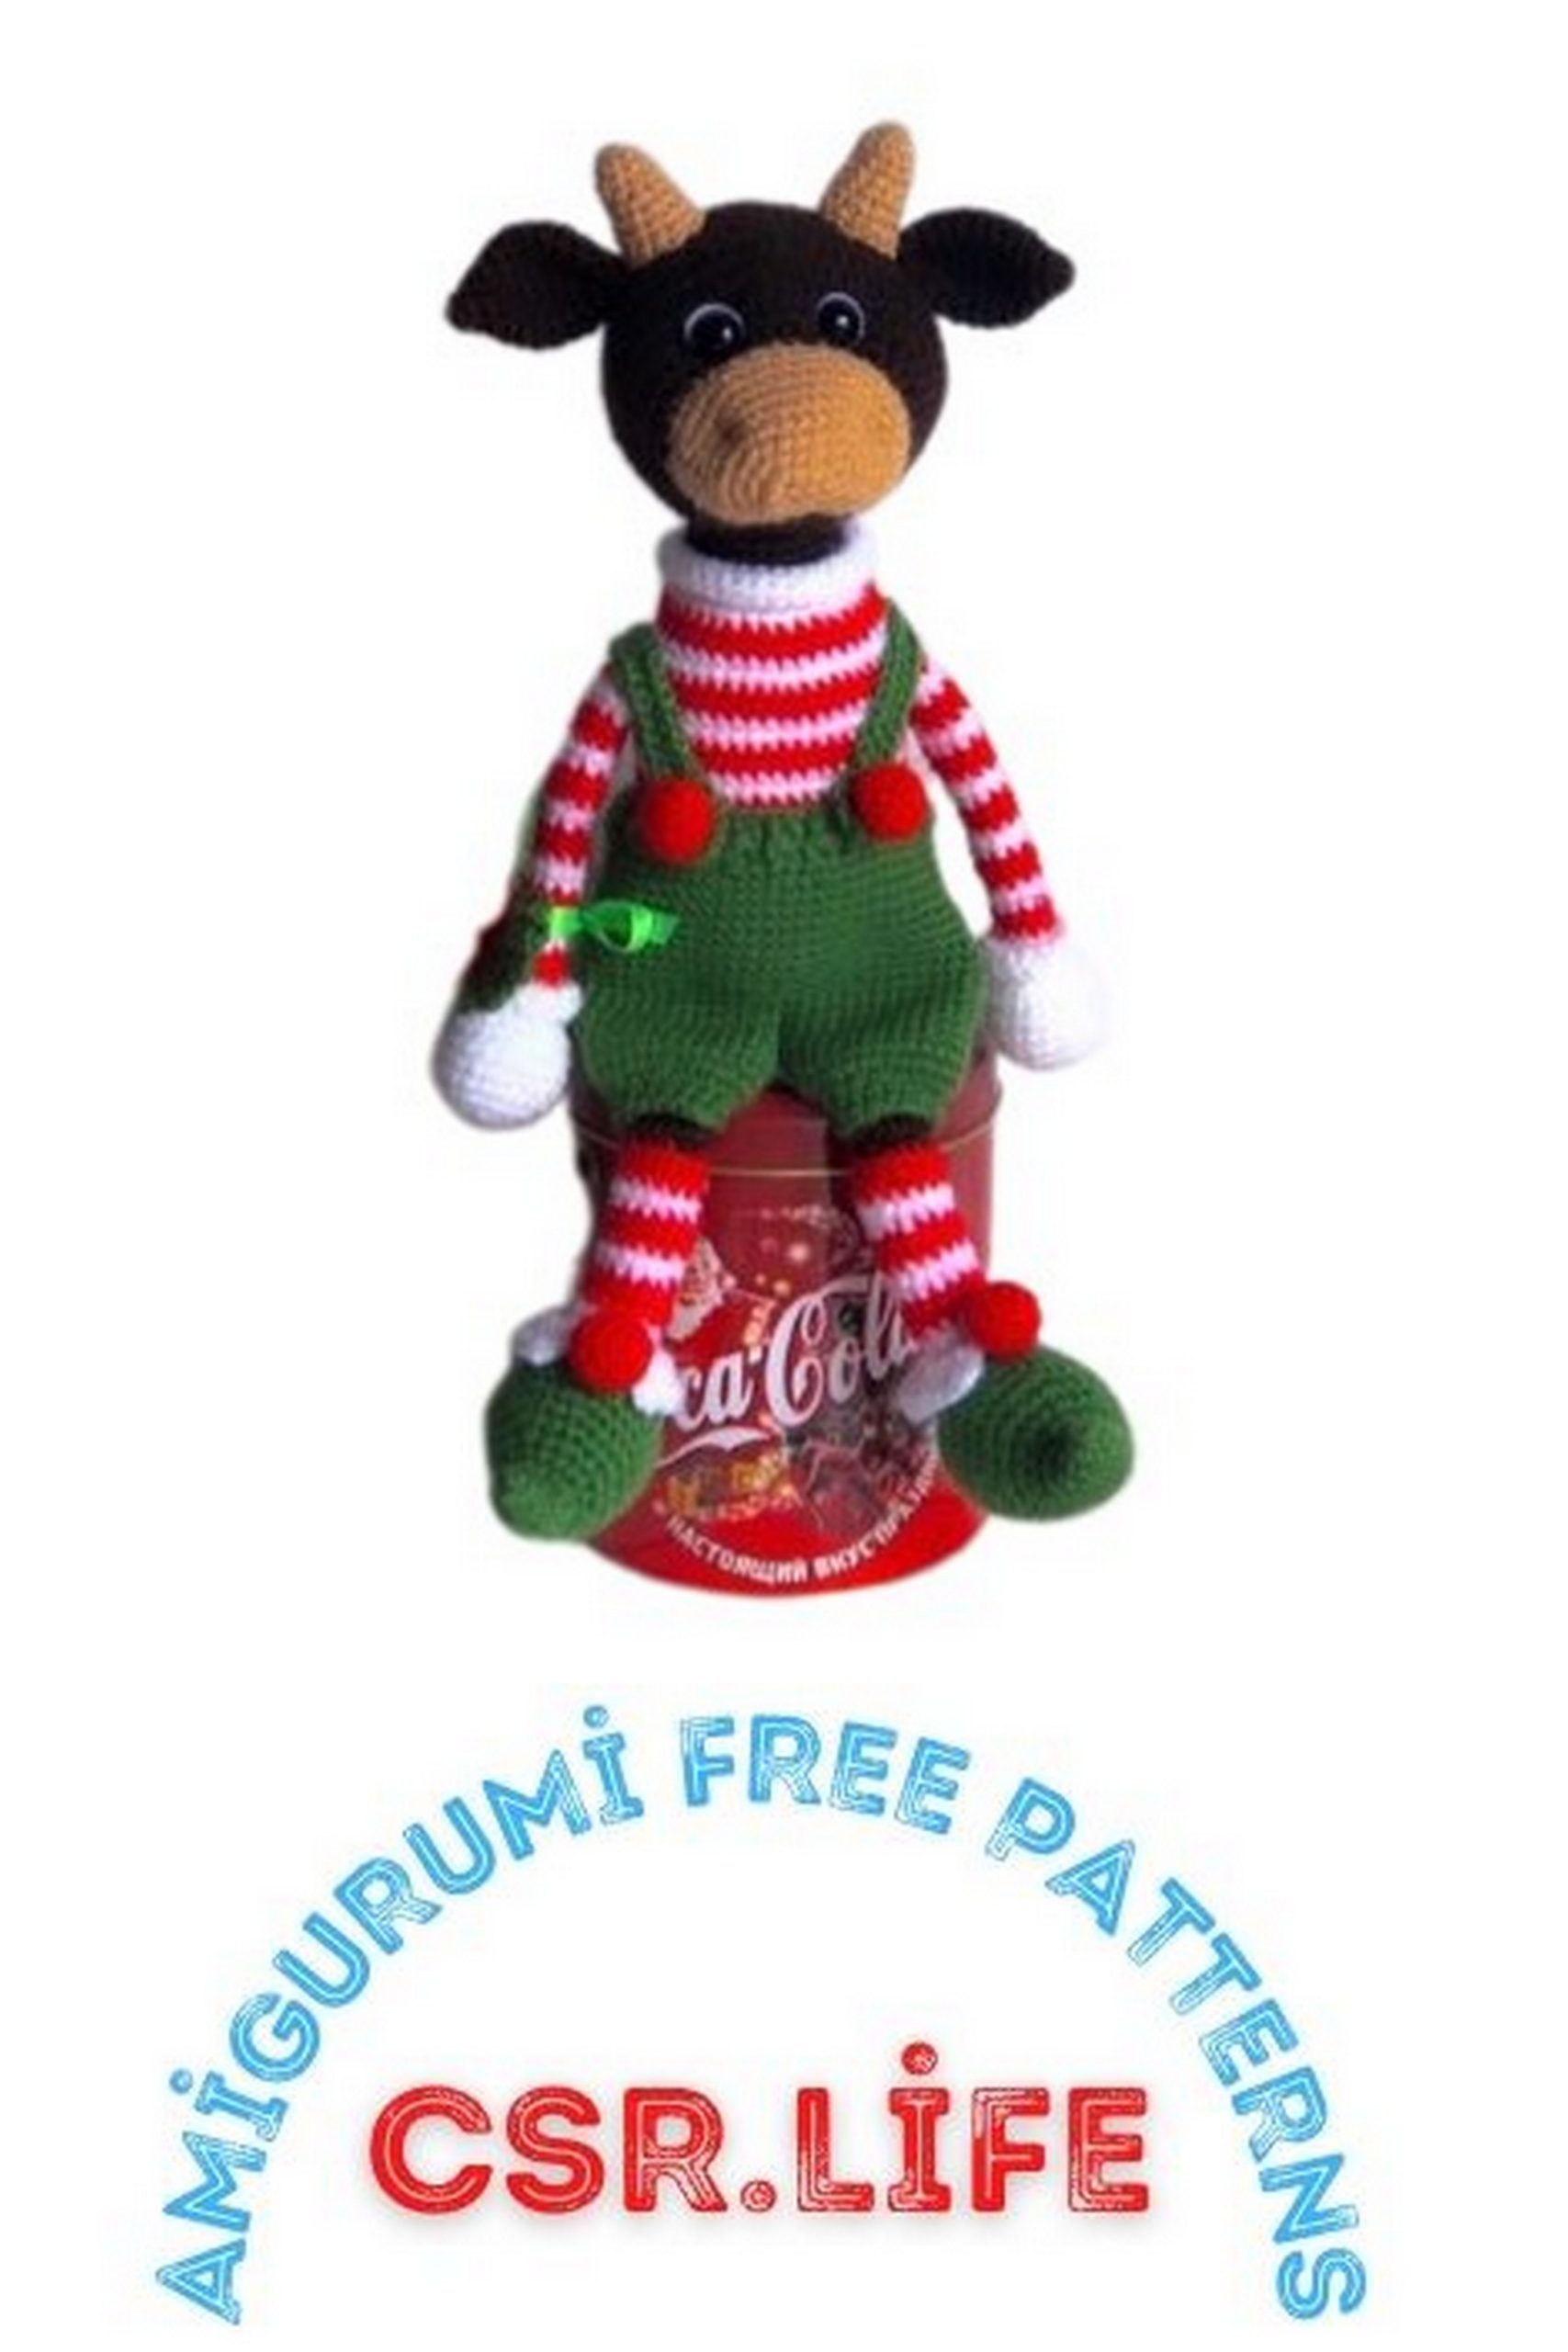
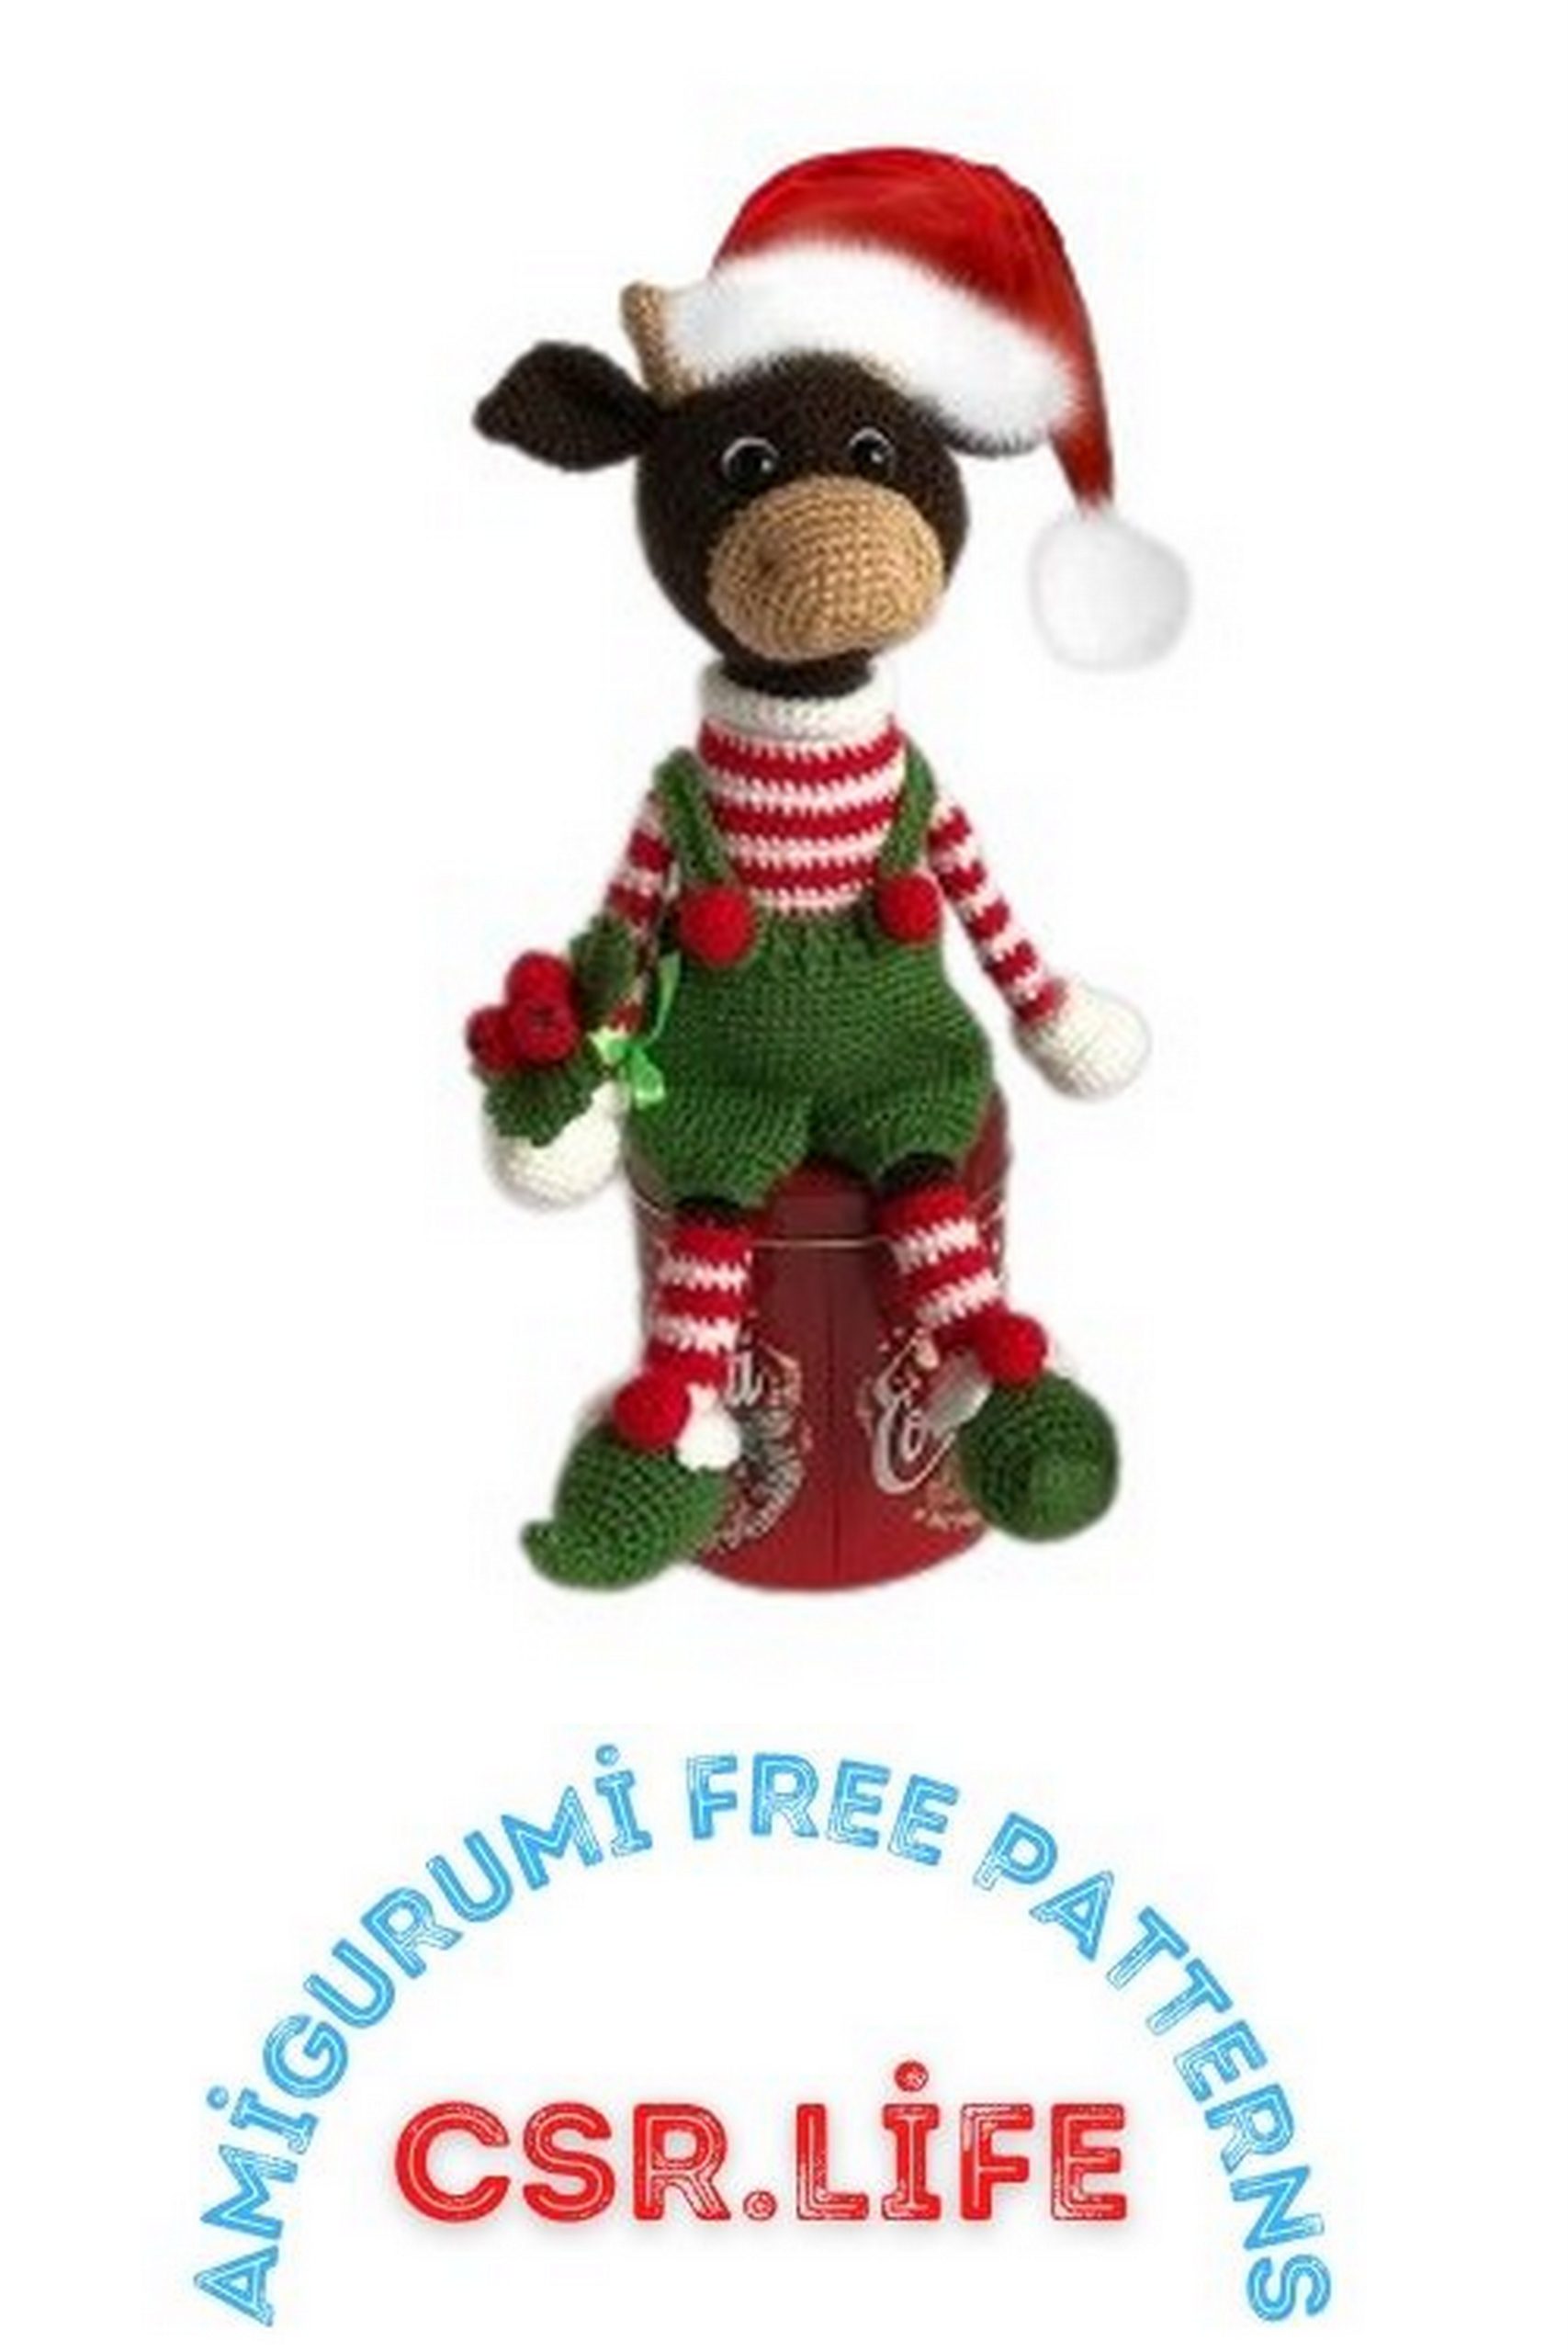
Secure the yarn, leave it for sewing. Attach the straps to the pants (crosswise on the back). For the front closure, you can attach buttons. I used strawberry-shaped buttons instead of regular ones, sewing them through the loop on the pants (they don’t need to be removed).
Strawberries (7 pieces).
Crochet the strawberries with red yarn in a spiral without a starting chain.
1st row: 6 single crochet in a magic ring (6).
2nd row: 6 increases (12).
3rd-4th rows: 12 single crochet (12).
5th row: 6 decreases (6).
Stuff them slightly, tighten the ring, secure the yarn, and leave it for sewing.
On three strawberries that you will use for a bouquet, embroider the centers with thin black thread.
Sew two strawberries in place of buttons through the loop on the strap to the pants.
Sew two strawberries on the front of the boots.
Leaves for the bouquet (3 pieces).
Crochet the leaves with green yarn in turning rows.
1st row: Chain 6.
2nd row: Starting from the second chain from the hook, single crochet 4 stitches, 3 single crochet in one loop, 3 single crochet on the other side of the chain (10).
3rd row: Turn, chain 1, single crochet, 4 single crochet, 3 single crochet in one loop, 4 single crochet (11).
4th row: Turn, chain 1, single crochet, 5 single crochet, 3 single crochet in one loop, 4 single crochet (12).
5th row: Turn, chain 1, single crochet, 5 single crochet, 3 single crochet in one loop, 5 single crochet (13).
6th row: Turn, chain 1, single crochet, 6 single crochet, slip stitch (7).
Secure the yarn and leave it for sewing.
Assemble the bouquet, attach a satin ribbon as a tie.
The bull-elf is ready!”