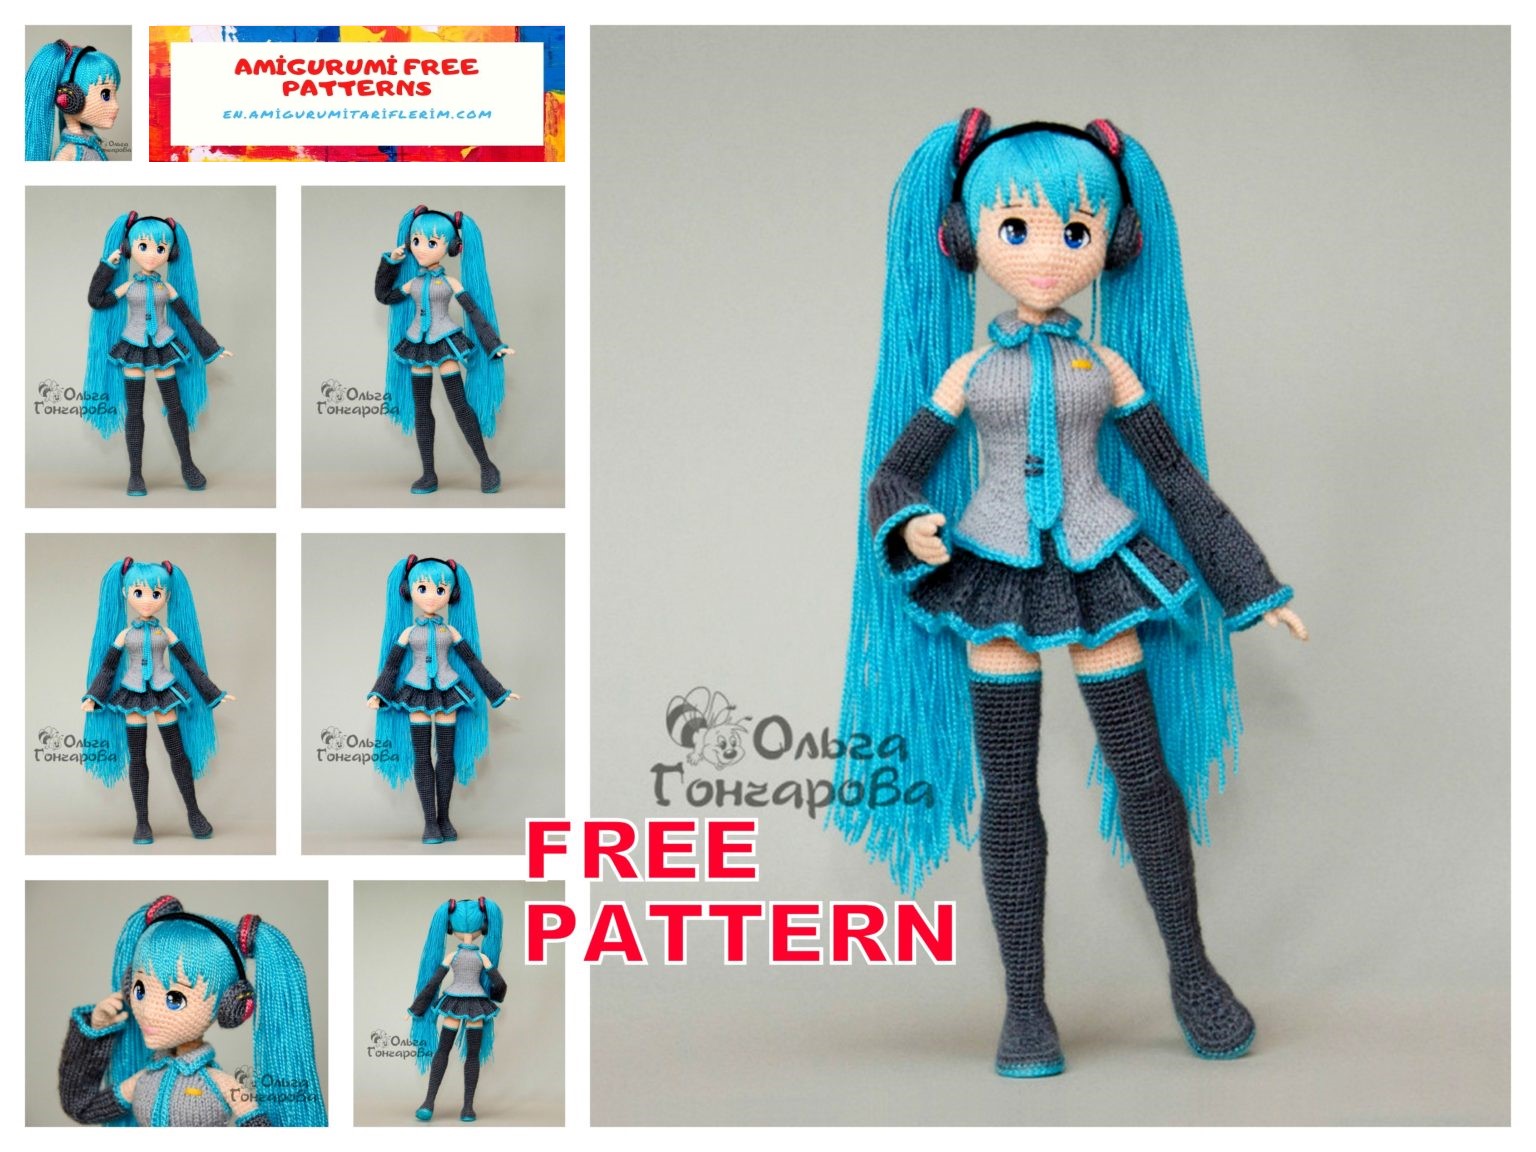
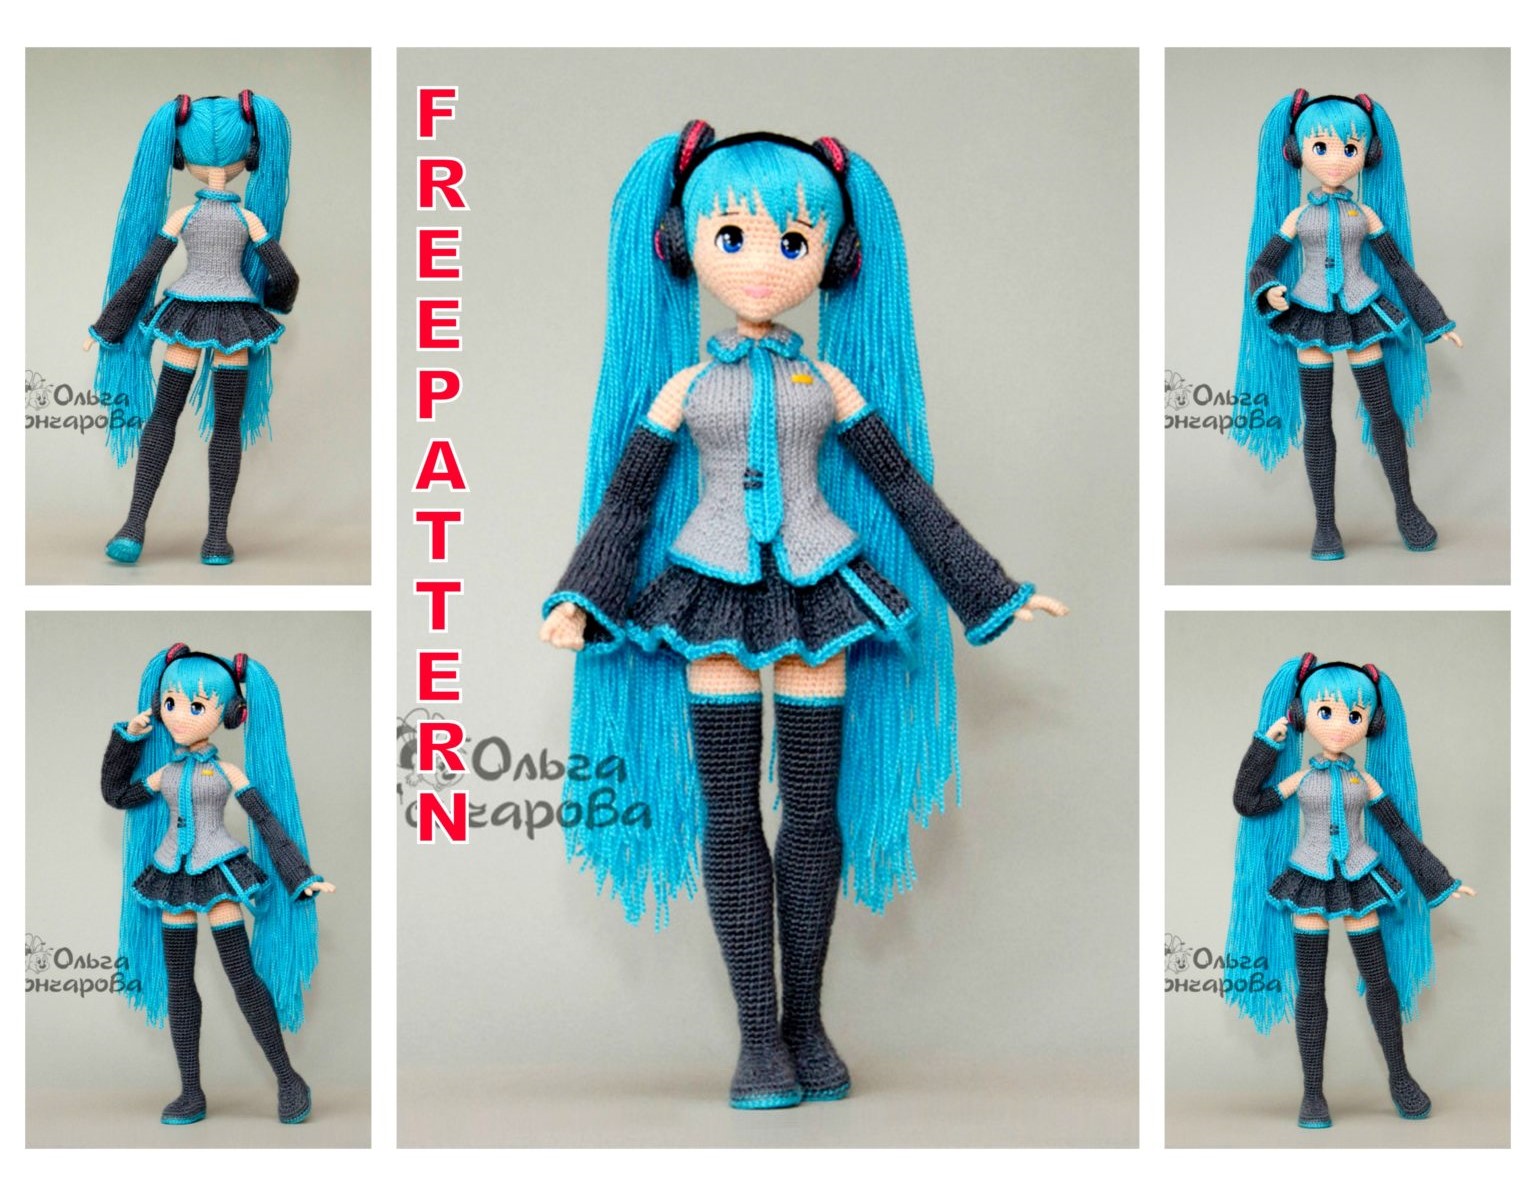
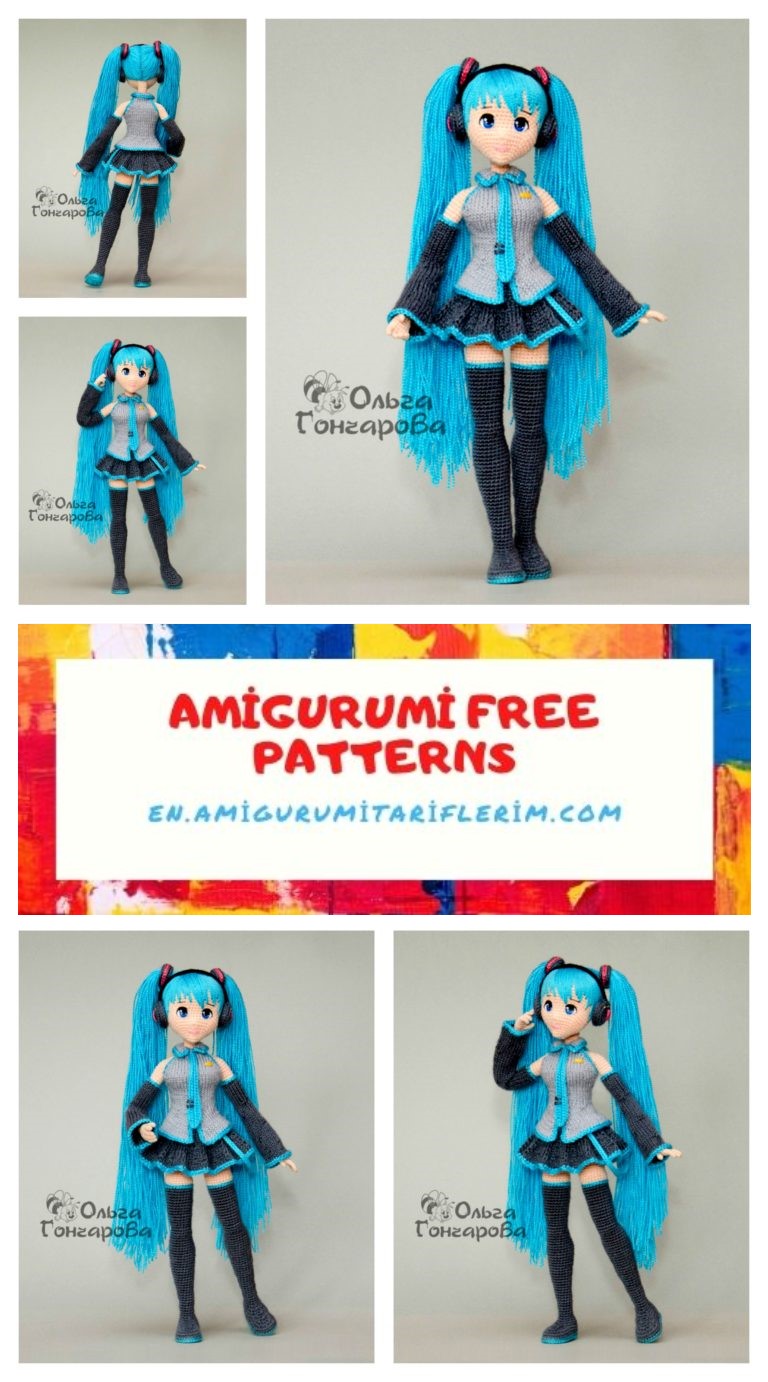
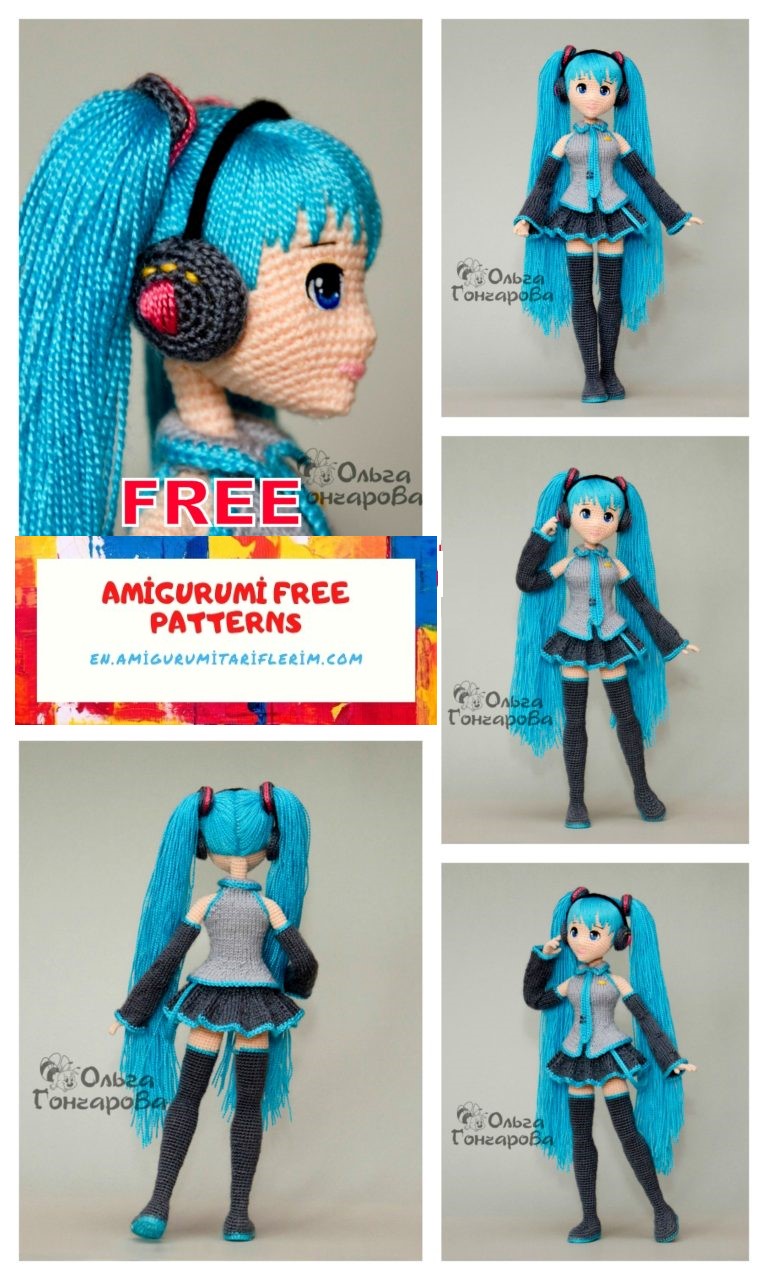
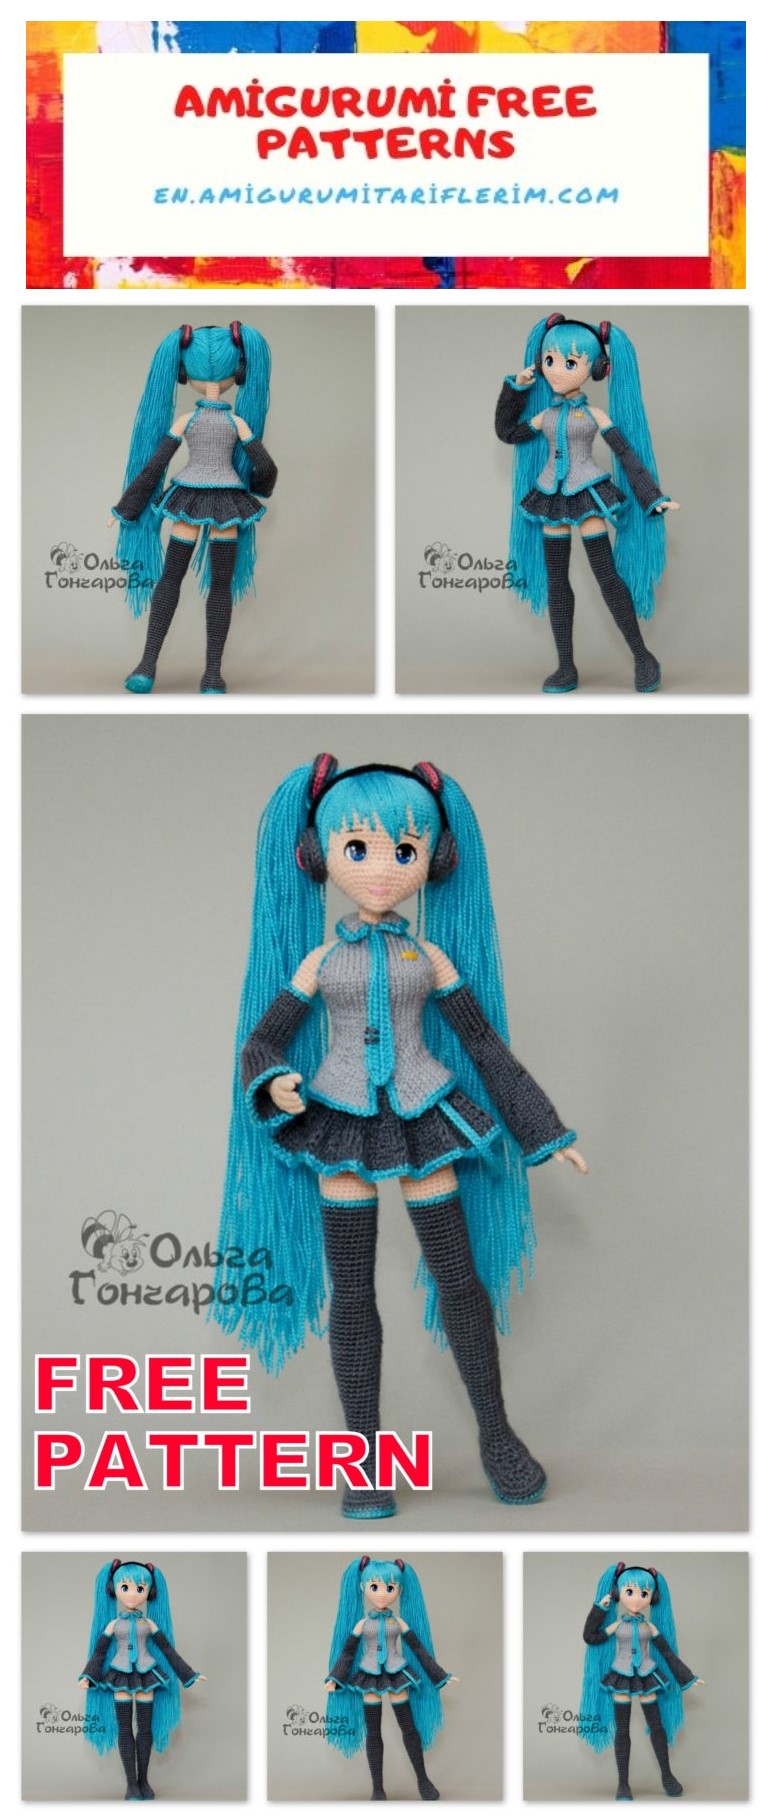
Hatsune Miku Doll Amigurumi Free Pattern
When using the recommended materials, the pupa will turn out to be 29 cm tall.
Difficulty Level: High
Author’s toy of Olga Goncharova
Materials:
All yarn should be the same thickness. It is best to take yarn from one manufacturer and one
stamps. For example, these materials were used for my Miku:
• flesh-colored YarnArt Jeans yarn (55% cotton / 45% polyacryl, 50g / 160m) flesh-colored (21),
knit in 2 thin strings, fingers knit in 1 thread
• VITA Brilliant yarn (45% wool laster / 55% acrylic, 100g / 380 m) dark gray (4980) and light gray (4963) – disconnect one thread and knit in three thin threads
• turquoise yarn: VITA Crystal (100% acrylic, 50g / 275m) (5665) – for hair and trim
clothes
• white yarn: Color City Amazon (45% bamboo / 55% cotton; 50g / 155m) (101) disconnect
one thread, knit in 5 thin threads – panties
• hook 1.25 (main); 0.75 and 0.6 (for knitting fingers)
• toe knitting needles 1.75 – 5 pcs.
• holofiber
• thick wire d = 2.5 mm (braided) 120 cm – for the frame of the legs and body
• wire d = 1,5 mm 50 cm – for the frame of the hands
• thin wire for beadwork d = 0.4 mm, 80 cm – for the frame of the palms
• 10 cm light pink yarn for embroidery mouth
• a small piece of dense fabric (calico), acrylic paints in white, black, blue, deep blue (or green) colors – for the eyes
• art artificial brushes No. 0 and 0/3 (the thinnest)
• glossy acrylic varnish
• glue Crystal Moment
• thick plastic paper folder – for insoles
• tissue-based adhesive plaster
ABBREVATİONS
ch – air loop
sl-st – slip stitch
sc – single crochet
dc – double crochet
dec – inconspicuous decrease (grab the two front walls of the base loop at the same time and knit 1sc)
dec * – normal decrease (2sc together)
inc – increase (2 sc from one loop of the base)
hdc – half crochet
inc hdc – increase with half crochets (knit 2 hdc from one loop of the base)
3vm – 3 sc together (knit 3 sc with a common vertex)
İNC – turn the work, thread for knitting
İNC * – turn the work, the thread before knitting
Author’s toy of Olga Goncharova
Legend (knitting needles):
knit – front loop
purl – purl loop
front surface – on the front side knit with facial loops, on the wrong side – purl
2vm – 2 together front for the rear wall. Synonym: 2 loops knit together front with an inclination to the left
2vm * – 2 together front for the front wall. Synonym: 2 stitches knit together front with tilt
right
2vm purl – knit 2 loops together with the wrong loop
+ 1 person – tie an additional facial loop from the loop of the previous row
Adding loops right and left raising – video (I was more comfortable adding loops left
raising)
1 stitch to the right knitting needle without knitting, the working thread behind the removed loop
Knit the edge loops in the front row, and in
wrong side – wrong side.
Head
The head spirals from top to bottom, from the top of the head to the chin. The marker line is centered.
occiput.
1 p: 6sc into magic ring = 6
2 p: (inc) × 6 = 12
3 p: (1sc, inc) × 6 = 18
4 p: (1sc, inc, 1sc) × 6 = 24
5 p: (3sc, inc) × 6 = 30
6 p: (1sc, inc, 3sc) × 6 = 36
7 p: (5sc, inc) × 6 = 42
8 p: (2sc, inc, 4sc) × 6 = 48
9 p: 48 sc
10 p: (7sc, inc) × 6 = 54
11-17 p: 54sc (7 rows) +1 n offset
18 p: 12sc, put an additional marker (place
sewing eyelets), 30sc, put a marker (second
eye), 12sc = 54
19 p: (dec, 7sc) × 6 = 48
20 r: 48sc
21 p: 17sc, dec, 1sc, dec, 4sc, dec, 1sc, dec, 17sc = 44
22 p: 12sc, inc, 1sc, inc, 14sc, inc, 1sc, inc, 10sc, 2ch = 48 (it turned out that the last 2 were not tied
loops, and above them 2 ch)
23 p: 2ch (total 4ch: 2ch from the 22nd row + 2ch of this row), skip 4 base loops, 10sc,
inc, 3sc, inc, 14sc, inc, 3sc, inc, 12sc = 52
24 p: 52sc – between the 23rd and 24th rows mark the 27th loop – from this mark we will count
eye hook loops +1 n offset
Author’s toy of Olga Goncharova
Sew a thread of contrasting color to outline the hairline: in front – between the 6th and 7th rows, along
on the sides – 1 row above the ears, behind – 1 row above the neck hole.
Make hair.
Cut turquoise strings into strands 60 cm long,
fold them in half and fix along the perimeter of hair growth. To me
it took about 130 threads. Fasten with ordinary knitting
crochet according to the pattern. Attach hair for one first
tail, then for another.
Attach the strings along the parting line to the same holes as
the first row, then when dividing the lock into two tails on
there will be no bald spot in the middle of the parting.
If you divide the hair along the center line to the left and to the right, you get an even parting, and if
distribute the row to the left, the row to the right, you get a zigzag parting.
Author’s toy of Olga Goncharova
Tie ponytails with small rubber bands for hair. This is a temporary option, we will finally
to fix when the head is completely ready.
Continue to knit your head.
25 p: 12sc, dec, 3sc, dec, 6sc, inc (nose formation), 6sc, dec, 3sc, dec, 13sc = 49
26 p: 1sc, dec, 5sc, dec, 6sc, dec, 5sc, (inc) × 2 (nose), 5sc, dec, 6sc, dec, 5sc, dec, 2sc = 45
27 p: 1sc, dec, 5sc, dec, 4sc, dec, 13sc, dec, 4sc, dec, 5sc, dec, 1sc = 39
28 p: 1sc, dec, 3sc, dec, 4sc, dec, 4sc, 3vm (nose tip), 4sc, dec, 4sc, dec, 3sc, dec, 1sc = 31
29 p: 1sc, dec, 2sc, dec, 2sc, dec, 4sc, dec, 4sc, dec, 2sc, dec, 2sc, dec = 24
30 r: 24sc
31 p: (1sc, dec) × 3, 2sc, (inc) × 2 (chin formation), 2sc, (dec, 1sc) × 3 = 20
32 p: 2sc, dec, 2sc, dec, 1sc, (inc) × 2 (chin), 1sc, dec, 2sc, dec, 2sc = 18
Fill your head with filler. Filling is not too tight. Form from filler
a small ball and place it in the area of the nose so that it stands out better on the face.
33 p: (dec) × 3, 6sc, (dec) × 3 = 12p
With the help of three hooks, tighten all these 12 loops in one step. Fasten and hide the thread inside out.
Ears
Knit in rows.
Left ear
1 row: 7 loops in an amigurumi ring, 3ch (for lifting), İNC
2 row: starting from the 1st loop: 1dc, 2hdc, 3sc, inc, 1ch, ss into magic ring
Leave the thread for sewing.
Right ear
1 row: 7 loops in an amigurumi ring, İNC
2 row: from the 1st loop knit: inc, 3sc, 2hdc, 1dc, 1ch
Next, knit a ss in a broach of a crochet column and fasten the thread. Leave the thread for sewing.
Author’s toy of Olga Goncharova
Embroider bangs
In a knit needle with a blunt tip
insert a long thread of turquoise color and
start embroidering bangs, stitching stitches
tight to each other. At the same time, we try to
the strings did not twist during operation,
and lay parallel to each other.
We make the lower border uneven. Bang part
we put on already completed stitches.
Sew ears on the markers.
Determine the exact location for each ponytail
and fasten them with small silicone
rubber bands.
Hands
Paired details are best knitted in parallel (from two balls), so that they turn out the same
size. We begin to knit hands with fingers, the direction of knitting from the bottom up to the shoulder.
We knit with a disconnected thread (two times thinner than the main fabric), hook 0.6. Starting from the 3rd row
You can insert a sewing needle into your finger and then knit as around the frame (method from Elena_rak).
Index finger (2 pcs.)
1 p: 5sc into magic ring
2-8 p: 5sc (7 rows)
9 p: 2sc (partial row)
Middle finger (2 pcs.)
1 p: 5sc into magic ring
2-9 p: 5sc (8 rows)
Ring finger (2 pcs.)
1 p: 5sc into magic ring
2-8 p: 5sc (7 rows)
9 p: 3sc (partial row)
Little finger (2 pcs.)
1 p: 5sc into magic ring
2-7 p: 5sc (6 rows)
Thumb (2 pcs.)
1 p: 5sc into magic ring
2-8 p: 5sc (7 rows)
Author’s toy of Olga Goncharova
Finger assembly
On the left hand, the marker goes from the index finger up the edge of the palm (in front), on the right hand – from
little finger up the back of the hand. Monitor marker position on these lines.
Left hand
We begin to collect with the index finger.
Change the hook to 0.75, attach another
a thread to the worker (we knit the main worker
thick yarn).
Right hand
We begin to collect with the little finger. Change hook
at 0.75, attach another thread to
working (we knit the main working thickness
yarn).
1 p: 1sc, dec * (one loop from the index finger,
second – average), 1sc average
finger, 1sc over the ring, dec * (one
loop with ring finger, second – with
little finger), dec (“invisible”), 1sc on the little finger,
dec * (one loop with the little finger, the second with
ring finger), 1sc over the ring finger
finger, dec * (one loop with the nameless
finger, the second – from the middle), 1sc by
middle finger, dec * (one loop with
middle finger, the second with the index finger), dec
(“invisible”) = 13
1 p: 1sc, dec * (one loop with the little finger, the second with
ring finger), 1sc over the ring finger
finger, 1sc on the middle finger, dec * (one
loop from the middle finger, the second with
index), dec (“invisible”), 1sc by
index finger, dec * (one loop with
index finger, the second – from the middle),
1sc on the middle finger, dec * (one loop with
middle finger, the second – with the ring finger),
1sc on the ring finger, dec * (one loop
from the nameless, the second – from the little finger), dec
(“invisible”) = 13
2-4 p: (change the hook by 1.25) 13 sc (3 rows) 2-4 p: (change the hook by 1.25) 13 sc (3 rows)
5 p: 2sc knit together with eyelets
thumb1
, 11sc = 13
5 p: 5sc, next 2sc knit with
thumb loops1
, 6sc = 13
6 p: 2sc over thumb loops, dec * (one
loop from the thumb, the second with
hands) 1
, 10sc = 13
6 p: 4sc, dec * (one loop from the palm, the second with
thumb), 2sc over the loops of the thumb
finger1
, 6sc = 13
1 To hook the loops on the thumb, grab the 0.75 hook again.
We knit them the first two loops of the 5th row and the first three loops of the 6th row.
We make the frame. Take two pieces of wire with a cross section of 1.5 mm2 by 25 cm, and two pieces of thin bead
wire d = 0.4 mm by 40 cm. Make a frame of the hands and insert it into the palms. Further knit around
wire.
Author’s toy of Olga Goncharova
7 p: (dec, 1sc) × 4, 1sc = 9
8-10 r: 9sc (3 rows)
11 p: inc, 3sc, inc, 4sc = 11
12-13 p: 11sc (2 rows)
14 p: inc, 4sc, inc, 5sc = 13
15-17 p: 13 sc (3 rows)
We stuff in the process of knitting: we do not stuff the wrist; add a little filler in the forearm,
distributing it around the wire; we’re not stuffing the elbow so as not to disturb the shape of the hand; humeral
part is stuffed a little denser so that the hand holds its shape.
Left hand right hand
18 p: 6sc, inc, 6sc = 14
19-23 r: 14sc (5 rows)
24 p: 6sc, (inc) × 2 (elbow – located on the back, on
one line with the little finger), 4sc, dec (ulnar
fold) = 15
25 p: dec, 12sc, inc = 15
26 p: inc, 4sc, (dec) × 2, 6sc = 14
27-28 r: 14sc (2 rows)
29 p: inc, 13sc = 15
30-31 p: 15sc (2 rows)
32 p: inc, 14sc = 16
33-44 r: 16sc (12 rows)
45 p: 2sc, ss (incomplete row) – the thread is located with
the inner side of the arm (from the side of the body).
Cut the thread and secure it on the wrong side.
18 p: inc, 12sc = 14
19-23 r: 14sc (5 rows)
24 p: 13sc, inc (elbow – located on the back, on
one line with the little finger) = 15
25 p: inc, 4sc, (dec) × 2 (ulnar fold), 6sc = 14
26 p: 6sc, (inc) × 2, 4sc, dec = 15
27 p: dec, 13sc = 14
28 p: 14sc
29 p: 6sc, inc, 7sc = 15
30-31 p: 15sc (2 rows)
32 p: 7sc, inc, 7sc = 16
33-44 r: 16sc (12 rows)
45 p: 2sc, ss (incomplete row) – the thread is located with
the inner side of the arm (from the side of the body).
Cut the thread and secure it on the wrong side.
Sleeves
Knit from the bottom up. Dial 24 stitches (6 cm), close in a ring, and knit, evenly reducing the stitches.
1-5 p: 24 faces (5 rows)
6 p: (dec, 10 persons) × 2 = 22
7-11 r: 22 faces (5 rows)
12 p: (5 knit, dec, 4 persons) × 2 = 20
13-17 r: 20 faces (5 rows)
18 p: (dec, 8 persons) × 2 = 18
19-23 r: 18 faces (5 rows)
24 p: (4 knit, dec, 3 persons) × 2 = 16
25-29 p: 16 faces (5 rows)
30 p: (dec, 6 persons) × 2 = 14
31-39 p: 14 persons (9 rows)
40 p: knit a row while closing all the loops
Tie the top and bottom of the sleeve with one row sc of turquoise yarn. Complete it with a secret connector
column. Steam the finished sleeves with a steam jet (without touching the knitted fabric).
Put the gloves on Miku’s hands (put on top). Mittens can not be sewn to the hands, they are already
hold well.
Author’s toy of Olga Goncharova
Legs
The marker line runs behind the leg (“seam on the stocking”). Watch the marker if it starts to go away
right, knit an extra column at the end of the row and move the marker one loop. The legs are the same as
hands, it is better to knit both at once.
Sole (2 children)
Knit in circular rows with a lifting loop and a closing connecting column. This ss can
knit either in the first column of this row (green arrow), or in the lifting loop (yellow arrow). we
we will close the row in the first column of the row.
Turquoise yarn knit a chain of 10 ch.
1 p: starting from the second from the hook loop: 8sc, 4sc to the last
loop of the chain, 7sc, inc, ss in the first sc of this row (by
green arrow) = 21
2 p: 1ch for lifting; starting from the same loop on which it is connected
lift loop: 6sc, 2hdc, (inc hdc) × 4, 2hdc, 6sc, (inc) × 2,
ss in the first column of this row (in the green arrow) = 28
3 p: 1ch for lifting; starting from the same loop on which it is connected
lifting loop: 10sc, (inc, 1sc) × 3, 9sc, (inc, 1sc) × 2, ss in
the first sc of this row (in the green arrow) = 34
4 p: 1ch for lifting; starting from the same loop on which it is connected
lifting loop: 8sc, (1sc, inc, 1sc) × 4, 11sc, inc, 2sc = 39
Cut the working thread, leaving a thread about 1.5 m long (its length should be sufficient for tying
soles with one row of connecting posts). Insert this ponytail into a knitted needle and
execute a countersunk column in the first loop of the row (order of execution is here). It turns out 40
loops.
Heel (2 children)
We knit in rotary rows. Knit a chain of 4ch with turquoise yarn.
1 p: starting from the second loop from the hook: 2sc, 4sc into the last loop of the chain, on the back
chains 2sc, 1ch, İNC = 8
2 p: 3sc, (inc) × 2, 3sc, 1ch, İNC = 10
3 p: 4sc, (inc) × 2, 4sc = 12
Author’s toy of Olga Goncharova
Boot (2 pcs.)
Knit with dark gray yarn in 3 thin threads. Link the chain from 40ch, lock it in the ss ring.
1-2 p: 40sc (2 rows)
3 p: 13sc, (dec) × 7, 1sc, İNC *
4 p: (knit with purl sc) (dec *) × 4, 1sc, İNC
5 p: dec *, 2sc, dec * (pull the first loop from the center of the last column, the second from the next
hinges of the 2nd row), 1sc İNC *
6 p: (knit with purl sc) dec *, 2sc, dec * (similar to the previous row), 1sc, İNC
7 p: dec *, 2sc, dec *, 9sc
Author’s toy of Olga Goncharova
Attach the heel to the sole and place the upper part of the boot on top, precisely align all the details
relative to each other. Turquoise yarn to connect all these three parts in one row
connecting columns (in the photographs for clarity, the connection of parts is shown in white
yarn). Secure the thread with a secret connecting column and hide on the inside.
From the plastic paper folder, cut out the insoles slightly smaller than the soles.
Author’s toy of Olga Goncharova
If the doll will be interior and I want her to stand in any position, then in the heel area on
insoles need to make holes. Then they can insert the frame from the stand.
Cut two pieces of wire of 60 cm d = 2.5, bend the frame in half. One end should be long
slightly larger than the length of the leg, approximately 22-25 cm, the second – slightly larger than the length of the body. Bend
fasten the resulting loop perpendicular to the frame and in the ankle region fasten with 1.5-2 turns
adhesive tape.
Attach a plastic insole to the wire with 1 turn of adhesive tape (a lot is not needed, only to
the insole was locked in the correct position). Insert this frame in the leg and continue to knit around
wire. Stuff in the process of knitting, evenly distributing the filler around the wire
frame.
Then again we knit in circular rows.
Author’s toy of Olga Goncharova
8 p: 8sc, dec * (pull the first loop from the 9th column, the second from the first loop of the rotary row),
2sc, dec, 8sc = 20
9 p: 7sc, (dec *) × 3, 7sc = 17
10 p: dec, 5sc, (dec) × 2, 5sc, dec = 13 (the last decrease captures the last loop of the 10th row and the first
loop of the 11th row; as a result, the marker has shifted left by 1 loop)
11-16 p: 13sc (6 rows)
Left foot right foot
17 p: 1sc, inc, 11sc = 14
18-19 p: 14sc (2 rows)
20 p: 2sc, inc, 11sc = 15
21-22 p: 15sc (2 rows)
23 p: 3sc, inc, 8sc, inc, 2sc = 17
24-25 p: 17sc (2 rows)
26 p: 3sc, inc, 11sc, inc, 1sc = 19
27 p: 19sc
28 p: 1sc, inc, 17sc = 20
29 p: 20sc
30 p: 4sc, inc, 11sc, inc, 3sc = 22
31-32 r: 22sc (2 rows)
33 p: 3sc, inc, 15sc, inc, 2sc = 24
34-38 p: 24sc (5 rows)
39 p: 3sc, dec, 16sc, dec, 1sc = 22
40-41 p: 22sc (2 rows)
42 p: 3sc, dec, 15sc, dec = 20
43 p: 3sc, dec, 4sc, inc, 1sc, inc, 8sc = 21
44 p: 2sc, dec, 17sc = 20
45 r: 20sc
46 p: 3sc, inc, 4sc, dec, 1sc, dec, 3sc, inc,
3sc = 20
47-48 p: 20sc (2 rows)
49 p: 4sc, inc, 10sc, inc, 4sc = 22
50-53 r: 22sc (4 rows)
54 p: 4sc, inc, 12sc, inc, 4sc = 24
55-58 r: 24sc (4 rows)
59 p: 21sc (partial row)
17 p: 11sc, inc, 1sc = 14
18-19 p: 14sc (2 rows)
20 p: 11sc, inc, 2sc = 15
21-22 p: 15sc (2 rows)
23 p: 2sc, inc, 9sc, inc, 2sc = 17
24-25 p: 17sc (2 rows)
26 p: 1sc, inc, 11sc, inc, 3sc = 19
27 p: 19sc
28 p: 1sc, inc, 17sc = 20
29 p: 20sc
30 p: 3sc, inc, 12sc, inc, 3sc = 22
31-32 r: 22sc (2 rows)
33 p: 2sc, inc, 15sc, inc, 3sc = 24
34-38 p: 24sc (5 rows)
39 p: 1sc, dec, 16sc, dec, 3sc = 22
40-41 p: 22sc (2 rows)
42 p: dec, 15sc, dec, 3sc = 20
43 p: 8sc, inc, 1sc, inc, 4sc, dec, 3sc = 21
44 p: 17sc, dec, 2sc = 20
45 r: 20sc
46 p: 3sc, inc, 4sc, dec, 1sc, dec, 4sc, inc,
2sc = 20
47-48 p: 20sc (2 rows)
49 p: 4sc, inc, 10sc, inc, 4sc = 22
50-53 r: 22sc (4 rows)
54 p: 4sc, inc, 12sc, inc, 4sc = 24
55-59 p: 24sc (5 rows) +6 loops
displacements (the beginning of the row is shifted inward)
Author’s toy of Olga Goncharova
Then both legs are knitted the same way. Change the thread to turquoise.
60 r: 24sc
Change thread to skin color.
61 p: (behind the back wall of the loop) 24sc
62-71 p: (for both walls) 24sc (10 rows)
Body
On the right leg, knit 2sc with flesh-colored thread, then switch to white yarn and knit 1sc –
the working thread is exactly between the legs. Tie 1ch (so that there is a small distance between the legs).
1 p: 24sc (on the left foot), 1sc on ch, 24sc (on the right foot), 1sc on ch = 50
Author’s toy of Olga Goncharova
Now you need to transfer the marker to the stomach so that the halves of the priests are not one above the other, so that
increases / decreases were located strictly in one row and were at the same height. Knit 24 p offsets and
place the marker exactly in the center of the abdomen.
2 p: 15sc, (inc, 3sc) × 2, 1sc, dec, (3sc, inc) × 2, 16sc = 53
3 p: 16sc, inc, 4sc, inc, 3sc, dec, 3sc, inc, 4sc, inc, 17sc = 56
4 p: 27sc, dec, 27sc = 55
Bend the frame coming from the legs to each other, cut off the excess wire with wire cutters, and connect it
together with a band-aid.
5-10 p: 55sc (6 rows)
11 p: 16sc, dec, 4sc, dec, 7sc, dec, 4sc, dec, 16sc = 51
12 p: 12sc, change the thread to a flesh color, (continue to knit behind the back wall of the loop) 39sc = 51
13 p: (for the back wall of the loop) 12sc, (for both walls) 2sc, dec, 4sc, dec, 7sc, dec, 4sc, dec, 14sc = 47
14 p: 14sc, dec, 3sc, dec, 5sc, dec, 3sc, dec, 14sc = 43
Author’s toy of Olga Goncharova
15 p: 43sc
16 p: 8sc, dec, 3sc, dec, 6sc, dec, 5sc, dec, 3sc, dec, 8sc = 38
17 p: 13 sc, dec, 8 sc, dec, 13 sc = 36
18 p: 5 sc, dec, 22 sc, dec, 5 sc = 34
19-24 p: 34 sc (6 rows)
25 p: 6sc, inc, 20sc, inc, 6sc = 36
26-27 p: 36sc
28 p: 12sc, inc, 10sc, inc, 12sc = 38
29 p (incomplete row): 19sc
Put the marker exactly in the middle of the back. This is necessary so that the chest does not work out on different
height.
When you fill the body, try not to put a lot of filler in the abdomen, so as not to
the bulging tummy turned out.
30 p: 8sc, inc, 4sc, (inc) × 3, 5sc, (inc) × 3, 4sc, inc, 9sc = 46
31 p: 14sc, (1hdc, inc hdc) × 3, 6sc, (inc hdc, 1hdc) × 3, 14sc = 52
32-34 p: 52sc (3 rows)
In the 33rd row, note the center of the chest with contrasting thread, in this
we’ll do a little tightening later.
35 p: 15sc, (dec, 1sc) × 3, 4sc, (1sc, dec) × 3, 15sc = 46
36 p: 16sc, (dec, 1sc) × 2, 4sc, (1sc, dec) × 2, 14sc = 42
Author’s toy of Olga Goncharova
Attach the frame of the hands to the “spine”.
When you get to the site where you need to knit at the same time the body and arm loops together, get a working thread
under the wire frame, knit these three loops. Then pull the hook out of the loop and slip it
under the frame to the other side (turn). Next, knit according to the scheme to the next section of the arm connection
and body. Perform it similarly to the first.
Now you can knit the body further.
37 p: 8sc, 3sc (capturing simultaneously the loops of the body and left hand), 5sc, dec, 7sc, dec, 5sc, 3sc
(capturing simultaneously the loops of the body and the right hand), 7sc = 40
Author’s toy of Olga Goncharova
Slightly pull the center of the chest to the “spine” with two stitches. Strongly do not zealous so as not to
it turned out a hole instead of a beautiful hollow.
38 p: 8sc (back), 13sc (left hand), 19sc (front), 13sc (right hand), 7sc (back) = 60
39 p: 8sc, dec, 4sc, dec, 3sc, dec, 19sc, dec, 3sc, dec, 4sc, dec, 7sc = 54
40 p: 7sc, dec, (3sc, dec) × 3, 7sc, dec, (3sc, dec) × 3, 6sc = 46
Author’s toy of Olga Goncharova
Once again, slightly pull the center of the chest to the “spine”. The tie point is 2 rows higher than the previous one. This
fasten the weight, as well as the first one, under the arm frame.
Shoulders
The shoulders fit, as well as the feet, in swivel rows. It is necessary to ensure that the wrong bars
were pretty tight. Otherwise, you will get holes on the shoulders, and through them will shine through
filler.
41 p: 8sc, (dec) × 4, 1sc, İNC *
42 p: (purl) dec *, 1sc, dec *, 1sc, İNC
43 p: dec *, 1sc, dec *, 1sc, İNC *
44 p: (purl) dec *, 1sc, dec *, 1sc, İNC
45 p: dec *, 1sc, dec *, 12sc, (dec) × 4, 1sc, İNC *
46 p: (purl) dec *, 1sc, dec *, 1sc, İNC
47 p: dec *, 1sc, dec *, 1sc, İNC *
48 p: (purl) dec *, 1sc, dec *, 1sc, İNC
49 p: dec *, 1sc, dec *, 2sc +1 n offset
50 r: (continue to knit in a spiral) 3sc, 1sc to the center of the column knitted in the next loop of the row,
11sc, 1sc to the center of the column knitted in the next loop of the row, 6sc = 22
Author’s toy of Olga Goncharova
Shoulder knitting pattern:
Fulfillment of the 50th row: the arrows show on which stitches the 3rd and 4th sc should be knitted; 16th and 17th
sc knit similarly
Author’s toy of Olga Goncharova
51 p: 2sc, dec, 2sc, dec, 6sc, dec, 2sc, dec, 2sc = 18
52 p: 18sc
53 p: 2sc, dec, 1sc, dec, 4sc, dec, 2sc, dec, 2sc = 14
54-61 p: 14sc (8 rows)
Knit another 3 sc so that the working thread is on the left side of the neck (here when sewing the head does not
the “step” will be so noticeable), ss. Cut the thread, leaving a tail sufficient for sewing
heads.
Take your time sewing on your head. When trying on clothes, hair will interfere, so first we
we will dress Miku, and then we will fix the head.
Author’s toy of Olga Goncharova
Clothing (knitting needles)
Pleated skirt
We will need:
• yarn is dark gray
• turquoise yarn for decoration
• toe knitting needles 1.75 (5 pcs.)
Type 48 stitches on the knitting needles. Distribute them to 4
knitting needles 12 loops. Close the loop in the ring and then
knit in a circle.
1 p: 48 persons = 48
2 p: (4 faces, + 1 life) × 12 = 60
3 p: (2 faces, 1 faces to retake without knitting (thread for
loop), 1 face, 1 life) × 12 = 60
4 p: (4 faces, 1 life) × 12 = 60
5 p: (1 person, + 1 person, 1 knit, 1 person to retake without tying
(thread behind the loop), 1 person, 1 life) × 12 = 72
6 p: (5 faces, 1 life) × 12 = 72
7 p: (3 faces, 1 faces reshoot (thread behind the loop), 1 faces, + 1 faces, 1 life) × 12 = 84
8 p: (6 faces, 1 life) × 12 = 84
9 p: (1 person, + 1 person, 2 knit, 1 person reshoot (thread behind the loop), 2 person, 1 life) × 12 = 96
10 p: (7 faces, 1 life) × 12 = 96
11 p: (4 faces, 1 faces reshoot (thread behind the loop), 2 faces, + 1 faces, 1 life) × 12 = 108
12 p: (8 people, 1 life) × 12 = 108
13 p: (1 person, + 1 person, 3 person, 1 person retake (thread behind the loop), 3 person, 1 person) × 12 = 120
14 p: (9 faces, 1 life) × 12 = 120
15 p: (5 faces, 1 faces retake (thread behind the loop), 3 faces, + 1 faces, 1 life) × 12 = 132
16 p: (10 faces, 1 life) × 12 = 132
Knit the first loop on the knitting needle, and then re-knit it on the right knitting needle. The beginning of the row has shifted to 1
loop to the left. In the next row we knit loops and close. Close the loops one at a time, and upon reaching
wrong side, grab the wrong side and the next one behind the front wall and close both of them
at once.
17 p: 9 faces, 2vm * (the wrong side and the following one are knitted together) = 120
Cut the thread and hide the tail on the inside. Attach a turquoise thread and tie the bottom of the skirt
one side sc.
Very carefully, through wet gauze, steam all the folds (with one touch, do not press strongly).
Put the skirt on the body and sew with a thin sewing thread (or thin fishing line) along the hips, just above
the top edge of the shorts.
Author’s toy of Olga Goncharova
Belt strap
Link a chain of 56 ch. Starting from the second loop, knit 55 sc along this chain. Steaming the strap
a stream of steam (do not touch the iron) and sew on the skirt on the left to the belt.
Jacket
Light gray yarn, knitting needles 1.75, knit tightly.
Tie a chain of 54 ch with a contrasting thread (tied more than necessary, because it is difficult to make from extreme loops
dial loops). Take the main yarn in light gray, leave a loose tip about 70-
80 cm (then we will close the open hinges of the bottom with this thread) and use a hook to pull out light gray
yarn on the back of a chain 52 loop.
1 p: 52 purl = 52
2 p: 52 knit = 52
3 p: 15 life, (2vm purl, 5 life) × 3, 2vm purl, 14 life = 48
4-5 r: facial smoothness (2 rows)
6 p: 2vm *, 12persons, (2vm *, 4persons) × 3, 2vm *, 12persons, 2vm = 42
7-8 r: facial smoothness (2 rows)
9 r: 2vm wrong side, 5niz, İNC
10 r: double crochet, 6 knits, İNC
11 p: 3life, İNC
12 r: double crochet, 3 knits, İNC
13 p: 3 life, yarn and the next loop to knit together
wrong side of the back wall, 2 wear, yarn and
knit the next loop together
back wall, 4lv, (2vm purl, 3lv) × 3, 2vm purl, 13lv = 37
14 p: 2vm *, 5 persons, İNC
15 p: yarn, 6niz, İNC
16 r: 3 persons, İNC
17 p: yarn, 3niz, İNC
18 p: 3 knit, double crochet and the next loop together with the front for the front wall, 2 knit, double crochet and
knit the next loop together over the front wall, 29 faces = 36
Author’s toy of Olga Goncharova
19-21 r: facial smoothness (3 rows)
22 p: 9 persons, + 1p, 18 persons, + 1p, 9 persons = 38
23-25 r: facial smoothness (3 rows)
26 p: 10 persons, + 1p, 18 persons, + 1p, 10 persons = 40
27-29 r: facial smoothness (3 rows)
30 p: 10 persons, + 1p, 20 persons, + 1p, 10 persons = 42
31 p: 42 life
Next, we form the armhole. Knit each part separately.
Right shelf:
1 p: 12 persons, İNC = 12
2 p: (and all even rows are purl loops) 12 purl
3 p: 10 persons, 2 VM = 11
5 p: 9 persons, 2 vm = 10
7 p: 8 persons, 2 vm = 9
9 p: 6 faces, 3 vm = 7
11 p: 5 persons, 2 vm = 6
13 p: 4 persons, 2 vm = 5
14 p: close all the loops.
Back:
1 p: 18 persons = 18
3 p: 2vm *, 14 persons, 2 vm = 16
5 p: 2vm *, 12 persons, 2 vm = 14
7 p: 2vm *, 10 persons, 2 vm = 12
9 p: 2vm *, 8 persons, 2 vm = 10
11 p: 2vm *, 6 persons, 2 vm = 8
13 p: knit this row, closing the loop
Left shelf:
1 p: 12persons = 12
3 p: 2 vm *, 10 persons = 11
5 p: 2 vm *, 9 persons = 10
7 p: 2 vm *, 8 persons = 9
9 p: 3 vm *, 6 persons = 7
11 p: 2 vm *, 5 persons = 6
13 p: 2 vm *, 4 persons = 5
14 p: close all loops
Author’s toy of Olga Goncharova
Collar
Turn the jacket back to you and dial 22 loops on the closed loops of the neck,
picking up the front wall of the loop (the one closest to you):
6 loops on the left shelf, 10 loops on the back, 6 loops on the right shelf.
It turns out that on the shelves you need to add one additional loop, and on the back add 2
loops.
1 p: 22 life = 22
2 p: 22 persons = 22
3 p: 22 life = 22
4 p: knit this row at the same time closing all the loops.
Try not to tighten the edge, knit looser so that the collar edge is not pulled, it should
to lie freely on the shoulders.
Tie the collar with one next to sc turquoise yarn. At the corners to rotate, knit in one loop:
1sc, 1ch, 1sc.
Remove the thread of contrasting color along the bottom of the jacket, put open loops on the knitting needle, and knit one row
closing all loops at the same time. To tie the bottom and armholes of the jacket with one next sc turquoise yarn.
At the corners, also knit in one loop: 1sc, 1ch, 1sc. Fasten and hide all tails on the wrong side
strings.
Author’s toy of Olga Goncharova
Put the finished jacket on Mika, sew the shelves with each other. You can make a fastener, then a jacket
will be removable.
On the left shelf, yellow yarn to embroider two
badge stitches.
Tie
Link a chain of 29ch.
Starting from the 2nd loop from the hook: 9sc, 9hdc, 8dc, 1ch, 1hdc; in
last loop of the chain: 2sc, 1ch, 2sc; starting from
the next loop on the back of the chain: 1hdc, 1ch,
8dc, 9hdc, 9sc.
Steam the tie with a stream of steam (without touching the knitted
cloth) and sew under the collar.
On the side of the tie, embroider two stitches with dark gray yarn.
Author’s toy of Olga Goncharova
Bend your neck a little back. Measure about 3-4 cm
wire coming out of the neck, cut off the excess. Put on
head to this frame, find the correct head position and
sew it to your neck.
Eye sockets
Between the 23rd and 24th rows, place a marker exactly in the center of the face (exactly above the nose). Now left and
To the right of this central loop, count 2 loops, and retreat another two loops to the temples – this
marks for eye tightening.
Bring down ordinary sewing with a solid thread of flesh
colors in 2 additions. We form each eye separately.
Tie up the tie in the most inconspicuous place –
either at the base of the neck or under the hair (I hid
hair nodules). Never pull hard.
you need a little bit to get tiny
neat pits. If you look in profile, then
The nose should be slightly submerged.
Author’s toy of Olga Goncharova
Eyes
This is the most creative moment in creating your baby doll. The perception of the whole image in
whole.
Materials:
• acrylic paints in white, black and blue (green) colors
• tassels No. 0 and No. 0/3 (the thinnest)
• a piece of dense cotton fabric (I took calico)
• glossy acrylic varnish
• toothpicks – they will take a small amount of paint for mixing on the palette and for
applying varnish
For dolls in the style of anime, you do not need to make realistic eyes, they look on such faces a little
unnaturally, more sketchy eyes are needed. It is no coincidence that there is such a thing as anime eyes.
To measure the height of 4 rows of knitting is the size of the eye vertically. I got 9.5-10 mm. Width
eyes are calculated by multiplying the height by 0.8, it turns out 8 mm. Now on a piece of paper you need to note this
distance and draw two ovals. It’s better to take dark paper so that it’s easier to understand how it will look
eyes on the face.
Cut out these ovals with nail scissors, attach to your face and see if the eyes of such
size or not, if you want more or enough.
Author’s toy of Olga Goncharova
Now you can start drawing on the fabric. We draw in the same way as we painted on paper.
I drew two sizes at once, because I don’t know which ones will look better in the end.
Now we take acrylic paints and color these blanks. First, draw the squirrels with white paint,
then a blue (green) narrow strip of iris.
Now from below on the iris you need to make a lighter blue (green) highlight. For this on plastic
in the palette (or on the lid of mayonnaise) mix a little bit of blue (green) paint and a little white
mix with a toothpick and a thin brush apply glare.
Author’s toy of Olga Goncharova
Now paint over the pupil and eyelashes. Let it dry.
Under the eyelashes, the anime always has a shadow, this gives the eyes depth and volume, so now you need
apply these shadows. Mix a little white paint with a black droplet on the palette (literally on
the tip of a toothpick) and do exactly the same with blue (green) paint. Very thin brush
gently apply these paints under the eyelashes to the appropriate areas. And again let it dry.
Author’s toy of Olga Goncharova
It remains only to apply glare with white paint.
Allow eyes to dry well.
Now, with sharp nail scissors, cut out the finished eyes and try on the dolls to the face,
move them, see how it will be better, you can even twist your eyes slightly, while
completely different facial expressions.
This is an individual process, see for yourself how it will look better. As soon as you like it
look of your beauty, mark with a thin sewing needle the control point on which you will
to navigate (for example, the inner corner of the eye), only then glue the eyes into place. Need to glue
one by one. When gluing the first eye, the second remains on the face, do not change its position,
control the position of the glued eye on it.
Let the glue dry and apply acrylic glossy varnish on the eyes. I applied it back (flat)
toothpick side. You do not need to take a lot of varnish, gently touch the surface of the varnish with a toothpick and
then apply it to the eyes and distribute it in a circular motion over the entire surface of the eyes.
The mouth can be embroidered with two stitches of light pink yarn, or you can also draw on fabric and glue
in place.
Author’s toy of Olga Goncharova
Tail jewelry
Cut two pieces of thin bead wire d = 0.4 mm 24-26 cm. Yarn dark gray knit
a chain of 24ch.
Note: the length of the chain depends on the thickness of the yarn that you took for the hair.
If the yarn is quite voluminous and the ponytails are magnificent, then ch
should be linked more – 28-30.
Take one piece of wire and tie it under 23sc, on one side of this chain.
Then in the last loop knit 1ch, 1sc, 1ch. Bend the wire in half, attach it to the back
side of this chain and tie another 23sc also by tying the wire.
Author’s toy of Olga Goncharova
Now with pink yarn, knit 23cc in the center of the finished strip, as if “flashing” it through.
Bend this knitted strip in the form of a square, bend the ends of the wire perpendicular up.
Pass the tails through these adornments, insert the wire ends in the head directly under the tails and
Sew the threads with the left ends.
Author’s toy of Olga Goncharova
Headphones
Take a piece of wire with a cross-section of 2.5 about 16-18 cm long (do not remove insulation) and bend it into
in the form of headphones. Try this blank on Miku’s head, the loops on the ends of the wire should
located just below the ears.
On one loop of this billet, fix the tip of the black yarn with adhesive tape. Wrap this
thread the central part of the headphones tightly to the coil. Fasten the end of the thread to the second loop
headphones with a small piece of adhesive tape.
Author’s toy of Olga Goncharova
For the ears, take yarn in dark gray.
Inner part (2 children)
1 p: 6sc into magic ring
2 p: (inc) × 6 = 12
3 p: (1sc, inc) × 6 = 18
4 p: (2sc, inc) × 6 = 24
Outside (2 children)
1 p: 6sc into magic ring
2 p: (inc) × 6 = 12
3 p: (1sc, inc) × 6 = 18
4 p: (2sc, inc) × 6 = 24
5 p: (behind the back wall of the loop) 24sc = 24
Fold the outer and inner parts in pairs and knit 18 cc, fastening both of these parts together
(row is not completed). Insert the wire loops of the headphones into these “pockets”, add a little bit (!)
filler and tie the connecting row to the end. No need to fill up much; headphones should be
pretty flat and not look like balls. Cut and fasten the thread, hide the tail on the inside.
Embroider pink yarn on the outside of the headphone “light bulb” and yellow to execute small dots.
You can slightly toned the area around the eyes. Just do not overdo it with a shade, the color of the tint
should be slightly darker than the main tone of the face. And you can leave it as it is.
Gently comb the ponytails of the comb with very rare cloves, align the strings and cut
the ends of the ponytail corners.
Miku is ready!
Author’s toy of Olga Goncharova
I express my heartfelt thanks to Elena (Elena_rak), Eugenia (nipl) and Nelly
(Nelly) for helping me test Miku. Thanks for the beautiful images created.
you!
This MK is an authoring and is intended for personal use only.
use. Copying, publishing on their pages on social networks and blogs,
as well as the sale of this master class is prohibited.
You can sell toys related to this MK subject to instructions
the author of the description.
Thank you for understanding!