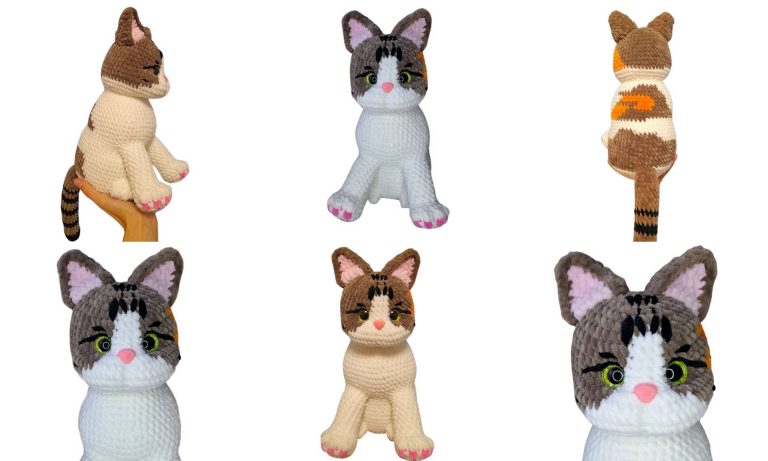
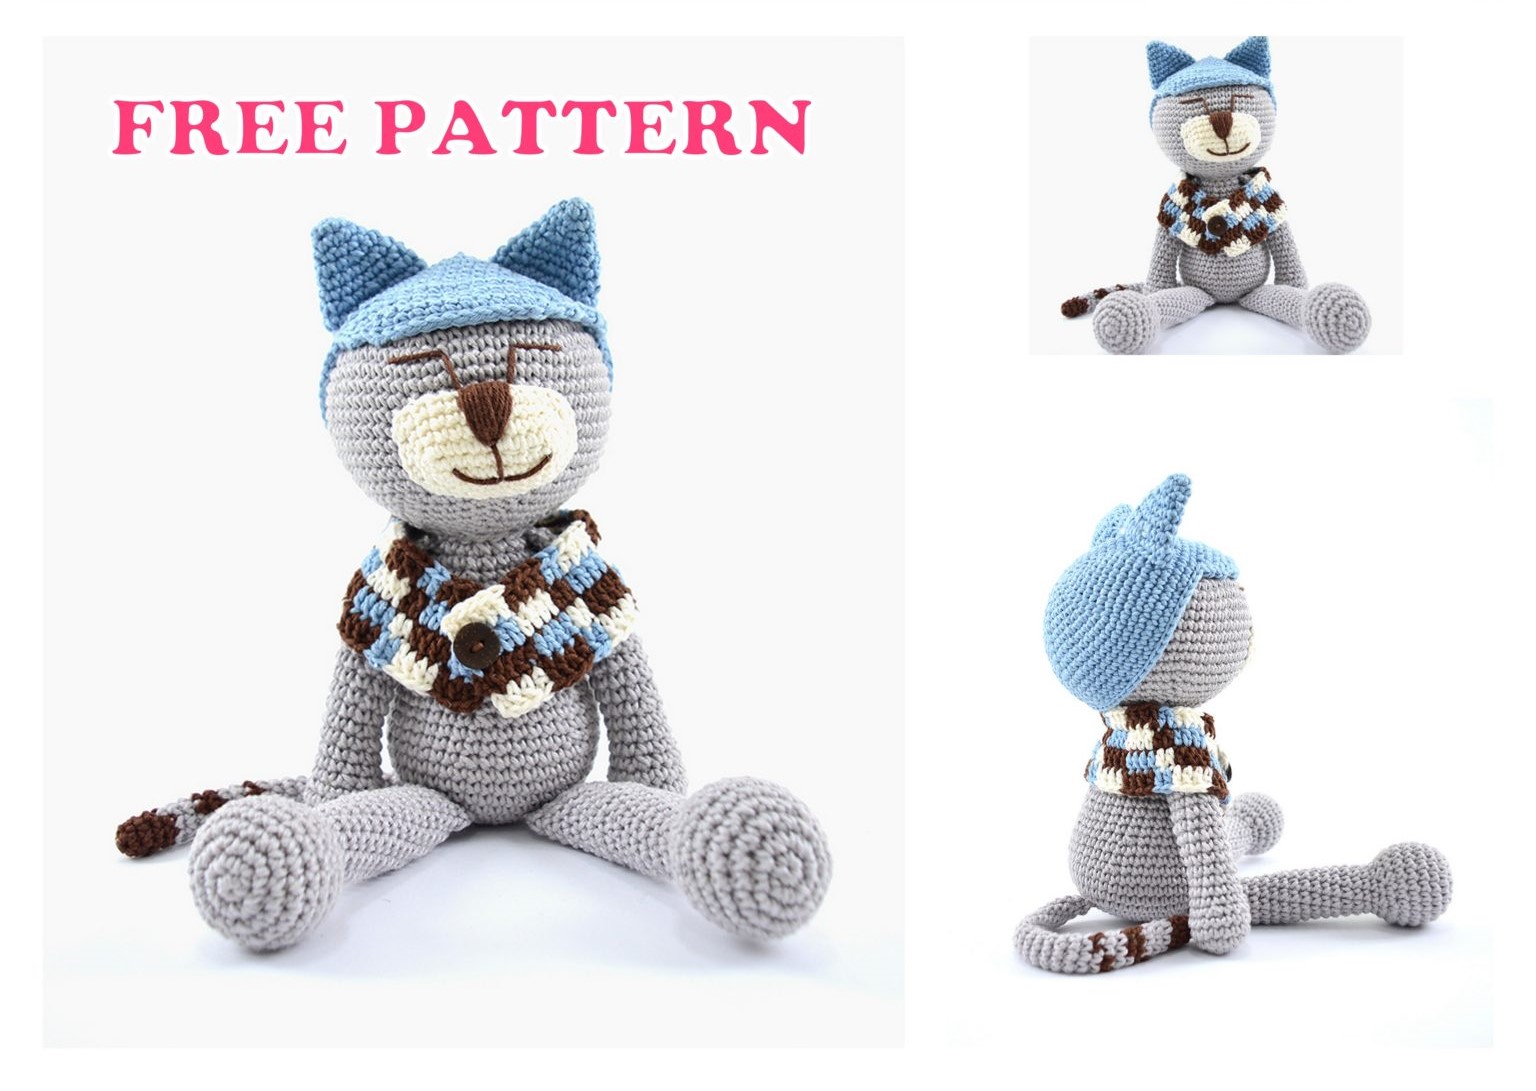
Mr. Cat Amigurumi Free Pattern
I am sharing top best amigurumi free patterns. In this article, Mr. cat amigurumi free pattern is waiting for you.
Material used:
Amigurumi Yarn by Círculo: 1 ball in colors 8013 (glacial), 2137 (hydrangea), 8176 (off white)
and 7567 (cocoa)
Crochet hook: 1 2.5mm needle
Tapestry needle nº16
1 middle button
Acrylic Fiber for Filling
Size: 30cm
Love Amigurumi? Find everything you need to make your beautiful pets here.
EXECUTION
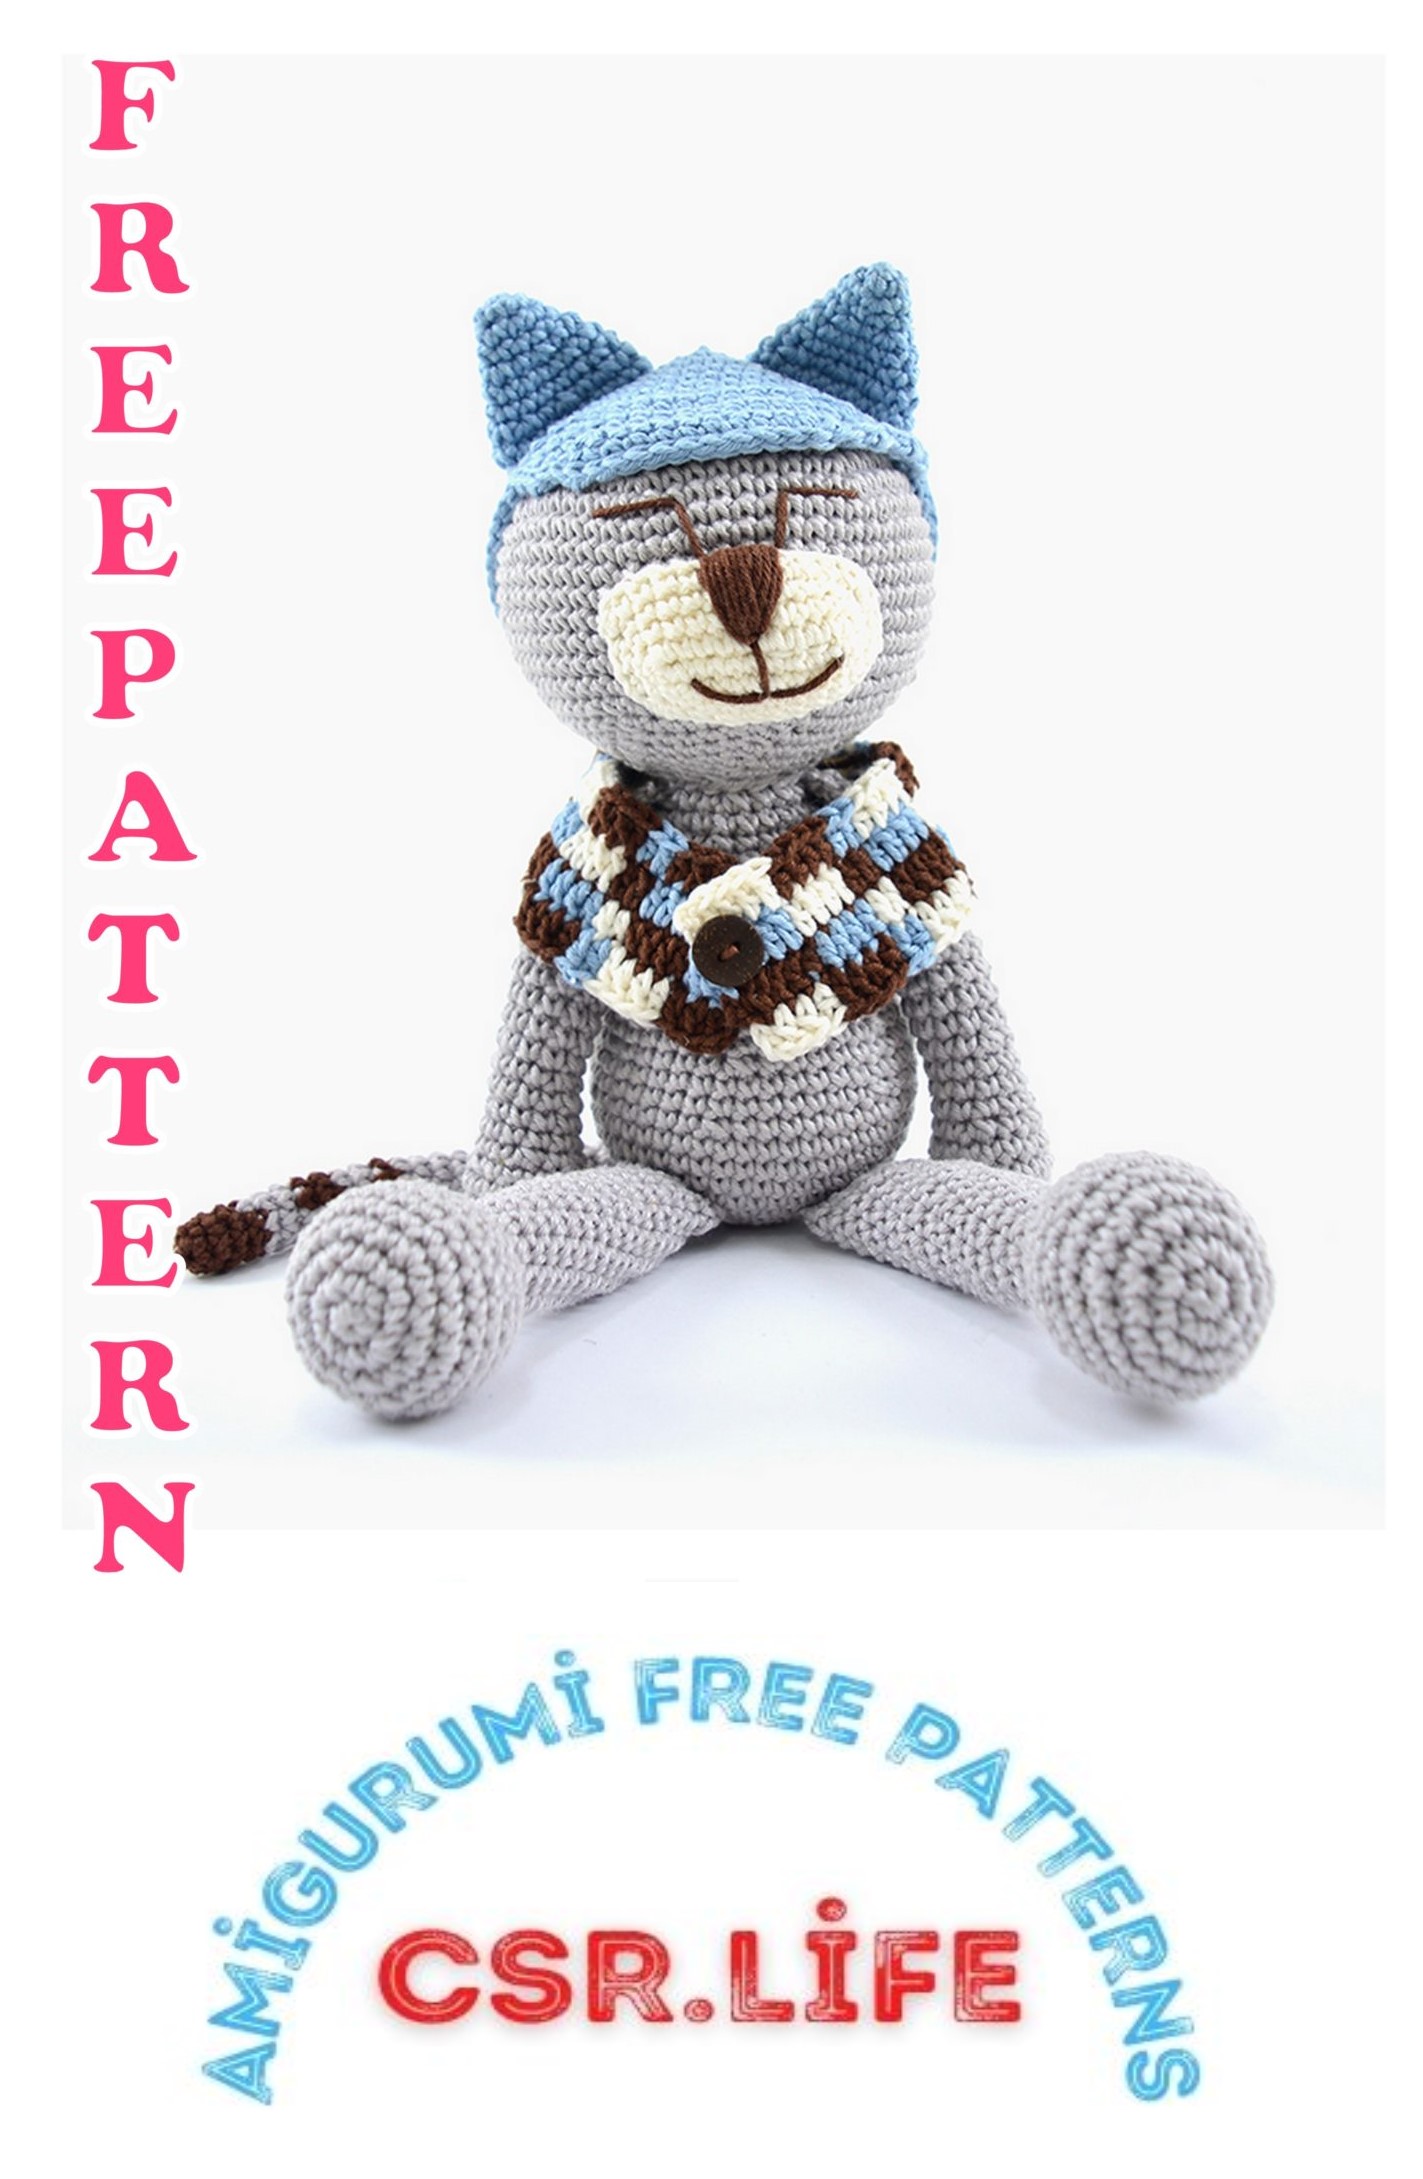
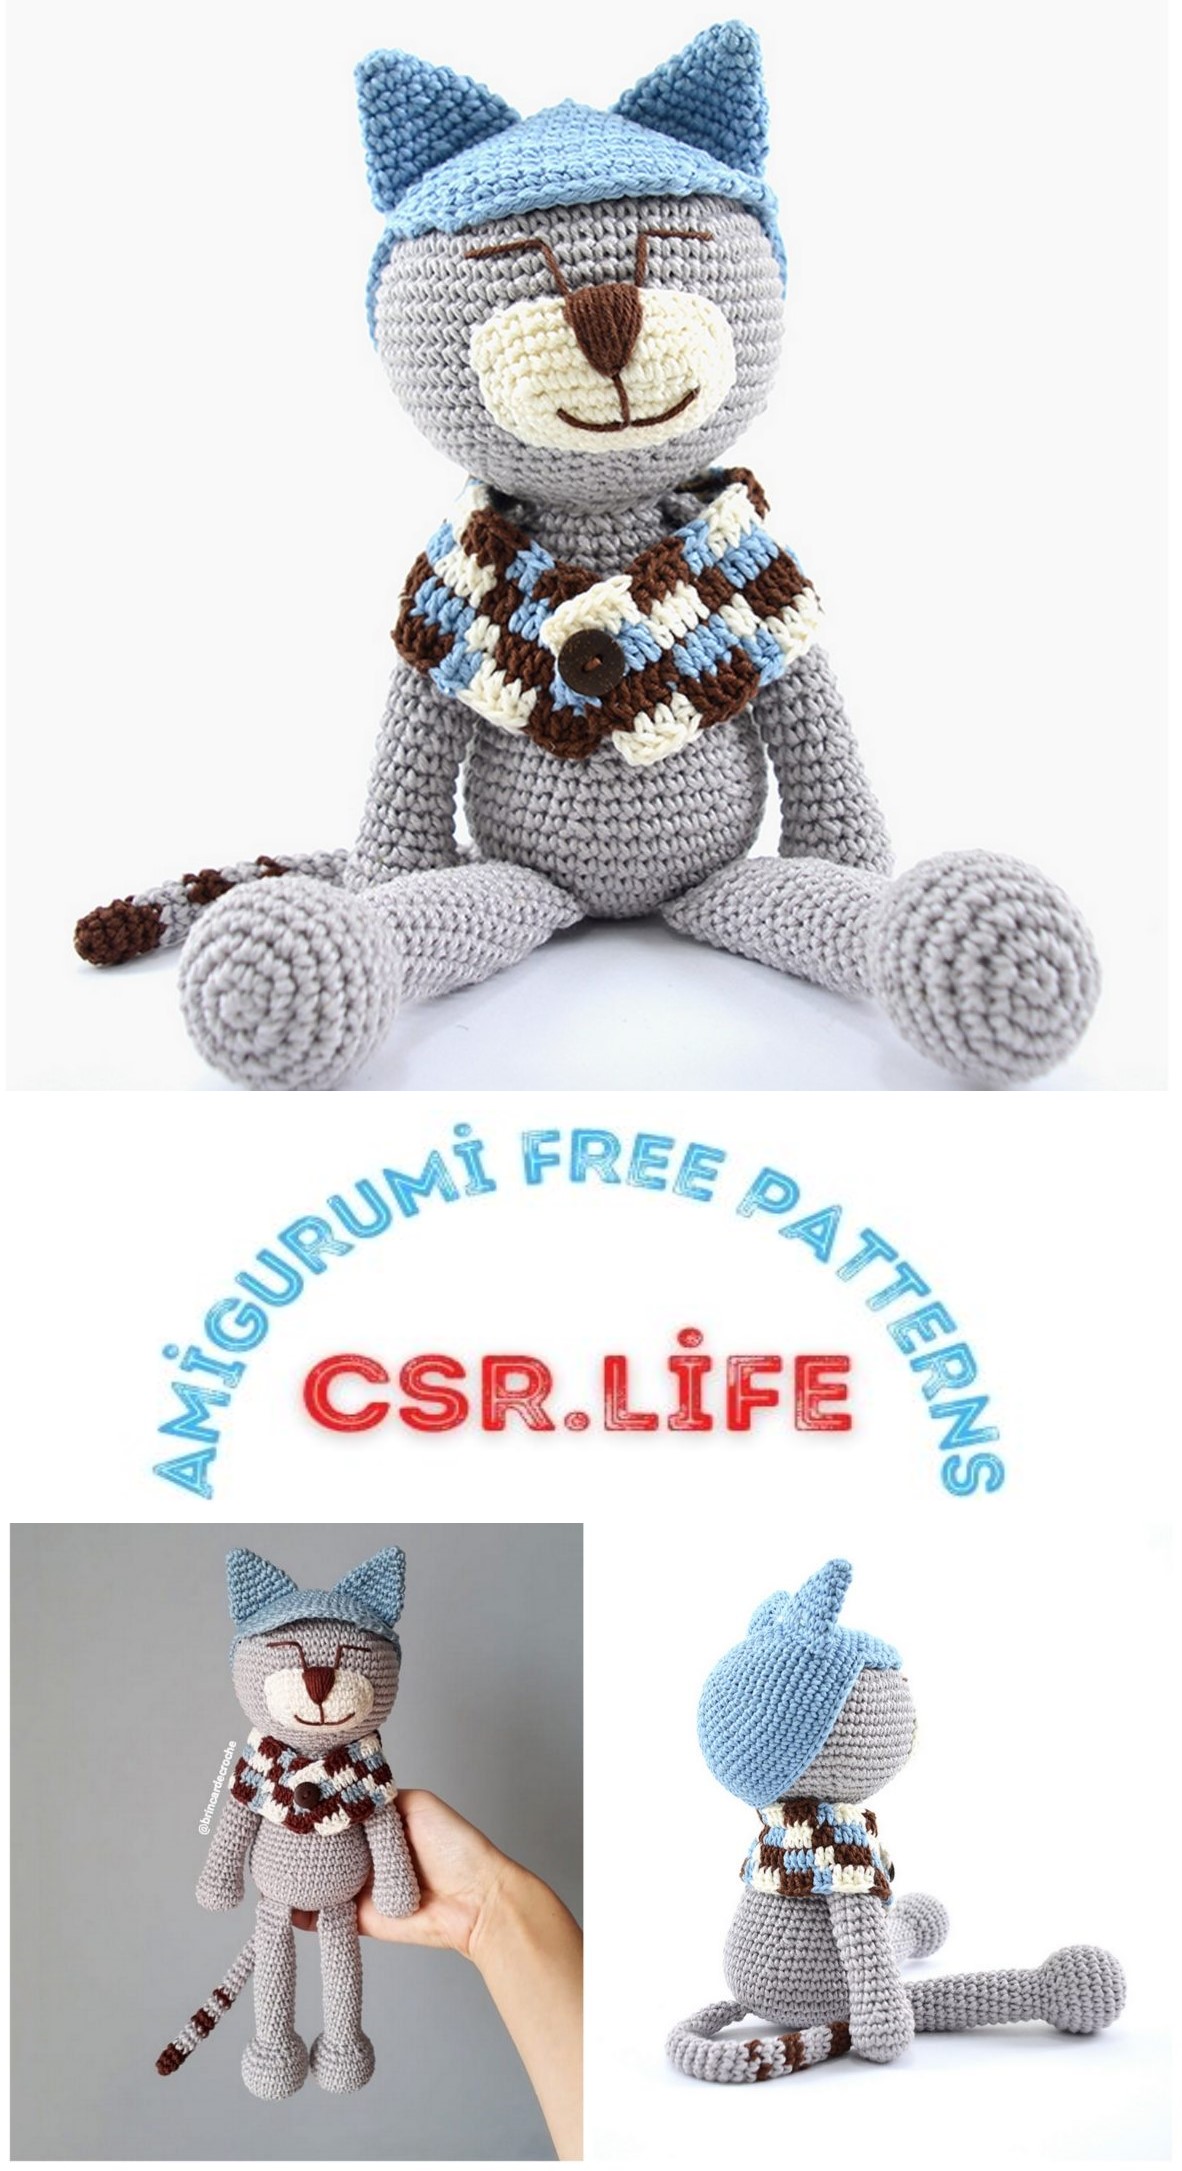
PATTERN: @brincardecroche
Head
Start wired 8013
1 – 6sc into magic ring. = 6sc
2 – 6x 6x = 12sc
3 – 1sc 1 inc 6x = 18sc
4 – 2sc 1 inc 6x = 24sc
5 – 3sc 1 inc 6x = 30sc
6 – 4sc 1 inc 6x = 36sc
7 – 5sc 1 inc 6x = 42sc
8 – 6sc 1 inc 6x = 48sc
9 – 7sc 1 inc 6x = 54sc
10 – 8sc 1 inc 6x = 60sc
11 to 18 – 1sc over each sc 60x = 60sc
19 – 8sc 1 dec 6x = 54sc
20 – 7sc 1 dec 6x = 48sc
21 – 6sc 1 dec 6x = 42sc
22 – 5sc 1dec 6x = 36sc
23 – 4sc 1dec 6x = 30sc
24 – 3sc 1dec 6x = 24sc
25 – 2sc 1dec 6x = 18sc
Finish and hide the wire inside the piece.
Hat
Start wired 2137
1 – 6sc into magic ring. = 6sc
2 – 6x 6x = 12sc
3 – 1sc 1 inc 6x = 18sc
4 – 2sc 1 inc 6x = 24sc
5 – 3sc 1 inc 6x = 30sc
6 – 4sc 1 inc 6x = 36sc
7 – 5sc 1 inc 6x = 42sc
8 – 6sc 1 inc 6x = 48sc
9 – 7sc 1 inc 6x = 54sc
10 – 8sc 1 inc 6x = 60sc
11 – 20sc 1 inc 2x, 1sc over each sc 18x = 62sc
12 to 15 – 1sc for each sc 62x = 62 sc
Cap flap
Start wired 2137
Work in linear crochet. At the end of each row make 1 ch and turn the work over.
16 – 1sc over each sc 20x = 20sc
17 – 1sc on each sc 19x = 19sc not working the last sc of the career
18 – 1sc on each sc 18x = 18sc not working the last sc of the career
19 – 1sc on each sc 17x = 17sc not working the last sc of the career
20 – Skip the first sc of the career. 1sc over each 14x sc. do not work the last 2 sc of the career.
21 – Skip the first sc of the career. 1sc over each 12x sc. do not work the last sc of the career.
To finish the cap do from the last sc of row Nº 21 1scx in each gap between one row and another of the cap flap and 1 scx in each sc of the entire contour of the cap until you reach the scx that started the cap finishing .
Finish with sc and hide the thread between the stitches.
Ear (do two)
Start wired 2137
1 – 4sc into magic ring = 4sc
2 – 1sc 1 inc 2x = 6sc
3 – 1sc 1 um. 2x = 9sc
4 – 1 sc for each sc 9x = 9sc
5 – 1inc 1 sc 3x. inc 1 x = 14sc
6 and 7 – 1sc for each sc 14x = 14sc
8 – 1 inc 1sc 7x = 21sc
9 – 1sc over each sc = 21sc
Finish and leave thread to sew.
Sew the ear in row nº 9 of the cap trying to leave them aligned with the flap with 3sc of distance between them, sew with the aid of a tapestry needle nº 16, taking only the handle of each sc of the ear passing over with the needle and a cap sc passing underneath, always in the same direction for a more harmonious stitching.
Snout
Start wired 8176
1 – 11 ch
2 – Start on the second ch inc 1x. 1sc over each 8x sc. inc 1 x (Work the other side of the floors) inc 1x. 1sc for each 8x sc. inc 1 x. = 24sc
3 and 4 – 1sc for each sc 24x = 24sc
5 – inc 1 x. 1sc over each sc 1 x. inc 1 x. 1sc over each 8x sc, 1x inc. 1sc over each sc 1 x. inc 1 x 1sc on each 9x sc. inc 1x = 29sc
Finish and leave thread to sew.
Sew the muzzle from row 13 of the head with the help of a # 16 upholstery needle, taking only the back handle of each sc before finishing sewing, add a little bit of filling to make the muzzle volume. With the help of a tapestry needle nº16 and thread nº 7567 embroider the nose in the form of an inverted triangle in the center of the snout below it, make a vertical streak then make two horizontal streaks one on each side forming the kitten’s smile. Still with the tapestry needle No. 16 and thread 7567, embroider the eyes in an “L” shape upside down, facing each side, leaving the ends where the cat’s nose ends.
Body
Start wired 8013
1 – 6sc into magic ring. = 6sc
2 – 6x 6x = 12sc
3 – 1sc 1 inc 6x = 18sc
4 – 2sc 1 inc 6x = 24sc
5 – 3sc 1 inc 6x = 30sc
6 – 4sc 1 inc 6x = 36sc
7 – 5sc 1 inc 6x = 42sc
8 – 6sc 1 inc 6x = 48sc
9 to 11 – 1sc over each sc 48x = 48sc
12 – 6sc 1 dec 6x = 42sc
13 and 14 – 1sc for each sc 42x = 42sc
15 – 5sc 1 dec 6x = 36sc
16 and 17 – 1sc for each sc 36x = 36sc
18 – 10sc 1 dec 3x = 33sc
19 – 1sc for each sc 33x = 33sc
20 – 9sc 1 dec 3x = 30sc
21 – 1sc for each sc 30x = 30sc
22 – 8sc 1 dec 3x = 27sc
23 – 1sc for each sc 27x = 27sc
24 – 7sc 1 dec 3x = 24sc
25 – 1sc for each sc 24x = 24sc
26 – 6sc 1 dec 3x = 21sc
27 – 1sc for each sc 21x = 21sc
28 – 5sc 1dec 3x = 18sc
Finish and leave thread to sew.
Join the body to the head with the help of a # 16 upholstery needle passing the line between 1sc of the head and one of the body joining each other. Do this with the 18sc of the two pieces, finish off and hide the rest of the thread inside the piece.
Legs
Start wired 8013
1 – 6sc into magic ring. = 6sc
2 – 6x 6x = 12sc
3 – 1sc 1 inc 6x = 18sc
4 – 2sc 1 inc 6x = 24sc
5 to 8 – 1sc for each sc 24x = 24sc
9 – 2sc 1 dec 6x = 18sc
10 – 1sc 1dec 6x = 12sc
11 to 28 – 1sc for each sc 12x = 12sc
Fold the leg in half and make a sc over two dc joining them. 6x. = 6sc Sew the legs with the aid of a # 16 upholstery needle in row 7 of the body with 3sc of distance between each other trying to keep the legs aligned with the face.
Arms
Start wired 8013
1 – 6sc into magic ring. = 6sc
2 – 6 inc = 12sc
3 – 1sc 1 inc 6x = 18sc
4 and 5 – 1sc for each sc 18x = 18sc
6 – 1sc 1dec 6x = 12sc
7 to 9 – 1sc for each sc 12x = 12sc
10 – 10sc 1 dec 1x = 11sc
11 to 14 – 1sc for each sc 11x = 11sc
15 – 9sc 1 dec 1x = 10sc
16 to 19 – 1sc for each sc 10x = 10sc
20 – 8sc 1 dec 1x = 8sc
21 to 23 – 1sc for each sc 8x = 8sc
Fold the arm in half and make a sc on top of two sc joining them together. 4x. = 4sc Sew with the aid of a tapestry needle nº16 the arms in the last row of the body leaving approximately 5sc of distance between each other, try to leave them right on the sides of the body.
Tail
Start wired 7567
1 – 5sc into magic ring = 5 sc
2 – (inc 1x), 1sc over each 3x sc. (inc 1x) = 7sc
3 and 4 – 1sc over each sc 7x = 7sc
Switch to wire 8013
5 to 7 – 1 sc over each sc 7x = 7sc
Switch to 7567 wire
8 and 9 – 1 sc over each sc 7x = 7sc
Switch to 8013 wire
10 and 11 – 1 sc over each sc 7x = 7sc
Switch to 7567 wire
12 – 1 sc over each sc 7x = 7sc
Switch to 8013 wire
13 to 30 – 1 sc over each sc 7x = 7sc
Finish with scx and sew with the help of a tapestry needle # 16, the tail in row # 7 of the little body on the back where Mr. Cat’s butt would be, passing the needle through a point of the fox and a point of the little body until it has gone through all the points of the tail.
Encharpe
Work in Jacquard technique.
1 – 59 little chains.
2 – Start on the third floor 1dc on each floor 4x in color 7567. 1dc on each floor 4x in color 2137. 1dc on each floor 2x in color 8176. 5x. 1dc on each ch 4x in color 7567. 1dc on each ch 3x in color 2137. close the row with scx = 57dc
3 – Make 3 ch and work the other side of the initial ch do not turn the work over so the color change thread will appear. 1dc on each floor 4x in color 8176. 1dc on each floor 4x in color 2137. 1dc on each floor 2x in color 7567 5x. 1dc on each 4x floor in color 8176. 1dc on each 5x floor in color 2137. close the row with scx = 57dc
Finish off the wires.
4 – Attach the thread to the first dc of the previous row. 3 ch in color 8176 1dc over each dc 3x in color 8176. 1dc over each dc 4x in color 7567. 1dc over each ch 2x in color 2137. 5x 1dc over each dc 4x in color 7567. 1dc over each dc 3x in color 8176 . = 57dc
Finish off the wires.
5 – Attach the wire to the first dc of the first carriage. 3 ch in color 8176 1dc over each dc 3x in color 8176. 1dc over each dc 4x in color 7567. 1dc over each ch 2x in color 2137. 5x 1dc over each dc 4x in color 8176. 1dc over each dc 3x in color 7567 . = 57dc With the help of a needle and tapestry no. 16 hide the stitches left over on each side after the finish. Wrap the scarf around Mr. Cat’s neck, leaving the part with the strands showing inside and join the two parts together by sewing a wooden button in color next to the 7567 on them.